The layout of kitchen furniture requires special attention, especially in old-style apartments, where extremely rational use of free space is necessary for a comfortable stay. One of the options for a compact and ergonomic kitchen arrangement would be to install a corner set. This furniture consists of two modules located along the walls, the space between which is filled by a corner cabinet under the sink. Its design, varieties, sizes and assembly methods will be discussed later in this article.
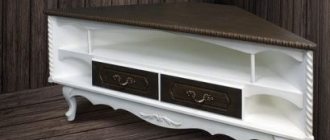
Example of a corner cabinet for a kitchen sink
Drawings of corner cabinets for sinks
If you do not take into account the principle of building in a sink bowl (and it can be overhead or mortise), then there are three designs of a corner cabinet for sinks:
- Straight side corner table. In fact, it is a standard kitchen module with one “muffled” door - a false panel. The most common option in modular kitchens.
- L-shaped corner table-pedestal. The most flexible option in terms of resizing. Most often it is equipped with a transforming door, which significantly expands access to the inside of the cabinet.
- Trapezoidal table-pedestal for sink. The most bulky “classic” version of a corner cabinet for a sink. It is not recommended to install it in small kitchens, as it “eats up” a lot of usable space.
Drawings of a corner table-cabinet for an “added” sink
Typical dimensions of a corner cabinet for a sink of this design are 1000x600 mm along the countertop. At the same time, the module itself, taking into account the overhang of the tabletop in front, behind and from the corner, has dimensions of 950x550. The dimensions of the facade with these dimensions and the standard height of the kitchen modules are 716x396 mm.
Usually, to supply water supply communications, a cut is made in the inner side of the cabinet under the sink, approximately 250x150.
If the pipes go deeper, then it is better to make the sidewall not solid, but to “assemble” it from planks.
Drawings of an L-shaped corner cabinet for a sink
For a table-cabinet of this design, you can give two drawings, with different designs of the back walls. The first drawing is suitable if all communications “enter” from the corner on one side.
If you plan to install counters in the cabinet under the sink, connect a separate filter, and generally plan a lot of wiring (for a dishwasher, washing machine), then it is better to leave both sides hollow.
The dimensions of the corner sink cabinet in the standard version are 920x920 mm (taking into account the rear overhang of the countertop 970x970 mm). In this case, two doors measuring 716x396 are installed.
The module can be modified by cutting the size of any of the sides. In this case, the wider door is always attached to the side, and the lighter one is attached to it. Otherwise, the transforming door will begin to sag over time.
Drawings of the “trapezoid” sink table
Corner sink cabinets with a characteristic trapezoidal shape look good only in spacious kitchens with a classic design.
For modern kitchen design, the design of the first two variants of cabinet sinks is better suited.
The design is somewhat softened by the radius design of the door and tabletop, with a concave shape.
But at the same time, the kitchen module itself remains very bulky, voluminous, with limited access inside. With its overall dimensions of 900x900 (including tabletop overhangs), the door is 716x470.
Another disadvantage of this kitchen module is that it requires additional joining of standard worktops with a width of 600 mm. And this means the presence of an additional seam in the sink area, which can potentially swell from moisture.
The joint is made at the same level as the sink or through a superstructure.
The joint can be avoided if you order a countertop made of artificial stone or plastic. But this leads to an increase in the cost of the entire kitchen.
There are also pentagonal, ready-made post-formed countertops on sale specifically for trapezoid sinks. But their range is limited.
Inner space
The internal storage system can be represented by several types:
- Shelves. Conveniently divides the space into several zones.
- Baskets and nets. One of the most convenient ways to store small items.
- Drawers. Suitable for storing any kitchen utensils, especially cutlery.
The interior space of the sink can be decorated in different ways.
See alsoFeatures of caring for countertops made of artificial stone: useful tips and recommendations.
Design Features
Before considering the main types of corner kitchen cabinets, we will determine for what purpose the corner segment serves and what functions it performs.
The meaning and functional loads of a corner sink cabinet:
- connecting - that is, thanks to this segment, the furniture set transitions from one wall to another;
- technical - it contains one of the important components, namely the sink and communications to it. This main purpose is to rationalize the space used. A corner sink is convenient because it can be equidistant from the work table and the hob. This goes a long way towards making cooking convenient. In addition, it can accommodate sinks of different configurations and sizes. Inside it, in addition to the communications drainage system, there may be water filters, a flow-through heater, garbage containers, retractable storage systems, most often household chemicals;
- aesthetic function - this element fits organically into the overall space.
Tips for choosing
When deciding what the corner floor element for the sink will be, take into account the totality of the above factors. The best material for countertops is artificial stone. Then a sink made of the same material would be more suitable. If the work surface is covered with a countertop made of laminated slabs, then it is more correct to use overhead sinks.
A segment made entirely of laminated board is not much cheaper than a cabinet with an MDF facade. Therefore, from an aesthetic and practical point of view, preference should be given to the second option.
The main thing for the safety of the cabinet is maximum protection from water getting inside the stove. To do this, all possible joints are sealed with sealant, edges in contact with moisture are trimmed with protective tape, and furniture plinths are installed.
Design Features
High-quality sink cabinets are a great necessity in every home. The purchase of these products must be thoughtful and balanced, because for the kitchen you need to select furniture that is optimal in size. It is also important to purchase products based on their aesthetic and decorative features.
This workplace should be very comfortable and preferably multifunctional, since the corner is a fairly large space.
When choosing, you need to consider what functions this bedside table performs:
- The practical side. Rationalization of the square footage in the room - the object takes up a minimum of free space, in addition, it houses other household appliances: a cabinet, a sink, communications, etc.
- A corner cabinet connects the kitchen unit along the walls.
- Expressiveness and aesthetics. If all the elements of the room’s style, including the sink-bedside table, are correctly selected, the kitchen will look quite representative.
- Aspect of comfortable use. If you plan the purchase and installation of the cabinet correctly, it will always be quite convenient for the housewife to use the cabinet while cooking.
A corner kitchen set is a necessary necessity: the size of the kitchen is not large enough to place everything you need along one wall.
Important. If a person wishes, he can construct the necessary sample himself, which will meet his purely personal needs.
Kitchen section is corner, right angle. Assembly diagram.
Drawings of kitchen section parts with assembly holes.
2. Bottom of the corner section.
3. Corner connection panel.
4. Facial communication.
Return to locker list.
Copying article materials is only possible with an active back indexed link.
Source
Varieties
There are two types of corner kitchen sinks: L-shaped with an acute angle, these sections are also called attached, and a kitchen cabinet with a beveled corner. They differ in internal overall dimensions, design, quantity and method of opening the doors, and ease of use.
Corner cabinet for the kitchen under the sink, main overall dimensions.
| Type of corner segment for sink | Corner cabinets for kitchen sink dimensions |
| L-shaped bedside table with an acute angle, attached |
|
| Kitchen cabinets with beveled corners. Equilateral dimensions (adjacent to the wall) - from 85 cm to 90 cm. The height of all types of segments varies from 85 cm to 90 cm. For ease of cleaning, the segments are equipped with legs (up to 10 cm), which can be covered with a furniture strip. It is attached to special clips. |
|
Custom-made kitchens may have slightly different overall dimensions.
L-shaped
With beveled corners
Dimensions and shape of sinks
Mostly round, rectangular or square models are installed. Semicircular or oval options are less often chosen.
Let's look at typical models:
- Round ones are the most compact, their diameter varies from 400 to 500 mm;
- Rectangular - suitable for rooms with an elongated shape or when the width of the set is less than the standard 60 cm. Common dimensions: 400x500, 400x800, 550x500, 500x800, 500x1000, 500x1250 mm;
- Square - chosen for arranging small kitchens. The most common sizes: 400x400, 500x500, 600x600 mm.
How best to make a kitchen table-cabinet under the windowsill
As a rule, in typical apartment layouts, the level of the window sill is lower than the level of the working surface of the kitchen unit. The “difference” is about 100mm, that is, 850mm versus 730-750mm. Take this nuance into account if you were planning to make a kitchen set with a transition to a window sill with a solid countertop. To implement this idea, you will have to change the window at the renovation stage - install it higher and raise the level of the window sill.
The angle of the window sill in Khrushchev-era kitchens protrudes by about 70-120mm. If the refrigerator slides into a corner, then to open the door it is enough to cut off the corner of the window sill. You can do the same when designing a kitchen table-cabinet in this place. However, most often they make it narrower, since in addition to the window sill, heating pipes also get in the way. And the gap between the cabinet and the wall is covered with a plank.
Otherwise, the design of the kitchen table-cabinet under the window sill is absolutely similar to other modules.
The nuances of making and assembling cabinets for sinks with your own hands
For the manufacture of corner cabinets for sinks, the same materials are used as for standard kitchen furniture:
- The body is made of laminated chipboard or MDF. It is important to use a PVC edge and roll up all visible ends with it. This will better protect the module from moisture and swelling.
- As a facade, you can also use laminated chipboard, MDF with various cladding, solid wood or acrylic.
- The tabletop for sink tables can be postforming, chipboard with plastic lining, veneer or artificial stone.
- Sinks for corner cabinets are mainly used as mortise sinks. This may be an option made of stainless steel or artificial stone.
Correlate the dimensions of the sink with the available space for the insert, taking into account the width of the wall plinth.
A corner cabinet for the module is designed to fit the existing angle based on the drawings discussed above. It is important to immediately take into account the dimensions of the internal cuts for the pipes. It is better to make them before assembly and paste them with an edge. If you cut locally, the ends will remain unprotected from moisture.
Assembly of a corner kitchen cabinet under a sink is carried out by analogy with other modules.
Euroscrews (confirmats) are also used to assemble the housing. The legs are attached to 4x20 self-tapping screws, furniture hinges are attached to 3.5x16 self-tapping screws.
It is important to treat all open ends without edges with silicone or sealant. You should also do the same with the cutout for the sink. All this will increase the service life of the furniture.
Manufacturing materials
When deciding on a cabinet, you need to navigate the materials from which it is made. Main types of materials:
- laminated board is an affordable option. This is essentially compressed glued wood chips covered with a layer of plastic. Please note that moisture must not get inside the slab. For these purposes, the ends, in the part where water can get in, are protected with an edge;
- cabinets made of laminated board with MDF facades. MDF is wood waste crushed to a dispersed state, vacuum-pressed under high pressure. On top, the slab is covered either with a thin layer of a special film, or with veneer (a thin cut of wood), veneered facades. The slab can be protected by painting. Painted MDF has a wide range of colors. Another advantage is that they can be embossed. The façade does not require edge finishing at the ends. The most popular and optimal option in terms of price and quality;
- natural wood - in the vast majority of cases, only facades are made from it. Wood, although the most environmentally friendly material, is also quite capricious. It must be well dried, expertly fitted and coated with special varnishes. These compounds protect it from moisture, temperature changes, and mechanical stress;
- facades made of plastic and glass - they are quite beautiful and expressive. But expensive, like wooden ones. They are framed with aluminum end tape. Susceptible to scratches, glass, chips and cracks;
- cabinets made of food grade metals. This is most often furniture for food production, where increased sanitary and hygienic requirements are imposed.
The sink plays an important role for ease of use.
Wooden
Chipboard
MDF
Filling
Don't forget to take into account the interior contents of the cabinet. If technical components are concentrated there (chopper, water filter, flow-through heater), then it is wise to use a cabinet with a beveled corner, since it is more spacious. When you plan to use it for storage, both options are suitable. You just need to decide on the dimensions of the stored items. The height of the shelves will depend on this.
In an attached segment with an acute angle, it is possible to use special pull-out baskets and rotating shelves, this is quite convenient.
If a garbage container is located in the corner segment, then when planning the interior space, it is better to know its size in advance. Then you can rationally place additional shelves.
Options for corner segments
There is a wide range of sinks on the market, including corner sinks.
What types can be used:
- corner sinks - for cabinets with a sharp corner, rectangular sinks are suitable. For the second type, with a beveled corner, the choice is wider, since the working surface is larger;
- round sinks 50, 60 cm, these are standard sizes. It should be remembered that a section with a sharp internal corner is also suitable for sink 50;
- direct sink - most often manufacturers produce them in lengths of 60 cm (600 mm) and 80 cm (800 mm). The depth depends on the type of sink (countertop or mortise) and shape.
A floor-mounted corner cabinet for a sink, its choice, is directly related to the size and shape of the sink.
Round
Oval
Rectangular
Corner
Methods for installing a corner kitchen sink
Most modern people with simple knowledge can install this object:
- we fasten the side parts with the bottom part;
- installation of a corner structure;
- we fasten the connecting components;
- installation of legs (if provided);
- We install doors and handles.
At the location of the washing unit, all communications necessary for its functioning are located.
Additional Information. When purchasing any furniture, a diagram is included, with which installation is quite simple. There are two installation methods: mortise and overhead.
Initial data
So, what did I have at the start of this whole event? A kitchen with an area of 6.2 m2 (according to the technical passport), which has not had any, not even cosmetic, repairs done for many years. The kitchen set has generally been like this since the time the house was commissioned, and this is already almost 40 years. The window frame is old, wooden. The refrigerator is old and needs replacing. The gas stove is relatively new, but does not meet the wife’s requirements.
In general, of what was supposed to be taken from the old kitchen and transferred to the new one, only the microwave and the washing machine mentioned in the prologue remained.
It only remains to add that the old layout of the kitchen and the arrangement of all the elements on it always seemed terribly inconvenient to me, not practical and not rational, and therefore I began to fight for every centimeter, for every piece of free space, and, looking ahead, I want to admit, that I succeeded.
Kitchen installation
It is best to install the headset after all the cabinets have been assembled. For convenience, it is better to fasten the doors last - this will simplify the installation process. The installation process begins with preparing all the holes in the walls.
Care should be taken during the installation process regarding placement. If it is installed incorrectly, the kitchen will look unsuitable in the future.
Keep all outer and lower cabinets level so they are level. If you do not install carefully, the doors may not close or may not be level, so make sure to adjust them well before attaching all the drawers together.
Installation
Let's consider the most popular type of corner sink mounting - mortise. This is one of the simplest options where even a beginner can do it with his own hands. A short instruction on how to properly install a sink into a corner countertop.
- We mark the place where the sink will be located. It is advisable to have a drawing, as in the photo above.
- Using a jigsaw, cut a hole in the tabletop.
- We glue the seal along the edge of the hole.
- Place the sink in the hole and secure it.
- Lubricate the seam with sealant and remove excess.
After this, you need to connect the sink to the water supply. This is done using a plastic corrugated hose and a siphon. The last element is necessary to prevent food debris from clogging the hose.