Assembly
Log table with dimensions
- Let's mark the prepared log for sawing. After that, using a chainsaw, we will divide it into the necessary parts. You can do this yourself or hire a sawmill. The services of professionals will cost a certain amount, but the likelihood of damaging the log will be reduced.
- Carefully cut the logs for the tabletop lengthwise. Make sure the cut is even. The halves of the logs will be positioned with a flat surface up, so they form the table top. Longitudinal sawing of logs
- After sawing, clean the resulting parts from the bark. This can be done with an ax or chisel and hammer. Carefully cut away the bark, being careful not to damage the surface of the log.
- If necessary, cleaned logs are processed with a grinding machine. This way you can achieve a smooth surface and hide wood defects.
- Putting the details together. We cut out a round groove for each log, on which another will lie on top. Try to adjust the size of the groove to the part as much as possible, this way you will achieve greater stability. Log fastening
- We connect the folded logs with self-tapping screws. To do this, we make a hole 15 centimeters deep in the top log. Then we place a self-tapping screw in the hole and tighten it with a screwdriver. We connect all the logs in series.
- We fix the table cover on the resulting stands. This is done using the same screws. For beauty, you can disguise the screw caps with metal caps. Metal decorative caps
- We thoroughly impregnate the finished table with a protective composition. Apply three to four coats to best preserve the wood. The drying time of the impregnation is eighteen hours, after which a layer of varnish can be applied. Do-it-yourself log table for a summer house
Assembling a table base from logs
- Reinforcement and glue will help make the assembly of the structure reliable and durable. Insert metal pieces into the joining logs. The rods must fit exactly into the holes. If they peek out slightly, cut off the same amount at the end of the metal fastener. Disassemble the structure for final connection.
- Fill on ? glue the bottom hole, then insert the reinforcement, put the next log according to the drawing on top (we recommend numbering all the logs used accordingly in the drawing).
- On top-mounted logs (the rods are in them), fill the holes with glue to the very edges.
Leave the resulting design. The glue must dry.
How to make your own table
A log table made with your own hands will serve for a very long time and will become a real reason to sit in nature on a warm summer evening, drink tea, talk, or, conversely, enjoy the peace and quiet.
The type of logs from which it can be made is not of fundamental importance, but it is much easier to construct from rounded logs than from wood cuts covered with bark. However, this is a matter of taste and individual vision of your own garden interior, although ensembles of a bathhouse, gazebo, doghouse, well, house and garden table made in the same style and from the same material look very impressive.
Making such a table from logs with your own hands is very simple. All work will consist of the following:
- Decide on the dimensions based on the available materials and taking into account the place where the furniture will be located.
- Make the most detailed drawing indicating the dimensions, for which you need to make all the necessary measurements. This will greatly simplify the work itself.
- Select logs for the legs, make sections of a certain length according to the design, cut out inclined corners on those parts on which they are provided, give the cuts the chosen decorative shape and finish them with stain.
Important: at this stage, when processing parts, you should number them, and the numbering of each log should also be on the drawing. This approach will significantly simplify and speed up assembly.
Saw along the logs intended for the tabletop and supporting strip, also saturate them with some kind of product, and carefully sand the details of the future surface.
- Cut out all parts and align the places for future fastenings. For convenience, they can be marked with a marker directly on the material.
- Prepare reinforcement bars or threaded rods. Each leg will have two metal rods, slightly longer than the height of the structure itself.
- Drill holes for reinforcement fasteners, the diameter of which should not be significantly wider than the rods themselves, and the lower parts should not be drilled through.
- Pour glue into the lower grooves, insert the rods and leave everything to dry. After the glue has dried, you need to try shaking the reinforcement to make sure the fastenings are tight. Next, you should string the remaining parts step by step, allowing the glue to dry.
- While the structure is drying and assembled, you can prepare everything you need for the countertop.
- The parts defined below the surface can be nailed, or they can also be fixed to the reinforcement if a decent piece of it remains on top. When choosing the method of installing the “face” of the table using self-tapping screws or nails, the protruding pins of the rods must be cut off.
- You can additionally fasten the tabletop parts from below with slats.
- Finally, the finished table must be varnished.
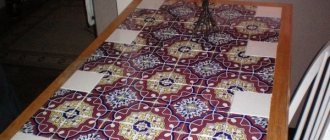
The tabletop deserves special attention. Its appearance depends solely on the imagination of the master and can be absolutely anything, not only in form, but also in content. For example, you can use fragments of ceramic tiles and lay out a mosaic. Broken tiles are sold for mere pennies at any large hardware store. However, besides tiles, you can use any materials.
For example, make a decorative panel from everything that comes to hand, and cover the resulting picture with glass, making sure to secure it at the junction with the wood with glue.
Or lay out a picture of dry leaves, covered on top with a glass panel for tabletops. There are no restrictions in the design of the front part of the table, except, perhaps, practical expediency and the availability of free time for creativity.
There is nothing difficult about making a table with your own hands; all you need is your own desire and quite a bit of patience and effort.
Of course, garden furniture can be made with your own hands not only from logs, but also from almost anything that comes to hand. But, made from materials remaining on the site after construction, the table will solve the problem of recycling scraps and, if all the details are properly worked out, will last for decades, while being permanently located in the garden.
Several options on how to make a table from rounded logs
Table No. 1. Universal base for a table top of the correct shape.
For the base you will need logs of length:
- 1 meter – 3 pcs. (Fig. 2, tabletop logs and log 8);
- 0.9 meters – 3 pcs. (Fig. 2, logs 1, 2, 7);
- 0.8 meters – 2 pcs. (Fig. 2, logs 3, 4);
- 0.7 meters – 2 pcs. (Fig. 2, logs 5, 6).
And also timber 5x5 or 6x6 cm - 3 meters (Fig. 2, screed).
Making the base of the table.
To make a table from a rounded log, you need to master some techniques for joining logs. In this case, a “cup” connection. Figure 3 shows the principle of this design.
1 step. Manufacturing of elements. If the log cuttings already have “cup” notches, then it is necessary that they are located exactly in the middle of the segments - this ensures the stability of the structure. If not, you will have to cut them out yourself: first make cuts, then finally shape the bowl with an ax, achieving a semicircular shape (see photo 1).
The dimensions of the bowl must correspond to the dimensions of the log: the length is equal to the diameter, the depth is half of it.
Logs 1 to 7 are stacked as shown in Figure 3, in the order shown in Figure. 1 (top diagram). Moreover, under the ends of log 2, small pieces of log halves are placed - legs, which give stability to the entire structure.
On the logs, places for dowels are additionally marked (additional fastening from reinforcing bars, Fig. 1 - marked with dashes). It is convenient to mark the holes as follows: on the bottom log, in the place of the intended hole, drip a little nail polish with a brush - the varnish will stain the bottom of the log of the next row when applied. The holes must be made strictly in a vertical direction, the depth of the hole is 8-10 cm. Marks are also made on the legs.
It is better to assemble the table structure immediately on site, since the structure is quite heavy to carry:
First, log 1 is laid, a little glue is poured into the holes, and pieces of reinforcing rod are inserted (the length of each of them is from 16 to 20 cm, depending on the depth of the holes). Log 2 is placed on top of the bowl. The procedure with rods is repeated. Next, log 3 is tried on, which is strung on the dowels of the 1st log: if the rods prevent a tight connection of the logs, then they are shortened using a hacksaw, if not, the rods are smeared with glue and the log takes its place. The structure of the entire frame is formed in a similar way.
Manufacturing and installation of countertops.
Meter-long logs are sawed lengthwise, the reverse side of the cut of 5 of the 6 resulting “half-logs” is trimmed to a thickness of about 5 cm. The sixth is sawn to a length of 90 cm and laid on the 7th log, cut side up (also secured with reinforcement).
If possible, it is better to entrust the sawing to specialists - you need the log to be divided into two absolutely equal halves (see photo).
Before laying the tabletop parts, it is necessary to make a screed from a block. The location is shown in Fig. 2 (lower diagram, dotted line), the inset diagram is in Fig. 4. The end parts of the logs are sawn, as shown by shading in Fig. 1.
Parts of the tabletop are laid on the crosspiece of the frame, as shown in Fig. 2, fastened and filed in a circle.
If you need a square table, the parts of the tabletop are mounted on a crosspiece, as shown in Fig. 5.
Various furniture made from logs
To create such furniture, it is not necessary to immediately buy material. Sometimes it is enough to look around and select drying trees on the site that cannot be rejuvenated by cutting branches and fertilizing. When we cut them down, we get a mass of wood that can be used to create, for example, a bench from logs.
For this, a base is selected that will be processed. Having marked the cut points with an electric saw, we cut the log in half and construct a back and seat from both parts. To fasten them together, strong branches cleared of bark are used, in which holes are drilled with a drill and a steel rod is inserted.
Garden bench support made of logs.
To prevent the metal from moving freely in the resulting space and the bench from becoming loose, the most common PVA glue is used to work with wood. It needs to be poured into the recess and a rod inserted there, allowing the structure to dry. In order for the bench to last longer, before assembly, all parts must be thoroughly sanded, all damage must be removed, and cracks and cavities must be filled with a special grout.
If the owner does not have steel rods at his disposal, and it is difficult to purchase them, you can use ordinary nails, removing their heads. A prerequisite when creating furniture: treatment of all parts with impregnation, which subsequently eliminates rotting, mold formation, and colonization of bug colonies. After assembly, when the furniture is already firmly installed, the surfaces are covered with layers of varnish, which will give a well-groomed appearance and protect from bad weather.
The back with which the bench is equipped can also be decorated using not boards, but 2-3 forged intricately curved rods, which are not so difficult or expensive to buy. Additions made from wicker, which is very easy to work with, will look no less impressive. It is durable and can be used to create a high back or armrests if the log is not large enough.
Tools for making furniture from logs.
If the owner has coniferous logs at his disposal, he needs to take care to get rid of the resin, which, especially on hot days, will actively release, staining clothes.
To neutralize resins, several compositions are used to choose from:
- acetone and water in a ratio of 4 to 1;
- a solution of acetone and caustic soda in a ratio of 20 to 4;
- potash and soda ash in a ratio of 5 to 6.
The mixture is thoroughly rubbed into the bark-free wood several times and washed off. After this, the material is dried naturally or using a hair dryer.
Advantages and disadvantages
Today, like centuries ago, people try to choose the most reliable, safe and beautiful furniture for their living spaces. Many new synthetic materials, decorative techniques and specific mechanisms have been invented that are used in furniture production. But natural wood is still highly valued. The most common species used to create furniture are oak, beech, walnut, birch, pine, alder, acacia, cherry, and mahogany.
Log furniture is considered an elite purchase because it has a large number of positive qualities:
- high aesthetics - wooden surfaces have a luxurious appearance, unique texture and pattern. With their help, designers create truly “royal” interiors in ordinary city apartments and country houses. Wood goes well with many other materials: glass, metal, stone. We also note that the color schemes of natural wood are very diverse, which allows you to choose an option for any interior style;
- ecological purity, naturalness, pleasant aroma. Logs do not contain unsafe substances in their composition, therefore wooden interior items are not capable of triggering the development of allergic reactions, poisoning and other health problems in humans or pets. Species such as pine, spruce, fir have a positive effect on people with diseases of the respiratory system;
- durability - natural wood demonstrates high strength and resistance to many negative factors in the environment, therefore it lasts for a long time without changing its performance characteristics;
- easy maintenance - solid wood does not require maintenance, so it retains its original beauty for a long time. And if during operation a scratch or chip appears on the surface of the cabinet, it can be restored without much hassle;
- versatility - wooden log furniture is relevant in almost any room. The living room will look simply chic, the bedroom will be filled with coziness, and the children's room will be as safe and practical as possible with such decor.
There are also disadvantages to furniture made from timber, which is important to be aware of when choosing such interior items for a bedroom, living room or children's room. We will describe them in detail below:
- ability to crack under the influence of high humidity in the room. Even if the wood surface is well treated, it will remain sensitive to moisture. If there is no optimal humidity in the room, the furniture may dry out or swell;
- excessively high cost of wooden products. Often this fact scares off the buyer, forcing him to choose a more affordable analogue. To be fair, we add that the technology for producing interior items from timber is complex, which is why they are expensive for buyers;
- high weight - furniture made from logs is not suitable for old houses with frame floors;
- specific qualities - different types of wood evoke different tactile sensations and associative thoughts in a person. For example, the natural smell of pine can scare away one person and attract another.
Preparation of material
First, make sure that you have enough wood according to the drawing and size. If according to the design project it is supposed to make a rough table with legs made of rough wood, then the processing will take place with minimal labor and time. If it is assumed that the finished specimen should be more elegant, then in this case you need to carefully process the wood with a plane.
In the finished bottom boards you need to make holes for the reinforcement. There is no need to do them all the way through. Half the thickness of the board is enough. Each hole should be located at a distance of 30-40 cm from each other. The boards that are above the bottom ones are drilled through at an angle of 90 degrees.
On a note! If there are unevenness on the boards, they can be easily removed with a plane. You can sand the surface and make it perfectly smooth using sandpaper. This concludes the wood preparation.
Materials and tools
Prepare everything you need for work:
- Logs with a diameter of 30 cm. The harder the type of wood, the longer the table will last you. And if it is an oak round timber, the result of your skill will be inherited by your children and then your grandchildren.
- Stain or other wood impregnation agent. This treatment will protect the material from rotting and parasites, and will make it more resistant to aggressive external factors.
- Axe.
- Bit.
- Hammer.
- Chainsaw.
- Electric drill with thick drill bits.
- Nails, large screws.
- Sandpaper.
- Universal glue (preferably epoxy).
- Grinding machine with attachments of different grain sizes.
- Stain to improve the protective qualities of wood.
- A varnish that is suitable for treating wood.
Preparation
- First of all, you need to prepare a drawing, which will indicate the parameters of the component parts. If you are going to align the logs used on one side, then you need to make a three-dimensional diagram. You can choose the size of the table, as well as the shape of the tabletop, but maintain the proportions to make the table strong and stable. Your diagrams and drawings may be formatted like the ones below.
- Prepare the logs. Check the amount of work material with your plans. If there are not enough logs, you will have to:
- limit yourself to a simpler option - make a table on log legs;
- do not abandon the idea, but purchase additional material.
- Remove the bark from the logs using a hammer and chisel.
- Process the cleaned material with a plane. On the lower parts of the trunks, remove a small layer of wood, making the contact surface smooth. This way the logs can be stacked one on top of the other. The cutting width should be at least 4-5 cm. Using another method of laying - “in a bowl” - requires more labor. A semicircular depression is cut into each upper log. Then the top log is laid on top of the bottom one. In both the first and second cases, additional fixation with screws, dowels or fittings will be required.
- Give the base parts a neat shape at the ends. To do this, cut the edges of the lower and upper logs at 45 degrees. Continue this bend along the trunks towards the center, making the intermediate elements shorter. The shortest one will be the central log.
- Be sure to sand the sharp edges to make the elements of the future table safe.
- Proceed to preparing the holes for the reinforcement. In the log that will be located below, it is enough to drill only half the thickness. In each log located inside, you need to make several through holes at a distance of 30-40 cm. In joining logs, the holes should match, and the drilling angle should be 90 degrees. You need to do the work with a drill whose diameter is the same as that of the reinforcement you are using.
- Using a plane we correct uneven areas and rough areas. Carefully sand the surface of the parts with sandpaper. Start with a coarse-grained abrasive paper, such as a four-grain sandpaper, and then use a finer one.
Assembly and installation of the countertop
As a countertop option, you can use a chipboard sheet of the size and shape you need. It will need to be attached with screws to the top logs. This method is suitable for tables with a surface area of less than 100 cm. It significantly reduces the time spent and simplifies the work process. But such a table will look much simpler, and you shouldn’t put something heavy on it.
If the countertop area is larger than a square meter, it can be made from a sheet of chipboard. But in this case, install the material on a base of additional beams (necessarily level). They are used as auxiliary material and do not require processing. The beams are nailed to the top logs with large nails or self-tapping screws. Moreover, the number of beams depends on the size of the tabletop. The chipboard, in turn, is attached to this frame.
- Adjust the size and shape of the boards to match the parameters of the desired countertop. The thickness of the material must be at least 20 mm. The width can be arbitrary. Perform the work using a plane and sandpaper or a grinding machine.
- Attach the tabletop parts to the legs at the contact points using glue and large self-tapping screws.
The table is ready. The last step is final processing.
- Use a file or sander to remove any sharp or protruding parts. Level the surface of the tabletop and sand it.
- After removing shavings and wood dust, cover the table with stain or other composition that can enhance the protective properties of wood.
- After drying, polish the surface again and proceed to varnish the table. One coat of varnish will be enough.
It is popular to make table tops for similar tables from logs sawn in half. The complexity of this option lies in the fact that cutting large trunks clearly in half is not an easy task. This is exactly the case when turning to a specialist is the most reasonable decision. After cutting, a cut is made on the round part of the logs or a “bowl” joint is applied. Additionally, the tabletop is fixed to the legs using self-tapping screws and glue. Next, a finishing scenario similar to the previous one is used.
The new table will become a favorite family gathering place and will bring you together for many years to come. And also... having acquired such useful skills, now you will be able to make benches from logs.
Types of log tables
| Illustration | Description |
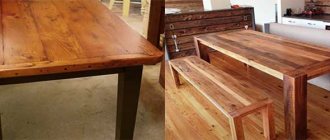
Rectangular models. The most common and popular solution, the main advantages are:
| |
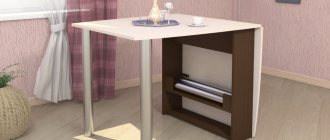
| Square options . This solution is in many ways similar to the models described above. Its main feature is that the length and width of the tabletop are the same. Such tables are well suited for gazebos and square rooms. There are 1 or 2 people on each side. There is no point in making a table anymore, as it turns out to be uncomfortable - it is difficult to reach the middle. | |
| Round tables . They have an attractive appearance and are comfortable due to the fact that you can sit anywhere around the perimeter. If benches are used in rectangular and square options, then stools and chairs are more suitable here. They are also made from logs so that the set is a single whole and looks harmonious. The diameter of the tabletop is usually from one to two meters. | |
Oval models. An unusual solution that comes in two types:
| |
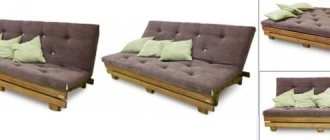
| Composite options. In this case, the bench and table are on a single base, most often it is a chopped element in which recesses are made. The solution is good because of its compactness, but sitting down at the table and getting up from it can be not very convenient. After all, the bench does not move back and it is inconvenient for people of large build to sit. Another disadvantage is that the design is very heavy, it is much more difficult to carry it than a table and benches separately. |
Outdoors on sunny days
With imagination and desire, you can create beautiful things on your own that make family vacations even more enjoyable. In addition to a bench and table, you can build a durable swing and even a hammock. As blanks for the swing, you need to choose 6 pieces of strong logs, the height of which exceeds 2.5 meters. The radius of the logs should be at least 5-6 centimeters. The structure must withstand the weight of adults who will definitely try to swing.
For supports, three pieces of logs are used on both sides, arranged in a triangle, the upper part of which is fixed with self-tapping screws. The length of the vertical log and crossbars is determined by the width of the bench, which, depending on the design. can accommodate 1-3 people.
Diagram of a log swing.
In order not to disturb the unified composition, but also not to make the structure too heavy, several carefully polished cuts are used for the back and seat, connected in the same way as a regular bench. In conclusion, all that remains is to decide on what the bench will be suspended on: on a metal chain or on a strong, thick rope.
Garden furniture can be supplemented with an original hammock, which will require:
- 2 small logs 1.2 m long and 3-5 cm in radius;
- a piece of durable fabric 1.5 m by 2.5 m;
- strong rope or colored clothesline;
- round steel rivets.
First of all, the wood is processed and thoroughly sanded. Multiple through holes are drilled in it at a distance of 2.5 cm. Then it needs to be treated with an antiseptic, varnished and left until completely dry. Next, work begins with the material, which, if measured correctly, does not need to be sheathed with a sewing machine. It is enough to fold the edges three times and often stuff steel rivets, which is original and quite fast. A rope is pulled through the transverse holes and the drilled dry crossbar, from the free ends of which very strong loops are created on both sides of the hammock. You can diversify the design by creating a kind of fringe from the remains of a rope tied in a knot in the free holes with rivets on the sides.
A beautiful and very practical hammock can be hung from the beams of the gazebo, between trees, or from log pegs buried in the ground for stability. In this case, part of the logs, buried in the ground to the maximum depth, is protected from possible decay by resin or several layers of roofing material. A small stand for a flowerpot, also made from a cut log, will help complement the decoration.
A simple way to make a “wild” stool from thick wood
... which you won’t be ashamed to put in your home. Look how easy it is:
Please note that it is not at all necessary to master a chainsaw, since the scale of the workspace allows you to correct the unevenness of the first cut.
Such a stool will fit into the interior, as well as a table made of logs, especially in a log house in the “wild style”.
Another method of making a stool, where you don’t even need to cut anything out:
A thick enough piece of wood can make an excellent chair. If you burn it, sand it and varnish it, you get an exclusive product that would be a pity to take outside:
Installation
Assembling a table, both from rounded logs and from regular ones, primarily depends on what kind of furniture you plan to make. But, in any case, there are several main points that are the same for both complex designs and very basic simple tables.
- Drilling holes for reinforcing bars - in the log that serves as the basis for future furniture, that is, in the lowest one, the holes should not be through. A depth of half the thickness of the part will be sufficient, but in all the following elements they must be through.
- All holes should be 30 cm from each other, this is the most optimal distance that will ensure the strength of the entire structure.
- All drilled holes must be tightly filled with epoxy glue so that the rods do not dangle in them.
- The places where the parts are attached to each other should be well aligned and not too deep, ideally within 5-6 cm, this will prevent possible cracks during further use of the furniture.
Where can I put such a table?
A table made from cut wood will look natural in the kitchen or living room in a number of interiors, such as folk style, ethnic style, rustic, country. But, of course, it is most optimal to make it for a country house.
Such tables fit well into almost any interior.
Do-it-yourself furniture made from wood cuts will become the highlight of any interior. If you want to surprise guests with an unusual furniture design, then a beautiful coffee table made by yourself will be the ideal solution, because every detail and decorative element will be unique and convey exactly your idea and mood.
Tools
- Decorative impregnation for wood. Since we will be processing the entire table, it is worth buying two cans at once. This impregnation will protect the wood from rotting and external damage, so there is no need to save money. Regular stain is also suitable for these purposes, but professional impregnation will do a much better job. Decorative impregnation for wood
- Wood saw. Necessary for small cuts and finishing work. It is better to choose a model with small teeth, so the cuts will look neat and even. Crosscut saw
- Carpenter's axe. Useful for making grooves in logs and sanding them. It’s better to choose a model with a small handle and a light spine. Carpenter's ax
- Chisel. Useful for finishing small recesses and sanding grooves. If necessary, a chisel can be used to sand logs, but doing this with an ax is much more convenient and faster. Chisel
- Hammer. The tool is paired with a chisel, necessary when working with hardwood. Hammer
- Chainsaw. The main tool when working with a whole log. Necessary for sawing into individual parts. A chainsaw is used for rough cutting of grooves and cups. Chainsaw
- Wood varnish. The final finishing material that is applied to provide additional protection to wooden parts. Varnish helps preserve the wood grain and its original color. Apply it in two layers; one can is enough for a medium-sized table. Varnish
- Self-tapping screws 6 x 200. Necessary for additional fastening of logs together. Self-tapping screws
- Screwdriver. Used for tightening self-tapping screws. Although its speed is lower than that of a drill, it is convenient to use due to its portability. The absence of a wire allows you to work away from a power outlet. Screwdriver
- Long bit for a screwdriver. Long bit for screwdriver
- Line for marking gutter lines. Trait
Tabletop
The upper part can be assembled in two ways. Let's consider the first of them.
Method 1
While the glue that holds the wood to the reinforcement dries, we move on to assembling the tabletop. If you do not plan to put anything heavy on the top, then you can cover the top with a sheet of chipboard. To decorate, cover it with self-adhesive paper. This method of making a tabletop is only suitable if the height and width of the table does not exceed 1 meter.
Method 2
If you want the table to be more elegant and beautiful, you can attach treated beams. The entire rough surface is processed with a plane and sandpaper. When you are sure that all the parts have a uniform structure, you can file all sharp edges to avoid the possibility of injury.
Wipe the finished table first with a damp cloth, then with a dry one. Now you can start varnishing the finished product. You can apply the protective solution in one layer. This is enough to protect the surface from bad weather.
What can you make yourself?
Almost any table can be used by each of us. This simple household item does not require special knowledge or special professional skills. We start making wood products at school, during labor lessons. Therefore, a simple wooden design of a laptop table will be quite feasible. You can also make both the chairs and the bench for your country house yourself.
You can come up with your own design for home crafts. A folding table will not constantly occupy living space. It can combine several functions. From a place for changing a baby, to a work surface for home crafts.
A wide field for creativity will be provided by a combination of wood and other materials. Don't be afraid to experiment. Connect dissimilar objects together and you will achieve amazing results. Even if you decide to combine rarely combined elements, don't be afraid to try. Any ideas can be realized.