Repair of drawers: causes of breakdowns
Before you start repairing drawers with your own hands in a closet or chest of drawers, you should understand the cause of the breakdown. Understanding what caused the problem is the key to successful repairs. The main thing is not to confuse causes and effects. For example, warping the cabinet or cabinet body itself can cause incorrect movement of the guides and their failure. And if you do not “return” the body to the original correct geometry, replacing the guides simply will not solve the problem.
The box frame has fallen apart or the bottom is falling out
This kind of breakdown is especially common in wooden chests of drawers assembled on spikes. Over time, the boxes dry out and become unstuck. All that is required is to take them out, disassemble them into parts, level them, sand them and reassemble them with glue. For reliable tightening, use additional fasteners in the form of furniture corners and self-tapping screws.
The bottom of the fiberboard box may not be nailed securely at first. Fasteners on small nails are especially unreliable. If the drawer is made of chipboard, then it is better to attach the fiberboard bottom to it using 3x16 self-tapping screws. Use washers to expand the clutch area.
The drawer falls out or warps in the guides
Most likely the reason is the insufficient rigidity of the cabinet or chest of drawers itself. Due to the uneven load of the shelves, the body inevitably deforms: the sides bend, the distance between them increases, and the drawers begin to fall out. The cabinet may warp if the floors are uneven and the cabinet or chest of drawers itself is not level.
Correct, smooth movement of the guides is possible only with the correct geometry of all elements. That is, both the body and the boxes of the drawers must be aligned diagonally. Perhaps the assembly was incorrect from the beginning - if you screw the guides unevenly relative to each other by at least a millimeter, and over time, as the boxes are loaded and they sag, this inaccuracy will become critical.
Also, the cause of the box warping and falling out of the guides may be grinding and deformation of the rollers (ball bearings) of the rails themselves. It happens that the metal of the guides itself bends. The reason is simple - the fittings have exhausted their service life and require replacement.
The drawer doesn't slide out well, the guides stick
The reason may be either in the deformations described above or in the fittings themselves. Even if I installed Chinese analogues with thin metal on the guides, it is unlikely that the fittings were originally designed to fully load the box. Therefore, it cannot ensure the expected smoothness of closing and opening the drawer.
Role in furniture production
And although the useful properties of telescopic devices have been evaluated in various fields of activity, such mechanisms are mainly used in the process of manufacturing various furniture.
One example of such an application is wardrobes using folding hanger rods, various cabinets for shoes and chests of drawers, and cabinets with drawers. That is, any furniture that allows you to save space or increase the comfort of using furniture.
It is worth noting that ball guides have a positive effect not only on convenience, but also on the efficiency of using furniture. After all, getting and putting things away is much easier and more comfortable, and free access makes it possible to take up useful space in the closet.
DIY drawer frame repair and replacement
Summarizing all of the above, we can identify several repair methods to return the drawer to its former strength and smooth operation:
- Strengthening the structure itself . It is necessary to add rigidity by installing strips along the back wall. You can also level furniture that is standing unevenly so that its geometry becomes correct. After checking all the corners, you can repair the drawers and replace the fittings (if required).
- Strengthening the drawer frame and strengthening the bottom . If during operation it becomes clear that the fiberboard bottom is not able to withstand the load and is expected to fall out even after replacement, there is a reason to strengthen it. To do this, install a stiffener horizontally or vertically along the bottom - a partition. You can additionally attach the bottom to this part. This method will also help make a large box more rigid without warping.
- Replacement of drawer boxes. Sometimes wooden tenon boxes that have fallen apart are easier and cheaper to replace than to repair. For example, make them again from chipboard. You can read how to calculate the dimensions of the drawer parts for replacement here. It is also worth doing if it turns out that the dimensions of the drawers were initially calculated incorrectly, and therefore fall out of the guides. Or the fittings themselves are already outdated and are no longer available (such as some types of guides with an insert into the groove of the drawer).
For roller and telescopic guides, the optimal clearance for smooth extension is 13 mm on each side.
Dismantling sequence
Before you remove the drawer from the slides, note that each drawer has two of these features. You must act in the following sequence:
- Pull the drawer out as far as possible.
- Plastic fasteners will be visible in the window. Lower the special “tendril” down and then pull it towards you so that it comes out.
Before removing the drawer from the guides, please note that the arrangement of the antennae varies depending on the design: symmetrical or mirrored.
In the first option, lightly pull both elements down; in the second case, one “tendril” moves down, the other moves up. Determining which method is suitable in your case can only be done by trial and error.
3. Lowering the “antennae”, pull out the drawer. It comes out of the guides without much effort.
Repair and replacement of guides in drawers
It happens that the guides quickly fail because the box is large and heavily loaded. Telescopic (ball) guides allow installation in two rows. In this case, the drawer will be endowed with greater load-bearing capacity and will last longer.
With such an “upgrade,” it is quite possible to replace the bottom made of flexible fiberboard with chipboard or plywood in order to store, say, tools in such a box.
It is better, of course, to replace the metal guides. They don't cost that much. However, if upon visual inspection the rollers are intact, have an even shape, and only the metal of the runners is bent, you can try to return it to its original shape. To do this, use a vice, pliers and other hand tools.
Source
How to properly arrange drawers in a kitchen set
This question becomes the main one if you purchase a custom-made kitchen set. It is recommended to make sketches of the future product yourself at the planning stage. Here literally everyone becomes both a constructor and a designer at the same time.
It is important to consider that in the work area where cleaning and cutting of products will take place, a large number of drawers are usually placed. This is done in order to remove a cutting board, knife of any type, paper towel, and utensils used in the cooking process without unnecessary movements.
Modern storage systems have various modifications that have a number of characteristic features. One of them is drawers that complement the kitchen set. Analysis of objective conditions and your own preferences allows you to make the right choice.
For example, cargo drawers are a solid achievement in the furniture industry. They are equipped with chrome-plated multi-tier shelves, which allows you to place a huge number of dishes and products.
A folding façade with a roll-out “carousel” system is in high demand for organizing the space of corner cabinets. Such a system can be easily placed above the sink for a while. In this case, the “carousel” is used as a drying dish. At the end of the process, everything is returned to the cabinet with a folding front.
What cabinets and drawers should be in the kitchen set - everyone decides at their own discretion . However, there are generally accepted standards and recommendations based on them:
- It is more convenient to store kitchen utensils and essential items in the upper tier cabinets.
- In the lower cabinets of the set, large-volume dishes are placed - pots, pans.
- Rarely used utensils, which have to be taken out only for a large feast, are hidden deep down.
If the drawer becomes difficult to move
1. DRAWER IS TOO HIGH
carefully inspect the edges, identifying frayed areas. If they are on the top edges, secure the box to a workbench and use a plane or 100-grit sandpaper to remove some of the material in those areas so the box can move freely in the opening. Take your time and check the result often to avoid creating another problem by removing too much material.
2. DRAWERS PULL OUT NOISY
Apply strips of anti-friction nylon tape along the inside corners of the body where the drawer slides. For better adhesion, first clean these areas of dust and old wax paste. Carefully apply the tape tightly to the inner corners of the opening.
3. DRAWER IS TOO WIDE
If the sidewalls are stuck, you can remove a thin layer of material using a planer. And if the drawer front can't be separated, make a few quick passes with a belt sander.
Source
The drawer doesn't close all the way
Hello!
In this short post, I want to solve the problem of many novice furniture makers. Sometimes I read interesting questions, one of which sounds something like this: “How to install a drawer with telescopic guides into a box?”
The fact is that when the drawer is inserted into the box, when closing it (the drawer), some resistance is observed. And this is natural. But the following may also happen: when closing the box, the front part of the movable plate (containing holes in which metal balls are located) may “bite”, that is, it will be slightly deformed (bent). In this case, how much this part bends, how many balls will fall out of it.
This problem is solved simply: the plate takes its original shape using pliers (of course, the dropped balls are put in their place), after which its front ends (those that were bent) are pressed against the guide itself as far as possible with the same pliers.
In order to correctly insert the box with telescopes, you need to observe the following points:
- Those parts of the guides that are attached to the box itself should be pulled out of it as much as possible.
- The moving plate with balls (which we talked about above should also be shifted forward as much as possible - from the box to the outside).
- When a drawer is inserted with its guide rails into the corresponding places of the guides, which are fixed on the box itself, you need to make sure that the drawer does not warp when it slides inside the box. It should go straight in.
- At a certain stage, slight resistance may appear. If the drawer slides smoothly, then you need to apply a little force, the latches on the guides will work, and everything will go like clockwork.
Here, in brief, are the main points of working with telescopic guides.
Biglis
I am also of the same opinion. especially after watching videos on YouTube - when telescopes are placed with an inclination of 5-7 degrees and it works as a closer - it moves in smoothly on its own. To close my drawers, I put in 7-10 kg of force to push them in or out. My wife can't cope at all..)
100% that the drawers are wider than necessary, or the cabinet is too narrow for the drawers, which is the same thing.
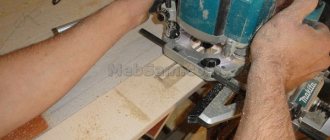
To overcome this, you need to arm yourself with a jigsaw and reduce them, or look for other guides, although now this is problematic.
Misalignment is a consequence of incorrect manufacturing or assembly of furniture.
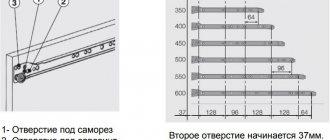
If you assembled it using the finished holes, but it does not fit as expected, then you will have to find out what is causing this. The simplest thing, if these are guides (the most common mistake of additive operators in factories), is to check the position of the receiving skids (they must be screwed in the same way). If there is a difference, then re-drill the holes for the screws on one receiving slide to the distance that the drawer does not close.
How to return the drawer to its original position
How to return the structure back is not difficult to guess. You just need to repeat the sequence of dismantling steps described in reverse order. Insert the box into the slides and push along the guides until you hear a characteristic click.
As you can see, figuring out how to remove a drawer from telescopic guides is not so problematic. Simple instructions will always come to the rescue if you are new to repairs and need express advice without leaving your home.
We repair drawers with our own hands
In the modern furniture market you can find many types and designs of drawers. But what we are interested in now is not their appearance. No matter how high-quality the guides are and no matter how high-quality the assembly is, there are many cases when problems begin to arise over time. Most often this happens
- when the load is exceeded
- incorrect installation of guides
- exceeding the effective service life
- deformation of individual parts during operation
The problems cited relate to the mechanics used in modern furniture to pull out drawers. There are fewer problems with the box itself and its design. Let's look at them first.
Do-it-yourself repairs are economical!
It’s not that I wanted to rub his nose in, but really, call a master for such a thing? Yes, I’d rather fix it myself, and with the money I save I’ll buy myself something nice. Looking ahead, I’ll say that the repair of two drawers cost me only 140 rubles, and by calling the phone number in the ad, the master said that just a call would cost 300 rubles plus materials and labor, a total of about 1200. My chest of drawers, of course, is not new, and four years ago, when we bought it, it cost 3500. Yes, that’s a third of its cost!
Problems with the drawer design
The most common problem is the bottom of the drawer. There are two types of drawer bottom fastening. We can safely say that 90 percent of manufacturers simplify production and make an overhead bottom that is attached to the bottom of the box. Attached along the perimeter to the sidewalls. This greatly simplifies the technology; the bottom becomes another load-bearing part, which also takes on the role of a part that forms the geometry of the box. What to do if there are problems with this type of bottom fastening.
Most often, the reason is insufficiently strong and well thought out fasteners. The bottom is attached with nails to the front and back, and it is held in place by guides on the sides. At first, this scheme works quite well, but over time the nails become loose and the bottom comes off, even if the box is not overloaded. The solution is to replace it.
Nails - forget them right away. Today only the lazy and downright stingy use them. For repairs, it is easiest and most effective to use furniture staples. A furniture stapler is very inexpensive, staples are even cheaper. If your drawer is not loaded to its maximum capacity, 8 mm staples will be enough for you. They are easier to work without getting used to, they are less deformed and go to a sufficient depth. But if you are ready to practice first and fix the bottom more confidently, take 10 mm long hardened staples. You can use hardened nickel plated ones - they are even stronger and do not rust. Afterwards the procedure is simple. We remove the old fasteners and “shoot” the bottom with staples around the perimeter. Under the guides too. They are easy to remove - they are secured with three screws on each side. In this case, you must not disturb the geometry of the box, so punch the sides sequentially.
You can use screws if you have problems getting a stapler and staples. You will need screws with a diameter of 3.5 mm. There are two generally accepted standards for the length of furniture screws of this diameter - 15 and 30 mm. In principle, 15 is enough. However, it may be that the box is made of low-quality chipboard, which is porous inside, so it is better to use 30 mm screws.
Both of the above methods are also suitable for replacing the bottom of a box - you will need to cut the material to the required size and secure it to the box box.
The second type of bottom fastening is a mortise bottom. Most often this is thin plywood, which is glued into the slots on the walls of the box. Such a bottom very rarely causes problems; in most cases they are caused by its destruction. If laminated fiberboard is used, you may encounter a situation where, due to plasticity, the glued zones simply tear out of the grooves. This “disease” can be treated a couple of times by re-coating the groove and gluing the bottom in place, but it’s still better to change it right away. This is not an easy procedure, but with some skills it can be done.
- the box needs to be disassembled;
- clean the grooves without disturbing their shape and thickness;
- order or cut a new bottom part of the required size;
- reassemble the box by gluing in a new bottom;
- give time for the glue to dry thoroughly. Do not load the box.
If the box is assembled using self-tapping screws or confirmations, this can be done easily. However, if tenon joints were used, it is better to turn to specialists for disassembly if you are not strong in carpentry. The same actions are performed when you need to replace the plywood bottom. If it is cracked, damaged, deformed or lost its appearance.
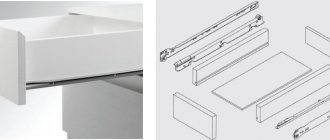
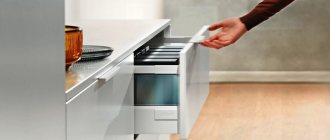
Roller guides and their “convenient” brothers – metaboxes
The advantage is simplicity, low cost, ease of installation, the design is such that the box closes under its own weight - the last few centimeters of closing are downhill. Thanks to this, such guides have become very widespread. The photo of the metabox clearly shows which part of the guide is intended for what. One is attached to the furniture wall (small parts in the photo, load-bearing), the second is attached to the drawer structure. In the case of a metabox, the second part of the set forms the entire side wall of the box. A box with roller guides installed looks like this
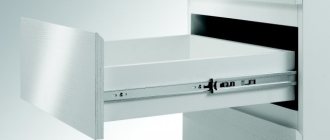
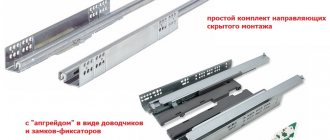
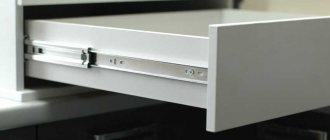
Ball guides
The second type of guides is ball guides. Or the “telescope” type. And their older brothers are “tandemboxes”. They are more expensive, but free from all the diseases of roller skates. Therefore, they are often used by those manufacturers who value quality over savings. They look like this
The ball guide can withstand many times the mass. In a roller there are two points of support - rollers on the supporting part and part of the box. In a ball bearing, there is a whole block (middle) on which small balls are located according to the principle of a rolling bearing. Plus, the thickness of the metal from which the guide parts are made is much higher. Three more most noticeable advantages are that such guides are almost impossible to install incorrectly; they allow you to pull out the drawer to its full depth and make it possible to firmly fix the drawer when closed. In addition, ball guides can be installed at any height according to the structure.
Source
Types of telescopic guides
To understand how to carefully pull out a drawer in a kitchen or other unit, you need to understand the classification of telescopic guides.
In modern furniture sets, various rail guide systems are installed for ease of use.
There are several types:
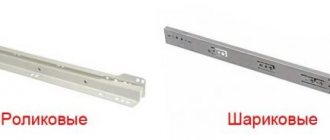
- roller and ball, determined by the type of moving mechanism. Rollers have a shorter service life, withstand much less load and become noisy over time. They cost less than ball systems;
- full or partial extension, which depends on the degree of extension.
Important! If a partial extension system needs to be repaired, the back of the dresser will be obscured from view. Such guides have a budget price.
Metaboxes have been developed based on roller systems. Tandem boxes are considered the most expensive option. The last criterion: location of installation. You can purchase products that are installed on the side or bottom of the drawer, the so-called hidden installation.
They usually cost more, but they are very convenient and practical.