Every owner of residential property wants to furnish the premises beautifully and originally, so he purchases furniture in accordance with the existing interior style. It is often quite difficult to find ready-made designs on the market that meet all the requirements and requests, so an excellent solution for each person is to independently create suitable furniture. A do-it-yourself chest of drawers is considered optimal if it has the required dimensions, consists of the required number of compartments and drawers, and its appearance will ideally match the room where it is planned to be installed.
What types of chests of drawers can you make with your own hands at home?
Many craftsmen and homeowners have learned to make chests of drawers with their own hands. This type of furniture can be assembled from wood, plastic, and different types of plywood. The chest of drawers can be made to an individual size and design, and equipped with the required number of drawers and compartments. Painting the chest of drawers in the desired color will allow you to fit it into any interior as a stylish and unique piece of furniture.
A chest of drawers differs favorably from a wardrobe in that it can be of any size and height. Dresser drawers can be retractable, hinged, open, or folding. You can store any items in the chest of drawers: from clothes and shoes to dishes and bed linen.
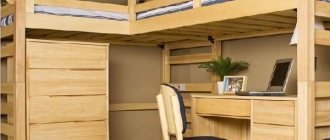
Dressers are great for storing children's things, toys and stationery. The size of the chest of drawers can be made so that the child can reach any drawer and the farthest corner.
A chest of drawers in the kitchen can easily replace numerous kitchen cabinet drawers and create an alternative to wall cabinets, which can only be accessed by climbing on a stool. In the kitchen chest of drawers you can store cutlery, tablecloths and napkins, small dishes, and household appliances. Higher boxes can be filled with items not suitable for children (stabbing, cutting, graters, etc.).
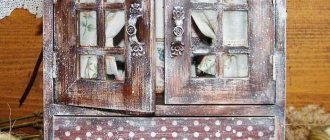
Decorating a finished product
The finished furniture design is not a very attractive thing. Therefore, it is very important to bring it to perfection through decoration. Wood is a very beautiful material that requires minimal processing. Decoration options are:
- A varnish coating that gives wood shine and also protects it from any impact.
- Use paint of any color that will blend favorably with interior elements.
- The use of coating film, which is a fairly modern method of decoration.
- In addition to all this, you can use different colors for each drawer, and also decorate them with unusual patterns. For this purpose, special stencils are sold, which are glued, then paint is applied, after which everything is opened with varnish.
When choosing the final option, it is important to consider the overall style of the room and interior items.
The design of the finished structure is optional. The main thing is that the detail fits perfectly into the overall design of the room. If you use your imagination, you can make a completely unique and unusual thing that all guests will admire.
How to make a chest of drawers with your own hands at home
The first thing you need to decide before you start making a chest of drawers is the place where it will stand. You should also decide what function the chest of drawers will perform. The further process depends on these criteria:
- determine the size,
- choose material,
- make a drawing.
Criteria for choosing a product design during manufacturing
When making a chest of drawers, after determining the purpose, you should think about the material. If you plan to store bulky items of a certain weight, it is better to choose wood as the main material. If the chest of drawers will store jewelry or clothing, you should choose certain types of plywood or plastic.
What do you need for work?
Before any type of carpentry work, you must first prepare all the tools and materials. These include:
- nails;
Preparing tools
- double-sided tape;
- handles for dresser drawers;
- set of self-tapping screws;
- boards or sheets of plywood;
- screwdriver and set of drills;
- construction hair dryer;
- a simple pencil;
- meter, ruler, tape measure or other measuring instrument;
- mounting brackets made of metal or plastic;
- stationery knife;
- electric drill.
You should also take care of safety glasses and gloves. Once everything you need is at hand, you can get to work.
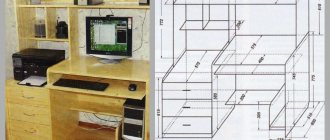
How to design a chest of drawers yourself?
Each chest of drawers is made in accordance with the place where it will be located, the overall design of the room and its purpose. The number of drawers can be any, but most often there are 4. There is also an option where the three bottom drawers are long and the top two are short.
Preparing for painting
Before painting, sanding must be done. The better it is done, the less likely it is that the tinted coating will be applied well. Since oils and glazes are transparent, putty cannot be used. The surface should already be of high quality and without unacceptable flaws.
The flat surfaces were sanded using an orbital sander, while the pilasters and milled ends were sanded by hand. For soft breeds, 180 grit is sufficient, but it is better to go up to 250.
List of necessary tools and materials for creating a chest of drawers
To start creating a chest of drawers with your own hands, stock up on the necessary tools for making furniture and working with wood. The main list consists of the following items:
- drill
- screwdriver
- stationery knife
- hammer
- screwdrivers
- square
- drill
- pencil
- ruler or tape measure
- nails
- self-tapping screws
- jigsaw
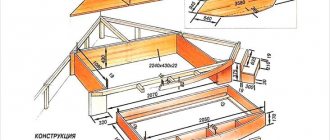
Components and fittings are prepared in accordance with the project, but most often these are 2 side walls, 1 back wall, bottom and top cover. The boxes are made of a bottom and side walls. If necessary, covers or doors are made. If the project has shelves, you should prepare them.
The result of cutting furniture panels onto a wooden chest of drawers
As a result, a set of blanks is obtained. The photo below shows mostly the details of the drawers. These are the most labor intensive pieces of my dresser. Five boxes are: five fronts, fifteen walls and five bottoms. And besides, there are many holes!
While cutting, a full 10 liter bucket filled up. The cyclone separator greatly saves vacuum cleaner bags. It can be seen in the rear view in the photo.
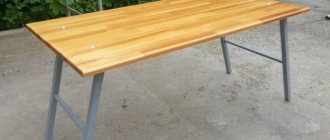
Also using a plunge-cut saw, but with a larger guide bar, I reduce the width of the panel for the table top and the bottom of the drawer.
DIY chest of drawers: step-by-step instructions
The progress of creating a chest of drawers includes the following steps:
- Creating a drawing. Preparation of materials and tools.
- Sawing the material according to the dimensions specified in the drawing. If you doubt your ability to saw material, order this service from professionals. They will cut and mark according to size.
- Marking fastening points with a pencil.
- Assembling the frame and securing it with self-tapping screws. Installation of dresser legs (if included in the project).
- Assembling boxes according to the drawings according to the fastening points.
- Installing drawer hardware guides.
- Checking the compatibility of the drawers and frame, securing the screws.
- Installation of fittings (handles, decorative elements).
The nuances of drilling and self-assembling a chest of drawers
I will provide drawings of the drilling diagram for the dresser parts.
IMPORTANT! In the drawings, the parts are shown in one position for drilling. But it is clear that they will need to be “mirrored” - the mirror frames of the dresser body itself and the sides of the drawers are drilled.
The drawing of the chest of drawers shows markings for fastening the guides, but does not indicate the dimensions. This was done intentionally to avoid confusion - after all, these holes are not through and will not be on the outside, but on the inside of the chest of drawers.
Also, the position of the fasteners depends on what guides you purchase.
- A cheaper option is roller guides. They are attached to the bottom of the box.
- A more practical and durable option is full roll-out ball guides. They are attached to the center of the side of the box.
Particular precision is not required when distributing boxes along the sidewall. The main thing is to maintain alignment - symmetrically fix the parts of the guides on the stand of the chest of drawers and drawers themselves. Mark the approximate position of the drawers along the facades so that they do not overlap each other. And then determine the most optimal position of the fastener.
The chest of drawers is attached from the inside, through the top strips, using 4x30 self-tapping screws.
The fronts of the chest of drawers are first secured with double-sided tape to ensure that the gaps are evenly distributed. And then they are also attached from the inside using 4x30 screws. Handles are installed through the front and inner wall of the drawer. You will need long screws for the handles. In some cases, the length of the screws may be too short or too long. Then they are either recessed, countersinking the holes, or washers are placed (can be metal, can be silicone).
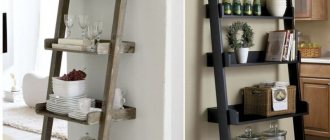
What decor can be used for homemade chests of drawers?
Decor for homemade chests of drawers is used in accordance with the overall design of the room, other furniture, or according to the preferences of the owners.
For example, when using wood to make a chest of drawers, professionals advise using stain, varnish or paint to match the furniture, walls, and curtains.
Hand-applied designs, decoupage, and decorative elements made of wood, plaster, and metal look good on the surface.
If desired, the chest of drawers is upholstered with fabric, covered with film, paper or wallpaper.
Types of fastening of wooden parts
If you are planning to create a structure from an array yourself, you need to know the common methods of connecting elements. Manufacturers also use them when assembling furniture in workshops. There are:
- Spiked. Flat root tenons are cut out on a machine or with a hacksaw or milling cutter. A drill is used to drill out a socket of the required size. The tenon is adjusted to fit it so that their connection is close to each other.
- Corner. A metal or plastic corner is attached to the joints of the parts with self-tapping screws.
- Confirmat, metal tie. It should not be used for furniture made of chipboard, since it spoils the surface at the joints.
- Minifix. Refers to the quick installation of product parts. Eccentric coupler. It has gained popularity in furniture production due to the ability to connect and disassemble parts several times without damaging their surface. Not suitable for hand work.
- Rafix. Used in the assembly of built-in structures and shelves. This fastening is visible only from the inside. Allows you to repeatedly disassemble furniture into parts. Strong but expensive connection.
For self-assembly of furniture, it is recommended to use a tenon fastening or a metal corner.