Not quite what you need? Design as you like!
Use our design software to create your own combination
Stoppers prevent the drawer from falling out of the frame.
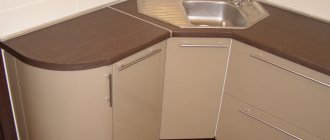
Thanks to the front panel finish, the module can be placed in the center of the room.
Plastic pads to prevent the tabletop from slipping are included.
This product has been tested and approved for household use.
Designer
Wipe clean with a cloth dampened in a mild detergent.
Wipe with a clean dry cloth.
Materials
Main parts/Front panel:
Particleboard, Acrylic paint, Film, ABS plastic
When purchasing cabinet furniture for home and garden in a store, many are guided by the principle of simplicity. I chose something more or less suitable in size, paid, and received it delivered to my home. All that remains is to assemble. It's good that the kit always includes assembly instructions. However, for many this becomes a problem. Without experience and appropriate understanding, simple assembly turns into torture.
To simplify the task for such craftsmen, we will analyze the assembly process using the example of a bedside table with drawers. Knowing how to assemble a nightstand with drawers will help you handle other items as well. After all, all other furniture is assembled in the same way.
Preparation for work on assembling the cabinet with guides
The instructions below describe the process of assembling a cabinet with guides, the overall dimensions of which are 85X40X50cm. The design of this piece of furniture consists of five drawers of the same size. The dimensions of the front of each drawer are 14x39.7 cm.
In order to significantly simplify the work, lumber can be sent to the nearest carpentry shop for sawing. Following your calculations and the proposed drawings, specialists will manufacture all the elements of the cabinet for you, and also treat their ends with high-quality self-adhesive edging tape. As a result you will get:
- Front part of the box (14X39.7cm) – 5 pieces;
- Drawer sides (11X45cm) – 10 pieces;
- Front and back walls of drawers (11x31cm) - five pieces each.
It will be useful: How to decorate corners in an apartment
To start assembling the structure, you will need a relatively small set of tools, which includes:
- Powerful screwdriver or drill;
- Drills for woodworking (5 and 8 mm);
- Screwdriver bits;
- Hex bits for furniture screws;
- Roulette; ruler or small building level;
- Square and pencil;
- Knife;
- Sandpaper of different fractions.
When choosing guide elements, give preference to roller-type mechanisms. They are not very cheap, but they last a long time. Such fasteners are not distinguished between right-handed and left-handed. You need to buy ten pieces of roller guides 45 centimeters long. In addition, for high-quality assembly of the cabinet you will need:
- Self-tapping screws for woodworking (4X16mm and 4X30mm);
- Furniture screws (5X70);
- Five furniture handles for drawers.
Tools and materials required for assembly
Before you begin assembling furniture, in order to avoid surprises, you should check the complete set of purchased materials and fasteners contained in the box . The name and quantity are indicated in the attached instructions. Typically, the kit contains the following parts.
- Wood plywood slabs, cut to required sizes . Walls, lid, base of the product, as well as front, side and back parts of drawers. The bottom of the drawers and the back wall of the bedside table are often made of thinner material.
- Legs or wheels for the base.
- Elements for fastening parts together: wooden dowels, special screws for wood, self-tapping screws and small nails.
- Accessories (handles and guide rails).
Tool you will need
To assemble a cabinet, take care of these tools.
- Phillips screwdriver for screws . If the manufacturer suggested using a special Euroscrew for fastening, then the kit should include a hex key .
- Hammer.
- Screwdriver.
Installation of accessories
A DIY cabinet will be convenient and pleasant to use if it is equipped with special fittings. This includes handles and hinges, and may also have other elements depending on the shape and design of the bedside table. For the bedroom you need to choose fittings that will fit well into the existing interior. Additionally, it should be convenient to use so that property owners enjoy using the contents of this furniture.
The procedure for assembling the bedside table
If you do everything carefully and in order, very little time will pass until you see the result. And the process itself is quite simple.
Assembling the base
Select the slab marked in the instructions as a base. Distinctive features: it is smaller than the lid and on the bottom plane there are holes for attaching legs .
Then, using a screwdriver or screwdriver, we secure the legs (wheels) to the plane of the base with self-tapping screws.
In the opposite plane , insert wooden dowels into the finished holes and hammer them in until it stops.
Walls and cover
Preparing the walls before assembling the housing
Before proceeding with final assembly, guide rails should be attached to the walls of the cabinet . Using a screwdriver (screwdriver), we screw self-tapping screws into the holes pre-marked by the manufacturer , securing the rails with them .
There are three on each side.
The simplest cabinet with drawers
This simple cabinet is versatile and can be used both in the hallway and as an addition to a bed for storing things or, for example, a kitchen couch. It's easy to make and the only tricky part you'll need is a pull-out drawer system. This step-by-step guide will show you that installing drawers is easy and fun.
It will be useful: How to make a path from crushed stone in the country
The cabinet is equipped with three drawers and silent fittings. The figured drawer fronts have the same simple design as the cabinet itself. Painting also won’t take much time and effort, because it’s all about choosing the right protective and decorative coating. Read about all this further.
To make a simple cabinet with drawers you will need:
Materials:
– 2 longitudinal and 8 transverse bars for making the frame; – two sheets of plywood for the side parts of the cabinet; – a large sheet of plywood or glued furniture board for the base of the cabinet; – 5 plywood parts for each box; – wooden slats for making cabinet fronts, as well as furniture drawer fronts; – 3 drawer systems; – furniture screws or wood screws; – nails for plywood; – furniture paint; – furniture varnish and glue for working with wood, if desired.
Tools:
– hand-held circular saw or jigsaw; - electric drill; – screwdriver with a set of bits; – grinder; - Miter saw; – construction tape; – hammer or pneumatic nail gun; – pencil and square; – paint roller for painting, brushes.
Step one: decide on the dimensions and prepare a drawing
The dimensions of such structures are individual and depend, first of all, on its purpose. Determine the dimensions in your case and, using the drawings provided, prepare your own drawing with detailed dimensions of the parts.
Step two: tips for choosing materials
The frame of the cabinet is made of bars and will support the weight of three adults. You can use used lumber by pre-planing and sanding the wood.
For the manufacture of facades from natural wood, any trimmings of slats of the same section are suitable.
The lining of the cabinet is made of plywood. For the main part of the seat, use plywood of a suitable thickness if you plan to place a large load on the cabinet. Plywood should have a pleasant smell of freshly sawn wood, which indicates the high quality of the adhesive components used in the process of its manufacture.
Choose a paint of the shade you are interested in. It must have high abrasion resistance, which furniture paints usually have. If you plan to carry out painting work in a residential area, choose water-based paints. They are practically devoid of unpleasant odor and are the least toxic.
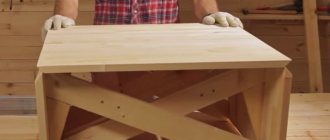
Step three: assembling the cabinet frame
Mark the block and cut it into individual parts. To ensure the cut is as straight as possible, use a miter saw. This will greatly facilitate all further work and the assembly process.
Join the parts on a flat surface and check all dimensions. Mark the mounting locations and drill holes for the screws. Assemble the frame using a screwdriver and clamps for easy fixation of the structure. Also use a square. It will provide a right angle when assembling the frame.
Assemble two frame parts in this way. Next, they will be fastened together with plywood panels. Cut the plywood using a hand saw or jigsaw. The author uses a guide to ensure an even cut.
Secure the side parts of the cabinet with self-tapping screws. The frame is ready!
Step five: installing drawer systems
The simple design of the cabinet will allow you to install a system for drawers simply and quickly. First, determine where the fittings will be fixed on the drawers and cabinet. Mark the attachment points with a pencil so as not to confuse anything. You can mark with lines in order to control the angle of fixation of the guides.
Using regular self-tapping screws, secure the fittings to the walls of the cabinet and to the sides of the drawers. In order to maintain the same indentation from below, the author selected a backing strip that was suitable for the height.
Place each drawer in its own compartment and make sure it opens and closes easily.
Step six: assembling the front of the cabinet and drawers
The facade of the cabinet was conceived by the author from natural wood. It is needed to hide the joints of parts and make the front part of the cabinet more attractive.
Saw the slats into pieces of the required length and make diagonal holes to connect the parts together. Assemble the facade using self-tapping screws. In order to facilitate the assembly process, the author uses clamps, securely fixing the structure in place. This will allow you to carry out all the work alone.
Assemble the perimeter of the facade and try it on. Mark right on the spot where the cross bars will be attached. Secure them with self-tapping screws.
Using the same principle, make the drawer fronts as shown in the photo. Try them on the overall structure and make sure that you leave a gap of a couple of millimeters between the two facades.
Step seven: assembling the cabinet and painting
The facades are ready, all you have to do is secure them and you can move on to the next step. Use nails for fastening. They are less noticeable and quite sufficient for fixing decorative elements, which are facades.
Use a sander to go over the details of the cabinet, preparing the surface for painting. It should be smooth and clean. Apply the first coat of paint using a paint roller and let it dry completely. Apply the paint again and leave until completely dry. Some of today's high-quality furniture paints do not require varnish fixation. This is usually determined experimentally.
However, for reliability, you can apply one or two layers of durable furniture varnish. Try to choose paint and varnish from the same manufacturer. This way you can be sure that they are fully compatible.
Cabinet structure
Any cabinet belongs to the category of cabinet furniture, in which the interior space is functional. Its body can accommodate several drawers. But, given that we are talking about a piece of furniture that cannot be higher than a table, there are usually no more than three such drawers that would be convenient to use. The cabinet can be attached, but in our case, preference was given to the more convenient option on casters.
Cabinet body dimensions
- You can see the most optimal dimensions of the product in the photo above. Well, the height of the drawers should be determined by dividing the height of the cabinet by three.
- Do not forget to take into account the necessary gaps between them, which are optimally 3 mm. That is, if you have three drawers, then you need to take into account four gaps: one at the top and bottom, and two between the drawers.
Hand drawn sketch
In any case, work must begin with a drawing on which all dimensions will be calculated and indicated. It will help not only to better navigate the work, but also to accurately calculate the amount of consumables and accessories.
Prices for various options for desk cabinets
We nail the fiberboard bottom
From the bottom of the resulting box we nail a structural part made of fiberboard, having previously aligned the quadrangle along two diagonals
It is very important that the diagonal sizes are equal! Otherwise, you will have problems using the furniture box; it will constantly jam when moving, and will not fit completely
We nail the fiberboard bottom
The principle of assembling the box
A box without a front element, which is assembled first, consists of a bottom with three walls screwed to it. In factory cabinets, the bottom is made of hardboard (hard fiberboard). This material is chosen not because it is better, but because it is cheaper in mass production.
1. When working independently at home, it is much more convenient to use the same material for making the bottoms as for the walls - 16 mm thick laminated chipboard. One sheet, the area of which is about 4 m², is enough for the entire bedside table.
Fastening the side walls of the box with confirmations
Fastening the facade to an eccentric screed
2. Such thick sheet material is used to ensure that the connections of perpendicularly located elements, which are made on confirmations, are as strong as possible.
3. Confirmats are so-called euroscrews with zinc coating, which have a blunt shaft at the end and a countersunk head. These hardware are very convenient because they do not require scrupulous precision markings.
Note. Although the confirmations go into hiding, the places where they are installed remain visible. This is unacceptable for facades, so for their fastening you should use eccentric ties, for which you need to very accurately mark.
See below for how this is done.
Leather covered bedside table
An easy-to-make but interesting-looking bedside table can be made from chipboard and eco-leather. The design is quite simple. The cabinet will have only two drawers.
Step 1. The first thing you need to do is make a simple drawing of the future bedside table and put all the dimensional parameters on it.
Simple design drawing
Step 2. Next you need to assemble a frame from pieces of chipboard. They need to be sawed (remnants from a large sheet will do) and connected to each other using self-tapping screws.
Frame made from chipboard pieces
Step 3. Then you need to make the drawers themselves from the remnants of the chipboard, in this case in the amount of two pieces. Also, as in the previous case, it is important to correctly install and adjust the drawer guides.
Drawers installed
Photo of the result of the work
Step 4. Since the bedside tables will be covered with eco-leather, they must first be covered on the outside with thin foam rubber, which can be secured to the bedside table using a construction stapler.
The cabinets are covered with foam rubber
Step 5. Afterwards, the frame needs to be covered with facing material. You need to pull it tightly enough so that the eco-leather sits tight. Step by step, you need to fix the material also with a construction stapler, but in such a way that the staples are not visible to the eye.
Covering with face material
Staples should not be visible
Step 6. Using the same principle, you need to cover the front sides of the drawers.
The front side is also covered
Step 7. These are the bedside tables you should get.
Finished cabinet
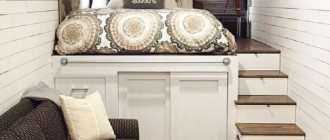
This is what the nightstands look like next to the bed
Video - Making a cabinet from plywood
Video – Wooden bedside table
A bedside table is that type of furniture that, it seems, you can do without, but still its presence significantly increases the level of comfort, and also makes life in the house much more convenient, cozy, and enjoyable. So you shouldn’t give it up even to save money. Moreover, creating a bedside table with your own hands will cost very little.
Completion of the assembly stage
The principle of assembling the cabinet itself is not very different from making a drawer. The sides and rear wall are attached to the bottom in the same way. The front walls of the drawers will form the façade - these are what we will be installing now. To do this, the body of the cabinet must be assembled without the back wall, and the drawers must be put in place.
Table 3. Assembly
| We decide on the position of the running mechanisms, which can be either from the bottom of the side wall of the box, or from the top or in the center. | |
Step 2 – marking on the drawer for the guide | Make markings on the side of the box. |
Dimensions and functionality
Before you start creating a homemade bedside table, you should decide on its size and functionality, and also decide what material it will be made from. So, in order to decide what size to make a cabinet, you need to measure the available free space near the bed and pay attention to the dimensional parameters of the room. If the space allows you to install any cabinets, then you can make them, adjusting them to standard sizes. In any case, you need to make a drawing of the product and apply all the necessary dimensions to it. Having a drawing will greatly simplify the work in the future.
Bedside table drawing
Advice! If there is not enough free space in the room, it is recommended to install simple hanging bedside tables. They will not load the room and visually will not take up much space.
As for functionality, it is important to decide what structural elements the cabinet will have. So, these can be shelves, drawers, doors. It will be more convenient to use a cabinet that has a door and an upper shelf that is not covered by it. But, however, it will be more convenient for someone to constantly pull out the drawers. By the way, making a cabinet with drawers is not much more difficult than making a simple one with a door.
Small bedside tables for the bedroom fit perfectly into the interior of small rooms
On a note! Cabinets can only have shelves that are not closed by a door. This is the simplest design option, functional and easy to use, but often requires cleaning, since the inside of the cabinet is not protected from dust.
How to assemble a bedside table yourself?
A bedside table is a multi-functional item that is essential for any bedroom. An alarm clock, a mobile phone, glasses, a mug with a drink, a lamp - all these things are conveniently placed on its surface and are always at hand. The bedside tables are supplied disassembled.
Scheme of a bunk bed with a wardrobe.
You can, of course, order furniture assembly services in a store, but there are no particularly complex parts in it, so you can assemble the bedside table yourself.
In addition, manufacturers usually include instructions and an assembly diagram. Before you start assembling the bedside table, carefully read the list of parts and check that the fittings are complete. Inspect all decorative parts for chips, cracks, unpainted parts, and defective parts. If everything is in order, you can start working. Required tools:
- Screwdriver.
- Hammer.
- Hex key for Euroscrew (usually included in the supplied fittings).
The assembly principle for all models is approximately the same.
- Side walls 2 pcs.
- Bottom 1 pc.
- Back wall 1 pc.
- Cover 1 pc.
- Legs 4 pcs.
- Drawers or door with hinges
- Set of accessories
What tools are needed
To independently assemble the kitchen sections and install them on site, you will need the following tools:
- Screwdriver with attachment and bits for screwdrivers. If you don’t have a power tool, a regular set of screwdrivers can replace it.
- Electric drill with drills or brace (hand drill).
- Hammer drill (if there is a concrete or brick wall).
- A jigsaw or grinder with wood cutting discs. If you don't have power tools, a set of hand saws will do.
- Hex key for installing fasteners.
- Auxiliary tools (hammer, mallet, measuring tape, level).
To assemble the headset you will need tools.
The selection of tools is made based on the method of fastening all elements and the availability of fittings.
Assembly drawing of a chest of drawers
If you can do without a 3D project, then a drawing must be made. After all, it is according to his scheme that you will assemble your chest of drawers.
To create an assembly drawing, you can use a pencil and a ruler, but it is better to do it electronically using special drawing programs Compass 3D or AutoCAD.
Such a drawing is also convenient because in the program itself (Compass 3D), using the “segment” tool, you can easily determine the dimensions of any individual part that we will need to draw up the detailing of the product. Details on how to use the program are written here.
The drawing of the chest of drawers must show at least two views: “front” and “side” or “top”. This will give you a complete picture of all the necessary details and indentations.
Important dimensions and indentations:
- Plate thickness (chipboard and MDF) – 16 mm,
- The thickness of the guide (between the side of the drawer and the wall of the chest of drawers) is 13 mm,
- The gap between the back wall of the chest of drawers and the back wall of the drawer is 10 mm minimum,
- The length of the drawer is measured along its side and when determining it, it is based on the length of the guides (from 200 mm to 800 mm, in increments of 50 mm)
- Size of inset facade: from the total dimensions 3 mm for the gap and 2 mm for the edge (1 mm for each end).
As an example, you can download the drawing of the chest of drawers that we discuss in this article.
Download link: