Vadim
1455 0 0
Vadim December 1, 2018
Handmade wood carving is always exclusive. It is believed that such work is the domain of a limited circle of craftsmen, however, you can master the basics of the profession quite quickly. Let's try to dispel the myths and go all this way from the idea and creation of a drawing to finishing the finished table with our own hands.
A carved solid wood table is not only a useful thing and an indicator of style, but also a good hobby.
How to make table legs with your own hands
With a wooden tabletop at minimal financial costs.
The house has been rebuilt and renovations are nearing completion. The kitchen was also ready at that time. The question became about the kitchen table. The shops were looking for wooden tables. Normal tables with a wooden tabletop (not chipboard) cost from 3,000 rubles. After looking at the whole thing, I decided to make a table with my own hands.
To make the table I bought:
It took 1,500 rubles for everything.
The dimensions of our future table are 60 cm by 160 cm (half a furniture panel), based on the size of the kitchen), so the cost of the table was set at just over 1000 rubles.
Having cut the tabletop to the size of the table, I began sawing the ends of the beam at 45 degrees.
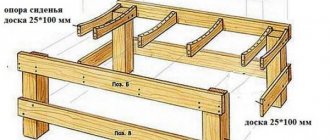
The timber is necessary to give rigidity to the tabletop. We run it around the perimeter of the table from the bottom side. Without a block, the tabletop will sag.
We apply the blanks of the bars to the tabletop and check that everything fits together without gaps.
We attach the beam to the tabletop with screws.
On the back side of the tabletop we mark the mounting locations for the legs and holes.
We drill holes in the tabletop for screws. Drill diameter - 10 mm. The diameter of the screw nut is 12 mm. To make screwing the nut easier, you can set the tap stroke to 12mm. The tap pitch is equal to the thread pitch on the socket nut.
We do all this with four legs.
The table is ready and standing on legs. Let's start sanding and varnishing it.
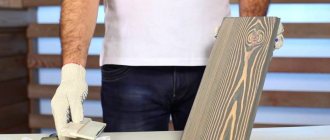
After careful sanding, I began to varnish the table.
Our varnish was matte (we used it earlier to cover the floor). After applying the first layer, let the varnish dry. After drying, the pile rises. We go over it again with fine sandpaper and cover it with a second layer of varnish.
If necessary, after the second layer we also sand it with sandpaper and varnish the table, as I did.
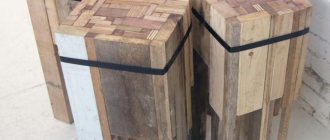
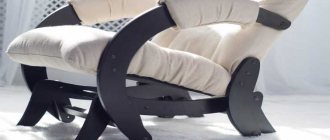
Instead of metal legs, you can also use square beams or ready-made balusters, which are sold ready-made.
Probably when I make another table, I will use balusters. They come in different sizes. It is advisable to use balusters with a diameter of more than 70 mm. They are also secured with screws.
Perhaps the main attribute of a room for eating - a dining room or kitchen - is the kitchen dining table. When choosing any furniture for a small-sized kitchen in a typical city apartment, you have to make a compromise between the free space in the room and the spaciousness and comfort of the furniture, this fully applies to the choice of table. It is not easy to find a small kitchen table with the desired shape of the tabletop in stores; custom-made ones promise considerable additional costs. There is a decent way out of the situation - making a table with your own hands.
For a room with an area of 6-8 sq.m., probably the most suitable tabletop size will be in the range from 800x500 mm to 1200x600 mm, with a standard height of 750 mm from the floor. The elongated shape of the tabletop - oval or rectangular - allows you to place the table along the wall, saving free space.
Selection and purchase of materials and accessories.
When making a kitchen table, it would be the right decision to use a factory-made material intended for the same purpose, namely a post-forming countertop made of chipboard. These countertops are covered with wear-resistant decorated plastic, used in the furniture industry in the manufacture of kitchen sets, supplied in the form of sheets about 3 m long, 600 mm wide, 26 mm or 36 mm thick (standard). Postforming countertops have a low price. Their front overhang (end) has an aesthetic semicircular shape and is also covered with plastic. Standard fittings are available for them: end and connecting strips, edges for processing ends, couplers, etc. There is no need to purchase a whole piece of kitchen countertop just for one third of its length. The required piece can always be found (purchased for a proportional fee) in furniture workshops, where they accumulate in large quantities as remnants from the production of kitchen sets. There, in the furniture workshop, you can immediately ask to cut the part on a format cutting machine to obtain a rectangular workpiece with the required dimensions.
Postforming type tabletop.
However, chipboard countertops have one feature - they have only one or two plastic-covered overhangs along the length of the canvas. For the table, we need to have all the ends processed (on all sides). For this reason, it will not be possible to directly (without processing the ends) use ready-made kitchen countertops. Moreover, you will have to cut off the front factory overhang. The open ends of the chipboard must be treated taking into account protection from water ingress, not forgetting the aesthetic appeal of the treatment. There are two main ways: apply (glue) a special edge tape or use PVC-based furniture edging. We will take the second path, as it is the most practical from an operational point of view and forgiving some minor mistakes of the master. We will use furniture edging with sides (girths), this will not only give the tabletop a more solid appearance, but will also provide additional protection. A piece of edging of the required length can be purchased at a furniture fittings store. A T-shaped (with a central tenon) PVC edging with girths is required for chipboard with a thickness of 25 mm or 32 mm. When purchasing a 25-mm edge, you must first make sure that it can be put on a 26-mm end without any problems. The use of a 32nd edge is also quite acceptable and gives the tabletop a visually thicker edge.
T-edge with girths (sides) in section.
Another important point is the legs (supports). Today there is a wide selection of both piece supports and ready-made bases for tables. The most common solution is a round leg with a height of 710 mm and a diameter of 60 mm. Legs of this type are collapsible, adjustable in height, have a low price, are easy to install, and come in several external coating options (shiny, matte, painted in various colors). If you need to transport or compactly store the table, it can be easily disassembled. Legs are also sold in specialized furniture stores. As a rule, the manufacturer packs them in packs of 4 pieces, unassembled. When purchasing a whole pack, the kit must include a hex key.
Set for making a table: a piece of kitchen worktop, four legs, edging.
The process of making a table.
What tools are needed for this have already been described in detail; we will not repeat ourselves; we will briefly list the main stages and dwell on some of the nuances.
Step 1. Apply markings.
On the front (working) surface of the tabletop we apply markings with a pencil according to the design of the future table. All roundings must be made with a radius of at least 60 mm, in order to avoid changes in the color of the edging in places of sharp bends (depending on the edging manufacturer).
Applying markings for rounding corners on the front surface of a rectangular workpiece.
Step 2. Give shape.
According to the markings, leaving a small reserve of 2-3 mm, we cut off the excess. The jigsaw file must have the opposite (reversible) direction of the teeth (see article about), in order to avoid chipping the plastic coating, even though the edge with its girths can partially hide small chips in the cut. Use a belt sander to ensure that the contours of the table top exactly match the markings.
We fasten the legs
How to secure the legs of a steel bathtub? So, we have already decided what is best on a self-adhesive basis. Such supports are shaped like the letter “P” with some deflection at the base. They contain screws for adjustment with plastic tips. The most reliable set of legs for a steel bathtub has smaller supports and longer adjustable bolts.
Since metal products are not very weighty and can tip over under the weight of water or the weight of a person, additional support can be made for them in the form of laying blocks or bricks. Naturally, this support is installed on the outside of the equipment.
After all the basic work on installing the plumbing fixture has been carried out, the brick is covered with tiles, so its original appearance does not play a special role. If you intend to make such a support, then be sure to leave space below for free access to the siphon.
To install the legs on a steel bathtub, you must perform the following operations:
Preparation
It is necessary to prepare a place for installation of equipment. It is immediately necessary to organize conclusions for the sewer drain and the future mixer. The next step is to treat the walls with moisture-proofing agents. If the angles between the walls are not straight, they need to be aligned. After which you can begin installing the plumbing fixture.
Installation of legs
Tip: To ensure that the legs fit very well to the bottom, you can manually adjust the depth of the channel deflection. In any case, it is advisable to do this procedure not under the bathtub, but somewhere off to the side on a substrate.
Tip: To ensure that the protective layer comes off easily from the lining, it can be heated with a construction hair dryer or a regular household hair dryer.
Adjusting the bath by level
Wood coating
Then the wood is coated with a special varnish, which allows the material to be preserved in its original form and protected from moisture and mechanical damage. As an option, you can use water-repellent varnishes; they are considered a fairly reliable product. If you accidentally spill water or another drink, the surface of the countertop will remain unharmed.
Today, the choice of varnishes and paints is very wide: from transparent to dark, matte and the brightest. In addition, the right varnish will make the table an attractive piece of furniture.
Sink mount
The final stage of installation - attaching the sink to the countertop - is carried out in the following way:
The installation diagram for the countertop with special grooves, as well as the installation diagram for the sink and hob, are presented in the video.
If you are assembling a kitchen with your own hands, then at each stage you need to remember that all joints: between parts of the countertop, between the sink and the countertop, between the wall and the countertop, are sealed to protect the countertop from moisture.
If the table wobbles, it means the binding has come loose.
Necessary materials
The materials that are used to make tables are very different; we will tell you about some of them.
- Solids of different types of wood are suitable for this, for example, conifers, oak, etc. If you are a novice craftsman, it is better to use pine, as it is easy to process. It should be remembered that such furniture fades, absorbs odors and liquids, and does not tolerate temperature changes well. On the plus side, the material is environmentally friendly, durable, and looks elegant.
Solid pine for making a table with your own hands
Chipboard is an inexpensive material option for making a dining table
MDF is suitable for making a table, it is of higher quality and environmentally friendly
Furniture board - square or rectangular sheets of wood, which are made by gluing together wooden blocks along the width or length
Stainless steel products are easy to maintain, durable, practical, and versatile in use.
These materials are suitable for both the tabletop and legs. They also make plastic, chrome-plated, and forged legs. When choosing, rely on your preferences.
Chromed furniture support for tables with side fastening
Coffee table with forged legs
Drawing
Regarding the drawing, you need to determine three indicators for yourself: the height of the table, the number of supports, the size and cross-sectional shape of the legs. In order to determine these characteristics, it is worth analyzing what kind of table you want to get as a result? Will it be a dining table, an outdoor table, a work table, a coffee table, or even a bar counter? the height depends on the intended purpose .
The number of supports is made depending on preference, but do not forget about the purpose. It’s hard to imagine a dining table for a large family on one or two legs.
One leg fits perfectly under countertops with a cross-section that fits into a square. In this case, it will have to stand not on its own section, but on an additional support.
Next comes the choice of section, which dictates the thickness and shape of the leg.
Advice . The supports should not be too thin or too thick - this will all be non-functional and show bad taste.
When constructing a drawing, you need to take into account the thread, if any, and the change in cross-sectional shape along the length of the support.
Fastening the table legs
The legs of the table are attached to the sides of the supporting frame, and the tabletop is, in turn, attached to them. In order to ensure a tight connection between the drawers and the legs and to compensate for the shrinkage of the wood due to fluctuations in humidity, the following fastening methods are used.
Joiner joint tenon-socket
Advantages : high strength, lack of additional fittings and unnecessary fasteners, ease of manufacture.
Disadvantages : the connection is non-separable and does not compensate well for shrinkage.
Wooden corner ties
Advantages : proper connection strength, the ability to disassemble, good compensation for seasonal deformations of wood, an alternative to purchased fittings.
Disadvantages : difficult to manufacture, rarely used for mass production of furniture.
Connections on dowels
Advantages : reliable carpentry connection without visible fasteners, as simple as possible to manufacture.
Disadvantages : inseparability, poor compensation of deformations.
Metal corner ties
Advantages : they perfectly compensate for shrinkage, are easy to disassemble, provide a permanent tight connection, and strengthen the entire frame.
Disadvantages : relatively labor-intensive installation technology, the presence of protruding metal elements under the table cover.
Professional furniture repair is quite expensive. Therefore, people often try to produce it themselves. Every craftsman should know how the countertop is attached to kitchen tables, because these products fail especially often, especially under intense loads. For successful work you need to choose the right tools and materials. It is important to clearly understand the step-by-step algorithm of actions.
Design developments
To create exclusive furniture requires a certain skill, perseverance and the ability to use both modern and familiar technologies.
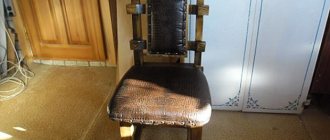
Carving on legs will help the master to express his intended image on wood
You can interestingly combine glass and wood
Transparent countertops are becoming more and more popular.
All the beauty of the supports is visible under the glass tabletop
The inclusion of bright colors allows you to choose a table for Art Deco, kitsch, or simply make suitable furniture to match the interior.
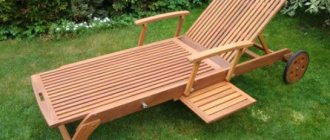
We make a beautiful and strong country table with our own hands
Achieve a horizontal position of the countertop by adjusting the outer legs of the kitchen set. Then unscrew the remaining supports so they sit firmly on the floor.
Installing legs on a kitchen set with your own hands is not difficult; it requires care and accuracy.
A folding table on a balcony or loggia is a very rational thing. You can read a book behind it. Sit with friends with a bottle of beer. Or drink a cup of coffee.
This article is dedicated specifically to folding structures. Such tables are often confused with stationary ones. In the photo on the Internet when unfolded, both the first and second ones are very similar. But if you take a closer look, the transformable table is more practical. It changes position and takes up virtually no space on the balcony or loggia.
There is only one way to fold at the wall tables on the balcony. When folded, they are pressed against the wall of the loggia. But the mechanism that is responsible for fixing the tabletop makes a big difference.
Convertible table with leg
Like all subsequent types (with the exception of tables with brackets), in this design the tabletop hangs on hinges fixed to the wall. When you lift it to a horizontal position, you simply place the leg as a support from below. And that’s it, the tabletop is holding.
The legs are often made separate, not connected to the main part. Typically, they fit into a deep hole at the bottom of the countertop. The essence of this design is that the folded table hangs as close to the wall as possible. Its device is very simple and reliable.
To prevent the support from being lost, the mechanism was improved. It was simply screwed to the bottom of the table. Such a support has, on the one hand, a hinge, and on the other, a stop. The supporting part is a recess or a piece of lath screwed to a vertical surface with self-tapping screws.
These legs can be attached to the wall. And it is fixed in the recess of the tabletop. As they say, change does not change the essence.
Mounting methods
The legs of the table are attached to the sides of the supporting frame, and the tabletop is, in turn, attached to them
Many craftsmen know that improperly secured legs are the root cause of the table swaying and tilting. There are adjustable mounts that can correct a large percentage of tilt, but quality assembly is paramount.
There are several options for attaching legs to tabletops:
Attaching the leg with surface plates
Attaching the Legs with T-Nuts
An option for attaching the table top to the table frames without using additional fittings using screws
Using small metal Z-brackets is another popular way to secure a countertop.
| Fixation with surface plates | Let's say you bought legs without the appropriate fittings. To install them, you will need eye bolts for larger tables and threaded dowels for smaller ones. |
| Fixing with T-nuts | This mounting option is suitable if you intend to restore the front surface of the table and thus give the interior an updated look. You should have T-nuts, eye bolts and eye bolts available. |
| Screw mounting | This is a common and time-tested method of attaching the table surface to the drawers without the use of auxiliary fittings. Suitable for classic furniture. |
| Application of Z-shaped holders | The use of small iron Z-fasteners is another popular method of fixation. The main advantages of this method are low cost, simple and reliable installation. |
| Use of wooden clamps | An easy and durable method of attaching a tabletop without using commercial hardware. They are similar to Z-shaped holders. They are made from any scraps; it is enough to observe the orientation of the fibers. |
| Using Figure Eight Holders | These metal fasteners are widely used in securing countertops. They come in two types - with washers of the same and different sizes. |
| Application of spacers with grooves | In this case, 2 or 3 auxiliary spacers with rectangular grooves, the length of which is 10-15 mm, are attached to the frames of the kit. |
Cut out the Leg Shape.
Using a band saw, cut out the profile of the front and back of the first side of the leg. Be sure to leave bridges intact.
When the front side and back of the leg were cut out, many of the line markings on the second side of the leg were removed. These lines will be needed when we cut out the second side. Attach the template and complete the lines.
Turn the workpiece 90 degrees and make a cut on the second side of the leg. Notice how the bridges support the base of the leg while cutting. Cut carefully. The goal is to remove as much material as possible, as cleanly as possible. This will reduce the amount of manual work later.
The bridges are cut after the leg profile has been completely formed.
Here are the table legs after making the cuts on the band saw. As you can see, the products have curves and a general shape, they just need some refinement. This is where things get interesting.
Table with folding support
Supports are usually a stationary thing.
They have a triangular shape or close to it and work in the same way as the upper part itself - on hinges. You lift the lid and move the support to the side. Sometimes it is fixed, for example, with a dowel + recess connection. Magnets or ball fasteners also serve as fasteners.
These tables are reliable and beautiful, but unlike options with a removable leg, they are not as compact. The thicker the tabletop and the leg itself, the further such a table is moved away from the wall. For example, a table with a removable leg extends beyond the wall by 2-3 cm, and a table with a flat support by 6-9 cm.
This difference often plays against such a transformer.
What to make of: wood or metal?
The first step when approaching the manufacture of legs for a future table is to choose the appropriate material . The material determines how functional and reliable the table will be, and these, by the way, are the two most important criteria for furniture.
What should you start from when choosing what to make legs from? There are three options:
Plastic . It is very problematic to make supports for the tabletop from plastic yourself.
In addition, plastic legs do not have a high level of strength and reliability - they may not withstand impact and may crack. This material is chosen as usual for children's furniture and for finished products.
- Metal . As for metal, it is considered the most reliable, functional and aesthetic. Designer furniture is increasingly placed on chrome supports and looks very beautiful.
- Tree . It is as durable, reliable, looks designer as metal, and is also easy to process. But there is a risk that the wood will crack.
Table with folding arms
Over the past ten years, the industry has begun to produce mechanical brackets for folding tables.
The material for them, as a rule, is iron, ordinary iron, less often stainless steel.
There are usually not many colors in stores; you can find black, white, chrome-plated mechanisms. But there are a great many designs.
The table operates on brackets without hinges. Or rather, there are hinges, but they are implemented inside the bracket.
One part of the bracket is attached to the wall, the other to the tabletop. When the table cover is lifted, the mechanism opens 90° and locks itself. The moment of fixation is difficult to describe on paper. So let's look at the photo.
To lower the lid you need to pull it up or pull the lever.
Finishing
In order for the product to last for many years, it must be processed. Legs made of chrome cannot be processed in any way, but wooden products must be properly processed.
In order for a wooden leg to serve faithfully for a long time, after manufacturing it must be treated with sandpaper . This is the polishing stage. After sanding, open with varnish or stain . Wait until dry, sand again, then re-open. Repeat this algorithm of actions several times.
Advice . The processed product takes on a marketable appearance and lasts longer.