The countertop is the main attribute of any kitchen. It takes on the main load during any kitchen manipulations. But if the surface of the kitchen countertop has become uneven and covered with indelible stains, it is not necessary to immediately buy a new one.
Learn how to make your own countertop and avoid unnecessary costs.
Do you need to make a new countertop yourself?
The tabletop of an inexpensive kitchen table is made of laminated chipboard, which suffers from typical disadvantages:
- There are greasy stains from cooking marks and scratches from knives on it;
- The vibration of a nearby washing machine shakes the structure of the table;
- Detergents quickly render the laminate unusable;
- Frequent temperature changes at the point of contact with hot dishes lead to deformation and cracks;
- Moisture entering through cracks leads to swelling, delamination and rotting of chipboard;
- Buying a new set may lead to replacing the sink and hob.
Budget, in no case, does not mean a deterioration in appearance or performance.
You will avoid unpleasant consequences if you decide to make a countertop with your own hands. And you will find that there is always a choice! You can come up with many beautiful and practical options. Here we will describe only a few of them.
If you do everything correctly, your new kitchen countertop will delight you and your household for many years!
IMPORTANT! Carefully measure the old countertop and make a detailed drawing.
Consider the dimensions - the load on the kitchen table depends on this. There is no need to make the width of the tabletop more than 60 cm, and the thickness should not exceed 5 cm.
There are many ways to make countertops.
It is better to divide the corner tabletop into three sections, which are easy to make and install in parts:
- Cooking and hob area;
- Corner area with a hole for the sink;
- Area for dishes and accessories.
It is advisable to make a complex shape with protrusions and bends from monolithic concrete or liquid stone at the installation site.
Don't forget to treat the outer ends of the countertop. Concrete and liquid granite can be sanded. For chipboard and ceramic tiles, molding is more suitable.
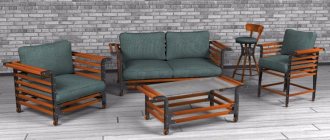
Creative ideas
To make housing more original and attractive, non-standard approaches to furniture manufacturing are used. You can use one of the following ideas:
- The bottoms are made of boards from giant decommissioned barrels. The available inscriptions only emphasize the interesting history of the product. The lower edges of the tables can be equipped with thresholds made of iron brackets or chopped firewood.
- Large diameter trunk cuts. Their edges may be rounded or remain with bark. Wild wood looks very good in gazebos, verandas and hallways of country houses.
- Coils from the power cable. The products are comfortable, large, stable. They only need finishing. Service inscriptions add originality.
- Solid wood with carvings. The depressions made are filled with epoxy glue. It looks very unusual.
A round table helps create an atmosphere of intimacy in the home. And if it is made with your own hands, it will definitely become loved by all family members. Exclusive design will help give the room individuality and unique style.
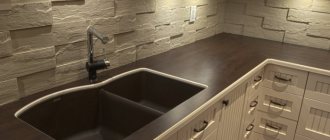
Concrete countertop
It is reliable and durable. If you try, you can give it the appearance of noble marble. To make it you will need:
- Boards or bars with a thickness of at least 4 cm of the required height for the sides of the formwork;
- Wide sheet of chipboard (MDF), plywood or boards;
- Drying oil or anti-adhesive compound;
- Small crushed stone, sand;
- Dye for giving concrete the texture of marble;
- Two abrasive discs - coarse and fine grain;
- Reinforcing wire with a diameter of up to 8 mm;
- Silicone sealant;
- Aluminum profile (molding) on the outer ends;
- Assembly adhesive;
- Self-tapping screws.
To make the countertop look like marble, granite, or any other shade, a special pigment is added to the mixture, which can be purchased at any hardware store.
Tools you will find useful:
- Bulgarian;
- Grinder with power from 1 kW;
- Screwdriver;
- Construction mixer or small concrete mixer;
- Building level;
- Trowel (trowel);
- Clamps - several pieces;
- Spatulas – regular and serrated.
Tools.
Select a chipboard sheet based on overall dimensions. Draw a drawing of the countertop on it. Using self-tapping screws and a screwdriver, build the sides. Fill the joints with the chipboard with silicone - the concrete will not flow into the cavities, and the ends of the tabletop will be smoother. To prevent it from sticking to the formwork, lubricate the inner surface with drying oil or an anti-adhesive compound.
Advice! When calculating, immediately add about 10% on top of the received amount as a reserve and in case of defects during cutting and installation.
Make a grid with a 5x5 cm cell from wire. Its overall dimensions should have a gap of at least 1 cm from the inner walls of the tabletop formwork.
If the frame is ready and the glue has dried, you can begin preparing the cement-sand mixture.
FOR YOUR INFORMATION! Instead of wire, you can use reinforcing mesh.
Prepare a concrete solution of the following composition:
- Cement – 1 part;
- Small crushed stone – 2 parts;
- Sand – 2 parts;
- Plasticizer - it will increase the plasticity of the solution and the strength of concrete after drying;
- Dye (0.2 kg per 10 kg of concrete), previously diluted in water.
FOR YOUR INFORMATION! Use acid dyes - they are durable and safe for humans.
Concrete pigments can be added to the solution during mixing or applied to the surface of the structure after the composition has hardened.
Dilute the solution with water to the consistency of thick sour cream. Fill the formwork evenly to half the height. Place the grate. Fill the remaining space with the solution. Use a wide spatula to remove the excess and form a flat surface for the future countertop. Cover with plastic wrap and leave to dry for 7 days.
Gently tamp and smooth so that the underside of the tabletop is smooth.
After drying, use a sander with a coarse abrasive disc to remove any rough spots. Using a fine-grit disc, sand the surface until smooth. Finally, use a special suede nozzle at low speed to apply polishing paste.
An electric or pneumatic angle grinder and a set of diamond discs are optimal for home use.
For a new countertop, use an existing kitchen table. After removing the old one, strengthen the body with vertical supports made of bars. Glue them with wood glue to the inner surface, and after drying, screw them with self-tapping screws. Insulate the area where it touches the wall with a kitchen plinth.
Materials and tools for work
An important stage of work is the preparation stage. Stock up on all the necessary tools and materials, make sure you have a good understanding of the process at all stages.
For the manufacture of
As you work, you will need the following.
- A jigsaw or circular saw for cutting plywood.
- Furniture glue.
- Thick cardboard or other similar material for creating life-size templates.
- Pencil and long ruler.
- Fastening elements - bolts, furniture corners or wood screws.
For processing
A separate line is worth highlighting the materials needed at the stage of final processing of table surfaces. This is usually a sandpaper or grinder for initial processing. And wax, varnish or paint to finalize the piece of furniture.
However, a strict classic room, as well as ultra-modern high-tech, harmonize better with painted products.
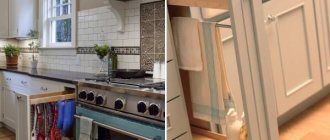
How to make a tile countertop
A product of large size and complex shape is inconvenient to move. An excellent solution would be to construct it and tile it at the installation site.
A DIY tile kitchen countertop will be your pride.
The advantages of this approach are obvious:
- The formwork is created at the installation site of the tabletop and is partially dismantled upon completion;
- Labor-intensive grinding is successfully replaced by gluing tiles.
Required materials and tools:
- Facing tiles;
- Grout for joints;
- Assembly adhesive;
- Tile adhesive.
- Tile cutter;
- Tile tongs;
- Grinder with cutting disc.
Tools.
Move the table away from the wall. Remove the top. According to the drawing, cut out the prefabricated base of the new tabletop from OSB. Prepare the wall for installing a tile backsplash. Using a level, mark the line along which the wall profile (for example, UD17) will be attached with dowels. Insert the parts of the tabletop base into the grooves of the profile, which should also be connected to each other using the profile.
Install vertical supports around the perimeter to prevent deformation during pouring.
Mark out areas for washing and cooking in advance. Foam plugs are cut out according to their shape and glued to the OSB at the marking site. Along the outer edge, screw the edges from boards or pieces of drywall with self-tapping screws. To make it easier to level the surface of the tabletop, install a beacon strip along its upper border adjacent to the wall.
Fill the mold completely, remove excess with a rule or spatula.
IMPORTANT! The total height including OSB should not exceed 4 cm.
Create a concrete base as previously described. After drying, remove the sides of the formwork and remove the foam. Using a jigsaw or grinder, cut out the holes marked on the OSB. Plan out the tiles. It must be laid from the wall to the outer edge of the tabletop. Cut off the edges of the tiles that protrude beyond the ends with a grinder or a manual tile cutter.
Mark the rounded edges on the underside of the tile, make a cut with a grinder disc, carefully break out unnecessary pieces using tile tongs and smooth the edges with a file.
ADVICE! For precise cutting, use sand or water jet cutting.
Apply tile adhesive to the concrete in an even layer up to 3 mm. Install the tiles, aligning the seams using beacon crosses. After the glue has dried, grout the joints. Reinstall the kitchen table frame in its original place. Treat the ends of the tabletop with sealant and cover with molding, gluing it using mounting adhesive and clamps.
The advantages of a tiled countertop are undeniable!
Deciding on design and construction
How to make a box with your own hands?
When choosing a design, you must first focus on your own skills and capabilities. It is better to make a high-quality tabletop of a simple configuration than to take on a complex project for which you do not have enough time and skills.
In addition, there are several other factors to consider:
- kitchen style;
- size and weight of the finished product;
- material chosen for the base;
- availability of necessary tools for processing;
- complexity of the configuration (whether it will have mortise elements, curvilinearities, etc.).
It is better for novice carpenters to choose simple models with a minimum of mortise parts.
It is very convenient to make a tabletop from parquet or floorboards; they already have the necessary groove for reliable adhesion of the individual dies.
Also, you should not make a shield from old boards - such a product will not last long. In addition, if stored improperly, mold may form on the surface of the wood, or bark beetles may develop inside.
If a homemade countertop should have an antique look, then let it be an imitation. The desired design is achieved using brushing and staining of the appropriate shade. This product will last much longer.
From self-leveling stone (granite)
The manufacturing method is very similar to creating a concrete countertop. The main advantage of the method is that you can make a countertop with a shape of any complexity, which will have an appearance indistinguishable from mountain stone.
The disadvantage is sensitivity to mechanical and thermal influences.
Liquid stone is a composite material and consists of:
- Crushed filler (marble or granite chips, sand) – up to 80%;
- Polyester resin – up to 20%;
- A small amount of hardener and coloring agents.
If everything is done correctly, this countertop will serve you for many years.
ATTENTION! Some manufacturers of liquid stone add styrene to the composition - a substance hazardous to health. Take the time to study the chemical composition or contact the seller for advice.
To increase resistance to mechanical and thermal damage, you can strengthen the surface of the countertop with gelcoat. It is evenly applied to the inner surface of the formwork and only after that it is filled with liquid stone and a reinforcing mesh is installed.
After drying, the workpiece must be sanded and given a final polish.
IMPORTANT! When using gelcoat, the front side of the tabletop is formed by the internal space of the formwork, so carefully select the material for its assembly.
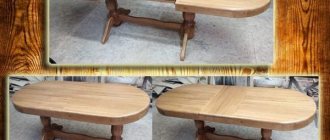
Drawing
Before you start making the table yourself. You need to make a preliminary template. For small furniture products it is not necessary to make a drawing, but having one will greatly simplify the work process.
As for the exact dimensions, it depends on the personal wishes and preferences of the owners. Such furniture can be made in standard sizes. Or you can come up with your own personal dimensions. The main thing is that you feel comfortable and comfortable using the furniture.
Chipboard table top
The main advantages are ease and speed of production. You can install a plastic coating on it or apply liquid granite by spraying.
Chipboard countertops are the most affordable and popular solution for your kitchen.
You will need to purchase:
- Chipboard 20 mm thick;
- Sheet plastic;
- Epoxy glue.
Cut out the components of the tabletop using a jigsaw from chipboard. Treat the end faces with sealant. Cut a blank from a sheet of plastic to the shape of the tabletop with an allowance around the perimeter of up to 3 mm.
If the tabletop consists of several parts (which is quite likely), its parts need to be fastened together with a stapler.
After drying, remove excess with a construction cutter. Cover the end with molding.
You can cover the end edge with a metal plate or plastic sheet for cladding.
You can make many options for your kitchen table top yourself - from liquid stone, tiled, or concrete with imitation granite.
It will look better than purchased, and will last longer!
Prices
| What | How many | Price |
| Plywood, 10 mm. | 2 sheets (2.326 m2 each) | ~7 USD |
| Beam, 50x50 mm. | 3.24 m. | ~2 USD |
| Self-tapping screws | 30 pcs. | ~1 USD |
| Pens | 2 pcs. | ~1 USD |
| Furniture hinges | 4 things. | ~2 USD |
| Varnish + paint* | 5 USD and less | |
| Self-adhesive* | 5 USD and less | |
| Total: | 18 USD |
*or
Calculating the cost is, of course, not final: a do-it-yourself plywood set can always be reduced in price in a dozen different ways.
The calculations do not include the cost of tools and deliberately do not indicate the necessary list; prices are indicated with a reserve. Thus, the lower tier of the direct kitchen is 3 sq.m. will cost about $40 because:
- The sink cabinet does not require a back wall and a countertop (for a sink cover)
- It is possible to combine several cabinets into one - less plywood will be required
- You can refuse to buy timber in favor of furniture corners
- It is not necessary to close the base
- Prices for accessories vary greatly
- You can easily find much of this list in your garage/dacha/at your neighbor’s house.
If desired, ready-made doors for facades can be purchased at large chains like Leroy Merlin or Ikea
Kitchen countertop – 50 photo ideas:
PreviousKitchenHow to care for glossy kitchen furniture
Next
KitchenHow to properly arrange furniture in the kitchen
Decoration
The final stage of making a plywood table is its decorative finishing.
Important. You cannot paint such a piece of furniture.
But you can decorate it with:
- varnish;
- wax;
- stains;
- self-adhesive film.
Advice . If the material has been mastered, then it’s time to move on to tables made of chipboard, glass, pallets, solid wood or boards.
3D model
To calculate the materials, I modeled the table in SketchUp.
I had never worked with modeling programs before. Overall, it turned out to be quite simple. Model file stol.skp
Now the free version of Sketchup has become completely browser-based, which I don’t really like. You can find the old desktop version on the Internet, which is more comfortable to use.
You can also play with flowers there. I decided to paint the table black and green.
Manufacturing process: step-by-step instructions
Procedure:
- Draw the details on paper according to the dimensions indicated on the diagram.
- Transfer the paper pattern onto thick cardboard. Cut out the details.
- Lay out the cardboard templates on a sheet of plywood and trace them with a pencil.
- Apply masking tape tightly to the drawn lines.
- Using a jigsaw, carefully cut out the plywood pieces along the tape line. The tape will protect the cut edge from damage.
- Sand all cuts (especially joints of parts) with a grinding machine or sandpaper.
- Mark the edges of the tabletop in a round or oval shape.
- Draw with a pencil, cover with tape and cut off the corners with a jigsaw.
- Sand the edges and surface of the tabletop.
- Cut out the stiffening bar and table legs.
- Use a pencil to mark the fasteners.
- Drill holes for fasteners with a drill with a diameter smaller than that of self-tapping screws. Then process the top of the holes with a drill whose diameter is larger.
- Connect the tabletop, legs and side inserts with self-tapping screws. The parts must fit tightly. Place plugs on the heads of the self-tapping screws.
- Cover the assembled table with stain. After drying, give the product its final look using varnish or paint.
More details in the video below.
Painting
The most enjoyable process. It turns out that modern paints do not smell at all, dry in half an hour, and are very pleasant to work with, so the table could be painted right in the apartment without discomfort.
Painting is the most enjoyable process
Painting shelves
Cable management
To lay the cables, the largest plastic box was screwed to the back. Wires going out to the sides are laid in it.
On both sides I screwed extension cords (in some regions of Russia they are called “pilot”) into eight sockets.
As a result, there are no cables under the table, except for one that goes up from the socket into the box. You can ignore the cabinet with drawers; it will be removed from under the table.
No cables under the table.