There is something about retro style that touches the hearts of thousands of people, which may be why antique painting has not gone out of fashion for several decades. Doors with brushing and patination always top the top sales, as they create a unique aura around themselves. Also, the advantage of this kind of doors is that they retain their original appearance for a long time. Perhaps someone knows that painting wood to look antique is not such a difficult task and can be done independently. You will learn how to paint wood antique in the following article.
Aging of furniture, mirrors, stucco and other interior elements
Artificial aging of furniture, aging of mirrors, stucco moldings have gained extraordinary popularity in the modern world
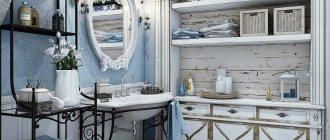
Artificial aging of furniture, aging of mirrors, stucco moldings have gained extraordinary popularity in the modern world. Antiquity always remains in fashion. No matter how much effort, money, or imagination you invest in the design of walls, floors, and ceilings, only furniture will give your interior completeness and harmony. How to give furniture the effect of aging, turn it into a real jewel that carries the spirit of history, even by touch giving rise to a feeling of the mystery of bygone days and the desire to solve it? There are special technologies for aging surfaces for this. At the same time, despite the ancient, truly antique appearance, the furniture will be new, strong, and durable.
Aging of furniture: artificially aged furniture is used in the design of offices, restaurants, pubs, and luxury home interiors to give them an aristocratic and noble appearance. The aging effect breathes life into your furniture and gives it personality.
Aging of wood (doors, floors): The effect of wood aging is mainly applied to doors. Doors are an interior detail that immediately catches the eye. They must be in harmony with the surrounding space. Antique doors will give you, as well as your guests or clients, a feeling of reliability, inviolability, trust, security and comfort.
Aging of mirrors:
quite a popular trend in aging things. In country and Provence style interiors, artificial aging of mirrors is often used.
Aging technology:
The most effective aging techniques for giving various surfaces the effect of aging are:
brushing, patination and craquelure.
Brushing is the artificial aging of wood specially treated with metal brushes. With this treatment, patterns of growth rings are revealed on the surface of the wood, and relief is acquired. Thus, the wood acquires the effect of aging.
Patination (patina, patination)
- This is the highlighting of surface texture. In order to achieve the aging effect, a patination composition is used, which is applied by a craftsman using a special technology. There are three patination options: gold, matte and silver. Patination is also used in combination with tinting.
Craquelure:
craquelure creates a network of cracks on the surface (cracking effect or craquelure effect). This is evidence of the antiquity of the thing. It takes centuries for such a network of cracks to appear naturally. To artificially create such cracks, there is a special craquelure technique, as well as decorative plaster with a cracking effect. Then you will quickly get a thing in which time speaks. Craquelure in the interior gives a certain charm, making it unlike hundreds of other “European-quality renovations”. You can order our craftsmen to create single-phase craquelure (with ordinary dark cracks) or two-phase. Colors can be very different, but it is more interesting when they are contrasting.
Recommendations for selecting vintage furniture, appliances and plumbing fixtures?
In order for the vintage in the interior of the apartment to turn out authentic, you will have to visit all the flea markets and flea markets in the city, spend a lot of time searching for the necessary details on classifieds websites and in groups of like-minded people. But it's worth it!
Furniture
Characteristic features common to all vintage-style furniture:
- Strength. Wooden cabinets and chests of drawers were made from solid wood.
- Decorative. The products were decorated with carved details.
- Epochal. If you doubt whether individual elements will fit together, check the production date. Things made at the same time harmonize perfectly.
To prevent the apartment from looking like a museum, select 1 main detail in each room, and match the rest to it:
- vintage in the bedroom is guaranteed by a wrought-iron bed;
- a wooden buffet or sideboard is appropriate in the kitchen;
- A vintage-style living room will be complemented by a massive chest or rocking chair.
The photo shows a vintage desktop
Technique
Since the main modern technology arose after the middle of the 20th century, vintage products are not provided in principle. So instead of styling a modern refrigerator or stove, just go for something that's inconspicuous.
In the kitchen, a built-in is appropriate; in the living room, the TV can also be hidden behind the doors - otherwise the plasma panel can destroy the entire perception of style.
Plumbing
Fortunately, furnishing your bathroom and toilet is not difficult. Manufacturers have separate “vintage” lines, which include:
- clawfoot baths;
- metal enameled or porcelain sinks on shaped stands;
- toilets with high hanging tanks;
- carved figured faucets.
A mirror in a beautiful copper frame and suitable accessories (brush holders, paper holders, shelves) will help complement the atmosphere.
Types of patina for wood
Initially, patina meant a layer of oxide or salts that forms on the surface of a metal over time. Later, that natural coating on old wood - oak, beech, which is formed due to the gradual chipping of soft wood fibers and filling the pores with wax or oil - depending on what product was used during care, also fell into the same category.
This effect is obtained just at home, since it is created with your own hands, but for a very long time. And it is clear that you can get a natural touch of antiquity only on solid wood, but not on MDF or chipboard. However, if you resort to a home master class, you can do this artificially, and much faster. Special compounds and special techniques are used for this.
How to age wood. Educational videos
Maximum reinsurance and studying the nuances are often the key to success in any business. For those who are used to understanding everything thoroughly, video instructions will be an excellent help.
The ideal option is to, after first reading the information, study several videos, listen to recommendations, understand the sequence and anticipate possible problems.
Of course, videos have already been made about aging wood with your own hands . It is preferable to pay attention to the recommendations of people with experience, as well as to those videos where you can see the process itself, and not just a general explanation and theoretical calculations.
You should not limit yourself to one author or methodology. The more approaches, views and hacks you learn, the better. For example, a video about brushing wood with your own hands can be about a separate process or about a stage of another technique (for example, heat treatment). In this case, each case will highlight its own characteristics.
Moreover, even after the aging technique is perfectly mastered, studying additional information can provide valuable information on how to speed up the process or reduce its cost. Therefore, in this area, as always, relevant articles and videos are useful not only for beginners, but also for professionals.
Please note that the more expensive the wooden object with which you have to work, the more carefully you need to approach the preparation - in order to avoid mistakes and damage to the product.
Below are several extremely useful videos about different methods and stages of aging wood on your own.
Good luck!
Brushing technology
The artificial aging technique cannot be applied to every type of wood. The main requirement: it must have pronounced alternating hard and soft growth rings. The technology can be implemented in a wooden frame made of oak, walnut, pine, ash, larch, but is not applicable for pear, alder, linden, beech or maple.
The artificial aging procedure is performed using manual brushes or brushes attached to a drill or grinder. It consists of three stages:
- At the first or roughing stage, soft fibers are selected. Metal brushes are used for this.
- Then the board is sanded with synthetic bristles with an abrasive coating.
- The last stage is polishing. It is carried out using a hair or sesal brush.
Thermal firing
Thermal aging method includes firing of wooden furniture. This method requires special attention and accuracy, since the work involves the use of a blowtorch or an ordinary candle. The combustion source is brought to a wooden object and fired. Then the fumes are removed with a metal brush. To smooth out fragments, use sandpaper. The final stage is varnishing.
Advice!
Designers specializing in antique wood interiors recommend treating the wood layer by 3 mm, but no more.
Advantages of brushing
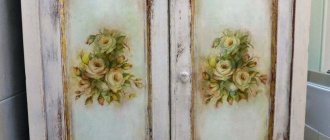
Painting wood after brushing allows you to highlight the textured surface: the depressions are painted in dark tones, and the ridges in light colors
Painting wood after brushing allows you to highlight the textured surface: the depressions are painted in dark tones, and the ridges in light colors. You can carry out patination, in which special compounds penetrate the open pores and emphasize the texture of the wood, create a cracking effect on the surface, or cover it with varnish. The choice depends on taste preferences.
Painting and brushing of a log house is a fairly popular service in Moscow. It allows you to get a number of advantages:
- Original appearance due to the variety of troughs and ridges of the surface;
- Individual building design created by an artificially aged coating;
- Functionality. Brushed wood successfully masks emerging defects, which are clearly visible on a flat floor or wall.
The structure, processed according to the specified method in compliance with the technology, looks elite and even rare.
You can also place an order for artificial aging of wooden surfaces (boards, etc.) using the form on the website. See approximate price above.
Preparing for aging furniture (antique painting)
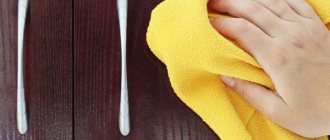
Remove handles and other fittings from furniture. If the furniture is polished, remove the polish with a special compound from a hardware store, following all safety rules and instructions on the packaging.
If the furniture is painted, then the old paint should be sanded until smooth (if this does not contradict your main idea, see the effects of antique painting below). If the furniture has not been painted, then you need to remove with fine sandpaper the top layer of dirt, grease and everything else that has fallen onto the surface of the furniture over many years of use (use a respirator to protect your respiratory tract from dust and ventilate the room well).
All dust should be thoroughly vacuumed from the corners, then wipe the furniture with a damp cloth and let it dry. If the surface of the wood is too greasy, wash the furniture with soapy water and let it dry.
We don't need furniture putty. The idea of the project is precisely the effect of aging, (slight) wear of furniture, so we want to emphasize defects in the surface of the wood, and not disguise them with putty.
Chalk paints for the effect of aged furniture are produced in a wide range of fashionable blurred
To age wood and paint antique furniture, Arina recommends using special chalk paints for home creative projects (these are produced under the brands Autentico, Annie Sloan, etc.).
Chalk paints for the effect of aged furniture are produced in a wide range of fashionable blurred (as if faded with time) shades. Chalk paints can be used on a variety of surfaces (including clay and even plastic!), and no pre-treatment of the surface is required at all.
If you don't have chalk paint, use regular water-based matte residential wall and ceiling paint (NOT bathroom or kitchen paint!) from any hardware store. When using such paint, it is better to first prime the surface of the wood with a water-soluble primer (primer).
A universal (2 in 1) primer prevents natural oils from the wood from seeping onto the surface of the base paint and promotes better adhesion of the paint to the surface of the furniture. To paint antique furniture, it is better to use a paint roller rather than a brush. Before starting work, protect the surrounding area with plastic film; it is even better to work outside.
Design and construction of homemade antiques
The effect of aged shabby furniture
When making furniture from antique wood with your own hands, you should know the basic ways of aging wood. In the process of wood processing, highly qualified craftsmen use methods that age the surface of furniture:
- chemical treatment;
- finishing with fire;
- mechanical movements.
Having studied detailed information about each technique, even a novice painter and carpenter will create an antique piece of furniture.
Before you make antique furniture with your own hands, you need to prepare drawings and diagrams of the desired products. It is worth considering that the product must be disassembled, so the drawing must be carefully thought out and the step-by-step assembly of parts must be depicted on paper. When creating an antique table, cabinet or chairs with your own hands, think about a design that will fit into the interior of the apartment.
To make an antique table with your own hands, you need to prepare drawings of the intended design, tools, materials and begin the creative process.
Required material
To create high-quality antique furniture, the following is used:
- natural wood from which furniture will be created;
- paints and varnishes (stain, varnish);
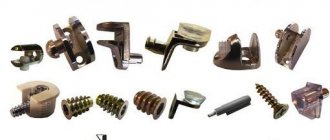
- high-quality fittings (locks, mechanisms, handles) that match the style of the intended product;
- decorative items.
Having prepared the necessary material and drawings of the desired product, processing of wood products begins.
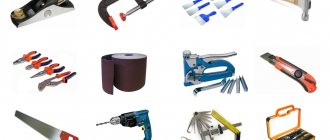
Required Tools
When making an antique wooden table with your own hands, you will need:
- different caliber sandpaper;
- metal brush;
- hacksaw, saw;
- grinding machine with different attachments.
Tools for working with wood using the artificial aging technique
Having thoroughly prepared, we consistently perform the following steps.
- We disassemble the table into separate parts or make the parts of the product ourselves.
We remove the old tabletop, carefully prying it evenly from all sides so as not to damage the underframe - Using wood files or sandpaper, we process the surface of the product elements, removing old paint and varnish.
We clean all surfaces and remove the old coating - We study the prepared sketch.
- We begin to manipulate the metal brush along the fibers of the furniture.
We sand the coating so that the paint lies evenly on the surface. - The depth of the grooves is adjusted through repeated actions.
On flat parts we use a grinding machine “Iron”In thin profiles and threads, nothing can be done with a machine; you have to manually sand every bend, every detail
- We clean the wood from dust particles.
We remove dirt and dust accumulations - Cover the surface with dark stain (excess stain is removed with a damp sponge).
We stain with water stain, because... The walnut mass is very dense and requires deeper penetration - We cover the product with the prepared varnish.
Apply finishing varnish to a carefully prepared surface - Leave the table elements to dry.
- After drying, the parts are assembled together according to the scheme (assembly occurs using grooves, glue or furniture screws and hexagons).
Having finished assembling an antique table made with your own hands from high-quality wood, you will be satisfied with the result of the work. Such furniture will decorate the interior of a living room or kitchen.
Finished table after restoration with your own hands
The cost and appearance of antique furniture largely depends on the type of wood and the chosen processing method. Most often for the manufacture of aged products they use:
- pine Soft material with a light shade and not very pronounced texture. It is well processed by cutting, but does not withstand impact. Suitable for small items or furniture frames;
- birch Medium density material. It does not tolerate changes in the level of humidity in the room, and therefore, even with high-quality protection, it can crack. Polishing and varnishing help highlight the beautiful texture. Used to make tables and chairs;
- beech. Processing of this material is difficult due to its high density and strength. Has increased hygroscopicity. Products require additional treatment with moisture-proof impregnations. Not the best option for a bathroom. Used for the manufacture of frames and facades of antique cabinet furniture;
- oak. Durable wood with beautiful texture. Withstands external influences well. Poorly amenable to cutting. A well-sharpened and durable tool is required. Has a lot of weight. Used to make cabinets, chests of drawers, countertops and more. Moisture resistant.
Various antique furniture is made from solid pine.
You can create an aged surface in various ways. We invite you to get acquainted with different options for making antique furniture.
You can age the surface with your own hands
The method is relevant for pine products. Special reagents are applied to the surface to ensure cracking of the base material. It is quite difficult to implement at home. This method involves the use of substances that can harm human health and the environment. If you decide to resort to this option, you must comply with the requirements for the safe use of aggressive substances.
Compliance with safety regulations is an important requirement
| Illustration | Description of action |
| A flame is directed onto the surface to be treated. For this purpose, a special soldering iron, lamp or burner is used. As a result, the surface layer is destroyed unevenly. The degree of heterogeneity can be controlled. | |
| Annealed boards are processed with a stiff brush or sandpaper. As a result, it is possible to remove excess ash and give the surface the necessary smoothness. | |
| Two layers of linseed oil are applied to the prepared surface. The second is applied after the first has completely dried. |
Brushing
| Illustration | Description of action |
| Using a stiff brush, soft fibers are removed from the top layer of wood. You can use hand tools or use suitable attachments. | |
| We cover the surface with white polyurethane primer with a high percentage of solids. You can use a brush or spray. We wait for the composition to dry completely. | |
| We thoroughly sand the surface and remove the lint. | |
| We apply varnish, which contains a certain amount of gray coloring pigment. | |
| We remove excess varnish, achieving the desired aging effect. |
We suggest you familiarize yourself with How to make a hot smoked smokehouse with your own hands
You can create a touch of antiquity using patination. The work is performed in the following sequence:
- a layer of varnish is applied;
- after the varnish layer has dried, the surface becomes covered with patina;
- half an hour after applying the composition, the surface is treated with a metal brush. The greater the force applied, the stronger the effect will be;
- the surface is wiped with a rag;
- the base is varnished.
Gilding antique furniture can be done in different ways. It is possible to form a golden web using a sponge dipped in paint with suitable characteristics. Gold plating will be performed in the following sequence:
- Mordan glue for gilding is applied to the surface using a flute brush. The base is covered with an even layer;
- the foil is being prepared;
- fingers are covered with chalk;
- The gold leaf is applied to the base and evenly distributed over the base. Existing gaps can be eliminated using pieces of foil;
- the finished surface is polished and covered with a layer of varnish.
The gilded surface on the surface of the furniture looks impressive.
To implement this method of aging furniture, a special “craquelure” varnish is required, when applied, characteristic microcracks appear on the surface. The work is performed in the following sequence:
- The base composition is applied to the prepared base. Its color corresponds to the color of future microcracks;
- Craquelure is applied to the dried base layer. Strokes are made strictly in one direction;
- color is applied. It contributes to the appearance of characteristic irregularities;
- the surface is covered with a layer of protective varnish.
Share in the comments which method of aging furniture you have already used, or which one you like best.
Basic painting of antique furniture
Start painting antique furniture from the back (invisible) side. This way you can get the hang of it, understand how much paint you need to take per roller, and you might even want to adjust the shade of the paint itself. Next, move to the front side of the piece of furniture, applying the paint in broad strokes, without leaving smudges.
Before applying a second coat of paint (if necessary, see below), check for smudges (possible smudges should be corrected with sandpaper, and then go over the area with an additional coat of paint). Between applying layers of paint to furniture, keep the roller in water to prevent it from drying out.
Apply the second coat of paint when the first one is completely dry (this is important!). The drying time of the paint depends on environmental conditions (humidity and air temperature) and can range from 1 to 5 hours.
Antique effects, aging furniture
How many coats of paint you need to apply depends on the style you choose. For a 'simple' look, a rough and weathered effect, or wood grain showing through the paint, one coat is sufficient. For a more traditional, sleek furniture look, go over the first coat of paint with fine sandpaper, remove any dust with a brush, and then apply a second coat of paint.
- The effect of wear and tear. After applying the paint, take a fine sandpaper and begin to scrub the paint in places where it naturally wears (on corners and ridged surfaces, near handles). Do this until you reach the desired level of weathering: primer, bare wood, etc. Now you can easily sand the entire surface of the furniture.
- The effect of old paint showing through.
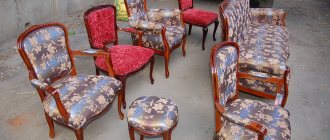
After applying two layers of base paint, use a dry brush to lightly apply paint of a different color in the desired places (it is good to use contrasting colors, see the photo of the blue chairs, where the cream-colored paint 'peeles through'). This technique is called 'dry brushing': take a little paint onto a dry brush, wipe the brush with a dry cloth and apply a thin layer of paint to the previously painted surface. This technique also works well for the effect of old paint ingrained into the wood texture. - The effect of a surface contaminated by time (see photo of Arina's Cafe Dubose project with an old window frame). This effect is achieved by unevenly applying dark wax in places where the furniture is touched with hands. Read more about applying wax (mastic) below.
- The effect of many layers of paint roughly applied one on top of the other. The paint is applied in several layers with careless strokes in different directions, sandpaper is not used between layers. The final coat of paint is applied with clear wax for protection, followed by dark wax for an aged effect.
All of these effects, as well as many others not described in this article, can be used together or separately. Experiment and be creative! However, I don’t advise you to get carried away with effects, because what is done deliberately and “too” quickly turns into trash.
Chemical method
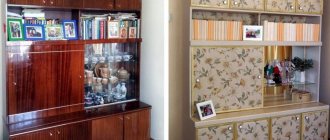
The presence of wooden furniture and decorative items in the room creates a special atmosphere of coziness and comfort. When a sideboard, wardrobe, chest, table, chairs have an aged look, it seems that such furniture was inherited from rich ancestors. This type of home decoration has gained popularity and become fashionable (f.5,6,7). To give wood an aged look, different methods are used:
- mechanical (conifers, oak);
- chemical (deciduous varieties);
- thermal (different types).
antique wooden chandelier, photo 4
antique wooden furniture, photo 5
Today there are many special chemicals that can give wood an aged look. You can use other reagents. Furniture can be given an old look using drain cleaner. It contains alkali, which destroys soft wood fibers. After treatment with this preparation, the surface of the product will take on a grayish tint. Then the wood is washed with water and covered with a solution consisting of vinegar diluted with water (tsp per glass of water). We hide it with varnish.
As an option, you can purchase old boards that were once barns, wooden warehouses, and other outbuildings. They are used for making furniture and interior decoration. However, such a solution cannot be called budgetary. It is much easier to choose ordinary natural wood and artificially age it, or restore old furniture, giving it an antique look.
There are mechanical, thermal, and chemical methods of influencing wood. Before artificially aging new furniture made by yourself, or boards from which you intend to create an antique masterpiece, it is worth familiarizing yourself in detail with the features of each of them:
- Mechanical. Divided into brushing and patting. The first option is used for processing different types of wood (oak, coniferous, walnut, larch). The method consists of special treatment with metal brushes, followed by tinting and varnishing. Patering is suitable for aging furniture made of chipboard or boards. A layer of paint is applied to the primed, dried surface, and then patina - a special composition that imitates paint cracks, worn gilding or silvering, and sometimes dirt clogged into the cracks. The work is done with acrylic, bitumen, wax, shellac, stain.
- Thermal. To artificially age the material, firing with an open fire followed by grinding is used. For this purpose, you can use a torch or blowtorch. Fire should be used away from flammable objects and liquids. After the boards have completely cooled, the desired shade is obtained by carefully working the surface with a drill with attachments or manually using sandpaper.
- Chemical. It involves treating natural wood with alkali. You can use liquid to remove blockages, clean stoves, or ammonia. The alkali is applied with a brush, the boards are covered with polyethylene to prevent reaction with air, and left for several hours. After this, they are treated with table vinegar to neutralize the active composition and dried thoroughly. Chemical aging of wood should be carried out outdoors or in a well-ventilated area.
The final stages of any aging method are surface treatment with a primer, tinting or painting, and opening with varnish. When making furniture, it is preferable to use acrylic paints and water-based varnish. They are much safer and fit better on the surface.
Brushing
There are several particularly popular types of aging wooden products. It’s worth understanding their features before decorating your favorite old furniture. To enhance the effect, you can paste over the elements of the product using the decoupage technique; these design trends combine perfectly with each other. It must be remembered that the surface must first be thoroughly cleaned of the old coating, the fittings removed and the product primed. Sometimes handles, hinges and other decorative elements have to be replaced because they do not match the chosen style.
| Aging technique | Necessary materials | Tools for work | Stages of implementation | The resulting effect |
| Crackle | Special 1 or 2 phase craquelure varnish | Brushes with synthetic bristles, protective gloves | Varnish is applied as a finishing layer to a painted or varnished surface. | A network of cracks appears. Their depth depends on the thickness of the applied varnish layer. Suitable for wood, plastic, chipboard. Bronze or silver paint is often rubbed into cracks to enhance the effect. |
| Patina | Performed using acrylic, bitumen, wax, shellac, stain | Soft brushes for applying a layer of patina, rags for rubbing | The product chosen for patination is applied with light strokes to a previously painted and dried surface. Without waiting for complete drying, rub it in with a rag. | The appearance of many years of use and significant wear of the paint is created. Suitable for wood, chipboard, decorative metal elements |
| Coloring | Several different colors of acrylic paint or shades of stain | Soft brushes for applying compounds, sandpaper, rags to remove dust | The first layer of paint is applied with light strokes so that the wood texture is visible. After drying, lightly sand with sandpaper. The procedure is repeated with several different coating colors. | There is an effect of multi-layer coloring and many years of use of the item. This is the best way to age furniture in the Provence style. Choose pastel paint |
| Effect of artificial pollution | Hard dark wax | Apply by hand to protruding areas of the surface with small strokes in one direction along the grain | After application, go over the surface with a thick cloth | Getting into cracks on the surface, colored wax creates the illusion of many years of dirt |
We suggest you familiarize yourself with How to make a homemade fishing rod at home
Of course, in order for the furniture to turn out beautiful, stylish, and look truly antique, you should use high-quality materials and tools. You need to first study all the nuances of its manufacture and choose a style that will connect all the elements of the decor into a single interior composition. And the process of radically changing old products and restoring them to a new quality is very exciting and very budget-friendly, while at the same time allowing you to diversify a boring environment. After such decoration, old cabinets, chests of drawers, and shelves will fit perfectly into the fashionable interior.
Crackle
Protecting Antique Painted Furniture
Wax (wax-based wood mastic) perfectly protects water-based paint from damage and prolongs its service life.
Wax (wax-based wood mastic) perfectly protects water-based paint from damage and prolongs its life. Wood wax is sold in two versions: clear and dark. The wax is applied to the furniture using a lint-free cloth or a regular foam sponge. The wax is applied evenly (or as required for the desired effect) to the surface of the piece of furniture, rubbed if necessary. It takes about 15 minutes for the wax to completely absorb and dry.
If you are happy with the paint color of the resulting piece, apply clear wax over the entire wood surface as described above. Now, with the help of dark wax, you can give the furniture the desired aging effect by applying the product only in the right places.
Dark wax, getting into the grooves of carvings on furniture or into defects and damage on the surface, enhances the effect of antiquity. Applying dark wax over the entire surface of a piece of furniture instead of clear wax can give the paint a darker tint. Start applying the dark wax at the back of the furniture to see if the effect suits you.
Protection of actively used antique painted surfaces
Intensively used surfaces (coffee table, dining table, etc.) after mastic (wax) will need to be additionally coated with matte acrylic varnish for wood. Apply the varnish according to the instructions on the package. The varnish coating will have to be renewed approximately once every six months (depending on the intensity of use of the furniture). To clean the wooden surface and care for aged furniture in the future, use a damp cloth and special household chemicals for wood care.
Photo ideas for decorating furniture with your own hands in Provence style:
PreviousFurnitureOrganizing the comfort of effective work using the correct arrangement of furniture in the office
Next
FurnitureHow to make a changing table with your own hands
Retro style: giving furniture a vintage touch
Today, antique painting is popular in interiors. The walls and furniture are given the effect of a noble antique finish. Such decoration will help to fit things into the overall interior, made in retro style. There are many ways to paint antique surfaces. To get started, just master a few design tricks. You will need:
- Primer for paint
- Artificial latex paint
- Long bristled brush
- Brush
- Sponge
- Rag
- Towel
- Technical wax
- Sandpaper
- Solvent
- White spirit
- Bronze, gold and green paints
- Set of crackle varnishes
- Bituminous patina
- Vegetable oil
- Fixing varnish.