Built-in wardrobes - characteristics, advantages. Faced with the problem of lack of space, many designers recommend saving every meter of space to create free space. An excellent solution in this case is built-in wardrobes. They allow you to save not only space, but also material resources.
Built-in wardrobes
What are the advantages of this furniture?
When considering the quality characteristics of built-in wardrobes, it is worth paying attention to a few.
Versatile use of built-in wardrobes
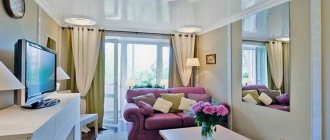
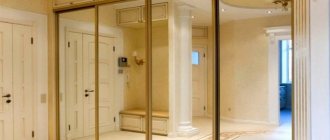
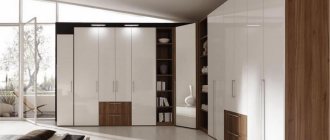
Built-in structures in modern design will fit into the interior of any room. The use of classic models is suitable for the bedroom, wardrobe, hallway. They allow you to store all your things (from linen to blankets and pillows), but everything will be hidden from prying eyes. Glass and mirror furniture facades will visually enlarge the room. Large mirrors located on cabinet doors will save money on purchasing free-standing ones.
Installed built-in furniture in the children's room will become a storage place for all toys and clothes. A child can use it as a toy house.
Capacity
Despite its small size, many useful and necessary things can be stored inside the built-in wardrobe. By installing such a structure, it will be possible to use the territory of inactive space. These are the places with the narrowest openings, with corners, near the ceiling. A built-in wardrobe in the hallway is more economical than buying a ready-made one. It holds much more things, unlike standard wardrobes and walls. And the provided niches, shelves, pull-out cabinets will become the location of bed linen, hanging clothes, or arranged books.
Original design of built-in wardrobes
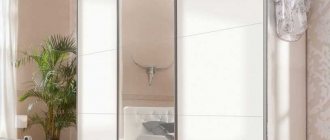
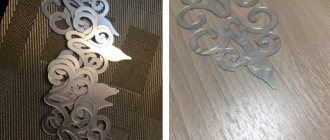
This is the main advantage that is typical for built-in wardrobes. For the manufacture of facades, frosted glass and mirror are used, thanks to which the furniture has a magnificent and truly unsurpassed appearance.
Built-in wardrobe in the hallway
Wardrobe in a niche made of plasterboard
If the layout of the room already has a niche, which in most cases is a big problem for household members, since it has an irregular shape and small dimensions, then you can equip it with plasterboard sheathing and make a real closet.
He will:
- Compact;
- Spacious;
- Beautiful to look at.
The wardrobe can be made in the form of a compartment, with sliding doors, but the base of the structure should be a metal frame, as well as plasterboard sheets. Using these materials, you can create many sections that will serve as an excellent place to store things, objects and everything your heart desires. If such a niche is made in the kitchen, then you can equip it as a pantry, if in the hallway, then as a dressing room.
It is especially important that the room should be comfortable, functional and well-lit, which can be achieved through electrical wiring and recessed spotlights. Read about the installation of spotlights here: https://homeli.ru/remont-i-otdelka/potolok/tochechnye-svetilniki-dlya-gipsokartonnykh-potolkov.
Disadvantages of this type of furniture
Built-in wardrobes not only have quality characteristics, but also several disadvantages. This is especially true for models with hinged doors:
- Installation in a narrow room is not recommended, since opening the door can completely block the passage to the rooms;
- Curved walls or a slight slope of the floor complicate the adjustment of hinges, and as a result, it is impossible to evenly adjust the gaps between closed doors adjacent to each other;
- Due to the design feature of swing doors, the facade can be supplemented with only one insert, for the manufacture of which laminated chipboard or a mirror was used.
But these shortcomings have virtually no effect on the popularity of this model.
Types of built-in wardrobes
Among the variety of designs, the most popular types of built-in wardrobes are:
- With hinged doors;
- With sliding doors;
- Wardrobe partition;
- Wardrobe-sofa (bed);
- The design of which has a built-in folding table and other models.
Also, this furniture differs from each other not only in the type of structure, it is also distinguished by the material of manufacture (natural or artificial origin), type of cladding and other features.
The most popular and in demand is the wardrobe. It will be an excellent alternative to an ordinary closet. It can be installed both in the living room and in the bedroom. It is distinguished by ease of use, spaciousness, and the ability to save space in the room.
Built-in wardrobe in a niche
Types of door opening systems
Depending on the system used to open the doors, the following types of built-in wardrobes are distinguished.
- Swing models will delight you with their high reliability, long service life, simple operating principle, and affordable cost. Door leaves are mounted to sidewalls, partitions or false panels using furniture hinges. Their number depends on the height of the sash. A handle is installed on the outside. The opening process is smooth, silent and provides full visibility of the contents. The only limitation is the absence of other pieces of furniture in front of the facade.
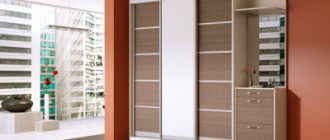
- Sliding or coupe models are much more compact and look modern. The fact is that when opened, the door leaf does not extend beyond the cabinet. The doors move along guides on special rollers, sliding over each other. Cons: limited visibility, increased noise level, the need for regular maintenance, high price. In addition, the system takes up part of the useful volume of furniture. The service life of aluminum guides is quite decent (25 years), steel fittings are designed for a maximum of 7 years.
- Folding (book, accordion) doors occupy an intermediate position. They consist of several parts, movably attached to each other. The entire structure is fixed on the top rail. During movement, the canvas folds and moves to the side. Accordions are considered more economical in terms of space, but a book can also save space. To open it, you will need 2 times less space than a hinged door. This type does not obstruct 100% visibility. The disadvantage of the folding version is the increased mobility of the door leaf.
A built-in wardrobe can fit into almost any room. But such designs are especially popular where there are problems with free space.
Where can I build a closet?
Many free areas in the apartment can be used for embedding.
Niche
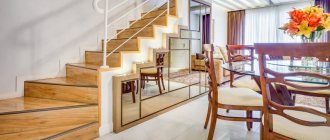
A built-in structure in an empty niche will be the best option for those who have a small apartment. This design can also be used if there is a partition that divides the room into zones. The wardrobe placed in it will be distinguished by its convenience, practicality and special style.
Corner
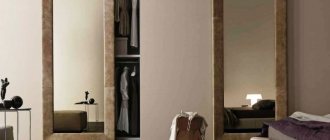
The cabinet installed in the corner has a large internal space, which will allow you to place a lot of things here. If you use mirror cladding for it, the area of the room will visually increase several times. Corner built-in wardrobes have both a front wall and a side wall. This does not affect its appearance or performance of its main functions. It saves quite a lot of space and allows you to store many things.
Attic
Premises characterized by a non-standard configuration (sloping ceilings) are called attics. Built-in wardrobes in the attic differ in technical and design characteristics. Here you can install both a beveled wardrobe and a shelving model. Just keep in mind that beveled furniture should be measured very accurately, and it would be better if a professional does this.
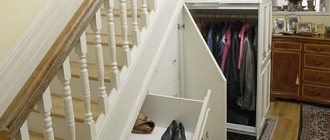
Under the stairs
Designers, when arranging the interior of a room, try to use every meter of free space to install something necessary and functional there. A built-in wardrobe under the stairs is a comfortable and practical piece of furniture that allows you to properly organize the space of your home. The cabinet can be designed as:
- Shelves under the stairs;
- Glass showcase;
- Wardrobe;
- Structures with swing doors;
- Models with drawers;
- Headset;
- Combinations of different options.
A great idea is to install drawers under the stairs. This option is only possible if the staircase has decent depth.
Around the window
For many housewives, the wall around the window is usually covered with curtains. But by attaching sets of shelves of shallow depth to this surface, you can free a certain area of the room from cabinets and use it for another purpose. And cornices and curtains can be attached not only to the ceiling, but also to the top panels. Such designs are suitable for storing books.
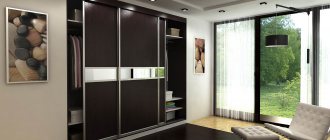
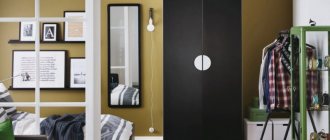
Built-in wardrobe in the bedroom
Scheme of a niche for a wardrobe
There are different approaches to installing a niche for a sliding wardrobe; it is made from both foam blocks and gypsum boards; you can find a lot of information about this on the Internet. The main thing in all this is to design the niche correctly. There is a niche diagram that can be taken as a basis (Figure 1).
Let's give a little explanation to the diagram. The size of the side wall of the niche for the sliding wardrobe must be at least 710-760 mm, the smaller of the interval sizes is allowed with zero distance to the door casing and a minimum casing width of 60 mm. In this case, we find that the depth of the wardrobe itself will be = 710 mm - 0 mm (the gap between the platband and the outer part of the compartment door) - 40 mm (the amount the platband will approximately fit on the wall of the niche) = 670 mm. If you fold at least 80 mm onto the sliding system, you will be left with 590 mm. And if you add a back wall, then 590 mm – 10 mm = 580 mm, this is how much will be left for the internal filling of the sliding wardrobe. The size of 580 mm is enough to comfortably place outerwear on hangers.
| Rice. 1. Diagram of a niche for a sliding wardrobe |
In addition, please note that the diagram shows a sliding wardrobe built into a niche. This means that the wardrobe has side walls, a bottom, a roof and a back wall. This option is rare because it requires filigree precision manufacturing of the sliding wardrobe body and the exact geometry of the niche for the sliding wardrobe, and is also more expensive.
| Rice. 2. A sliding wardrobe with all structural elements is built into a niche |
Typically, the internal filling of the cabinet does not have side and back walls in order to reduce the cost. Shelves, hangers and modules with drawers are attached directly to the walls using plastic corners, or better yet, false panels.
The walls of the niches are painted with the most durable paint so that they can be wiped or even washed.
| Rice. 3. Built-in wardrobe in a niche without side and back walls, bottom and roof |
How to arrange an apartment in Khrushchev
Having purchased an apartment in Khrushchev, many are interested in how to equip this small, cramped housing in a modern style while obtaining maximum usable space. A built-in wardrobe in a Khrushchev house will help solve a number of problems. Wardrobe-shelves, furniture built into the wall, wardrobes-beds (sofas) will allow you not only to use free space as economically as possible, but also to divide the room into zones without taking up extra space.
Thanks to the use of such furniture, you can use walls, corners, and space under the ceiling. In terms of performing its functions, it resembles a Soviet wall, but has a more modern look and does not clutter up the room.
Advantages and disadvantages
The advantages of using furniture include the ability to “wisely” fill the free space. Such structures are possible in all types of rooms and even in corners.
You can use any part of the room for construction.
Generally:
- space saving;
- capacity;
- practicality.
Among the main advantages are saving money and space.
At first glance, there are so many advantages that it is impossible to even imagine that these design items may have any disadvantages. But they are here too. Disadvantages include transportability. When changing the location or simply removing a built-in wardrobe without a frame, you will have to dismantle all parts attached to the ceiling, floor and walls. They will need to be repaired to hide any remaining traces.
The disadvantage of built-in furniture is the lack of mobility.
In addition, it is worth noting that this option is not available if the cabinet was built in along with the frame. Then, it easily moves to the right place and space is freed up.
Materials used for the manufacture of built-in wardrobes
Chipboard panels and some types of other materials are used to make furniture. The built-in wardrobe made of plasterboard is the most popular model today. Many are attracted by its ease of processing, ease of assembly, low cost and its environmental friendliness.
Of particular interest is the solid wood cabinet. This is an excellent material for furniture production. Wood is an environmentally friendly material with a natural pattern and relief, easy to process. It has an aesthetic appearance. But such furniture has a very high cost.
Plywood is also used to make built-in wardrobes. It is used to sheathe frames and make panels. Since plywood is produced using glue, it is not environmentally friendly. But there are some types of it, where the content of phenol-containing substances is almost zero.
In addition to the main material, the production of built-in structures involves the use of metal fittings.
Specialized stores present a huge range of furniture accessories: handles, locks, guides, canopies, hangers, casters and other elements.
Built-in wardrobe in a simple style
Advantages and disadvantages
Built-in furniture has many advantages. In particular, sliding wardrobes have only advantages:
- universal, can be installed in the living room, bedroom or corridor, that is, in any room;
- allows rational use of any corner of the room;
- diversity and variation - the ability to manufacture in any form at the owner’s discretion (built-in, straight, corner, cabinet);
- such furniture allows you to hide places that were unsuccessful after renovation;
- use of environmentally friendly materials;
- simplicity of design solution;
- excellent capacity - sometimes it seems that the size is small for a wardrobe, but a lot of things fit there;
- sliding wardrobe with lighting is made to any size;
- the internal configuration depends on the wishes of the customer;
- Can be used both for storing clothes and household appliances.
It would seem that with so many advantages there can be no disadvantages, but every item always has disadvantages. They are here too, although they are few in number and if used correctly, you can forget about them. Minor shortcomings are unlikely to scare anyone away, and what the disadvantages are are described below:
- door closing and opening systems wear out quickly;
- the specific design does not allow you to see all the contents of the cabinet at once;
- it is not possible to install standard lighting or its cost will be significantly higher;
- Aluminum structures are usually used for installation, but this is a soft material and is not durable.
Experts also note that all mechanisms must be carefully monitored, otherwise they will quickly fail. The latest new products offered are made using the latest proven technology and have no disadvantages. The disadvantages are not so terrible, you need to slightly adjust the design, treat it with care and listen to the recommendations of specialists, then the long cabinet will delight its owners for a long time with its beautiful appearance and the operation of the mechanisms.
Facade decoration
The market offers a huge selection of materials used for finishing built-in wardrobes. The most common are:
- Facades with a mirror. It can be placed either over the entire height of the doors or over a small part of them. The mirror can be decorated with corrugated or sandblasted patterns.
- Facades with photo printing. This unusual cabinet finishing option is gaining increasing popularity. Photos will give the furniture and the entire room as a whole a special uniqueness and exclusivity.
- Acrylic facades. The material is highly resistant to light. Thanks to this property, even after many years of use it does not lose its presentable appearance.
- Wooden facades. The classic way to decorate the front of a cabinet is wood. For these purposes, raw materials from rattan or bamboo are used. Although this material is quite expensive, its appearance will be at the highest level.
- Leather facades. This is an unusual decoration option, but since it is a practical and durable material, you don’t have to worry about its presentation over many years of use.
You can decorate the façade of a built-in wardrobe using various decorative elements and accessories. But they should not affect the main function of the structure. Opening the doors should be easy and free.
Built-in wardrobe
What to consider when choosing a built-in wardrobe
Since a built-in wardrobe is an individual thing and is made to order; there are thousands of models of such furniture; a person with imagination is quite capable of coming up with something exclusive for himself or herself. Therefore, further we will talk about the main points of choice and we will start with the classification of structures.
Built-in wardrobe in the corner
Corner models have a wide variety of shapes, plus it is precisely these cabinets that are distinguished by the greatest spaciousness and originality.
| Illustrations | Recommendations |
| L-shaped cabinet . A classic of the genre, the design consists of 2 standard cabinets connected at right angles. | |
| Square version . In reality, the design can be either square or rectangular. Such cabinets require a lot of space, but the owners get a full-fledged dressing room. | |
| Radial convex facade . Such a cabinet looks original, but it also “eats up” a lot of space, plus a radial sliding facade is an order of magnitude more expensive than a straight design. | |
| Radial concave façade . In technical terms, we have the same convex facade, only inverted, so its price will be the same as its convex counterpart, but the usable area is about a third smaller, but, for example, for a Khrushchev building this is even better. | |
| Triangular wardrobe . Here we see the triumph of minimalism; a smooth façade simply cuts off the corner of the room. Such a cabinet is cheaper than its competitors, but the capacity leaves much to be desired. | |
| Five wall cabinet. Among corner structures, the five-wall structure is considered the golden mean. Here, 2 sidewalls are installed, which allows the straight façade to be moved forward, as a result the owners receive a mini-wardrobe at an affordable price.
| |
| Complex combined facades . Facades with streamlined, varied shapes look solid, but they are the most expensive, plus not every furniture workshop undertakes such work. |
Wardrobe built into the entire wall
If there are no inconvenient niches in a standard rectangular room, and for some reason the corner option does not suit you, then all that remains is to fence off part of the room with a straight, even facade.
From a practical point of view, this is the easiest option to implement. Finding drawings of such furniture online and adapting them to your ceiling height and transverse size of the facade is not difficult, and then all that remains is installation, but we will talk about that later.
Interestingly, smooth, solid facades are suitable even for relatively small rooms, and if you install mirrors on the doors, the room will visually increase in size. As a result, the owners receive a psychological feeling of spaciousness, plus a convenient, multifunctional and relatively inexpensive wardrobe.
A flat, straight, full-wall façade is most accessible for self-installation.
Front options for built-in wardrobes
We have dealt with the shapes, types and configuration of facades, now let's talk about the advantages and disadvantages of the materials used to construct the front part of the sliding wardrobe.
Keep in mind - in wardrobes, by definition, doors can only be sliding. There are models where some sections are equipped with hinged doors, but this is a combined option. In addition, to maintain the name, sliding doors must occupy a large part of the façade.
| Illustrations | Recommendations |
| laminated chipboard. The most affordable material. At the same time, the appearance of such facades is quite decent. The color and texture of the laminating coating can imitate any material. In addition, laminated chipboard has high wear resistance. The only place where it is not advisable to install furniture made from particle boards is the bathroom, but sliding wardrobes are installed there extremely rarely. | |
| MDF. If you are interested in facades with decorative milling at an affordable price, then you need MDF. Unlike chipboard, which many accuse of containing formaldehyde, MDF is considered harmless. But this material is at least a third more expensive than its competitor. | |
| Tree. A natural array of elite wood species costs incredible amounts of money, so manufacturers usually use the so-called furniture board. It is made from pine planks, after which it is veneered with expensive wood veneer. Visually, the facades are absolutely identical, and the price is half lower.
Some craftsmen make facades from lining, the wood is, of course, natural, but the appearance is not for everybody. | |
| Glass. This niche combines 3 areas:
| |
| Photo printing. Photo printing can be applied to any material. In the budget version, colored PVC film is glued to the facade, creating something like photo wallpaper. Reputable manufacturers print photos on the facade using special equipment; the quality of such finishing is much higher. This is exactly how 3D photos with an immersive effect are created. |
Filling a built-in wardrobe: what should be inside?
Even a long and spacious closet requires a competent layout of the interior space, otherwise the owners will end up with a closet littered with things, in which it is difficult to find what they really need.
The owner decides how many shelves, drawers and auxiliary fittings he needs, but the zoning of the interior space has general rules. So in the lower part, which goes from the floor to the waist, shoes and bulky things such as a vacuum cleaner are placed. Drawers for small items can also be located here.
One of the recommended options for filling a built-in closet.
The middle sector, from the waist to eye level in all cabinets, is the most in demand. Necessary and frequently used things are placed in it. This is where shirts, trousers, blouses, underwear and bed linens are hung and stored. On mezzanines people usually store hats, blankets and suitcases, in general, everything that is rarely used.
If underwear and bed linen are stored on open shelves, then there should be at least half a meter from the floor to the nearest shelf.
Combination of wardrobes with suspended ceilings
Since a built-in wardrobe usually borders on the ceiling, the question often arises about connecting the facade to the tension structure. There are 3 common arrangement options.
| Illustrations | Recommendations |
Ceiling membrane inside.
| |
Membrane over cabinet.
| |
| Membrane around the cabinet . Here, the embedded beam is mounted exclusively under suspended ceilings, and the door structure remains independent. From an operational point of view, this option is considered the most reliable. |
Why is it better to make a custom built-in wardrobe?
Here you first need to figure out what kind of design you want to see. So, without having the skills to take on the installation of an expensive glass facade with a good hanging system yourself, it is simply stupid. Working with glass facades is generally difficult and I would not advise amateurs to take risks.
The second point is the type of construction. It is better to forget about the independent installation of radial cabinets and cabinets with broken facades. The only exception may be a triangular structure and a five-wall structure. Assembling an L-shaped cabinet also requires serious skill.
Most often, beginners stumble over partition wardrobes; people mistakenly think that a partition wardrobe is just a shelving unit on which sliding doors have been installed. But if in corner and niche structures the facade and filling are attached independently of each other, then in a partition the system is connected and not every professional takes on the installation.
The built-in partition cabinet is the most problematic to install.
Without going into the “wild”, it will be beneficial for an amateur, and most importantly, it will be possible to independently install a cabinet with a straight front in a niche (separating part of a room also applies to niches). But there are some subtleties here too.
- Let's start with the fact that for an amateur, it is better to choose laminated chipboard or laminated MDF as the main material.
- Buying a whole sheet and cutting it with your own hands at home is not profitable and difficult. Plus, you can only make an even cut with a circular saw; you can make chips with a jigsaw. You buy the material at the nearest furniture workshop and order cutting and lamination of the ends there.
- You also order the assembly of doors with rollers, edging profiles and related fittings from a furniture workshop. Without experience, you will collect them for a very long time and will definitely make mistakes. After all this, you can proceed to assembling the wardrobe with your own hands.
What can be placed inside a built-in wardrobe
The functionality of the internal content includes:
- Shelves for storing some things and bed linen;
- Bars that allow you to place clothes on hangers;
- Drawers where you can store small items;
- Shoe net. Instead, a shoe rack with a seat can be used.
It is better to divide the hinged wardrobe with a mezzanine into 3 parts. Rarely used items are stored in the upper part. Clothes are placed in the middle part, and shoes are placed at the very bottom.
Built-in wardrobe
Shape and dimensions
The shape, size and configuration of built-in cabinets are selected in accordance with the size and configuration of the space where the structure will be installed. An important condition when making furniture is to determine its height, width and depth. If only shelves are provided in the interior space of the cabinet, the depth can be about 30 cm. If there are hangers, the width of the structure should reach 60 cm. Typically, built-in cabinets are installed right up to the ceiling, so their height corresponds to the height of the room.
It may include a dressing room, a rack, and a key holder. Proper care will extend its service life for many years.
Step by step assembly
Having finished with the preparatory activities, you can begin to directly assemble the wardrobe built into the niche with your own hands in the following sequence:
- Initially, the furniture frame is assembled, according to the drawing, in a previously prepared place from a metal profile. The components are attached both to the wall and to each other using high-quality self-tapping screws. First of all, the vertical type of partitions with shelves is attached to both the floor and the ceiling surface.
- In order for the built-in furniture to fit harmoniously into the interior, it is imperative to ensure that the cabinet fits seamlessly into the niche. Correctly taken measurements and a carefully leveled floor will help with this.
- After the frame, shelves and drawers are completely assembled, you can begin interior finishing work, having first carefully removed the debris. What material to use for finishing walls or ceilings must be decided by everyone independently, taking into account both financial resources and their own priorities. According to experts, it is best to line the interior of the structure with panels made of plastic or ordinary wallpaper.
- The most critical stage is the installation of doors. Assembling the doors yourself is extremely problematic, so it is better to buy a ready-made element, and after the frame is completely assembled, in order to accurately select the desired size.
- Before installing the doors, you should install both the upper and lower guides, checking that they are positioned correctly.
- When hanging mirrored doors, be sure to check whether the mirror is securely fastened; if necessary, the decorative element is additionally fixed using a special compound called liquid nails.
- When assembling a structure, you must definitely use a building level to control the correct location of both horizontal and vertical axes.
At this stage, the process of assembling the built-in wardrobe can be considered complete. And, as is easy to understand, such work is not so difficult, therefore, if desired, every home craftsman can cope with it, believing in his own success and adhering to a previously analyzed plan.
Moreover, having assembled the model with your own hands, you will not need to doubt the quality of the material and components used, and the structure can be assembled in just such a design that will help fit the required number of things. If difficulties arise when assembling furniture, video instructions will come to the rescue, viewing of which is available to everyone when visiting the Internet resource.
Source: delajmebel.ru