Existing varieties
Fundamentally, all such tables are the same: base, legs with height adjustment function and tabletop. Nevertheless, there are quite a lot of differences, some quite significant.
Convenience is achieved primarily by matching the parameters of furniture to the characteristics of a person’s physique. An adjustable table helps achieve this.
There are a number of criteria by which you can determine the type of table:
- Adjustment method. Mechanical or using an electric motor.
- Table top material. Glass, plastic, wood.
- Form. Rectangular, round, corner.
- Purpose. Children's, writing, computer, office.
- Options. Monitor mounts, cable management, remote control, sockets.
Additional Information! The simplest (and cheapest) is a table with manual height adjustment. The presence of an automatic lift will significantly increase the cost of the design, so you should carefully weigh everything before going to the store!
Externally, the transformer consists of an adjustable base and tabletops of various shapes, designs and colors.
Shape and materials
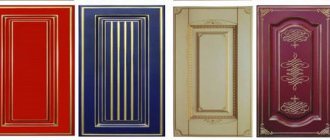
The countertop is most often made of wood or its substitutes:
- Chipboard. The most budget-friendly material. Disadvantage: a little fragile, which reduces its service life.
- Fiberboard. A more reliable, expensive material compared to chipboard. Advantages: high resistance to damage, good moisture resistance.
- Solid wood. The most expensive, but also the strongest and most durable raw material for the production of adjustable tables.
Sometimes metal is used to make adjustable tables. This is a heavy and reliable material with high resistance to damage, but is used exclusively for furniture that will be used for industrial purposes. The table is made of strong and durable steel, which significantly increases the cost of the product, or of aluminum, a soft and less wear-resistant, but cheaper alternative. Legs are rarely made of wood, but solely for decorative purposes (as a covering); they will still be based on hard iron.
Chipboard
Fiberboard
Solid wood
Metal
The ergonomics of the product largely depends on the shape of the tabletop. Corner models will help save space in a small apartment and use space efficiently: the furniture is simply moved to the corner of the room. This is the optimal solution for those who work at a computer. The second option is a standard rectangular table. It is universal for any specific activity, great for narrow spaces, and also allows you to organize a comfortable work area in the office. In addition, there are round design options - with their help you can beautifully arrange a work area in the living room or bedroom. Such a table often provides a comfortable recess for a seated person.
Rectangular
Round with seating notch
Angular
Height-adjustable desk: advantages and disadvantages
The main advantages of the structures under consideration include:
- The ability to alternate body positions during long-term “sedentary” work.
- Good adaptability. It is easy to choose the height for each individual.
- A modern approach to workplace organization. In some cases this may be important.
- Large lifting weight (more than 100 kg). For models with electric drive.
- A wide range of. It will almost always be possible to select a model that best meets the requirements.
The mechanical mechanism is the most reliable due to its simplicity.
At the same time, there are also quite serious disadvantages:
- Inconvenient mechanical adjustment method.
- Cheap designs are characterized by a kind of “tremor” - when raised, the table surface can sway or tremble during operation.
- Car lift models rely on electricity and require additional maintenance. For computer desks, it is not always possible to organize cable management using improvised means. The result is unexpected expenses.
- High price.
Tabletops can also be adjustable and adjusted to specific angles.
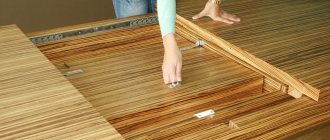
Country table made from leftover boards
This DIY garden table is assembled from the remains of boards of different types and sizes. Pine boards 25 mm thick and 50 mm wide were used for the tabletop frame, and 15*50 mm leftovers for the legs. We make the frame according to the dimensions you need. This table will stand on the veranda, which is small in width. So let's make it narrow - 60 cm, and length 140 cm. The height of the legs is 80 cm (everyone in the family is tall).
Immediately cut two long boards of 140 cm each. To make the tabletop width 60 cm, subtract twice the thickness of the board used - this is 5 cm. Short bars should be 60 cm - 5 cm = 55 cm. Fold the frame, following right angles, twist with self-tapping screws. We check whether the bars are folded correctly - we measure the diagonals, they should be the same.
We cut the boards into four 80 cm boards and attach them from the inside to the assembled frame. You can use 4 screws for each leg.
At approximately the middle of the height of the legs we attach the crossbars. This is a frame for a shelf. The shelf can be used for its intended purpose, and it also increases the rigidity of the structure. We fasten strictly at right angles, checking with a large square.
We put the frame on the floor and check whether it wobbles or not. If everything is done correctly, it should stand rigidly. Next, take sandpaper or a sander and sand.
Let's start assembling the tabletop. What remained from the finishing work were boards of different types of wood, some painted with stain. We alternate boards of different colors.
We fasten the tabletop boards with finishing nails, carefully finishing them off with a hammer. You can secure it to the shelf with regular nails or self-tapping screws. Then we smooth it out with a sander. The last stage is painting. Very unlucky with the choice of varnish. We bought it too dark and didn’t like the look. I'll have to sand it again and paint it a different color.
How to choose
Before you go to the store, you should ask yourself, what kind of height-adjustable table do you actually need? First of all, you need to proceed from the tasks, the solution of which will justify the feasibility of such a purchase. The second important factor is size. Such tables are quite large in size, so it makes sense to take measurements in advance of the place where it should stand.
Such furniture adapts to a person’s height and ergonomics, which allows him or her not to slouch while working.
In general, it is recommended to pay attention to the following:
- Structural diagram. Mechanical lifting or using electric drives.
- Material. If a large load is expected (monitor, printer, system unit), it is better to choose models with a metal frame and a massive tabletop. Models for paper work may be simpler.
- Number of supports. Again, it all depends on the load.
- Maximum lift height.
- Frequency of use. How often is the height supposed to be adjusted?
Note! In some tables with a mechanical lifting system, the adjustment process is carried out using a pin in the corresponding hole on the support. This means that you will have to remove all objects from the countertop that could fall during this procedure, which is extremely inconvenient if such an action must be performed constantly.
Adjustable furniture is an excellent prevention of various diseases of the spinal column.
Kinds
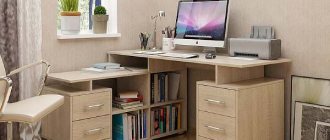
High-quality organization of a schoolchild’s workplace (growing desk + orthopedic chair) allows the child’s body to be in a natural position
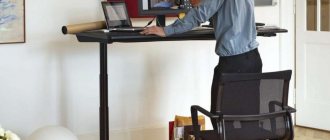
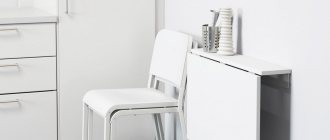
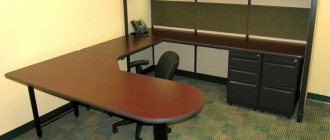
Laptop table for standing and sitting work
We can divide existing models according to several criteria. They will also become a checklist when choosing a product. So:
| Criterion | Varieties |
| Age category |
|
| Type of adjustment |
|
| Table top material |
|
| Form |
|
| Additional functions |
|
Table with mechanical height adjustment
The simplest form is a table with a mechanical lifting system without additions. Its cost will be within 14 thousand Russian rubles. If you want a table with an electric drive and additional functions, expect to spend from 30 thousand rubles on it.
Electrically adjustable table
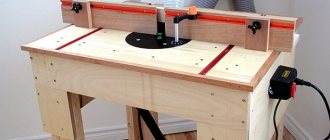
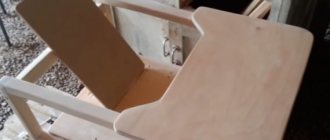
DIY height adjustable table
For the most part, it is unlikely to be possible to make an adjustable table at the level of a store sample. However, most likely this will not be necessary. The need for adjustment can be useful in two cases: organizing a separate workplace with the ability to work while standing and the periodic need to adapt the height of the table. Sometimes such a solution makes sense as a trial experiment to understand whether purchasing an industrial version of a given design would be justified.
Tabletop adjustment can also be mechanical or electrical.
What you will need
Since the manufacture of the table is supposed to be made according to a simplified scheme (all complex components are purchased in advance), everything necessary for the work can be divided into two parts:
- Materials.
- Tabletop. It is best to opt for MDF, but chipboard can also be used. The thickness is selected based on operating conditions, but not less than 22 mm.
Adjustable support. It’s easy to buy a finished structure at a large construction or furniture store. Depending on the implementation of the mechanical lifting system, it can be latched, with a lifting device, or equipped with a gas lift (as in an office chair). Ready-made frames are also sold. In fact, this is a full-fledged height-adjustable table, only without a tabletop. They can be equipped with either a mechanical or electric drive.
- Accessories. Cable box, brackets, sockets, plugs.
- Tools. In most cases, a standard set will be sufficient: a jigsaw, a screwdriver, screwdrivers, a core drill, a drill with a set of drills, a tape measure, a ruler, a level, a pencil and hardware.
Tools that will be useful to you in making a table.
The system can have any shape and dimensions. It all depends on the parameters you need.
Brief assembly instructions
It is assumed that the product being manufactured is of a modular type. That is, all the key components are already available and you just need to assemble them. In general, the sequence of work may look like this:
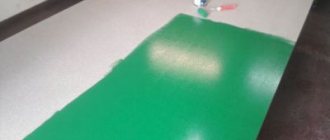
- Preparing the tabletop. If it has not been cut using special equipment, it will have to be cut from a sheet of the selected material, then sanded and the edges sealed. If the surface is not laminated, it will have to be painted. In this case, you will need a spray bottle, otherwise streaks from the brush will be noticeable.
- Turn the tabletop over with the wrong side up and mark the locations for attaching the supports.
- Secure the supports. Usually everything you need comes with them, but can be purchased separately.
- Place the table in the working position and adjust the horizon according to the level.
- Check the functionality of the lifting mechanism.
Such products fit perfectly into modern home and office interiors.
How to determine the optimal height
When working at a desk, it is very important to be in the correct position, because the condition of the human body depends on it. If the posture is incorrect, blood flow is disrupted and a strong load is placed on the spine, which leads to its curvature. As a result, fatigue appears and ability to work decreases. This is why it is so important to customize the individual height of the tabletop, taking into account the specifics of your activity:
- When writing. Your back should be straight, slightly touching the back of the chair. If you lean too far back, increased stress will be placed on your neck, and if you lean forward, it will put more strain on your spine. There must be a small distance between the table and the body of the person sitting; the elbows should be completely on the surface (this will relieve tension from the hands). Bend your legs should create a ninety-degree angle, completely touching the floor.
- When working at a computer. Determining the optimal height is simple - just look at the center of the monitor: if your head is tilted down, you need to raise the tabletop; if your eyes are not looking straight, then lower it up.
- While reading. The book should be at a distance of 35-45 centimeters from the eyes. You need to keep your head level. You should not tilt it back or tilt it forward too much, as this will increase the load on your neck. Doctors recommend reading in a position at an angle of 135 degrees, while leaning back in a chair, so blood circulation is not impaired and the spine does not experience discomfort.
It is better to avoid standing cross-legged - it disrupts blood flow and leads to various diseases, including the development of varicose veins.
For people who spend a lot of time at a desk, regardless of their type of activity, orthopedists recommend adhering to the Sit & Stand concept, that is, alternating sitting and standing postures:
- In the first case, the optimal vertical position of the back: the angle between the spine and the hip joint, the knee and hip joints should be 90 degrees.
- In the second, the tabletop should reach the person’s belt or waist. You need to bend your elbows and place them on the table surface: if they form an angle of 90 degrees, this is the optimal height, if not, it needs to be adjusted.
For an adult with a height of 170-185 cm, the optimal table height will be 70-80 cm. For short people below 160 cm, this parameter should be about 60 cm. For those above 190 cm, furniture is often made to order and reaches 85- 90 cm.
The design with adjustable dimensions is optimal for children. Since the child’s body is constantly growing, the level of the tabletop can be adjusted to suit his current growth. It is important that the student sits straight, without bending his torso, and his head is slightly tilted forward. The legs should rest on the floor with the entire foot, bend at the hip, knee and ankle joints at right angles. Your back should rest on the back of a chair or armchair, and your hips should occupy approximately 2/3 of the seat.
Adjust the height of the tabletop, taking into account the specifics of your activity
Sit & Stand concept
Tabletop height depending on height
Where to put an adjustable table
As for installation, such a table is suitable for both an office and a room in an apartment or country house. The only thing that needs to be taken into account is the dimensions, both in length and height.
The most significant advantage that attracts modern business people is the ability to work in standing and sitting positions.
For tables with an automatic lift, it is advisable to provide convenient access to power outlets. The best option is to be located near the wall, but not close. At the same time, there should be no paintings, lamps or other accessories on the walls that could be touched by the tabletop during lifting.
Don’t forget about proper care of the mechanism, and your table will last a long time, bringing only benefits and positive emotions.
Important! It should be kept in mind that the total height required for work will increase by the height of the largest object located on the table (usually a monitor).
Models with height adjustment: what is their appeal?
Not so long ago, tables with height adjustment were not so often seen. However, times are changing, and design thought is active, so such models (of different designs) are very quickly conquering the market.
Why are they so wonderful? The fact is that these desks literally help keep employees healthy. It's no secret that many workers spend almost all their time in a sitting position. This cannot help maintain their health: over time, their back and legs begin to hurt, their general health worsens, and their performance decreases. However, this can be avoided: just purchase a table with height adjustment.
Table repair
Typically, in such structures, the lifting mechanism most often fails. However, breakdowns of a different nature also occur.
When choosing a control mechanism, think about how often you will need to use it.
The most common malfunctions of adjustable tables:
- Failure of the lifting system (for structures equipped with electric motors). In this case, both the electric motor and the control panel may break. Sometimes the telescopic lift gets jammed. Most such breakdowns are resolved by replacing the faulty part.
- Backlash. Such problems are typical for tables with manual lifting. For example, a desk with adjustable height, in which the fixation is carried out using a pin. This can be solved by selecting a fixing pin of a larger diameter.
- Tabletop defects. For tables with one support, constant loads tilted to one side can lead to surface deformation. In addition, mechanical damage such as scratches, chips and cracks is possible during operation. In most cases, the countertop will need to be replaced.
If you just need to adjust a certain height of the kitchen table, then you can choose a mechanical mechanism.
Of course, it cannot be said that such a table will be an ideal option for everyone. Although, of course, there are certain benefits from such a solution. “Definite” because a height-adjustable table requires a review of the operating mode, constant alternation of body position and, in the end, doing it regularly, which not everyone can do. On the other hand, if it is possible to avoid diseases and not look like a question mark with age, then the answer is obvious.
When buying furniture for a child, you should not give preference to bright models, as this significantly distracts children from the thought process.
Homemade table from pallet boards
The material for this table was disassembled pallets. Naturally, you can use new boards. There is only one condition - they must be dry. You can buy dry ones (this costs more) or buy regular ones, put them somewhere in ventilated stacks and keep them for at least 4 months, or better yet, six months. In general, any furniture, including, is made from dry wood.
We are assembling a table for the street - to put it in a gazebo, so we will not glue the boards of the tabletop, but will fasten them from below, using planks. This is a very simple country table and very cheap.
Having disassembled the pallets, we get boards with individual colors and patterns. Having worked a little magic, rearranging them several dozen times in different ways, we achieve the required result. It turns out to be quite a nice tabletop.
Take the side parts of the pallet. We use them for the table frame. We first sand them with coarse sandpaper, then fine sand them to the required smoothness (grain 120 and 220).
We take the planks that remained unused and use them to fasten the tabletop. We place them in the place where the joints of the boards are located. We use two screws to fasten each board with a joint, and one for a solid one.
From the treated sidewalls and two boards (also sanded) we assemble the table frame. We fasten its parts with self-tapping screws at the end (two for each joint). The frame can be glued or also “planted” on self-tapping screws. Only they are long. For each, we pre-drill holes with a drill whose diameter is slightly smaller than the diameter of the screws.
We turn the assembled tabletop over and sand it. The procedure is the same - first use sandpaper with coarse grains, then with fine grains.
Next is installing the legs. We select four boards of the same size, check their length, and adjust if necessary. Then - sanding again. This is easier than sanding the legs that are already screwed on. We screw the sanded boards to the frame. These will be the legs. For each there are two self-tapping screws, fixed diagonally (look at the photo). For greater stability, we install jumpers at the bottom. You can leave about 10 cm from the floor to the lintels. We connect everything with self-tapping screws, so that the boards do not crack, we pre-drill holes.
After removing the dust, varnish again. In theory, the varnish should lie flat, but it depends on the wood, so another sanding/painting cycle may be needed. As a result, we get this homemade country table.
If you don’t like mismatched boards and traces of old nails, you can make the same design into boards. This table can be rectangular, or square. All sizes are arbitrary - please see the space available.
How to make a garden table from wood with benches
For this table we used 38*89 mm boards (we unraveled them ourselves), but you can take standard sizes. A difference of millimeters will not greatly affect the results. In the photo below you can see what should happen.
To connect the parts, 16 cm long studs with washers and nuts (24 pieces) were used. All other connections are made with nails 80 mm long.
The parts are installed in place, a through hole is drilled with a drill. A stud is installed in it, washers are put on both sides and the nuts are tightened. Everything is tightened with a wrench. Why is this option convenient? For the winter you can disassemble it and take it to a barn or garage.
Making seats
According to the drawing, we cut the boards to the required size. Everything is needed in double quantities - for two seats. We sand the boards, pay special attention to the ends.
The short sections that we use to fasten the three boards of the seat along the edges are cut at an angle of 45°. First, we assemble the structure that is attached to the seat from below. We take a board about 160 cm long, and attach two short boards sawn at an angle to the end of it. You need to attach it so that this board is in the middle.
Then we attach the legs to the resulting structure (you can use nails). Then we add more boards cut at an angle and tighten everything with studs and bolts.
We attach the seat boards to the resulting structure. Since this is an outdoor table, there is no need to knock them together closely. Leave a gap between two adjacent ones of at least 5 mm. We nail it to the supports (which have been sawn down), two for each board.
We fasten the finished seats using four boards 160 cm long. We fasten each leg with hairpins (if you walk, you can put two hairpins, installing them diagonally or one above the other).
Assembling the table
The table is assembled according to a different principle. Please note that for the tabletop, the transverse boards along the edges are cut at 52°. We attach them at such a distance that the legs fit in. 2 nails for each board. You can use finishing ones, with small heads, or you can drive them deep and then mask the holes with putty.
Now we need to assemble the cross legs. We take two boards, cross them so that the distance between their ends is 64.5 cm. We outline the intersection with a pencil. At this point you will need to remove the wood to half the thickness of the board.
We make the same notch on the second board. If you fold them, they turn out to be in the same plane. We connect with four nails.
We make the second leg for the table in the same way. We are not assembling the table yet.
Installing the table
Now you need to attach the legs to the structure on which the benches are installed. We place them at an equal distance from the benches and fasten them with pins.
Now we install the tabletop. We also fasten it with pins. The last stage is painting. Here everyone does as he pleases.
Variations on a theme
According to this drawing, you can make separate benches and a table for a summer house or garden. The design is reliable and simple to implement.
Making rollers and door flaps for a homemade workbench
To create a strong platform for the casters, add two L supports (Figure 5). Each one is sized to fit flush with the front, back and side trim.
Having glued the supports in place, mill a chamfer at the corners of the body (Fig. 6 and 6a), and then attach the rollers to the supports with screws (Fig. 7 and 7a).
The doors are made of MDF panels 20 mm thick, edged with solid wood. The height of the flaps is determined by the distance between the lid and the bottom of the body (Fig. 8 and 8a), and the width is determined by the thickness of the folded hinges and the gap between the flaps.
Having determined the height and width, cut two M panels to size. Then cut out the N trim and glue it in place.
Attach the finished doors to the body on piano hinges (Fig. 8 and 8a) with screws and add magnetic latches.
Wooden table with glued top
This design features L-shaped legs. They are assembled from boards of the same thickness. In this case 20 mm. In order for them to hold well, 5 self-tapping screws are needed. We pre-drill holes with a drill with a diameter 1-2 mm smaller than the diameter of the screws. Then, using a drill of a larger diameter, we drill recesses for the caps. The diameter can be matched to furniture plugs of a suitable color or made from a wooden rod. Another option is to use wood putty, to which you add wood dust that remains after sanding. After drying and sanding, the marks will be difficult to find.
When assembling the legs, you must ensure that the angle is exactly 90°. You can choose timber as a pattern. First, coat the joint of the two parts of the leg with wood glue, then install the screws in the following sequence: first the two outer ones, then the middle one, and only then the other two. After the glue has dried, we sand the legs, varnish them and dry them.
It's time to make the tabletop. We assemble it from boards of the same thickness. We select the size as needed. You can use fragments of different widths. It is only important that everything looks organic, and that the sides of the boards are smooth and fit together without gaps.
We coat the sides of the boards selected for the tabletop with glue, lay them on a flat surface (some kind of table) and tighten them with clamps. In this case, we got by with one, but preferably at least three. We tighten it so that there are no gaps in the resulting shield. Leave it for a day. Having removed the clamps, we get an almost finished tabletop. It still needs to be trimmed - to align the edges, and then sand it. You can trim with a jigsaw or a regular handsaw. It's difficult to get a straight line using an angle grinder, but you can try. After sanding we get a beautiful table top.
Using the same technique, you can make an oval or round tabletop. You just need to draw the appropriate line and trim the glued boards along it.
To make the table look more attractive, we will make a frame. We take a thin strip, sand it with sandpaper and fasten it around the perimeter of the tabletop. You can also use finishing nails. Only we also first coat the planks with wood glue, and then with nails.
After the glue has dried, we sand the joint again with sandpaper.
Now you can attach the table legs. We assemble a table frame from four boards (there is no photo, but you can do it as in the previous paragraph). We attach it to the back side of the tabletop with glue, then install furniture confirmations through the tabletop. A preliminary hole with an extension for the cap is drilled for the confirmations. The holes for fasteners are masked in the same way as on the legs.
We attach the legs to the fixed frame. We place them inside the frame. You can attach it with regular self-tapping screws. That's it, we made a table for the garden with our own hands.
Constructive component
Modern parents have already appreciated the benefits of such products, and they are very popular among them. But it is important that the furniture is of high quality, comfortable and functional.
The peculiarity of adapting to changing growth allows you to use the design for many years. At the same time, even with frequent work, there will be no problems with posture and vision.
Advantages of children's furniture
The adjustable table support is a godsend for families with children. It is difficult to overestimate the positive qualities of such furniture:
- Height adjustment will allow you to use the furniture for many years, because it will “grow” with the baby. By the way, even when your child is in school, the adjusted table will be just right.
- Changing the angle of the tabletop makes the product as comfortable as possible.
- Among other things, a children's furniture set often includes a chair, which can also be adjusted according to height.
- Additionally, lighting, book holders, hooks and drawers can be built-in.
Workplace safety
In order to avoid injury during work, it is necessary to carefully monitor the position of the saw table, its stability, and strength.
Before each use of the circular saw, check that it is securely in place.
Holding the cut material with your hands is strictly prohibited! This can lead to injury to your fingers or the wood to bounce into your face when hit by knots or uneven surfaces.
Also, to avoid eye injury, be sure to wear safety glasses while working. Do not neglect these simple rules, take care of your own health.
For more information on how to make a table for a hand-held circular saw with your own hands, see the following video:
Reading time ≈ 4 minutes
A circular saw is used to cut wood and plastic. Its cutting base is a flat metal disc with a serrated outer edge. When choosing such a tool, everyone decides for themselves what type they need: tabletop, manual, stationary. Many people prefer the manual option. However, in some situations it is necessary to secure the saw. In this case, you can make a table for a circular saw with your own hands, having the opportunity to secure the tool if necessary.
Making the body of the workbench
Start making the assembly table with a 20mm thick MDF frame (Fig. 1). Instead of MDF, you can use plywood. When assembling, use a tongue and groove connection.
Having cut out the cover A, bottom B and side walls C to size, select folds on the upper edges of the side walls, and corresponding grooves on the bottom side of the cover (Fig. 1a and 1b). Then cut out ridges on the side ends of the bottom, and corresponding grooves on the side walls.
Lubricate the grooves on the side walls with glue. Then insert the bottom into place and tighten the assembly with clamps. Then apply glue to the grooves of the cover and place it on the tenons on the upper edges of the side walls.
Add the back wall D, cut along the body opening (Fig. 1). It must be temporarily secured in place by driving finishing nails through the side walls (Fig. 1c), and later it will be secured with trim pieces.
Start by gluing the two front E and rear F trim pieces to the body (Fig. 2.2a and 2b). Please note that the rear parts are wider than the front. They provide a solid surface for mounting the rear wall of the case (Fig. 2a).
Add trim details to the side walls. In the trim of the rear leg K (Fig. 3 and A) there is a groove that forms a channel for a threaded rod, which will be used to raise and lower the working cover of the assembled table.
After cutting out the grooves in each part using a circular saw (Fig. 3), glue the trim of the rear leg into place. Then cut and glue the top and bottom trim H between them.
Add the front I and back J supports (Figure 4) to form the legs. The supports are designed to fit between the front and back trim pieces flush with the side trim of the legs (Figures 4a and 4b).
The dimensions of the front and rear trim of the legs K (made of the same material as all other trim parts) must be selected so that they fit flush to the bottom and lid of the case (Fig. 4).
Working cover of a homemade workbench
The lid must be durable, reliable and easy to clean, so it is made of two layers of MDF and covered with plastic. Cut one O panel to the final size, then cut the other panel and plastic with an allowance. Having connected the panels and glued the plastic, use a flush cutter to remove excess material (Fig. 10 and 10a).
A series of holes for stops provided in the cover will allow the use of convenient clamping devices (photo 4). To make drilling holes easier, make a jig whose dimensions correspond to the width of the cover (Fig. 9). After marking three holes on the jig, drill them on the machine with a feather drill (Fig. 11a). Marking the axis of the holes at the ends of the jig will help you align it when drilling holes in the cover.
The edging of the cover P is sawed off and glued. To smooth out the ribs, mill a chamfer around the perimeter of the edging (Fig. 9).
Supports for the workbench cover
The cover support system (Fig. 12) consists of threaded rods that fit into wooden blocks attached to the cover. Rotating homemade steering wheels raises (or lowers) the lid. The top side of the support blocks is convex, and the blocks themselves are attached to the cover with floating screws (photo 5), so the cover can tilt when the height changes (Fig. 12a).
The threaded rods fit into channels that are already cut into the trim pieces. In order for the steering wheels to rotate easily and smoothly, they rely on small bearings and washers (photo 6).
A piece of hardwood measuring 20x57x57mm is used to make the Q support blocks.
Having cut the blocks to size, drill three holes in each of them: the central one for the pin, and the other two for fastening to the lid (Fig. 13). Then round the bottom edge of each support block. When milling ribs, hold the blocks with a clamp (Fig. 14 and 14a).
Round the top of the support block. To do this safely, first epoxy a threaded rod into the support block. Then clamp it in a vice through wooden spacers so as not to damage the threads, and round the top of the support with a belt sander (Fig. 15 and 15a).