In the twenty-first century, which can rightly be called the digital age, a computer is one of the most popular gadgets in the home. Therefore, the location of this electronic accessory should be ergonomic and quite convenient. You can purchase a computer desk in one of thousands of online stores or make it yourself using only photos, diagrams and simple drawings with dimensions. Our article will tell you about the second option - which models are suitable for what and how to assemble them yourself.
DIY straight work surfaces for your computer
For the convenience of working with office equipment, there are many types of tables. They differ in design, type and size. Straight-shaped products are classics and occupy an important place in furniture production.
Stylish DIY accessory
Creating a fashionable work area for your desktop computer is not an easy task, but it is completely doable. The main difficulty lies in turning curved parts of the correct geometric shape. You can, of course, limit yourself to straight lines, but the effect will not be as expected.
First of all, you need to cut out the base and sides, and then adjust the radius of the transverse parts to fit them. If you do everything step by step, then there should be no difficulties. Pay special attention to the retractable keyboard stand. It is better to mount the runners under it, and not on the side, so it can withstand a significant load. At your choice, equip the product with additional rows of shelves for storing papers and other small items.
Gaming table for personal computer
The work surface, specially designed for gamers, allows you to spend time playing in comfort. With minimal effort, it provides the player with access to all the necessary tools. Most existing models are created by professionals, but if you really want to, you can make a gaming computer table with your own hands. A little skill and imagination will allow you to design a universal product that will satisfy exactly your needs. Use metal pipes as supports. Attach the wooden parts to them not directly, but using protrusions to which you mount the shelves. As a result, you should have a multifunctional piece of furniture.
Drawings and diagrams of computer desks with dimensions
When the question arises of how to make a computer desk with your own hands at home, you should first of all think about the types of these products. This will help you choose a general project and create high-quality drawings, which will greatly simplify your work. The details will subsequently be cut out from them.
There are different types of computer desks:
- Classic
- Corner
- Mounted
- With top shelves
The table must be made exactly following the drawing.
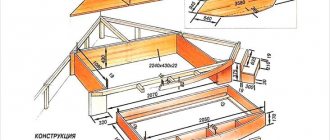
The classic version is a regular rectangular work surface with solid side legs, a pull-out keyboard shelf, drawers and a compartment for the system unit. The length should be from 80 to 150 cm. Depth – 65 – 70 cm. Normal height – 75 cm. If a person’s height is larger than usual, then the height is calculated using the formula: human height X 75/175.
Making a drawing of a table is not difficult.
The drawings for this model are the easiest to complete - just measure the desired length and width of the product. Once the dimensions of the tabletop have been determined, you can draw out the dimensions of the remaining compartments.
Make sure you have all the necessary tools available.
Important! The product should be 3-5 cm less than the occupied space. Otherwise, it will be inconvenient to install the furniture in the designated place.
You definitely need to check that you have worked out all the details and haven’t forgotten anything.
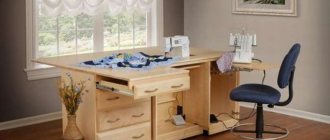
The model with top shelves is similar to the classic one. But it has shelves built above the work surface. This option is very convenient for small spaces, or for installation in the play area of the family room or next to the kitchen table.
Use quality materials to make the table.
You can install a printer, books, or put necessary things on the top shelf. Here they will always be at hand. Making a drawing for this model also begins with determining the dimensions of the tabletop. After this, the dimensions of the sidewalls are determined.
Prepare all the parts to assemble the table.
Their width should be equal to the width of the table, height 160-180 cm. At this height you can place 1 or 2 shelves for small items. At the bottom there is space for the system unit. For convenience, you can place a couple of drawers or shelves.
A corner table will be more difficult to make.
Corner products come in two types. The simplest option is when a person is positioned perpendicular to one wall and parallel to the other. This is the most convenient model, but it takes up more space in the room. The working space of such a product consists of two rectangles connected perpendicularly. On one side there will be a monitor and keyboard. On the other hand - a printer, papers, and small items.
After preparing the drawings, it is necessary to calculate the required material.
When making a drawing, the dimensions of the main tabletop where the monitor will be located are first determined. Then the dimensions of the additional working surface are determined. After this, the sidewalls and the bottom support in the corner are created.
Advice. The most convenient option is when two tabletops are located one above the other. The main one is slightly higher, the additional one is 15-20 cm lower. At the same time, an additional shelf appears in the corner between the parts.
Important! For comfortable working conditions, the length of the free edge of the working surface should be 80-100 cm.
You can choose any material for the table top.
Another model of a corner table requires the user to sit diagonally in the corner. This is the most difficult option to manufacture. To create this drawing, you first need to determine the size of the side parts and then, relative to the size of the sidewalls, calculate the size of the tabletop. The working diagonal should be 60-70 cm long. The depth of corner furniture should be 80-85 cm.
The legs can be made of metal.
The suspended version assumes the absence of legs. In this case, the tabletop is attached directly to the wall. Typically this option is used for country houses. This model is placed in a corner, attached to both walls using furniture corners.
The table may have no legs.
Advice. For convenience, a separate stand should be provided under the screen, which will be located 7-10 cm above the tabletop.
For a miniature room
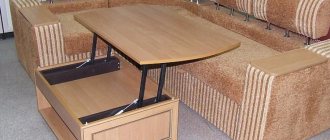
The option is designed specifically for use in limited areas. Depending on the type of room, it may have a different configuration. There are models with a retractable and stationary tabletop. Below is a diagram for creating the simplest table.
Large PC table with bureau
Such furniture will become indispensable for an office in which a lot of documentation is stored. Simple design, does not provide a pull-out shelf designed for a keyboard and other attributes. The photo shows the steps for making a bureau and other elements yourself.
Working studio
The product has impressive dimensions. But if your activity is closely related to computer technology, then a studio table will be the best option, since it has almost everything for work. Desire, as well as a minimum set of materials, will allow you to make such a piece of furniture yourself.
Height adjustable
An original idea for creating a work area for a computer. It is practically impossible to find such a model on the open market. The adjustable surface of the tabletop allows all family members to use the furniture comfortably. Creating such an item is not easy, you will need welding, metal, wood and other industrial style elements, but the effort will be fully justified.
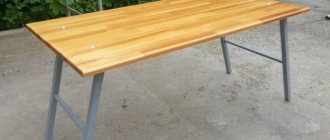
Simple
The easiest PC table to make can be made with your own hands from scrap materials, for example, for the needs of a country house. The product will most likely be universal and can serve as a regular dining or writing desk. The bottom drawer can be used as storage for papers and stationery, or converted into a shelf for a keyboard.
Calculating the size of a computer desk
It is more difficult to calculate the dimensions for a corner computer desk, so we will first consider this option.
Corner table dimensions
Factors that influence the size of the table:
- Tabletop width. The minimum tabletop width is 50 cm (500 mm). The optimal size is 60 cm (600 mm).
- The width of the sections (which are the table supports). Each table has a different section width. If this is a processor tray – 20–25 cm (200–250 mm). If the tray has drawers or a door – 45–60 cm (450–600 mm).
- Depth of the corner (where the person is located). The minimum size is 50 cm (500 mm), optimal is 60 cm (600 mm).
Common overlaps listed above -
- tabletop width – 50 cm;
- corner depth – 50 cm;
- section width – 20 cm and 45 cm;
- 5 cm + 20 cm + 35.4 cm + 50 cm = 110.4 cm – the length of one table wing;
- 5 cm + 45 cm + 35.4 cm + 50 cm = 135.4 cm – the length of the second wing.
Optimal table size
- tabletop width – 60 cm;
- corner depth – 60 cm;
- section width – 25 cm and 50 cm;
- 5 cm + 25 cm + 42.4 cm + 60 cm = 132.4 cm – the length of one table wing;
- 5 cm + 50 cm + 42.4 cm + 60 cm = 157.4 cm – the length of the second wing.
Optimal table size
- with one tray: 5 cm + 5 cm + 25 cm + 60 cm = 95 cm;
- with two trays: 5 cm + 5 cm + 25 cm + 50 cm + 60 cm = 145 cm.
Table height varies from 70 to 76 cm.
Note! It is not recommended to make the table higher or lower than the required dimensions, as this will lead to incorrect body position when working at the computer, the development and aggravation of back and spine diseases.
Drawing of a computer desk with dimensions
Table equipped with an extension
This option is more suitable for people of average and tall height. It is comfortable to work at the monitor while sitting in a large chair. The system unit with wires is placed below in the legs, which are made from old book shelves. The LCD screen is placed on stainless steel supports, slightly above the tabletop. The product is additionally equipped with LED lighting, which gives it a futuristic look.
Simple accessory with shelf
A simple, ergonomic option with sectors measuring 0.5 by 1 m. It is made from planed wood or improvised materials (old furniture, pallets). For manufacturing you will need a circular saw, a chisel, an angle grinder and other small tools.
Backlit
High-quality lighting will be the highlight of any design. Furniture equipped with an LED strip appears to float in the air, creating a feeling of lightness. The accessory will fit perfectly and decorate a small room.
Sketches of computer desks with the most popular sizes - photo gallery
Below you will see drawings of the most popular models of tables for personal computers. The diagrams visually show how to create an ergonomic and practical product from a minimum number of parts that will decorate any room.
Corner furniture for PC
This variety is designed to optimally fill the space in the corner of the room. Many existing models will create an ideal area for working with office equipment. Below we will look at the most interesting, in our opinion, projects of corner computer desks with drawings and dimensions.
What is it like?
The corner of the room will be a good place to place furniture for office equipment. Such accessories have a larger surface area. In terms of functionality, this product is much superior to its competitor with a straight tabletop. If you are looking for the most rational and optimal option for a miniature room, then making a corner piece of furniture yourself is a good solution. Just follow the instructions and you will be the owner of universal furniture that will satisfy all your needs.
Choosing a place to install a computer desk
first stage - marking the tree
Before you start making your own table, you need to determine where it will be installed. Its size and functionality depend on this. A small table will take up little space and will not clutter up the space, but at the same time it will be inconvenient and not functional.
There are several simple rules for placing a corner computer desk in a room:
It is advisable to place the table in close proximity to sockets and electricity. The use of a large number of extension cords and tees is not advisable. The ideal option would be to use equipment equipped with grounded sockets to power the equipment from the network;
cutting MDF boards to specified sizes For comfortable work, the workplace should be positioned so that natural light enters from the left side. To prevent equipment failure due to overheating, it should be located away from heating and heating devices. The placement of shelves should not coincide with any protruding or decorative elements on the walls. Such shelves and add-ons will not perform their functions and it is unlikely that it will be possible to place anything on them.
using confirmats to connect table elements
Table with high top in corner
Very often the corner space is the only place where you can put a computer accessory. Knowing the dimensions, it is possible to make it yourself. Use galvanized or water pipes as supports. This table is made high so that it is possible to work, so to speak, “on the go.”
Homemade corner table
When no store-bought model suits you, or you don’t have the necessary budget, then the best option would be to create an accessory yourself. You don’t need any special skills for this, just learn how to drill, grind, saw and have good patience. Photos with step-by-step instructions and drawings of computer desks with dimensions of parts will facilitate the manufacturing process.
Master class on making a table
When working on creating furniture, you must first measure the dimensions of the room, select a model, and prepare a drawing. Schemes and drawings for making a computer desk are now freely available. If you wish and have artistic skills, you can make the diagram yourself.
Sketches of corner products
Below are assembly diagrams for the most popular models. Making such interior items yourself will not be particularly difficult.
Work surfaces made from pallets
Building materials are excellent raw materials for creating home furniture. From pallets you can make benches, shelves for books and, in unusual shapes, tabletops.
A simple model of a pallet structure
An original solution to recycle unnecessary boxes and at the same time create something necessary for the home. The U-shape fits into limited space. You can place the system unit on the left side, and disks and documents on the right. The tabletop is covered with thick glass according to the size of the pallet.
How to make a PC desk
If you want to have a good work area for your computer, but no store-bought option suits you, or you don’t have enough money to purchase the models you like, then make it yourself from pallets. Such building material can be easily obtained and given the desired shape. Use the best boards for arranging the tabletop, the rest as needed. Open the finished product with varnish.
A simple option from pallets
To implement the idea you will need three pallets. Two of them will have to be disassembled to make a solid tabletop. From the rest, depending on the project, legs, shelves and other elements are created. It is better to fasten all components with self-tapping screws. When the structure is ready, it is polished and covered with ship's varnish.
Large table made from wooden pallets
It is quite expensive to purchase such a product in a store. Many people resort to pallets to solve this issue. Creating a table with your own hands is not difficult, but you will have to work hard. Boards made from pallets are not always smooth, often chemically treated, and have elements of rust. However, after sanding them and varnishing them, the product comes out as if it came out of a factory assembly line.
Folding pallet model
If your room is small, your budget is limited, and a table is extremely necessary, then you can make it out of pallets and fold it out. One part of the accessory is fixed on the wall, and the other has legs. Using door hinges, a mechanism is created that, if necessary, folds and unfolds the table. This surface is convenient to use for working with a laptop and PC.
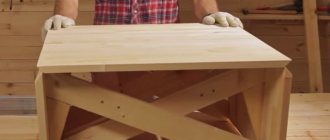
Assembly steps
A high-quality and completely durable homemade table can only be prepared if certain steps are followed. First of all, the structural parts are created, then they are connected and the finished product is finished. As an example, we will consider the assembly of a straight-type table with shelves inside and a sliding keyboard stand. Of course, this is not a full-fledged gaming desk, but it is quite suitable for office tasks.
Advantages of silicone transparent table pads, their manufacturers
Preparing parts
Since the drawing was already prepared earlier, you first need to cut out the parts for the table. To do this, you will need a sheet of the selected material, that is, chipboard or MDF, after which a jigsaw is used. With its help they do:
- two identical side posts with dimensions 735*465 mm, which will be the outer supports;
- central post 735*380 mm, this needs to be made in one copy;
- tabletop with parameters 1200*580 mm;
- the back wall measures 1090*290 mm;
- stand used for the keyboard - 830*380 mm;
- several internal shelves of medium dimensions - 450*250 mm.
Now all the structural elements are ready for assembly, you just need to do the work efficiently.
Assembly of the structure
The so-called formation of the desktop is done using dowels and screws; some parts are glued with a special glue created just for wooden parts. Bonding is done in stages:
- Holes are created in the side wall and the rear panel where the bottom shelf will be attached.
- From them, 50–70 mm are measured horizontally and a line is drawn to this point.
- In the horizontal area, two more holes are made, located in parallel positions. This way you will get two identical holes in the side wall, two more in the central one, they are fastened with self-tapping screws.
- In the same way, the top shelf is secured, which should be located at a distance of at least 100 mm from the beginning of the board.
- The cut-out rear wall is mounted, and the alignment should be ensured in relation to the ends of the side and central panels. After marking the holes, the sheet is attached to the screws.
- Another side support, not previously involved in creating shelf space, is also attached to the rear wall. This is done through holes in the back panel.
- The guide element is fixed. To do this, measure about 50 millimeters from the top of the side and central walls and draw straight lines parallel to each other. The rails are fixed.
- The keyboard shelf with already mounted rollers and strips is inserted into the prepared grooves.
- The table top is being installed. Holes are made in the edges of the side supports and the wall located at the back, as well as at the bottom of the tabletop, coinciding with each other.
- Dowels are used, which are coated with glue and inserted into shallow holes on the side and rear panels. Part of the dowels, also coated with glue, should protrude outward.
- A tabletop is placed on the open parts and pressed down for better fixation. It will take about an hour for the glue to dry.
- The shelves on the tabletop can be secured to the same dowels. You should not make the structure too high, as it will be unstable.
At this point, the table will be almost ready, all that remains is to work on its appearance so that it becomes a full-fledged interior detail.
Finishing work
To put the original table in order, you need, first of all, to cover the edges with furniture tape. It is applied to the edge, after which a hot iron is passed over it. You can also use a hair dryer for these purposes.
Algorithm for making original coffee tables with your own hands
If untreated wood was used for work, you need to be prepared for the fact that its surface will not be ideal. To bring the wood to a smooth state, it is first puttied in places of unevenness. They can be identified visually or by touch, but it is better to use a level. Next you need:
- Sand the surface so that it is not rough and remove any additional roughness.
- Cover with stain, which will prevent the appearance of dampness and insects eating the wood. In addition, this composition will improve the fire safety of the material.
- The entire surface is covered with varnish as evenly as possible. There should be no dust or dirt in the room, otherwise the varnish will be damaged.
The table is now finally ready for use and can be placed in a predetermined area. Caring for it will not be difficult; just wipe the surfaces regularly with a damp sponge or microfiber cloth. If the shine disappears over time, it can be easily restored using a special furniture polish.
After assembly, the table is covered with stain and varnish
Wheels are attached to pre-prepared holes.
Shelf for ups and holes for routing wires Furniture edging tape is glued to the edges
Photo selection of tables made from pallets
Below are photographs of the most popular DIY models.
Original solutions
A non-standard approach to creating a furniture accessory will help you create a truly unique piece of furniture. Below you can get some ideas.
Dresser
A computer tabletop can be combined with such a necessary furniture accessory as a chest of drawers. It is safe for children and takes up no more space than a standard TV stand.
Unusual modding on a coffee table
In this option, an additional pull-out shelf is equipped under the tabletop in which you can store a laptop. It is very convenient and incredibly practical. If you want a similar accessory for yourself, read the detailed step-by-step instructions.
Furniture with built-in PC
An interesting idea on how to hide a computer. The equipment is placed inside the table, so it is not visible from the outside. Looks compact and versatile.
DIY home office
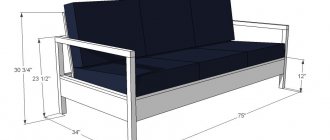
During sedentary work, blood stagnates and muscles atrophy. Uncomfortable furniture is the main provocateur of osteochondrosis. There is an opinion that working while standing is much safer. If you are a fan of this idea, you can create a special high computer table for standing work. The design looks solid and has everything you need.
Non-standard modding of the system unit made of natural wood
The universal covering of the device in a futuristic style will help decorate your room. Unusual shapes and dim lighting will make the equipment the highlight of the interior. I like the idea, try making something similar.
“Resident Evil” system desk
Reward accrued
This material was written by a site visitor and was compensated for. I have long dreamed of getting rid of my annoying old computer desk. As you can imagine, the system unit was in my legs and a little more and I had to amputate my left knee in order to sit comfortably behind it, but fortunately everything worked out)
My blog! As far as possible, I will add material with details, as well as new improvements!
So, one cold winter evening, while browsing the websites, I came across articles by foreign authors, namely:
Author No. 1 “L3p D3sk” Author No. 2 “Desk Art”
And then, gathering his masculinity into a fist and gritting his teeth, he decided to drink it with blackjack and hot girls from Oktoberfest... beer, yes, I love beer... oh yes! exactly, a table) It was, as I already said, in the winter, namely just after the celebration of the January holidays. Without hesitation, I figured out how much the consumables would cost me and the time it would take to make them, so I decided to cut this beauty, my beauty) In the following days I bought a metal beam, 0.8mm plywood, a couple of blades for a Bosch jigsaw, which I took and started to work))
Then I began to determine the dimensions based on my needs, my gaze fell on the following dimensions: width 600mm x length 1500mm. I started with a metal beam (profile), which was welded in the form of a “shell”.
I cooked it myself, I know how to cook (soups, borscht) the hostel won’t forget you), the welding machine is actually here (similar)
Then I started cutting the plywood, then there were a bunch of photographs, but they were after I cut the parts from the plywood and put them together to make photos (there won’t be a lot of writing, sorry). He took my wife’s camera and seduced the DSLR in all focus angles)
I fixed the table to the wall using anchor bolts and some kind of mother
I sanded the plywood until it didn't get splintered into my fingers.
I inserted the glass into the table and the motherboard in order to contemplate my creation, which roughly resembles something sane and pleases my soul and pride, pride in my glorious creation.
I started sculpting the wiring, trying it on to understand what was what and why, yeah... unfiltered topic, and especially unfiltered-living Velvet in general atas)
I decided on a tray “lid” to hide all those rags “cords” that will go to the HDD and DVD. The cover is made of plywood, ~10 mm. I painted it with the same paint as the whole base, “black, matte with an attractive girl on the label,” bought at a car store.
A Xilence 800w power supply was purchased. Cheap and cheerful, according to reviews from the network it ranks in the middle, just what you need. Golden Mean™
I painted the table matte black, it looks just great, I liked the color, but it’s not practical, the dust sticks like a magnet.
I did put it together, but this is only the basis of a “working version”, an unfinished bright project of a fundamental creation... my thoughts...
Next... I painted 2 DVD cutters and a “pilot” surge protector, all with the same matte black paint. The masking tape was nearby.
Then I started renovating the room, removed the old tiles, poured the screed, put on a heat-reflecting backing, then a film with infrared coating and a laminate on top, hung a regulator on the wall and was happy as an elephant, you drink something so cold with a movie and then your feet feel great from the heat on the floor, I advise , but the film consumes quite a lot of electricity, 150 W per 1 square meter. In short, overclocking... yes baby, it’s a volt mod, and not a simple software one that anyone can do.
The soldering iron is our everything
There is a card, an AMD XFX HD 6790 1G DDR5 video card; immediately after purchase, enhanced cooling was installed on it, namely: radiators for memory chips and a fan screwed to the factory cooling using a visual wire (without flinching the right hand and pliers), MX-thermal paste 2
Used arsenal of tactical and technical weapons:
- Faithful friend "Svetozar"
- Chinese sub-multimeter
- Solder and old Soviet rosin from the Brezhnev era
The patient is ready, Nurse Scalpel!
We find the pital chain we need from this burp of hell
We solder 2 wires to measure the frequency of the flaming motor of our piece of PCB
Solder the wire
measured the stock voltage value on the core of my graphic solution, not enough(
This should help
Another thing)
We remove the card, solder our additional wires
Testing with a shaggy cube for stable frequencies
result, not so great, took a photo with a cat
About the filling:
- Q9300 3.225 MHz
- DDR3 FSB 1333 4G
- XFX HD 6790 950/1200
- HDD 320Gb
I will answer many questions at once
- yes, I'm happy with everything, I did it for myself
- sit comfortably, have room to rest your legs
- everything fits tightly, no spills
- I have enough iron, overs are opening, films are watching
- I made the table for 2 months when I wasn’t too tired after work
- costs do not exceed 6 thousand rubles
- glass rises on both sides
- The brightness of the backlight is adjustable, there is a toggle switch to turn it off altogether
- I extended IDE and SATA, everything works as before, nothing slows down
- the table is not yet perfected
Reward accrued
This material was written by a site visitor, and a reward was accrued for it.
Table stand
Any desk or coffee table can be refined and reformatted into a computer table if you install such a stand. The design is height adjustable and adapts to the needs of the owner. This is an ideal budget option for creating a full-fledged work area.
If you decide to make furniture yourself, then follow these tips:
- • Study well the issue and drawings of the most popular office desks.
- • Properly calculate the amount of materials needed.
- • Before you begin, make a detailed project in which you indicate all the nuances.
- • Carry out the work step by step and slowly. Pay special attention to cutting curved parts - if you doubt your abilities, entrust the cutting to a professional carpenter.
- • Treat the finished product with durable varnish.
With a little effort and some patience, you can create an original sketch. In this article we told you how to make a computer desk with your own hands.
Common assembly errors
To assemble furniture with your own hands, you need to pay attention to some secrets and nuances that will help you avoid frequent and serious mistakes. It is these unfortunate mistakes that can reduce the quality of the product, its service life, appearance, and sometimes even ruin the items. It is important to consider the following:
- The first aspect that no instruction will tell you about, but which all assemblers know about, is working with an assistant. An extra pair of hands and eyes will never be superfluous;
- Often computer furniture is made of MDF. This is a soft material and is easy to damage. Therefore, instead of a drill, it is better to use an ordinary screwdriver;
- When installing the cabinet frame and drawers, it is important to check the corners. They must be strictly 90 degrees. Furniture should not be skewed. This is easy to check by level;
- the loops must be tightly “planted”;
- when attaching the back wall to the box, it is best to use self-tapping screws instead of nails;
- The computer desk has holes that are covered with plugs. These small parts are easily lost, so it is recommended to glue them to the surface;
- When using a screwdriver, you can accidentally scratch the furniture. If there is a protective film on the elements, it is better to remove it after finishing work.
Assembling computer furniture requires leisure. Strict adherence to the instructions and accuracy will help to carry out the installation work efficiently.
Use a screwdriver instead of a drill
Glue the plugs
Work with a partner