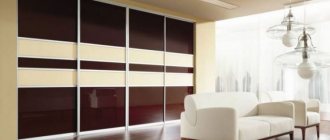
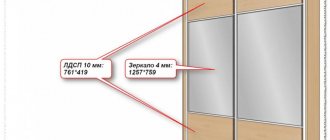
Built-in wardrobe (calculation example)
Height: 2500
mm.
Width: 1900
mm.
Depth: 600
mm. The door frame is Champagne (Optima). The color of the visible parts of the wardrobe is wood, the filling is wood. A cabinet without a back wall, without a floor and without one side wall.
Calculation of wardrobe doors. When calculating wardrobe doors, it is necessary to remember that according to the technology, each pair of doors requires an overlap, which in this case amounts to 20
mm and the height adjustment gap is at least
45
mm.
It should also be remembered that in all cases it is necessary to take into account the thickness of the chipboard of the side walls and false panels of the wardrobe ( 16
mm).
The formula for calculating the width of wardrobe doors looks like this: Opening height (2484
mm) - adjustment gap (
45
mm) =
2439
mm (door height) Opening width (
1884
mm) + overlap (
20
mm) / per number of doors (
2
pcs.) =
952
mm (door width).
To find out the cost of this door, you need to find the corresponding group of doors in the “Calculation Table”: Sliding door “Optima” (Raum+) Chipboard, in the “Size” column 1
» enter the height of the door
as 2439
mm, in the column “Size
2
” the width is
952
mm, in the column “Quantity” - quantity, in the last column the cost of the doors =
8749
rubles.
Sliding doors require a set of two-way guides, 700
r./p.m.
To calculate the cost of guides, in the line K-t of “Optima” (Raum+) guides, enter the length and quantity in the corresponding columns. We get 1319
rubles.
Calculation of the cabinet body. In the case of a cabinet cabinet, two side panels, a roof, a floor, and a back wall are required. The cabinet in question is a “partially built-in” cabinet, requiring only one side panel and a roof from the cabinetry. All chipboard parts are calculated by area. Therefore, the formula for calculating the side wall is: Cabinet height ( 2500
mm -
16
mm (roof thickness) =
2484
mm) x depth (
600
mm) x cost of chipboard
16
mm "Egger" panel.
28
colors of wood (
957
RUR/sq.m.) and add the cost of a
2
mm PVC edge (
55
RUR/m.m.).
In the “Calculation Table” in the chipboard line 16
mm "Egger" panel.
28
colors of wood, in the corresponding columns we enter the dimensions of the side panel: height/length, width/depth, quantity.
In the last column we see the cost including PVC 2
mm =
1563
rubles.
The roof (ceiling) of the cabinet is also calculated: 1900
x
600
x
1
x (
957
(+PVC)) =
1195
rubles.
Calculation of internal filling from chipboard. Sliding doors occupy 100
mm from the cabinet depth.
Consequently, the partition is 100
mm less in depth than the side wall of the wardrobe: overall depth
600
mm -
100
mm =
500
mm, cabinet height
2500
mm -
16
mm (roof thickness) =
2484
mm.
The shelves are calculated minus the thickness of the side panels and partitions: 1900
(overall width) -
16
(side panel) -
16
(partition) =
1868/2
=
934
mm with a depth of
500
mm.
In the “Calculation Table” the dimensions and quantities are entered in the same way as the case parts, only to save money you can change the color of the laminate (chipboard 16
mm “Egger” WHITE -
736
RUR/sq.m.).
The cost of the partition = 1051
rubles.
and 5pcs. shelves = 1870
rub.
Barbell. The width of the wardrobe opening where the clothes rail is installed ( 934
mm) x cost per linear meter of rod with fastening.
In the “Calculation Table”, the line reads: “A pipe-circle was hung. chrome with fasteners”, specify the length and quantity. We get 286
rubles.
Mesh shelf for shoes. Mesh filling is calculated based on the cost per linear meter. All mesh shelves require additional fastenings. In this case, we will need a honeycomb shoe rack with fastenings. The width of the wardrobe opening where the shoe shelf is installed ( 934
mm) x cost per linear meter (
515
rubles) + set of fastenings for a honeycomb shoe rack (
148
rubles).
In the “Calculation Table”, line – “Shoe rack with fastening”, enter the length and quantity. We get 629
rubles.
The last point in calculating a wardrobe is to count the “schlegel” - dust brushes (55
r./p.m.), “positioners” (
100
r./pc.) and “furniture corners” (
14
r./pc.).
In this version of the cabinet, 32
corners are enough (
448
rubles).
These elements in the “Calculation Table” are calculated automatically (corners are required) = 1185
rubles.
The total cost of a built-in wardrobe of the aluminum system "Optima" (Raum+), considered in this example, taking into account delivery and installation, excluding discounts, will be: 17952
rub.
+ Installation 12%
(but not less than
1500
rubles) + Delivery =
21004
rubles.
There is a system of discounts up to 15%
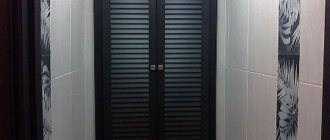
Sliding interior doors
Recently, double-leaf interior sliding structures have gained great popularity, the main advantage of which is saving space.
You can install them yourself; to do this you need to purchase:
- Door leaf.
- Sliding mechanism.
- Pens.
- Lock (if necessary).
This kit is already enough for installation. To make new interior doors look more attractive, you should think about replacing other parts:
- Door frame (you will need a rail).
- Platbands.
- Bar for sliding system.
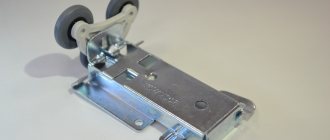
Installation begins with preparing the door leaf: first, a small slot is made in the center with a grinder (it serves as a door stop), rollers are screwed on all sides, a lock is installed, and handles are attached. Then you need to install the sliding mechanism in the doorway. Pay special attention to the length of the guide, adjust it to size if necessary, and calculate the correct installation height.
Thanks to the rollers, the blade can be easily installed in the guide.
A rubber stop, upper and lower stops are attached to the three-millimeter gap.
It is advisable to carry out the work after replacing the door frame: it is made of slats, reinforced with foam, and trims are installed. If the interior doors have a lock, then in place of one of the platbands a beam is placed where part of the locking mechanism will be located. The frame can also be decorated with stone, laminate, to match the design of the room, so that the interior doors look harmonious.
Sliding doors installed inside wide openings, in built-in wardrobes or walk-in closets, as a rule, have non-standard sizes. In order for the canvases to look neat when closed and not have gaps or significant overlaps, it is necessary to calculate the design in advance, taking into account the necessary gaps, the features of the sliding system and the width of the framing profiles. It is worth noting that to calculate compartment doors, a different formula is used than for swing doors or sliding panels moving in the same plane.
Selection of accessories
The various elements related to the fittings must be attractive and of high quality. Their design and colors should match the style of the cabinet. The accessories include:
- guides, stoppers and rollers to create a sliding system that makes it possible to comfortably open or close the cabinet;
- profile, which can be steel or aluminum;
- fastenings for shelves or other storage systems, and it is advisable to buy a tie system consisting of a flipper and a rod instead of outdated shelf holders;
- fasteners for connecting parts of the cabinet, which include screws, self-tapping screws, confirmations, nails for furniture and fastenings for rods.
Designing sliding wardrobes is considered a rather specific process. During its implementation, it is necessary to take into account the dimensions of the future structure, its design and the place where it is planned to install it. The reliability, durability and durability of the resulting furniture depend on the correctness of the design. Initially, drawings of the main parts of the structure are made, after which an assembly project is formed.
Rollers
Guides
Profile
Accessories
Facade filling
The facade is the main and visible part of the wardrobe. In addition to the classic filling options (chipboard (laminated chipboard) or mirror), there are many other interesting solutions. This is painting on glass or mirror. Embossed glass, sprayed glass or stained glass designs. Facades are offered with finishing made of artificial leather, decorative plastic, as well as natural bamboo or rattan. Filling options can be combined. Door inserts can be framed with profiles of various geometric shapes. Depending on the filling material and the type of sliding system, the calculation of the size of the wardrobe doors may differ slightly. When calculating combined doors, the height of the filling is reduced by 4.5 mm if its thickness is 40 mm, respectively, by 1.5 mm if the filling thickness is 10 mm. The glass and mirror filling on the reverse side must be reinforced with an impact-resistant coating.
Description of drawings
Before starting to assemble any piece of furniture, it is necessary to create a certain diagram in the form of a drawing. The dimensions should be carefully verified, with the obligatory indication of all parameters both on the outside and inside the structure, while being sure to indicate the thickness of each partition.
When drawing up a drawing, it is important to comply with certain size standards in advance: for example, it is recommended to leave the optimal distance between shelves at 30-40 cm, and the depth of the drawer should be no more than 50-55 cm
Before creating a drawing, you need to decide on the main characteristics that the future wardrobe will have:
- height, width and depth;
- height of mezzanines, if planned;
- how many doors, drawers and other sections there will be in the closet;
- what content is planned: drawers, crossbars, shelves, etc.
After this, a sketch of the future cabinet is drawn. If you have experience and the ability to draw, you can make a drawing yourself, simply using a sheet of paper. There is also a simple solution for those who are not good at drawing: special computer programs into which you just need to enter certain data, and the computer will produce a ready-made, full-fledged drawing. The quality and accuracy of such a drawing is so high that with its help you can safely begin to assemble the cabinet yourself.
The following is a small guide with which you can independently make a small built-in wardrobe at home, placed in a small niche in the hallway.
How to decide on sizes
Having determined the size of the wall opening, proceed to the next stage of calculating the compartment door. To make the process easier, it is recommended to use computer programs, although this is not at all necessary. In fact, even a middle school student can calculate the length of the framing profiles and guides, as well as the dimensions of the canvas filling.
Depending on the width of the passage, choose the number of movable canvases - one or two. The total number of compartment door sections installed inside the opening can vary from two to four or more. In this case, one or two doors remain motionless, and the rest, moving parallel along separate grooves of the guides, are hidden at the moment of opening behind adjacent sections like a cascade. This design makes it possible to open the opening to the required width, depending on certain circumstances.
When choosing the number of leaves for a compartment door, it should be taken into account that each of them should open at a distance that allows an adult to easily move to the next room, as well as bring furniture inside the room.
The minimum dimensions of doorways “in the clear” are established by state regulations. For compartment doors located inside the passage, there are additional rules that its width must be at least twice the size of the opening door. Otherwise, it will be necessary to install compartment doors on the outside of the opening, which will require additional material investments. But it will be easier to calculate such canvases, based on the absence of strict restrictions.
Making cabinet parts in a workshop
The next step is to make the cabinet parts in the workshop. So that in the workshop you don’t have to explain “on your fingers” what you need, just print out the specifications of all the elements and their drawings in advance and give them to the craftsmen. In addition, Basis can also make a cutting map, for which the workshop requires a separate fee.
To do this, you just need to use the Basis-Cutting module, specifying the dimensions of the original chipboard sheets. This card is a pattern according to which structural elements will be cut from a sheet of a certain size, taking into account indentations, thickness of cutting materials and other subtleties. True, some nuances still need to be coordinated with furniture makers, so it is better to entrust the cutting map to them - they have a better understanding of these issues, and when cutting they will take into account the tools they have.
As an example, let's consider the manufacture of a wardrobe with a height of 2.5 m, a width of 1.2 m, a depth of 0.4 m. According to calculations, it turns out that for its manufacture you will need two sheets of chipboard with an area of 4.08 m2 and a sheet of fiberboard with an area of 4. 67 m2.
What should you pay attention to when making a wardrobe?
When choosing a color, you should not rely on names like “Milanese walnut”, etc. Each manufacturer has its own understanding of what this very nut looks like, and there are no uniform standards. So it’s best to go and choose the color of the material yourself, based on its type, and not on its name.
After all the elements of the cabinet are cut out in the furniture shop, you may be offered to take with you the scraps of the sheets from which they were cut, because you bought a whole sheet, which means the scraps are yours.
If you don’t need them, furniture makers will keep them and give you a small discount. This solution seems more attractive to many. It seems like we got rid of garbage and also saved money. But it is not so. During the assembly process, some elements may become damaged, and you can use the scraps to replace them.
If you order a separate part from a workshop that is not made from your own material, you can overpay up to 25% of the cost.
One more nuance. You need to pay not for the manufacture of each individual part, but for cutting the sheet. At first glance it seems that these are one and the same thing, but in fact this is not entirely true. Therefore, when calculating the amount of starting material, you need to clearly determine the number of sheets and send them for cutting.
Programs like Basis will help you decide on the issue of material consumption quickly and accurately. Manual calculations often give inaccurate results, especially if there are a lot of parts.
A separate expense item is the production of shaped elements, for example, side shelves with a rounded corner or baseboards. The cost of such cuts is higher than cuts of a simple rectangular shape, which must be taken into account and agreed upon in advance, so that later there are no misunderstandings when paying.
Let's summarize. The costs of making parts in a workshop consist of:
- drawing up a cutting map (it’s still better to entrust this to the craftsmen);
- cutting laminated chipboard and LDVP sheets;
- making plinths;
- production of rounded elements.
How to make a wardrobe with your own hands: drawings and stages of the device
You can make a headset yourself, but this will require knowledge about design features. Sliding wardrobes are not so easy to make with your own hands, even if there is a description, drawings and step-by-step instructions. But don't rush to get upset. Let's look at all the intricacies of the workflow.
Measurements of the room and calculation of the dimensions of the built-in wardrobe with your own hands
The Aristo program will help you design and calculate sliding doors.
The following measurements must be taken:
To calculate the depth of the cabinet, you need to calculate the usable space, and also take into account the maximum allowable dimensions. 100 mm must be taken into account when planning a sliding system for sliding wardrobes. The height of the furniture should be 100 mm less than the distance from floor to ceiling.
Cutting and fittings
Before you make your own wardrobe, you first need to write a list of all the parts on a piece of paper. With the list, you can contact the workshop, where they will cut and cut the material. You can make the cut yourself, but this is a more difficult option. It is necessary to lay out the parts and calculate the number of laminated chipboard sheets.
Sliding systems consist of a profile and a sliding support. Roller mechanisms can be axial or bearing-based.
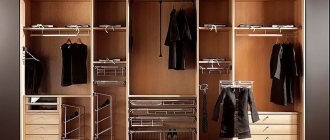
Choosing cabinet filling
The internal content helps decide what the layout will be. You should not place the section for outerwear in the center, as moisture from it can spread to the sides. It is better to place this compartment on the side. Boxes for bed linen are not recommended to be placed directly above the floor.
How to correctly arrange the elements and how to assemble a wardrobe with your own hands can be seen in the video below:
Watch this video on YouTube
Number and sizes of doors, guides, rollers for wardrobes
The best solution would be to use combined rail guides, in which the supporting surface for the rollers is made of metal.
The steel profile for sliding doors has increased reliability. Rail supports for furniture of famous brands are made from aluminum.
When planning doors, you need to calculate the width of the leaves. In this case, when closed, one handle should be visible, but it should not cover the door leaf.
The rollers are made of metal, since plastic is not durable. The roller contains a ball-bearing internal mechanism that allows the door to move freely in the horizontal direction.
Do-it-yourself wardrobe and compartment door assembly
We invite you to familiarize yourself with the process of assembling a sliding wardrobe with your own hands in the table below:
| Photo | Description of work |
| To assemble the wardrobe, you need to apply markings. It is necessary to note the dimensions of the cabinet in width and the location of the vertical rack. The heights at which the shelves will be fixed are noted. | |
| Drill holes for dowels. | |
| The profile is put on before installation. | |
| Install a vertical stand. | |
| We mark the mezzanine shelf and install it. | |
| The side wall is installed. | |
| The shelves are marked and installed. | |
| The clothes rail is marked by size and installed. | |
| False panels are installed. | |
| One panel is fixed at the bottom. | |
| The supporting upper part is attached. | |
| The bottom guide is secured with a screw. | |
| The top guide is attached in the same way. | |
| Doors are being installed. |
The process is presented more clearly in this video:
Assembly and installation of sliding wardrobe doors
You need to assemble the structure on a flat table or on the floor, first leaning it against something (a wooden beam).
General assembly algorithm:
- File a profile;
- Tap the top frame (tap gently with a rubber mallet);
- Stuff the bottom frame;
- Level the horizons (insert protrusion 7 mm);
- Installation of the handle (7 mm indentation);
- Put on the handle and side handle;
- Pull the frame;
- Screw in the screw at the top;
- Installation of rollers and seals;
- Installation of mirror inserts.
Inserts with a coating (film) at the edges should be rounded; if they are at a right angle, the film may be damaged.
Installation algorithm:
- We insert the sash into the installed upper guide mechanism.
- The rollers are installed in the lower track.
- The door is adjustable horizontally and vertically.
- Install the remaining parts: from far to near.
- If the facade is skewed: adjust using a hex key and screw the roller. In the direction of the clock - raise it, against the clock - lower it.
Useful information about the calculation and installation of sliding wardrobe door panels:
Calculation of wardrobe parts
To conveniently calculate the components of the cabinet, we will need its working drawing.
Download: Wardrobe drawing
If you did not make an electronic drawing, but drew it on paper, then it will be a little more difficult for you with the calculations, because You will need to calculate all the details on a calculator using calculations. But this can also be done. Many veterans of furniture production even today detail the project only by calculations and calculations.
So, our task is to compile a list of parts indicating their length and width, taking into account all the necessary indents and gaps.
To avoid confusion, you can start by listing the components of the outer box, and then gradually move on to smaller parts.
- In the Excel file, enter the name of the part, its length and width (the length is determined by the direction of the chipboard pattern structure).
- Next, indicate the designation of the edges along the length and width of the part. Both sides can be glued, or just one side, or without any edge at all. The visible ends should be glued with an edge. Those edges that will be joined to another part do not need to be edged.
- When determining the size of the part, consider the thickness of the edge. If you glue a PVC edge with a thickness of 1 mm, immediately subtract this millimeter from the total size.
- In the next column, indicate the number of components (if they are the same in size and edge edges).
- Next, enter the thickness of the material and the name of the board (for example, “Wenge chipboard,” “Mainau birch chipboard,” “White fiberboard,” etc.) If the cabinet is made from different chipboards, then in the line opposite each part you need to indicate the material from which it is made will be manufactured.
Important clearances and indentations:
- The gap on the edge, depending on its thickness, is 1-2 mm,
- The depth of the internal components of the cabinet is 100 mm less than the depth of the outer case,
- If the cabinet shelves are removable, they are edged on all sides. The width of the removable internal shelves should have a 1 mm gap on each side (this is already taking into account the edge),
- On the front of the drawer, make at least a 1.5 mm gap on each side (this is already taking into account the edge),
- The back wall of the cabinet is fiberboard. It is applied at the back and is smaller in size by 1 mm from the edge on each side,
- Base height – up to 100 mm.
How to calculate the size of the door leaf for a sliding wardrobe
First of all, indicators such as the height of the opening and its width are measured. Be sure to measure with a level so that the guides do not tilt - if they are not adjusted, the sashes may roll down.
The height of the slats themselves along which the canvas will move is about four centimeters.
First you need to determine the height of the ceiling (standard height 2500 mm) and subtract 4 centimeters of the gap for the guides - the resulting value will be the height of the door leaf:
- Door H = 2500 – 40 = 2460 mm
After determining the height, the width is determined. It will depend on the type of handle being installed, of which there are two main types: open (opens from the side where the hook is located) and closed (the same everywhere). For this reason, the width will vary.
The width of the door leaf is also calculated depending on the number of door leaves - when their dimensions are determined, it is taken into account that they are mounted overlapping so that they can open freely in all directions. If the cabinet has 2 doors, there will be one overlap, out of three - two, four - here are the options: two or three overlaps. It is clear that the width depends on the number of door structures. For example, if there are 3 two doors in the closet, the sum of their widths should be approximately 2 centimeters greater than the size of the opening (due to overlap).
The visible length (L) + overlaps is the desired indicator, which must be divided by the required number of sashes:
- L (open) = (2300+10*2)/2 = 1160 mm.
- L (closed) = (2300+15*2)/2 = 1165 mm.
How to calculate the cost of a cabinet based on the dimensions of the parts
What expenses make up the cost of a cabinet?
- Frame. The consumption of sheet material - chipboard and fiberboard - is calculated when drawing up cutting maps. It is also necessary to calculate the amount of edge for gluing the visible ends.
- Facades. Most often, the square footage of facades is calculated, since most manufacturers of furniture facades announce the cost per square meter.
- Fasteners In furniture production with custom manufacturing, the cost of small fasteners (hardware) in the form of confirmations, self-tapping screws, nails, shelf supports, etc. is rarely accurately calculated. Typically, these costs are “covered” by adding 10% to the cost of the sheet material. Or they form an approximate set of hardware for one section, 100-150 rubles. For example, in the cabinet being considered for calculations there are 2 sections. This means that for small fasteners it is enough to budget 200-300 rubles.
- Accessories. In addition to the fasteners with which the entire cabinet structure is connected, the purchase of functional and facial fittings is required (you can read about the types of components here).
Drawing up cutting maps
Once the list of parts for making a cabinet with your own hands has been compiled, you need to calculate how many sheets of chipboard will be needed for this. The format of chipboard can be different - accordingly, both the cost per sheet and material consumption vary. It can be 2750x1830, 2440x1830, etc.
You can install a special furniture cutting program (for example, any version of Cutting) and enter the dimensions of the parts, indicating the quantity, into the designated cells of the form. Be careful not to “turn over” the parts; the length is recorded first, then the width.
One click and the program will give you an option for the arrangement of parts on laminated chipboard sheets of the size you specified.
However, you can create cut maps for the closet manually. Since all the main parts are the same width, equal to the depth of the cabinet, this is not so difficult to do.
Blanks are drawn on the scale of a chipboard sheet. Since the sheet has to be cut along the edge (often the outer ends are knocked down) and the saw has its own width, the dimensions must be rounded. For example, up to 2400x1800 at 2440x1830.
Then the sheet “unfolds” in length to the width of the blanks.
The parts are “laid out” into the resulting strips. First the longest ones (sidewalls, partitions), then the shortest ones (shelves).
“Invisible” parts can be rotated (positioned crosswise) to minimize costs. For example, stiffeners, drawer parts, bottom reinforcements, etc.
Counting the number of edges
Laminated chipboard after cutting has untreated ends. All visible ones are covered with an edge: melamine or PVC of different thicknesses. The first one can be glued using an iron at home. PVC edge is more labor-intensive to apply and usually requires special equipment.
Both edges are sold by the meter. The work on the sticker is also assessed by the number of linear meters. This means that to calculate the cost (both purchases and stickers) you need to know the moldings.
This is quite easy to do. Only the visible ends are rolled up. And in the cabinet only the outer edges of the parts are “visible”. For a simple structure with only shelves and partitions inside, it is enough to add up all the lengths of the parts to get the required value.
To the resulting figure is added the edge along the depth of the cabinet (from the sides) and the details of the drawers.
11.41+0.6*2=12.61 (m.p.)
The total value increases by 10%, since when gluing the edge is cut with a margin, and rounded up to a whole number.
12.61*1.1=13.87 rounded to 15 m.p.
Drawing up a general estimate for the purchase of materials and accessories
This is usually also done using excel. The tabular form includes the names of body materials, facades, a list of fittings, components and hardware, indicating the required quantity and purchase price.
How to make built-in furniture: do it yourself
Many apartments still have old, Soviet-made furniture that has long gone out of fashion, physically and morally outdated, cluttering up the space of already very small rooms. However, at the same time, it should be noted that most often the material from which it is made has retained good quality, and it can be used to build modern versions of cabinets and bookshelves.
How to make built-in furniture
If you recall furniture walls with numerous cabinets, drawers and cabinets, you can easily imagine how many panels of different sizes can be obtained in order to make more compact, comfortable and modern pieces of furniture. How to make built-in furniture in a modern design, spending a minimum of money on it, and at the same time freeing rooms from bulky outdated structures will be discussed further.
Advantages of built-in furniture
Before moving on to the next sections, it is advisable to understand the advantages of built-in furniture made by yourself.
Built-in furniture elements help maintain the style of the interior while saving space
- If the furniture is made from material that will be obtained as a result of dismantling old cabinets or other pieces of furniture, then you can get significant savings on the family budget.
- Everyone knows that even in panel houses the walls are often not perfectly even. Well, with the help of built-in furniture you can perfectly disguise this flaw, and, again, save on construction work to level the surfaces.
- The owners are given an excellent opportunity to show their creativity when developing a project, and then reproduce their own design and engineering solution, making a piece of furniture that is as comfortable as possible for use.
- Serious savings in the usable space of the room are achieved. Almost every apartment has areas where it is difficult to fit standard pieces of furniture, and for those items that will be made to order, you will have to pay double the price. When developing your own project, you can provide for all the nuances and dimensions of the area where the cabinet or shelf will be built.
- And, of course, furniture made with your own hands will give you a reason to be justifiably proud of your amateur talents.
Materials for the manufacture of built-in furniture
In addition to chipboard panels, inherited from disassembled cabinets, other materials can be used to make pieces of furniture.
Original wardrobe made of plasterboard
- Today, plasterboard is extremely popular, from which not only built-in wardrobes are built, but even entire walls with niches and cabinets for one or even two rooms. This material has become so widespread due to the ease of its processing and the ease of installation, which can be carried out even by novice craftsmen with no experience. Its low price and environmental friendliness are also attractive.
Try to innovate your room with drywall!
You can learn how to work with this material correctly, quickly and easily creating various structures, from a special publication on our portal dedicated to the independent construction of plasterboard walls and partitions .
Natural wood is perhaps the best material for furniture, but you will have to pay a lot for high-grade material
- Natural wood has traditionally been an excellent material for making furniture. The old masters managed to build cabinets without a single nail, and some of these pieces of furniture, made at the beginning of the last century, are still in use today. Wood has many very important advantages over other materials - environmental friendliness, natural pattern and relief, ease of processing and aesthetic appearance.
Plywood is used for many built-in furniture elements
- Plywood is another material that can also be used to make built-in furniture. It is often used in combination with wood, covering frames with plywood and making panels. The manufacturing process of plywood involves the use of glue, so it cannot be called a 100% environmentally friendly material, although there are varieties with minimal, almost zero emission of phenol-containing substances.
The vast majority of furniture nowadays is made from chipboard or MDF.
- Chipboard is a board made from sawdust and shavings, which are mixed with glue and then pressed into a given shape. Then the slabs are given an aesthetic appearance by lamination or veneering. Such boards can be harmless to health or dangerous, depending on the glue that was used in their manufacture. Soviet furniture most often consists of slabs produced in accordance with GOST under strict control, so it can be called relatively safe compared to modern products of completely unknown origin. If furniture panels are purchased in a store, you should pay attention to the environmental safety group - E0 or E1 are required for living rooms.
Elements of furniture fittings are presented in specialized stores in a very wide variety
- In addition to materials for making furniture, it is necessary to select modern fittings that suit the design - handles, locks, canopies, guides, rollers, hangers, etc. There will be no problems with these furniture accessories, since today they can be found in specialized hardware stores for every request and taste.
Find out how to choose the right transformable bed for a small apartment from our new article.
Where can built-in furniture be installed?
Built-in furniture is an excellent way out of small-sized or one-room apartments. It can be fixed, as mentioned above, near walls that have never been used to install cabinets along them. In addition, it will fit perfectly into a wall that has a small surface area and is too small to install a standard cabinet. Such areas of rooms mainly include external walls, with window openings located in them, and internal ones, with a door frame located in the center.
It would seem a “useless” wall, but it can also be used rationally
They usually try to cover the wall around the window with curtains, without even thinking that it can be functional - this is what the vast majority of apartment owners do. However, if a set of shelves is fixed on its surface, having a shallow depth sufficient to accommodate books, then the structure does not fit the same curtains and cornices. They can easily be fixed not only to the ceiling, but also to the panels of the upper shelves. Having installed such a structure, you can immediately see how much area of the room will be freed from cabinets, and plan it for other needs.
closet
This wall of the room can only be used if it is absolutely dry, without the appearance of mold formations, otherwise the pathogenic microflora will quickly spread to the books, and its spores will hover in the air of the rooms, which is quite dangerous for human health.
Paper is an excellent insulator, and books placed on shelves close to each other will create a kind of heat-insulating barrier, so the room will become warmer.
Built-in wardrobes surround the front door
Another common option for installing built-in wardrobes is in the area of walls around interior or entrance doors. By securing the furniture in this way, you can solve two problems - saving space and additional soundproofing of the room.
Calculation of dimensions and drawing up drawings
Once you have chosen the location where the cabinet or shelving will be installed, you can begin to plan the placement of shelves and doors. The process of making a sketch and drawing with exact dimensions can be done using special applications - they can be found on the Internet. If this path seems difficult, then an ordinary sheet of paper, pencil, or ruler will do.
The key to successful installation of built-in furniture is a carefully thought-out drawing
The first calculation option will be more accurate, since the program will calculate not only all the parameters of the cabinet, but also the quantity and even the approximate cost of parts and fittings.
Video: example of designing a built-in wardrobe using a specialized application
The self-planning method helps you understand all the nuances right on the spot and makes it possible to immediately make the necessary adjustments. But you will have to work very carefully on the drawing, since all the necessary parts will be made from it. Particular care in drawing up the diagram will be required if the parts will be made according to it to order, in a workshop.
If a piece of built-in furniture will be constructed from chipboard, plywood or solid boards of approximately the same thickness, then the drawing for them is drawn up in the same way. If plasterboard is used to make a cabinet or shelves, calculations are made taking into account the width of the metal profiles from which the frame will be mounted, since the narrowest of them is 50 mm wide and 27 mm deep.
Find out how to make a wardrobe on the balcony with your own hands with illustrated instructions from a new article on our portal.
Built-in wardrobe with rear panel
Such a cabinet can be made of chipboard, plywood or solid boards 16 mm thick. Built-in furniture is equipped with a back panel covering the wall surface, or the interior wall itself serves as it.
This cabinet model has a height of 2600 mm, a width of 2400 mm and a depth of 650 mm. This design includes a back panel, but it is quite possible to simply mount the cabinet to the wall.
Parts for assembling the cabinet
Drawing of the internal structure of the cabinet
For such a cabinet you will need to make the following parts:
| the name of detail | Part size, mm | Number of parts, pcs. | ||
| Length | Width | Height | ||
| Side walls | 2584 | 650 | 2 | |
| Internal vertical partitions | 2568 | 550 | 2 | |
| Cabinet bottom panel | 2068 | 650 | 1 | |
| Cabinet ceiling panel with rounded corner | 2584 | 650 | 1 | |
| Vertical panel extending beyond the cabinet | 2600 | 308 | 1 | |
| Horizontal side shelves with rounded corner | 634 | 285 | 3 | |
| Drawers | 2568 | 586 | 220 | 3 |
| Lower horizontal shelves | 650 | 400 | 1 | |
| 800 | 400 | 1 | ||
| Upper horizontal shelves | 650 | 550 | 1 | |
| 800 | 550 | 1 | ||
| Horizontal shelves above drawers | 550 | 586 | 5 | |
| Back panels are made of plywood or fiberboard (5 mm thick) | 2600 | 665 | 1 | |
| 2600 | 816 | 1 | ||
| 2600 | 610 | 1 | ||
| Door panels | 2600 | 694 | 1 | |
| 2560 | 669 | 2 | ||
| Set of rollers | 2 sets | |||
| Drawer guides | 550 | 6 pairs | ||
| Shelf holders | 44 | |||
| Metal tubes with a diameter of 15 mm | 816 | 1 | ||
| 665 | 1 | |||
| Drawer details: | ||||
| Front and back walls | 586 | 220 | 6 | |
| Side walls | 518 | 220 | 6 | |
| Bottom panel (plywood or fiberboard) | 586 | 550 | 3 | |
| Sliding door guides with two lines of runners for movement | 2068 | 50 | Set (upper and lower) | |
Manufacturing of parts
Manufacturing parts for any furniture structure is a rather complex and labor-intensive process that requires not only high precision, certain dexterity and increased accuracy, but also the availability of special tools for working on workpieces.
| Illustration | Brief description of the operation performed |
| The first step is marking the chipboard panels, transferring the dimensions from the design drawing onto them and drawing cut lines. Next, all the cabinet parts are cut out. It should be noted that if the cutting is done with a hand hacksaw, it will require a lot of time and effort. Therefore, the work will go faster and more accurately if it is carried out using an electric circular saw or, in extreme cases, a jigsaw. To ensure a smooth edge without burrs, the cut must be made with a saw with fine teeth. In addition, it is recommended to stick masking tape along the edge of the cutting line, which will protect the laminated edge from chipping. If the edges are not quite even, they need to be trimmed with a file, rasp or plane. If you need to get a perfectly smooth edge of the parts or the model has rounded corners and other pattern configurations, then it is better to contact a workshop where there is special equipment that produces precise, down to the millimeter, cutting of any shape. | |
| If the furniture is made from panels obtained as a result of dismantling an old wall, and the height of the panels is not enough to build the intended project, then they will have to be increased. | |
| The connection of individual sheets can be done in different ways - this is a “groove-tenon”, using dowels, or using a special joining strip, into which two separate parts of the panel are installed on both sides with glue. The last connection method is the simplest, and is accessible even to an inexperienced craftsman. | |
| This cabinet model has shelves with rounded corners. To cut it beautifully, you need to draw a patterned cutting line using a construction or improvised compass. When sawing off rounded corners, use a jigsaw, being especially careful. | |
| The sawn parts are numbered and signed. If there is an appropriate tool, all edges of the parts are finished by milling. Then the finished parts are installed on the wall, following a certain sequence to simplify the search for the desired structural element. | |
| The outer end sides of the panels are covered with PVC edges specially designed for this purpose. The edges are secured to the end using a layer of glue applied to them, which begins to exhibit its adhesive properties after heating. To do this, the edge is placed on the end of the panel and smoothed with a heated iron. After the panels are processed and ready for assembly, the joints with other parts are marked on them, as well as the fastening of the fittings. |
After all the parts have been manufactured, processed and laid out, the cabinet is assembled in accordance with the drawing.
If the cabinet or rack has a back panel that will give the product additional rigidity, then after connecting all the structural elements to it from the back side, sheets of the back wall are attached to the ends of the panels, which are most often made of fiberboard or plywood with a thickness of 3÷5 mm . If the back wall is not planned, then the cabinet frame will have to be attached to the wall.
The presented cabinet can be assembled in different ways, and which one to choose is up to the master himself. Much in this case depends on the quality of the wall. To understand how the assembly is carried out, both installation options will be considered below.
Assembling a cabinet with a back panel
Built-in cabinet with a solid rear panel (wall)
The cabinet, secured with a rear panel, is assembled in the following sequence:
| Illustration | Brief description of the operation performed |
| The first step at the place where the cabinet will be located is to level its bottom part. Unfortunately, the floors are not always level, so if necessary, small wooden pads are installed at one or two corners. In this case, it is advisable to immediately secure the exposed bottom of the cabinet to the floor surface. | |
| You can, of course, attach adjustable legs in the corners and in the middle part of the bottom panel, but this is done if the differences in floor height are very significant. In addition, you need to take into account the height of the cabinet. If it is close to the height of the ceiling, then the legs will not be suitable for the structure, and you will have to use wooden pads. The front end side of the floor panel must be covered with PVC edge. | |
| Next, after marking, it is necessary to prepare holes on the vertical panels of the cabinet for installing shelf holders, if they are removable, or for furniture corners, if the shelves are permanently fixed. The latter installation method will make the structure more rigid. | |
| Another way to secure shelves to vertical cabinet panels is to use eccentric screws. This fastener is more accurate and almost hidden from view, but it is more difficult to drill holes for it, as it requires perfect accuracy. | |
| In addition, runners for drawers are attached along the drawn lines on the walls. | |
| If there are sockets or a switch mounted on the wall near which the cabinet will be installed, and it will cover them from the cabinet panels, then holes of the required size and shape are marked and drilled in it using a drill or jigsaw. | |
| The next step is installation along the lines of the vertical walls marked on the bottom panel. They will have to be temporarily supported on the sides, since they will not be supported only by the lower fastenings. To hold them in the desired vertical position, several horizontal transverse shelves should be secured without much delay. Since this design has side rounded shelves, to secure them it is necessary to connect the outermost vertical panel and the board adjacent to the wall at a right angle. The board is secured with its end side to the outer side wall using eccentric screws on the rear side of the structure. | |
| Having fastened two vertical panels at right angles, you need to immediately install the side shelves. They are mounted on the side vertical wall of the cabinet using dowels installed with glue, and on the wall panel using confirmats (Euroscrews) that are screwed into the back side of the panel. | |
| Then, the top panel-roof of the cabinet is installed and secured - it is most often mounted using eccentrics. If the top panel is raised right up to the ceiling, then through it you can fix the cabinet on the ceiling. | |
| Another way to secure the top panel, as well as horizontal shelves on vertical partitions, can be furniture corners. After installing the top panel, all other shelves and hanging rods are secured. | |
| Next, three drawers are made according to the dimensions indicated in the table. For more accurate joining of the corners of the box elements, quarters can be selected along their edges. Drawers can have one front panel or two - internal and front. When installing a double front panel, the drawer handle will be held more firmly. In the lower part of the side, front and rear walls, slot-like grooves are cut into which the bottom of the box will slide. | |
| Therefore, the assembly proceeds as follows: - first, the front and side panels of the drawer are fastened together; - then the bottom part is pushed into their grooves; - and only after that the back panel is installed with glue, which is additionally fixed with furniture screws. It should be noted here that you can use ready-made drawers from a disassembled furniture wall, replacing only the front panel with them. In this case, when drawing up a project, it is necessary to immediately take into account all their parameters. | |
| The second part of the roller guide system must be secured to the side walls of the drawers using self-tapping screws. | |
| The guides can be attached to the bottom or middle of the side panel. In order not to be mistaken in the correct installation, you need to try on the drawers in the cabinet walls, based on the dimensions given in the drawing. | |
| Next, handles are selected for the drawers. For them, through holes are drilled in the centers of the front panels, and then the handles are screwed from the inside of the drawer. | |
| The next step is to install guides for sliding doors. The presented model has three door leaves: - the middle one, installed on the first line of guides, and having the ability to move to any side of the cabinet; - two side doors, each of which, when opened, can reach the other along the second line of guides. | |
| Using the markings, the upper rail for moving the doors is attached to the ceiling panel of the cabinet, and then the lower rail is attached to the floor panel. Next, spring rollers are attached to the doors, allowing you to easily install the doors into the fixed guide rails. |
If desired or necessary, the structure can be fixed not only to the floor and ceiling, but also to the wall through the adjacent side panel of the cabinet from inside the structure.
The installation of compartment doors was mentioned in passing. But this is an extremely important point that requires comprehensive consideration. It is simply more expedient to refer the reader to detailed specialized instructions.
How to assemble and install wardrobe doors yourself?Special components are sold in stores for such furniture elements. Very detailed illustrated instructions for self-assembly and adjustment of wardrobe doors can be found in a special publication on our portal.
Built-in wardrobe mounted directly to the wall
This section of the article will look at ways to attach the same cabinet (or any other) to the wall, without using the back panel. As mentioned above, this option is perfect for hiding uneven walls in a room.
Parts for cabinets are manufactured and processed in the same way as in the previous version or when choosing a different model. Their list and dimensions also remain unchanged, with the exception of the rear panel.
You can add to the list of materials with metal corners, with the help of which the walls of the cabinet will be fixed to the wall, or with timber, which can replace the corners and act as a wall frame. It should be noted that if the cabinet shelves are open, then it is better to use metal corners or a profile for fastening - these elements look more aesthetically pleasing than timber.
To understand how such installation is carried out, you need to consider its options in more detail.
The first option is a prefabricated panel structure
This cabinet can be either open or closed with sliding doors. In this case, the shelves are installed using metal corners. Work on its installation occurs in the following order:
plywood
Cabinet without back wall, with wall mounting
- The first step is to draw up a design for a closet with the compartments that will be needed - these could be shelves for books, a wardrobe compartment or drawers intended for other needs. In the project, real dimensions are taken on a smaller scale - this is necessary in order not to make a mistake in the width or height of the location of certain parts. Moreover, it is better to make two copies of the project - on one of them put down the dimensions of the location of the parts on the wall, and on the other - the parameters of the structural elements themselves.
- Next, from a copy of the project, which shows how and where the vertical walls, as well as the top and bottom panels (if provided), will be primarily fixed, the places of their fixation are transferred to the wall. They must be determined by drawing precise vertical lines - along a plumb line.
- The first to be fixed to the floor is the floor panel of the cabinet, onto which vertical partitions can be fixed.
- Then, in the places of the drawn lines, the verticality of the wall plane is determined. To do this, you will need to prepare a perfectly even beam with a cross-sectional size of approximately 50×50 mm and a length almost equal to the height of the room’s ceiling, and a building level, or a level with a length of at least 2500 mm.
A level is placed on the wall at the indicated location, and with the help of it the difference in surface differences is determined. If it is about 3 mm, then this will not greatly affect the installation of the panels - even if a small gap is formed, then with the built-in version of the cabinet it will be almost invisible.
- In the case where the wall even visually looks uneven, there are two options to hide this flaw - level the wall with plaster or drywall, or fit the furniture panels of the side walls to the wall. The adjustment will have to be carried out gradually, cutting off the part from the panel that prevents it from completely pressing against the wall. Therefore, the side that will be adjacent to the wall will become uneven, but the front edge will be perfectly level.
- If the cabinet is mounted between two walls, then it is quite possible to completely abandon the outer vertical panels, installing only internal partitions.
- When the vertical panels are fitted to the wall, they should be immediately secured to their intended places so that you can begin marking the horizontal shelves, ceiling and floor front strips. To fix the vertical panels, metal corners are screwed onto them in three or four places on both sides. Then, the panel is leveled in relation to the walls, and on them, through holes in the corners, places are marked for drilling holes into which the dowel will be driven in and fasteners screwed in.
- Further, if you plan to install sliding doors on a built-in wardrobe, then bars or strips parallel to each other are marked and secured on the ceiling and floor or bottom panel, determining the width of the internal space and intended for securing guide rails for moving the doors.
Option for placing top, bottom and side false panels
- The next step, between the vertical internal partitions and walls, according to the drawing, is to mark the location of the horizontal shelves. Just like in the previous version of the cabinet, they are attached to furniture corners to vertical panels and walls. Horizontal shelves will connect the entire structure, secure it to the walls and give it rigidity.
Installation of the guide on the upper false panel
- Next, rods for hangers and runners for drawers, if provided, are installed; the drawers themselves are made according to the dimensions of the project and installed in place.
- The final stage is the assembly and installation of sliding doors.
The second option is with a timber frame
This design is most often used to build a built-in wardrobe, since it is the easiest to work with.
aluminum profile
Making a frame structure from timber for a built-in wardrobe
To build it, first a frame is mounted from a wooden beam according to markings on the wall, which immediately determines the dimensions of the cabinet, that is, its height, width and depth. When these values are known, it is easier to carry out the further process of securing the remaining elements of the cabinet and covering it with one of the selected materials.
A durable wooden frame can be covered not only with chipboard, but also with plywood, wooden or laminated fiberboard, as well as PVC panels - this criterion is chosen by the home craftsman himself, taking into account financial capabilities, design ideas and level of experience in working with a particular material.
It is much easier to attach both corners and panels to a wooden beam, so the work after erecting the frame will go quite quickly. The marking of horizontal shelves occurs in the same way as in the previous options, and vertical partitions are usually always formed by timber. Thanks to a more durable design, such cabinets can be equipped not only with sliding doors, but also with hinged ones - in some cases, the second option is preferable to the first.
The third option is with aluminum profiles
It is also quite possible to install a built-in wardrobe using this technology yourself, if you can produce all the necessary parts for the structure. An important condition when choosing the presented option for building a cabinet is that it can only be installed between two walls, that is, in a fairly narrow room, but across its entire width.
An original and fairly easy-to-assemble design using aluminum profiles
With this approach, to attach the panels to the wall, an aluminum U-shaped profile is used, which has a clearance width between the shelves that is 1÷2 mm greater than the thickness of the chipboard panels from which all other cabinet elements are made. In the presented model, the profile width is 16 mm, with a panel thickness of 15 mm.
U-shaped aluminum profiles fixed to the walls become a frame for installing parts made of chipboard or plywood.
The panels are neatly installed into the profile, and often do not require additional fastening at all. In those places where the shelves will bear a higher load, the bottom profile is additionally reinforced with a small chipboard panel.
Work on installing the cabinet occurs in the same sequence as when starting the assembly of any structure attached to the wall:
- Drawing up a project.
- Manufacturing of cabinet parts.
- Marking the wall surface using a plumb line, level, ruler and tape measure.
- Fastening to the wall according to the markings of the metal profile.
- Laying and fixing the floor panel and screwing profiles to it for installing vertical panels.
- Installation of vertical partitions - they are slid into a profile mounted on the wall and on the floor panel.
- Next, the top horizontal panel is tried on, and the location of the vertical partitions is marked on it. Then, it is removed, and profiles are also screwed to it, which will hold the partitions in their upper part. After this, the top panel is finally installed.
Installation of built-in wardrobe elements on aluminum guide profiles
- Then, all other horizontal shelves are mounted in the same way. They are installed in profiles that are fixed to the wall and to vertical panels. When the horizontal shelves are secured, the structure will become more rigid and durable.
- If the project includes the installation of drawers, then they must be installed between two chipboard panels, since without support on both sides they may not withstand the load. Therefore, this must be taken into account when designing.
The assembly is completed with the same installation of sliding sliding doors
- In the design example under consideration, sliding doors are planned, so for them, two-runner guides are fixed to the ceiling and bottom of the cabinet to move them, since both doors must move in one direction or the other.
- The last step is to install the movable door leaves and test them.
To conclude the publication, here is another clear example of high-quality assembly of a built-in wardrobe:
Video: assembly of a built-in wardrobe without a back wall
So, if you have the necessary tools, assembling built-in furniture with your own hands is a completely doable task. Much more difficult seems to be the high-quality production of all structural parts. It is best to carry out this process with professional tools, which are not found in every home. Therefore, having completed and thoroughly checked the drawing, having all the necessary materials, it is better to order their cutting and processing in a carpentry workshop - it will be much faster and more accurate. And with high-quality, well-fitted parts, the installation process becomes a real pleasure.
How do they work?
Everything is very simple.
In the first window, which opens with the “Parameters”
, we enter the initial data: the size of the opening into which the compartment doors will be built, the number of doors, places of overlap, the number of mirrored and blind doors, the number of intersection strips, etc.
In the second window, “Laminate”
, enter the dimensions of the body parts. This can practically be done automatically from any furniture program: PRO100, bCAD, Astra Constructor and others.
In the third window, “Accessories”
, – enter the set of necessary accessories. You can enter your own fittings by carefully writing down the name and price of the required fittings.
As a result, we get the final cost of the product, which is displayed in the “Parameters”
both in the
“Estimate”
and by opening the
“Details”
, we have the working dimensions of the filling in the sliding door, namely the mirror and blank panel, and profiles, horizontal and vertical.
This is very convenient and makes life much easier for the average furniture maker. And most importantly, everything is simple.