What is a stopper
A closet stopper is a device that helps fix sliding doors in the right place on the guide rail. Owners of closets with two sliding doors do not particularly need stoppers, but if there are 3 or more doors, the need for this device is extremely necessary, because after each opening, you will need to install all the doors (3, 4, 5) evenly, and this takes time and it doesn’t always work out the first time. This happens because without stoppers there is free movement along the lower rail.
Modern sliding doors with your own hands (video)
Sliding doors are a modern and stylish option for decorating interior doorways. The installation of such structures can be easily accomplished without the help of a professional technician. Follow our advice and may your renovation be a joy!
Attention, TODAY only!
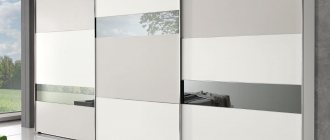
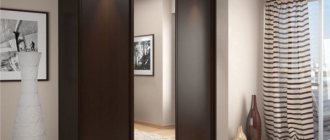
In a spacious or small apartment there are always wardrobes, cupboards, and bedside tables that provide places for organizing and securely storing clothes, dishes, books, and other necessary things behind a closed facade. This is why cabinet doors perform one of the most important structural functions.
Today it is proposed to use various methods of fastening traditional swing doors, as well as sliding ones, which are installed mainly in sliding wardrobes. You can install any doors into a closet with your own hands if you familiarize yourself with the mechanisms of their operation and follow detailed instructions.
Installation
Installation or replacement of the device in a sliding wardrobe can be done in a few minutes. All you need to do is place it in the recess of the bottom guide. How many stoppers are needed depends on the actual number of sliding doors. Installation does not require much effort.
How to install?
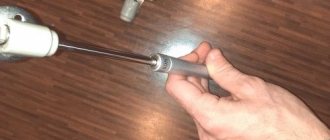
Anyone can install the device independently, without the help of specialists. For this:
- Before the guide is attached to the cabinet, we insert a stopper into the recess from the end of the line.
- With the bifurcated parts facing up, we pull it into the track to the place where the door wheel is planned to stop.
- Then we screw the rail to the guide.
Stopper for a sliding wardrobe: how to install and adjust it yourself
Hello! Today we’ll talk about a rather small, but quite important element. Namely about the stopper for the wardrobe. Not everyone knows what it is and why it is needed.
Others are interested in slightly different questions. They want to figure out how to install the lower or upper locking element, or how to make the adjustment themselves.
Actually, it is precisely these basic issues that this material will be devoted to. If you have anything to add, or have additional questions, you can always write in the comments. Let's get started for now.
Closer for sliding system
This is a whole system that includes stoppers, limiters, latches and other elements so that the doors automatically close smoothly and are comfortable to use. Every third model requires several closers at the same time due to the need to close the doors in different directions. Adapters that regulate the operation of the system are installed in the upper part of the cabinet, and the closer is installed in the upper part of the guide yard.
It is worth noting another significant role that is controlled by the automatic system - security. This device minimizes the likelihood of injury when closing the cabinet abruptly.
In addition to providing safety to the owners, the structure itself has an increased level of protection against loosening. This opportunity arises due to the shock-absorbing effect that is introduced into the automatic door closer systems.
To select an automatic closer system, you should pay attention to the following factors:
- dimensions and weight of the wardrobe;
- directions for closing and opening the sliding system;
- material of manufacture of the system itself (aluminum structure or steel).
The installed systems are in demand and extremely popular due to the fact that they combine:
- Ease of use. You just need to push the door and it will smoothly close on its own. Children or pets will not be able to do this. The effort that needs to be made is not noticeable for an adult, but for children even an animal will cause difficulties.
- Aesthetic appearance. The door is always in the right position and closed for a fee.
- Safe to use. When closing the doors, neither children nor pets will be harmed. Often when playing, children can sharply push the door, and the system slows it down 5-7 centimeters from the wall itself and slowly closes it, preventing injury and damaging the cabinet body.
- Reliability. Steel and aluminum structures allow the mechanism to be used for a long time.
Brush seals
To silently close the doors and prevent dust from entering the system, use a buffer tape. When choosing such a device, it is better to opt for a long-haired solid tape.
When installing doors for a sliding wardrobe, it is important to think through everything down to the smallest detail, so that in the future you do not have to remove the doors and install additional components.
The stopper allows you to fix the cabinet door at a certain place on the track along which the door moves. This part has a spring design and is needed if there are more than two doors in the cabinet. The stopper allows you to use the cabinet more simply and easily. By installing a door stopper, you will not have to constantly align the doors manually.
Stopper for wardrobe doors - installation and principle of operation
So, you see a photo of a closet door stopper. Let's figure out what it is for, how to install it and what its operating principle is. The purpose of this element of fittings is indicated by its name – “stopper”. That's right - the stopper helps to fix the sliding door in the place we need on the rail.
Owners of two-door wardrobes may say: “Why is it needed? My closet doors function perfectly without stoppers!” In principle, when using two-door wardrobes, you may not feel the urgent need to install stoppers. But starting with three-door designs, the need for this functionality is felt more acutely. Just imagine how, after each opening of the closet, you have to align all three (four, five) sliding doors exactly. After all, without stoppers, they move freely along the lower rail. And if the frame of the wardrobe is not set in a strictly horizontal position, then, I’m afraid, you won’t even be able to arrange the doors perfectly. In general, stoppers are simply necessary in sliding wardrobe systems.
Working principle of the stopper
Thanks to its simple design, the stopper easily fits into the recess of the guide. The two spring ends rest in the right place, and a small recess appears for the door rollers, which determines the location of the door. In order for the door to move further along the track, you just need to pull it a little harder.
The mechanism of this sliding system helps the door close smoothly and lock in the closed position.
Installation of a stopper, automatic closer and schlegel for sliding doors
The stopper allows you to fix the cabinet door at a certain place on the track along which the door moves. This part has a spring design and is needed if there are more than two doors in the cabinet. The stopper allows you to use the cabinet more simply and easily. By installing a door stopper, you will not have to constantly align the doors manually.
Stopper installation
Installation or replacement of the stopper is done in a couple of minutes. It fits in the recess of the bottom track. The question of its quantity depends on the number of doors.
Installation proceeds as follows:
- Before the guide is screwed to the cabinet podium, a stopper should be inserted into the recess at the end of the track;
- we insert the stopper into the track, with the spread parts upward;
- we stretch the stopper to the desired place on the track, where the door wheel will subsequently be locked;
- after that, we screw the guide to the cabinet podium.
Closers for sliding doors
A closet door closer is a system for smooth, automatic and comfortable use of doors and includes stoppers, limiters, latches and other elements to ensure convenience and aesthetics. Some cabinet models may require two closers. This is due to the need to close doors in two directions. The adapter that controls the operation of the system is mounted in the upper track, and the closer itself is mounted in the upper part of the doors.
In addition, another important role that the automatic system takes control of is maintaining security. The presence of a door closer minimizes the likelihood of injury from sudden closing of doors. In addition to the safety of the owners and their household members, the body of the structure itself is also protected from gradual loosening. This becomes possible thanks to the shock-absorbing effect created by the auto-closer system.
The choice of system is influenced by the following factors:
- dimensions and weight of the structure;
- door opening direction;
- system material - steel or aluminum.
Sliding closet door latches and stops allow you to secure closet doors so that small children or animals cannot reach the items inside. Such devices are in wide demand. When choosing the right element, it is important to pay attention to the quality of the device. In this case, any part will serve for a long time and reliably.
Brush seal
The buffer tape is an integral part not only for silently closing doors, but it is also what prevents dust from penetrating inside the cabinet. When choosing between various types of this element, it is worth choosing a solid tape with a long pile.
There are no less important stages in the overall design. Therefore, it is important not only to buy high-quality products, but also to understand the purpose of each individual element.
Now we have reached the final stage of assembling our cabinet. Today we will install one mechanism, thanks to which this product is called a sliding wardrobe - a sliding system.
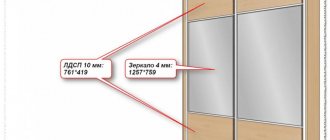
So what do we have? We have a fully assembled cabinet, but without a system. The actual size of the opening for installation was H 2318 mm (height) by L 1320 mm (top width) and L 2315 mm (bottom width). According to the drawing, this size was H 2318 mm by L 1318 mm.
As you can see, our actual width is slightly different from the planned one. By +2 mm (along the upper width), and by -3 mm (along the lower width). But there's nothing wrong with that. We order the system according to the planned opening H 2318 mm by L 1318 mm.
Installation nuances
As noted earlier, stoppers are made primarily of steel. You can see this for yourself by visiting any furniture fittings store, or by looking at the design of the compartment, where the use of stoppers was initially provided. Plastic options are not excluded. But here you can decide for yourself whether it’s worth it.
Similar products are also sold separately, which makes it possible to buy them and put them on your closet. Stoppers (limiters) are produced in Ukraine, Belarus (Minsk), St. Petersburg, as well as many other countries and a number of companies.
The assembly is extremely simple to install. The stopper simply needs to be inserted into the track from the side of the lower guide rail. This is possible on almost any ready-made and assembled coupe. Much more important is the question of the number of stoppers used.
Follow simple logic here. One door needs one stopper. If you have a three-door coupe, then one stopper is placed in the track in which one door moves, and a couple more elements in the next track.
One has only to add that when installing such a limiter for sliding wardrobes, you will have to remove the door and dismantle the lower guide. This is due to the need to install the element through the end side.
Order a sliding system
You can order a sliding system in your city at any store that sells furniture fittings and furniture fasteners. But I would advise you to find at least five such stores and find out the cost in each, after giving them the dimensions of your opening. Thus, you will choose and purchase the system at the lowest cost.
You can use our tips for choosing a sliding system for a sliding wardrobe.
My order turned out like this:
- System – Lika (Type – open)
- Opening 2318-1318
- Number of doors – 2 pcs.
- Profile color – Wenge
- Filling – Mirror
Here they recommended to me a company that specializes in cutting and sandblasting mirrors, as well as assembling doors for wardrobes.
Their assembly services amounted to 12 USD. for both doors. Since I don’t have free space for assembly in my apartment, this suited me, and after sandblasting, they immediately sealed the back wall with oracal and assembled the doors.
There is another plus to this. When assembled, compartment doors are much easier to transport, and the likelihood of breaking mirrors is reduced to zero.
Installation of guides
The dimensions of the guides must be equal to the width of the cabinet, in our case it is 1318 mm (according to the drawing). But in fact, the width of the cabinet is slightly different. Of course, we won’t cut anything; the difference of +- 3 mm is not so significant.
The first thing you need to do is install the top guide.
Top rail installation
The guides can be secured using self-tapping screws with a 4.2*16 press washer or universal screws with a countersunk head 3.5*16. To do this, we make holes in the upper guide with a 4 mm drill, approximately in increments of 300 mm.
If you are screwing in a universal screw with a countersunk head, in order for the self-tapping screw to “seat” completely, in these holes you need to make a countersink for the screw head, you can use a 6-8 mm drill (NOT through).
Installing a stopper (latch)
The stopper is needed to ensure that the door is fixed in the closed position and held tightly without forming a gap with the touching side.
How to install
Install them in the groove of the lower guide (where the wheel goes), one stopper for each door.
We insert one stopper into each groove, screw the bottom guide, install the doors and adjust the latches, ensuring a tight closure.
In order to accurately place the lock in the right place, completely close the compartment doors and mark the center of the wheel on the guide below, and install the stop there, centered on the mark. You can move the stopper in the groove with a flat screwdriver.
What are straight and shaped stops for a sliding wardrobe
Usually, when choosing sliding doors, they focus on a small part of the offered components:
- The shape of the side profile of the door (with different “handle” designs).
- The length and design of the lower and upper tracks of the guide. Narrow “paths” are more difficult to clean from dust, for example.
- The quality of the videos . The comfort of sliding compartment doors largely depends on the material of manufacture and shape.
- Availability of additional accessories. Shlegels, stoppers, closers, as well as middle frames with seals help to improve the design of the facade of the wardrobe and equip it with additional options.
Aluminum side stops for compartment doors are special linings on the cabinet body itself or on the side wall, if the design of the cabinet itself is built-in.
They are often neglected. However, it is the straight and shaped stop for the sliding wardrobe that gives the product itself a more finished and solid look, visually combining the upper and lower rails into a single structure.
In addition to the aesthetic component, such unique side linings also have a practical function:
- With their help you can hide the cracks and unevenness of the side walls of the niche.
- Thanks to the width of the false panel, on which the side support is placed, it is possible to somewhat level out the wall that is “filled up” diagonally.
Shaped and straight profiles differ in shape and installation method.
The straight stop is designed for attaching a built-in wardrobe or dressing room to the wall.
The shaped stop of a sliding wardrobe is put on the sidewall or false panel of a partially built-in or cabinet sliding wardrobe.
Buffer tape sticker
A buffer tape is absolutely necessary; it will protect the interior of the cabinet from dust, as well as soften the impact of the door on the side when closing.
They glue it at the very end, when access to the adjusting screws is no longer needed, because it covers all the holes on the vertical end of the door.
There are two types of buffer tape, differing in pile length:
- Short (up to 6mm)
- Long (up to 12mm)
If possible, when ordering your system, purchase long-pile buffer tape. Although it is not often used, the long pile will provide you with more comfortable use of the cabinet.
The color of the buffer tape is selected depending on the color of the system.
Gluing the buffer tape will not take you much time. Remove the protective film from the back of the tape and glue the brush onto the vertical end of the door.
This is where our work ends, we remove the protective film from the profile, use a rag and glass washing liquid to bring the mirrors to a perfect shine - and our closet can be hung with things.