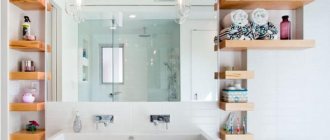
Every home probably has a wall-mounted bathroom cabinet, either made by hand or purchased in a store. This piece of furniture is very useful to put everything you need in it and distribute it on each shelf. For example, placing a cabinet in the bathroom will be an ideal option for storing bathroom accessories.
But not every store can provide you with an item that is suitable in size, color and material. However, there is always the opportunity to make a cabinet yourself; it will satisfy your desires.
Types of cabinets
The bookcase can be made in various styles and colors. When choosing a color, you should pay attention to the fact that its color should be combined with the color of other large furniture. Well, the choice of style and design of furniture depends on the preferences of the owners. In any case, it is possible to find a suitable harmonious solution.
Doors can be classic hinged, rarely used folding doors, or the quite popular compartment doors that simply slide to the side.
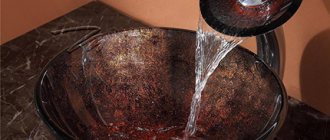
It is worth noting that glass doors must be made of durable glass that, after tempering, can withstand significant impact loads.
By type of materials - cabinets can be made from various materials
It is very important that the cabinet has a durable structure, as books are heavy. The following materials are used for the production of cabinets:
Chipboards - this material is most widely used due to its low cost and fairly high strength.
Bookcases made from solid natural wood are very beautiful, durable and environmentally friendly. Their only drawback is their high cost.
Plastic is also used in furniture production. Products made from it are not expensive, it is easy to clean, since the plastic can withstand any cleaning solutions. The disadvantage of such products is low strength. It easily gets small scratches.
When choosing a cabinet, you should pay attention to the possibility of adjusting the shelves in height for convenient placement of your home library.
Bookcases are located in various places in the apartment. There are three main ways to place bookcases: classic along the wall, in the corner of the room and in the center.
Most often, cabinets are located along the walls. The cabinet model is selected depending on the number of books to be stored and the allocated size of the room. A corner bookcase is used in small spaces. It combines small size and spaciousness and can have additional drawers and shelves
Showcase cabinets with transparent walls are installed in the center of the room. They are installed in large rooms and visually divide it into parts.
Types of toilet furniture according to installation method
To determine what type of useful design should have, you should first look on the Internet for a photo of the toilet cabinet. Already having an idea of what the result should be, you can interpret the option you like to suit your room. The closet in the restroom can be placed as a separate piece of furniture, built-in or hung on the wall. Learn more about each type.
The first option is a free-standing structure, or a cabinet with legs. An interior item made in this way is usually U-shaped. The shelves in it can be completely open, hidden behind the door, or of a mixed type. The opening in the cabinet is designed to be installed above any toilet.
If you don’t have the opportunity or desire to do it yourself, you can always buy a ready-made cabinet or one made to individual parameters. The only downside is that the plumbing fixtures must be hidden in the wall or in some other way, otherwise they will be visible.
A wall cabinet is the most popular type of furniture for toilet rooms, which is available in a wide range. It can be mounted directly above the toilet or in an already organized niche. The modular system allows you to focus your attention only on design and size when choosing. But, like the first option, it doesn’t reach the plumbing.
How to make a cabinet drawing
The most important thing when creating a drawing for any cabinet is a clear vision of what the end result should be. The fact is that it doesn’t take much time to create a sketch. The main costs of this resource will be required to take measurements of the place where the cabinet is planned to be installed. It will also take a lot of time to list all the elements needed to assemble the cabinet. Without this list, you shouldn't even start assembling. There is a very high probability that the process will go in the wrong direction.
When creating your own drawing for a cabinet, it is important to consider not only the dimensions of the external structural elements and internal parts, but also the thickness of the material from which the cabinet is planned to be made. This will help make calculations more accurately, which will further contribute to the creation of a high-quality interior element.
After taking measurements and transferring them onto paper, you need to decide on the components of the cabinet. Will these be shelves, drawers or all together. Will the cabinet have a stand or a vertical bar? It is necessary to indicate in the diagram all the details, even the most insignificant ones
Moreover, it is not enough to indicate the names; it is important to enter the exact number of elements
Selection of furniture fittings
It is best to buy quality products. This will not be cheap, but it will allow you to assemble a high-quality cabinet that will last quite a long time. Choosing accessories should not be difficult. The store manager will recommend one manufacturer or another, and the number of necessary accessories is already indicated in the drawing. The main thing is to follow the pre-planned assembly plan that you have on paper.
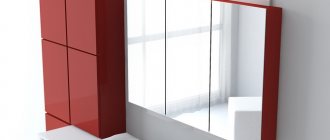
Making a cabinet with a large mirror
A very successful model, all the shelves in the cabinet are open. The mirror is installed on the reverse side, no furniture elements limit the view, and you can connect lighting if desired.
Floor cabinet with mirror
To make it you will need an electric hand saw, a drill with a set of drills, a tape measure or folding meter, a screwdriver, small nails or screws, fittings (handles, shelf holders, door awnings), paint or self-adhesive plastic film for finishing the ends, and a brush.
Fasteners and wheels
The cabinet is made of laminated chipboard 15 mm thick, moisture-resistant plywood or fiberboard 6 mm thick. If lighting installation is required, you need to purchase suitable lamps, cables and electrical fittings.
Chipboard sheet
Step 1. Choose a cabinet option with a mirror. You can search for options on the Internet or come up with your own, taking into account your own preferences. We suggest making a medium-sized cabinet; it is considered the most versatile. Looks great in both large bathrooms and small spaces. In addition, the internal volume allows you to place all the bath accessories for a small family in the cabinet. All shelves are non-removable, which greatly increases the strength of the structure. The cabinet is on wheels, the mirror is mounted on the back wall, the compartments have no doors.
Step 2. Prepare the cabinet parts, taking into account the dimensions of the mirror. Mark all the parts on the fiberboard board. Start marking with the largest element, in our case these are the sidewalls. Next, draw the elements in descending order of size. This approach will minimize the amount of waste. Do not forget to leave gaps between each element for cutting; the width of the cut depends on the parameters of the electric saw. Check the dimensions of the workpieces; all paired parts must be exactly the same.
Step 3. Place the side wall of the cabinet on a work table or special trestles.
We lay the sheet on the sawhorses
It is much easier to work on trestles: there is access to the lower surface, the drill easily passes through the slab and does not damage the surface of the table, you can change the distance between the trestles taking into account the specifics of assembly work. At the bottom of the side plate, mark the location of the cabinet bottom. The distance from the floor to the bottom should take into account the height of the wheels on which the cabinet with the mirror will be installed. Draw lines; they should be strictly parallel to the bottom edge of the sidewalls, all angles should be right angles.
Make the markings
Practical recommendation. True professionals constantly use personal protective equipment and never violate safety regulations. They know that woodworking equipment and tools are considered the most dangerous and the damage can be very serious. We strongly advise you to listen to the opinions of experienced professionals and not risk your health.
Real pros use glasses and headphones
Cutting laminated chipboard
Step 4. Use fine sandpaper to remove burrs and carefully remove dust from the surfaces. Prepare them for painting with waterproof dyes. The traditional color of small bathroom cabinets is white, but there are no strict restrictions; choose based on the interior of the room and your tastes.
The material needs to be sanded
Step 5. According to the manufacturer's instructions, prepare the paints for use. Smooth surfaces of parts are much easier and faster to paint with a roller. Pour the paint into a special container; its dimensions must correspond to the dimensions of the roller. The container has a recess for pouring paint and a raised area for removing excess. To prevent paint from dripping onto the floor or cabinet parts, spin it out of the caustic roller before applying it. Paint the sections of the slab especially carefully; these areas are most susceptible to moisture. Apply at least two coats of paint, making sure there are no gaps.
The paint needs to be mixed
Paint is poured into a ditch
Coloring
Step 6. To strengthen the bottom, screw the same piece of plate to it, make it double. At the same time, make sure that the dimensions of the parts are completely identical.
We do the marking again
Step 7. Start assembling the frame. All connections should be at an angle of 90°, and the drilled holes should be located exactly in the middle of the slab. In order to prevent the elements from moving while drilling holes, they should be fixed with clamps. It is much easier to use a homemade device for monitoring the position of parts, we will describe how to make it below.
We fasten the walls with clamps
It is better to fasten individual elements with confirmations; holes are drilled with special confirmation drills. They have two diameters, the lower part of the drill is long and has a smaller diameter; it is used to drill holes for the threaded part of the confirmat. The upper part of the drill has a diameter similar to the head; the depth should allow you to hide hardware and cover the holes with decorative plugs.
Drill
Drilling holes
Double bottom
Step 8. Attach the cabinet side pieces to the base and back wall. Secure the top. The distance between confirmations is approximately 20 cm, the number is selected taking into account the sizes of the elements being connected.
Attaching the side wall
Step 9. Fix the bottom shelf, fasten all the others one by one. The distances can be the same or different; choose this option taking into account what you plan to place on the shelves. In our case, they are all non-removable, which increases the strength of the structure.
Carrying out markings for attaching shelves
Fastening the shelves
Attach the back to the finished frame. It is made from a sheet of fiberboard; the workpiece must be pre-painted.
Cabinet assembly
Need to attach the wall
Step 10. Mark the position of the four wheels on the bottom, placing them symmetrically and as close to the corners as possible. This arrangement will increase the projection area of the center of gravity when tilting, which significantly increases the stability of the structure. This is an important factor for our cabinet mirror. The fact is that the mirror will be fixed to the back of the cabinet, due to this its size increases and the comfort of use increases. The cabinet can be placed in such a position that there is simultaneous access to the mirror and shelves. If the bathroom space or its layout does not allow furniture to be placed in this way, then in order to use the mirror, the cabinet must be rotated. It was for these purposes that the wheels were installed. If you plan to make the cabinet stationary, then instead of wheels you can install ordinary legs.
Wheel position markings
Wheel fastening. Fasteners with washers are screwed into the drilled holes
Important. Before attaching the wheels, check that they can rotate freely in a circle and do not allow the side walls of the cabinet to jam.
For fastening the wheels, select hardware such that their length is 2–3 mm shorter than the thickness of the slab. Control the depth of the drilled holes. This can be done simply with the help of a simple device. A strip of masking tape should be glued to the drill; the distance from the edge of the strip to the tip of the drill should be equal to the length of the hardware. When drilling, make sure that the drill does not go deeper than the glued mark.
Step 11. Turn the cabinet upside down and glue the mirror. We mentioned at the beginning of the article that the dimensions of the mirror must be taken into account when drawing a sketch of the future product. Accordingly, they must be taken into account during the procurement of elements. The mirror can be glued with double-sided tape or special liquid nails. The first method allows you to replace a mirror that has become unusable at any time or simply replace it with a more modern one. But the fixation strength is insufficient. Liquid nails securely fix the mirror, but difficulties arise during replacement.
The mirror is glued to strips of double-sided tape
Installation of plugs
This completes the assembly work. Place the furniture in the desired position and check the joint strength and stability. If oscillations are detected, the cause should be found and eliminated.
Check if the cabinet is wobbly
Materials
Metal
Iron products can be purchased ready-made. The industry produces them not only in the form of cabinets, but also as sets of work furniture. Metal is a particularly durable material and can take a large load, concentrating a number of large tools or organizers with hardware products on one shelf. The metal base cabinet has wide drawers, several lower shelves are designed for storing large items.
A large area (back wall and doors) is occupied by perforated surfaces on which tools can be easily fixed. There are small container shelves on the doors for small items. To help workshops, a convenient metal sectional set is produced. Wall cabinets for spare parts are mounted permanently, and the floor part is made in the form of modules on wheels and is mobile. Any of the modules can be easily brought to the workplace.
Tree
Wood is a pleasant, environmentally friendly and easy to process material. This is what home craftsmen choose to implement their projects. You can make your own multifunctional tool cabinet from wood, embodying all your ideas in it. Sometimes, with the help of sliding compartment-type doors, an entire workshop is hidden in the apartment. Here are 2 examples of wooden cabinets, one of which is made by hand, and the other is made in an industrial environment.
- The master produced a convenient cabinet for his own specific set of tools. When closed, it looks like a wall box and does not take up much space. If you open it, you get shallow furniture in which everything is at hand. Opening the doors doubles the storage space. A transforming desk hidden in the closet expands the functionality of the design.
- Thanks to the beautiful wood processing and carved facade, such furniture can decorate even a living room, you just have to close it. The closet has large and small drawers, shelves of different diameters, pockets and fastenings for storing small items.
Plastic
The cabinets are made in industrial conditions from particularly durable, reliable plastic. They are usually small in size, tabletop or mobile. The desktop type of plastic cabinets is designed for many small work items. A mobile design in the form of a set of containers is convenient in that it can contain tools of different sizes and move in the desired direction.
Combined
Tool cabinets can be made from several types of materials. For large items, a strong base is used, and small items can take up light plastic shelves, boxes, and containers. Sometimes furniture is equipped with pockets made of thick fabric.
- We offer two examples where metal cabinets are fully or partially filled with plastic in the form of convenient removable drawers.
- The following example concerns a wood product containing a large number of identical plastic containers.
Making a cabinet yourself, the easiest way is from a board. Its quantity is determined by a previously developed sketch and calculations. Since the board is selected as the main working material, the load of the cabinet contents will fall on it. The tool has a lot of weight, and accordingly, the thickness of the board should be considerable. When choosing, preference should be given to dry material, otherwise the product will subsequently become deformed during the drying process. A high-quality board should not have knots or cracks. For the cabinet, you can choose inexpensive hardwood or pine. Shelves and frames are made from boards.
To create the back wall of the cabinet and partitions, you will need a sheet of thick plywood. The cabinet is filled with tools as much as possible, the walls and doors of the structure are used. It should be remembered that plywood will not be able to bear the load of heavy tools; the bottom of the product cannot be made from it. By studying the sketches made in advance, you can understand which areas of the wooden cabinet are filled with plywood.
A beam may be needed for the lower base, runners, and legs. In addition, you should stock up on metal corners for furniture, door hinges, screws, nuts, and self-tapping screws. Having collected all the material and prepared the tool, you can begin to work.
Selection of accessories
The choice of fastening and functional parts is no less important than the selection of material. The frame can be fastened using:
- nails The simplest, but inconvenient option. Your structure will not be dismountable and will become loose over time.
- self-tapping screws This option is more convenient and reliable, but does not look very good aesthetically.
- confirmats (specialized furniture screws). This is the optimal mounting option. Holes of a smaller diameter should be drilled for the comfirmats. This design is easy to disassemble and looks good
- minifix (eccentric ties). Complex fastening, which requires additional preparation of workpieces. You will need a pen to drill out the glass. The advantage of this type of fastening is that it is invisible on the outside of the frame.
Minifix
For additional fastening, it is sometimes necessary to use corners, wooden dowels and moisture-resistant glue. Necessary functional elements for bathroom furniture:
- handles for doors and drawers. It is better to choose metal or plastic, they are easier to clean from dirt; legs and wall mountings. It is not recommended to place the frame directly on the floor. You can attach the organizer to the wall using dowels and screws, hooks, or more complex kitchen mounting boxes
- hinges for doors. Use hinges with closers, they provide pleasant ergonomics, although they are more expensive
- longitudinal guides. It is better to place the boxes on longitudinal rails, also with a closer, so that they open smoothly and completely
- shelf holders. Small corners can be used with glass; regular metal pins look better with wood
For cosmetic items, you can purchase corners for hiding frame joints and end strips for decorating laminated chipboard cuts.
Step-by-step manufacturing and assembly instructions
The first stage is marking:
- First, take a ruler or tape measure and measure the full length of the cabinet in the place where you are going to install it. The easiest way to do this is from the corner of the room, then one of the side walls will be the corner wall of the apartment;
- From the resulting point, draw a vertical line from top to bottom to indicate the border of the wardrobe. To make the line more even, you need to take several measurements from the corner at different height levels and make marks with a pencil, which you then connect with a line;
- then you need to measure and draw another vertical line - the border between the department with shelves and the department with a hanger. A wooden post will be installed along this line to separate these departments;
- Now mark the height of the shelves on the resulting lines, making marks on both sides with a pencil.
The second stage is to install the fasteners:
- take the fasteners, attach them to the resulting lines and mark the places where you need to drill holes in the wall;
- a dowel-nail must be driven into each resulting hole;
- We attach the fasteners to the wall with self-tapping screws.
The third stage is installation of the internal filling of the wardrobe:
- to secure the dividing post, place it on the fastenings and screw them to them with screws;
- To install the mezzanine, first of all we draw a line horizontally using a level and a pencil. Next, on the resulting line we drill holes for fastenings - two in each compartment and on each side; Dowel-nails are driven into them and the fastenings are fixed on the wall. Secure the mezzanine to them using self-tapping screws;
- To install the side wall of the cabinet, measure the height of the room as accurately as possible and try to adjust the wall to the result obtained. Install it and attach it with self-tapping screws to the existing fasteners;
- we mount the shelves: mark their installation locations on the side of the wall and on the dividing post, install two fasteners on each side and place the finished shelves on them. Attach using self-tapping screws;
- The second compartment of our closet is reserved for things on hangers, so we need to install a metal pipe there. Purchase round fasteners according to the diameter of the pipe, attach them with self-tapping screws to the wall and the middle dividing post, if necessary, cut the prepared pipe, insert it into the fastenings and secure.
Stage four – installation of false panels:
- false panels are installed at the bottom, top, side and near the wall. Each of them is drilled in several places, placed where installation is planned and marked with a pencil where it is necessary to make holes in the wall;
- Dowels are inserted into these holes, and the false panels are attached to them with self-tapping screws.
Fifth stage (final) - installation of doors and guides:
- To install the guides, you need to measure their desired length and adjust it to size. Afterwards, using self-tapping screws, they are fixed on the false panels - top and bottom;
- Installing doors requires a certain skill and accuracy. Attach the rails to them, but do not tighten them too much to allow the rollers to move more freely. The door is inserted first into the guide from above, then into the guide from below. Set them up to move freely along the rails. It is advisable to stick soft pile on the side of the door to prevent noise from impact and to avoid damage to the door;
- thoroughly check the quality of installation of all parts and the operation of the doors. If everything is in order, the job is finished!
Assembling the pencil case
If you accurately made the markings and drilled the holes according to the rules, then no difficulties should arise during assembly. In order to facilitate the process, you should adhere to this order.
- Prepare a site for assembly; its dimensions should be slightly larger than the parameters of the pencil case. This will make the work process easier.
- Lay out two sides, bottom and top, on the floor. Let the back wall lie nearby. Place the top and bottom pieces on the edge, and place one side panel on them. Check the alignment of the holes and fix the elements using confirmations.
Confirmat (furniture screed)
- Carefully turn the assembled parts over so that the side panel is on the floor, and the ribs of the bottom and top are facing up. Place the second side panel on them.
Marking
Marking line
Drilling a hole
Screwing in the confirmation
The second confirmation is screwed in
Important. Exercise extreme caution; in this position, the bottom and top easily break off from their sockets, as a result of which two big problems arise. First, you will have to re-drill the holes; the plugs will become asymmetrical, which has a very negative effect on the appearance of the pencil case. Secondly, if the chipboard cracks, there is no way to repair it; experienced carpenters will always immediately see the problem area. The only way to save the situation is to completely replace the damaged part.
- Place the second side panel on the ends of the bottom and top and attach it with confirmations. Now the structure has become a little more stable, but this is not enough for complete peace of mind.
- Place the pencil case frame on the floor with the right edges facing down. Secure the back wall. It can be fixed with small nails or self-tapping screws. We recommend using the first option: it is easier to drive in nails, and the work goes much faster. But this does not affect the strength of the pencil case.
- Screw the legs to the bottom. In most cases, leg manufacturers equip them with self-tapping screws. But most often their length is not enough for a reliable connection. It is better to buy more suitable screws, just make sure that their length does not exceed the thickness of the slab. There is no need to adjust the legs; this operation will be done at the final stage of installing the pencil case in place.
Connecting elements at an angle
Fastening the shelves
Attaching the legs
Rear wall mounting
The frame is assembled, attach the doors to it.
Stages of creating a drawing of a sliding wardrobe with your own hands
The process of creating a future working drawing of any furniture can be divided into four parts:
- Measurement of the room, the immediate location (niche, wall, corner) where it is planned to install the wardrobe.
- Drawing up a rough sketch by hand.
- Editing the sketch taking into account all the wishes for content and technological aspects.
- Drawing detailed drawings to scale for further calculations (furniture parts and components).
Measurements
This stage determines both the dimensions of the future wardrobe and its internal contents. And this is not disputed: the functionality of cabinets in hallways, bedrooms, living rooms, children's rooms, offices and dressing rooms may be similar in some ways, but basically they still differ.
When taking measurements, all the nuances are taken into account: the presence of window sills and baseboards, sockets and protrusions - everything that in one way or another can interfere with the installation of furniture or make it difficult.
For built-in structures in niches, the deviations of the walls from the vertical and the slope of the floor or ceiling are taken into account.
Measurements must be extremely accurate and of high quality. If you make a mistake in the measurements, then the best and most competent project from a technical point of view can be thrown into the trash.
Sketching
There is such a thing as pointless conversation. When everything is discussed at once, sometimes even seriously, but what is said has no basis and is not applied anywhere. A sketch is the beginning of work, it is a draft version of the future drawing. It may be the most primitive - there is no need to be afraid of it.
But whatever sketch will be at the initial stage is the subject of discussion and all subsequent adjustments. On its basis, the design of the internal content is modeled, the technical side and feasibility of implementation are assessed.
Editing a Sketch
Will there be enough shelves? Is this particular depth and length of the shelves and the distance between them convenient for you? Measure the ones you currently use. It is possible to lay things out the way you are used to, it will be more convenient in sections of a certain width and height.
Is there enough space for hangers? When they design a wardrobe for you at a manufacturing company, they will definitely allocate the lion's share of the internal space for hanging short and long clothes. And this is logical - empty niches reduce sales costs. And the furniture will be cheaper, and therefore more attractive to order. In reality, many people don't use hangers much. For example, men who do not wear ironed shirts and trousers, but prefer jeans and knitwear. They clearly need more shelves, not hangers.
Shall we add more boxes? Drawers are convenient. Anything that cannot be neatly laid out on shelves is best stored in drawers. It is also good to equip the lower niches of the wardrobe with retractable grids, shelves or baskets - this way they will be more functional and convenient. But be careful - sliding doors should not interfere with the drawer's opening.
Are there any large items that belong in this closet? In the hallway, a stroller, a stepladder, skis or a scooter can be easily stored in the closet. And in the bedroom there is an ironing board and dryer. If necessary, inside the closet you can set aside a niche for household equipment (mop, vacuum cleaner, etc.), a Christmas tree and much more.
What do you have a lot of in your wardrobe? Some people can’t resist an extra pair of shoes, others obliviously buy bags to go with every dress. This means there is a reason to allocate more space for shelves with shoe boxes or niches with hooks for storing bags. We are all different and the approach to how to make a drawing of a wardrobe should be individual.
Installing a cabinet in the bathroom
An example of installing a ready-made set of cabinets
After the cabinet is assembled, the only thing left to decide is how to install the cabinet in the bathroom. In the case of a classic pencil case, there should be no difficulties - we just put it in a predetermined place. If you made a cabinet with legs, take care to equip them with adjusting mechanisms so that the installation of the cabinet in the bathroom is reliable, especially when the floor is imperfect.
For a wall cabinet, you need to proceed differently. Before you make a bathroom cabinet, you need to decide whether to do it using a mounting strip or ordinary furniture hinges.
Selecting the height of the cabinet
Before you start attaching wall cabinets to the wall, you need to choose the right height for hanging them. It is determined based on the main criterion - the height of the owner. On average, the distance is approximately 50-60 cm from the countertop to the bottom of the wall cabinets. According to GOST, this value is 45 cm.
Rules for installing and hanging cabinets
Before hanging the cabinet, you must:
- carefully level the walls;
- finish laying the electrical wiring, installing sockets and switches;
- complete the finishing of the walls - plastering, wallpapering, installing drywall;
- assemble the tool;
- determine the height of the headset;
- Mark with pencil or chalk.
To work you will need:
- electric or hand drill;
- hammer drill if the wall is concrete;
- level, preferably water;
- tape measure for measuring distance;
- screwdriver with a set of attachments;
- hammer and punch;
- clamps, if the boxes will be hung as a whole set;
- wrenches if anchors are used.