Preparation for calculations, tools, parameters
To calculate the basic parameters of a sliding wardrobe, you first need to take several measurements of height and width. Walls are rarely even. Therefore the values will be different. You need to make several marks along the height of the wall (at the same level), and take measurements with a construction tape. It is important to take into account the different projections on the walls:
- sockets;
- door jambs;
- batteries, etc.
They may interfere with installation. When measuring the parameters of the places where the furniture will be installed, it is necessary to measure up to these objects.
Calculation of part sizes.
After we have decided on the overall dimensions of the wardrobe, we begin planning the internal contents. Here we place vertical partitions with shelves, drawers, and clothes rails between them. The distance between the vertical panels can be any. But it is most convenient to use a sliding wardrobe if there is a separate compartment behind each door.
Below are some important points to consider when planning your cabinet layout:
— Always take into account the thickness of the chipboard parts. Typically 16-18 mm. Unaccounted thicknesses in total can distort the entire internal space by up to 5-6 cm or more.
— When planning retractable elements in a wardrobe (drawers, baskets, shoe racks, etc.), keep in mind that they will not slide out if they are located outside the frame of a two- or three-door wardrobe. This is the “dead” zone of compartment doors, and it is always closed, regardless of the door position. In the four-door version of the wardrobe there are no “dead zones”.
— If the sliding wardrobe is a cabinet, free-standing, then I advise you to move the horizontal shelves to the outer compartments to the side panels of the sliding wardrobe. Due to constant impacts of compartment doors, the sidewalls may shift over time. The shelves are additional frame elements and securely hold the side panels together.
— It is very important to pay attention to the fact that the compartment door mechanism is 10 cm in depth. All internal contents should be 10 cm smaller than the cabinet dimensions! Be careful when calculating the depths of pull-out elements, which cannot be shortened in place, like shelves. In a wardrobe with an overall depth of 60 cm, do not install a drawer with a guide of 50 cm, only 45 cm, since in addition to the length of the guide itself there is also a front panel and a handle on it.
— Write out the cabinet roof 2-3 mm larger than the overall dimensions. No matter how accurately you calculate the dimensions of all parts taking into account the thickness of the chipboard (!!!), there is such an unpleasant thing as production errors of 1-2 mm. Shelves can be made 1-2 mm larger, then shelves inserted into each opening will increase the dimensions of the cabinet by several mm. It will be annoying to have to reorder the cabinet roof.
On our website you can independently plan your wardrobe using a special service for 3D modeling. But keep in mind that the dimensions there do not take into account the thickness of the chipboard and are approximate.
After you have drawn a diagram or drawing of a sliding wardrobe, we begin to calculate each part of the chipboard - this is the roof, floor, sides, shelves and partitions.
The calculation is very simple, the main thing is not to forget to subtract the height and width of all chipboard panels (16 or 18 mm) and the technological indentation for the sliding mechanism of 10 cm in depth. Only two sides of the cabinet, the roof and the floor have overall depth. All shelves and partitions are recessed by 10 cm.
For the sawing shop, where you will take the detailing indicating the dimensions of the chipboard parts, it will be enough to indicate the following:
1st part size (along the wood texture pattern) – 2nd part size (across the texture). Simply put, this is the length (width) and depth of each chipboard panel. Next, you need to indicate on which side of the part to apply the edge material, according to the first size or the second.
How to find out the dimensions yourself: width, height, depth
Having made preliminary measurements, you can begin to determine the dimensions of the main parts of the cabinet.
- Width. Its size is determined by finding the minimum size. For example, the following values were obtained: 1780 mm, 1777 mm, 1784 mm and 1779 mm. Then you need to choose 1777 mm. In order for the cabinet to fit into the right place, you need to subtract 50 mm from the found value. This way, a technological gap is obtained in order to easily mount the structure.
- Depth. When determining it, protruding objects, for example, sockets, are taken into account.
Even if the wall allows you to make the cabinet deeper, but there is a protrusion on the wall, then the depth must be marked according to it. Then, as with the width, a technological gap is made (in this case it will be 35 ± 5 mm). The distance required for sliding doors is 80–100 mm. For example, the walls allow a depth of 710 mm. Technological gap – 30 mm, distance for doors – 90 mm. Then the useful depth will be equal to 710 – 30 – 90 = 590 mm. - Height. This parameter is determined by the Pythagorean theorem.
The reason for this is the bulkiness of the design. It is more convenient to assemble the cabinet on the floor, and then lift it and install it in the right place. Let's assume that the depth is 710 mm and the ceiling height is 2700 mm. We assume that the height will be 2550 mm. Using the Pythagorean theorem, we find the size of the diagonal: 7102 + 25505 = 7006600. Finding the square root of this value, we get 2647 mm. This size is less than the height of the ceiling, which means that the cabinet will freely fit into the right place.
Advice
Once the required dimensions have been determined, you can begin to calculate the filling.
For built-in cabinet models
The peculiarity of the built-in wardrobe is that it is designed for a recess in the wall (for example, a niche). Therefore, when calculating the dimensions, you need to be very careful: if you make a mistake even by half a centimeter, it will be impossible to install the cabinet. This design will be much cheaper than a conventional cabinet, since the walls play the role of the side and/or back surfaces.
Advantages of the built-in product:
- free space is saved;
- convenient to use;
- the space visually expands;
- the product is ergonomic.
But there is one drawback: it is impossible to move the cabinet to another place. You can simply dismantle it, but then you will have to do cosmetic repairs, because the walls, floor and ceiling will not have a very attractive appearance.
If the depth of the niche is more than a meter, then it makes sense not to make a closet, but to equip a dressing room.
Features for door width and height
Since in the case of a built-in structure, the width of the product does not depend on the owner’s wishes, but on the existing recess, it is necessary to calculate the width of one door with the number of doors. For example, if you need to make three sections, but as a result of calculations it turns out that the doors will be too narrow, this is a bad idea.
When choosing the width, it is better to start from the size of 1200 mm. If you make the doors larger, they will turn out to be too heavy and will weaken the mechanism. Of course, if you buy good components, you can choose reinforced guides, but the costs will increase.
If, as a result of calculations, it turns out that the doors of the optimal size will not cover the entire width of the cabinet, then you can leave a small section open. There you can equip, for example, a rack for small items.
When choosing a height, you can start from the height of the chipboard sheet, which is 2780 mm. The maximum height is limited by the height of the guides - 4 meters. You can find longer components, but they are unlikely to be useful. And there are not many rooms with ceilings higher than 4 meters.
Height calculation
In a simple case, for a cabinet that completely fills the niche allocated to it, the height should be 100 mm less than the distance from floor to ceiling, provided that it is no more than 2500 mm and the depth is no more than 700 mm. In other cases, for hull models, it is necessary to use the Pythagorean theorem for calculations.
We will assume that height and depth are the legs of an imaginary triangle. The hypotenuse is the longest side; it is the one that can prevent you from lifting the cabinet to the wall.
The peculiarities of the calculations are related to the fact that the cabinet itself is a dimensional structure. Accordingly, the frame is assembled in a horizontal position. And only then is it placed vertically. At this moment, if the calculated height is incorrect, it may not fit into the opening.
Hypotenuse = ѵ(height from floor to ceiling - 100 mm)2 + width2
Example: height from floor to ceiling is 2700 mm, depth 700 mm. We get 26002 + 7002 = 2693
When deciding on height, you need to base your decision on these calculations. If in the opening there is at least one distance from the ceiling to the floor greater than or equal to 2650 mm, then when lifting the cabinet you risk scratching the ceiling, or it simply will not fit.
Door size
When calculating, the following basic requirements are taken into account:
- one leaf should not exceed the size of 1200×2800 mm;
- the doors should not be made too narrow;
- it is necessary to take into account the overlap of the sashes.
When calculating the width, you need to add the length of the door overlap to the total width of the cabinet and divide the resulting value by the number of doors. Example: With a width of 1777 mm, an overlap length of 27 mm and two doors, the width of one leaf will be equal to: (1777+27)/2=902 mm. To calculate the height, you need to subtract from the height the distance required for the suspension (40–45 mm).
Do-it-yourself calculation of filling a compartment
Calculation of internal space (filling) depends on what the product is intended for.
- If you plan to make a section with shelves, then usually the distance between them is 300 mm. But you can deviate from this rule: if it is assumed that large boxes will be stored on some shelves, then the height can be made larger.
- The section with hangers must have a width of at least 550 mm. If this parameter is not less, then it is convenient to use a barbell. But when the depth is shallower, you can use retractable hangers or position the bar so that things are “face-on.”
Drawers can be divided inside into cells. You will get organizers in which it is convenient to store small things.
You need to see what accessories for assembly are available or what you can buy in the store. Then the internal space can be organized in your own way, install:
- tie hangers;
- retractable nets;
- shelves for shoes, etc.
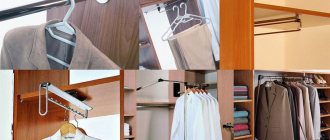
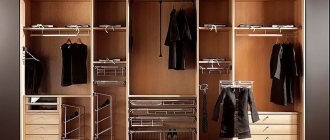
Proper filling of the wardrobe
For comfortable use, the closet must be properly zoned. This is especially true for the dressing room. For this purpose, internal content may include:
- shelves that can be retractable or stationary, half or full depth, solid or ventilated;
- hanger rod, horizontal or vertical;
- pantograph;
- hooks;
- trouser;
- shoe shelves;
- drawers;
- belt hanger;
- tie bar;
- retractable baskets.
The filling of the wardrobe can be anything, the main thing is that it is convenient to use. Creating a competent project for a built-in wardrobe is a labor-intensive task that requires care and precision. However, with successful design, it will be quite simple to assemble the finished structure, and the resulting result will be distinguished by its quality and pleasant appearance.
Box dimensions
When determining the size of drawers, it is important to take into account the dimensions of its parts:
- sidewalls;
- guides;
- bottom;
- facade;
- back wall.
These dimensions are determined as follows:
- The facade is 4 mm less than the size of the opening. There should be a groove in the facade to attach a handle to.
- The bottom can be attached to the box in two ways: nailed to the sides or inserted into special grooves. In the first case, the size of the bottom is determined by the dimensions of the walls. In the second, you need to take into account the depth of the groove and the thickness of the bottom material.
- The sides should be the same size as the guides or be slightly larger than them. The height of the rear and side walls is equal to the height of the facade or slightly less (about 40–50 mm).
Important
If the dimensions of the box are correctly determined, they will easily fit into the openings and there will be no gaps.
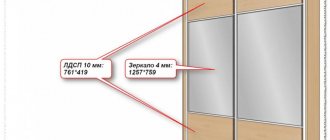
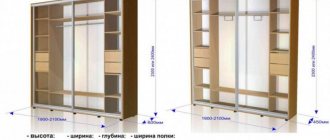
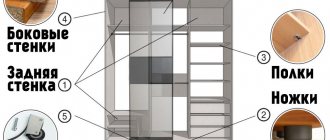
Determine the overall dimensions of the wardrobe.
After detailed measurements of the niche, we proceed to the detailed design of the cabinet. First you need to decide on the maximum dimensions of the cabinet.
Furniture designers have a rule - if the cabinet is free-standing (cabinet), then the minimum dimensions of the niche opening are taken as the basis. From them we subtract the technological gaps between the cabinet body and the walls of 1-2 cm. For example, based on our measurements (in the picture above), the minimum opening width is 2158 mm. We subtract 1-2 cm from this figure and get the actual dimensions of the cabinet – 2148 or 2138 mm.
And one more nuance: the sliding wardrobe is assembled lying down, so it lifts up. Therefore, the height of the wardrobe must be at least 10 cm below the ceiling, otherwise the diagonal of the side of the cabinet will not allow this.
If you are planning a built-in wardrobe, then, on the contrary, the maximum dimensions of width and height are taken as a basis. For the convenience of adjusting the outer shelves adjacent to the walls, add another 3-5 cm. This rule applies only to the internal filling of the wardrobe.
Sliding doors in a built-in wardrobe in a niche are calculated as follows: width - according to the maximum size (so that there is a slight overlap of frames in the narrowest part of the niche), height - according to the minimum or average size, depending on how strong the difference in height is between the extreme opening points. It should not be more than one cm.
For example, in our measurement drawing, the maximum width of the opening is 2182 mm, add another 3 cm for the undercut and adjustment of the internal filling of the cabinet, we get the cabinet dimensions 2212 mm. We calculate compartment doors without additional 3 cm.
Calculation of the amount of materials, fasteners, components
To calculate fittings and fasteners, it is best to create a table where all the data will be indicated in detail:
- name of the material;
- part dimensions;
- their number.
Depending on the dimensions, there may be several dozen such parts. In order not to forget anything and to buy materials that exactly fit the dimensions, you need to make a detailed list. If you add a price column to this list, it will be much easier to calculate the cost of furniture.
Based on materials, it is enough to make a list of all parts with dimensions. Then, with this list, you can go to the workshop, where the craftsmen will select the material to make the blanks. What is important when calculating the amount of materials:
- the base has a height of up to 100 mm;
- a gap of 1.5-2 mm is left on all sides of the drawer front;
- The internal space of the cabinet is approximately 10 mm smaller than the housing in terms of external parameters.
Important
It is also better to immediately summarize the data from the list of materials into a table, where we will then calculate the cost of the product.
Trust, but verify: we control the measurement and installation of the wardrobe
You have ordered a wardrobe. To measure the parameters of future furniture and clarify the features of the room where it is planned to be installed, a specialist arrived whose professional skills are questionable.
Will you be able to control the work of the craftsman and make sure that the wardrobe will fit like a glove in the room? To be calm in such a situation, get acquainted with the professional advice of manufacturers of inexpensive sliding wardrobes in Minsk Shkaf4u.
Measuring rules: how not to make mistakes?
It seems that measuring for the purpose of manufacturing and installing a wardrobe is a simple task. The reality turns out to be more prosaic: when the furniture is made, unpleasant surprises often arise.
The main problem is that in standard apartment buildings there are rarely even walls, floors and ceilings. If this point is not taken into account when making the cabinet, the furniture will not fit into a niche or close to the wall.
Measuring the height of the wardrobe
We measure the height of the walls in 3-4 places - at the edges and in the middle. This is necessary because the floor and ceiling may be uneven. If you measure the distance only at the edges, the wardrobe may not “fit”: in the middle the height of the walls is less than at the edges.
This happens often in new buildings in Minsk, so measurements must be taken carefully. You can find photos of inexpensive hallway cabinets with prices on shkaf4u.by.
If you measured the distance in 3-4 places and got the same result everywhere, do not rush to rejoice, it is possible that the floor and ceiling are “filled up”.
Arm yourself with a level and do an additional check. If a “blockage” is discovered, a false panel must be made during furniture production.
Important! The cabinet cabinet is assembled in a horizontal position; make it 10 cm below the ceiling, otherwise it will not stand up after installation.
We measure the width of the wardrobe
The width is about the same story as the height - take 3-4 measurements along the front line of the cabinet and along the back wall. Please note that the walls can be tilted in one direction and in the future this is a guaranteed misalignment of the doors.
If we are talking about a built-in model, make an adjustment in width by 3-4 cm - on each side there is an indent of 1.5-2 cm.
When it comes to furniture for a niche, smooth walls are important. The situation can be saved with false panels, but only if the unevenness is minimal.
Otherwise, you need to level the walls, especially in a situation where you plan to abandon the side walls, roof and floor, and install load-bearing metal structures into the wall.
Measuring the depth of the wardrobe
The standard depth of a wardrobe is 60 cm, but customers do not always stop at this. If the area of the room allows, and there are a lot of things that need to be “packed” into the closet, you can expand the depth to 80-90 cm. If the room is narrow and the space for furniture is minimal, the distance from the wall to the sliding doors is reduced to 40–50 cm .
But it's not that simple! Please note that mechanisms for sliding doors take up 10 cm of space; even with the standard version, you need to count on 70 cm, otherwise the hangers (in a horizontal position) will not fit.
We are planning internal content
Drawers, shelves, rods, hangers, pantographs - the functionality of the wardrobe depends on how well the internal contents are thought out.
Shkaf4u specialists advise:
- the internal filling should be 10 cm less than the depth of the wardrobe;
- drawers are complemented by front panels and handles, add another 15 cm to them;
- drawers should not extend beyond the doors, otherwise they will not open (an error typical for two- and three-door models);
- when measuring the installation height of the rods, take into account the length of the clothing; it should not touch the shoe shelves;
- the distance from the bar to the top shelf should be at least 5 cm, from the back wall to the bar - from 23 cm;
- provide a shoe shelf at a height of 30 cm.
Errors when assembling a wardrobe
Let’s say we have completed the measurements and corrected the specialist’s mistakes (if any). But where is the guarantee that the craftsmen will not make any mistakes when installing furniture?
We will focus on common mistakes when assembling sliding wardrobes and analyze how to deal with them. Once again we will call upon the experts of the Minsk company Shkaf4u to help.
Mistake No. 1. Overlapping doors
The ideal overlap is 2.5 cm. When the overlap exceeds 3 cm, the front door rollers in mirrored models are reflected in the door mirror, which is closer to the rear wall.
An overlap of less than 20 mm is also undesirable. Make sure that the technician follows the parameters, otherwise you will have to adjust the wardrobe doors yourself, and this is not always easy.
Mistake No. 2. There is no easy glide
Doors must move freely. If they move tightly, it means there is a problem with calculating the height (the traditional calculation rule is the height of the opening minus 4 cm) and adjustments need to be made.
The defect may also be associated with the protruding heads of the screws to which the rollers cling. In this case, the screws should be recessed.
Mistake No. 3. Problems with the stopper
To install the stopper, press the door against the side wall and make a mark on the bottom guide in the center of the roller with a marker or pencil. Pull the door aside and use a flat-head screwdriver to adjust the stopper so that it aligns with the notch.
The absence of a gap between the door and the side wall indicates that the stopper is installed correctly. If there is no tight fit, adjust the position of the stopper again.
Mistake No. 4. Drawers do not open freely
The drawers must move out freely, and the pantographs must be lowered and not touch the door, otherwise we have to talk about design errors. Of course, they need to be corrected.
This mistake is often made when creating two-door wardrobe models, and it is due to the fact that the two sections are made the same width.
It is recommended to reduce one of them by 3 cm. If the mistake has already been made, all that remains is to add a false panel between the partition and the drawers and trim the drawers.
We hope that the information from Shkaf4u specialists will be useful to you and you will be able to control the actions of the measurer and installers.
As an advertisement
LIKED THE ARTICLE -
SHARE WITH YOUR FRIENDS!
Comments:
0
0
Calculators and free programs
You can do the calculations manually or create a table yourself in Excel. But there will be a risk of making a mistake. You can use free programs or calculators, of which there are many on the Internet. Here are some popular free programs.
- BT-Closet. Using this software product you can calculate straight, diagonal and corner products. First you need to select the desired type, then specify the data, indicate the number of sections and their content. You can change the size and content of the layout. The program will display a table indicating the number of parts and materials, as well as drawings.
- eXponent Furniture Designer. The operating principle is similar. The difference is that you can create a 3D model. There are different types of furniture available in this program.
- PRO100. You can create your own project for the future interior, calculate the dimensions of individual pieces of furniture. During the design process, you can change the dimensions of one product or its individual sections.
- Basic cabinet. You need to indicate the external dimensions and specify the content. If the user changes one of the parameters, the program will automatically change the internal dimensions.
Instead of downloading programs, you can use online calculators. A lot of them. You can find websites of furniture manufacturers: almost everyone has their own calculator. For example,
- (www.mebel-data.ru);
- "Rosmebel" (www.shkaflon.ru);
- furniture factory "Mega" (www.fabrikamega.ru), etc.
There are also special sites, for example “Free service for calculating building materials” (www.zhitov.ru), where there is a section for sliding wardrobes.
Programs for creating sliding wardrobes
On the Internet you can find many utilities in which you can create projects for such an interior item as a sliding wardrobe
It is worth paying attention to the following software
Furniture PVM
This software will allow you to determine the real cost of the structure and calculate the amount of materials required. To get an accurate result you need to specify:
- How many shelves should there be in the structure?
- What is the height of the future piece of furniture.
- The width of the cabinet is also indicated in a special form.
- The sliding structures that will be included in the product also need to be considered in order to correctly indicate them in the list.
- The structure of the doors should also be thought out.
PRO 100
It is very easy to create a sliding wardrobe with PRO 100 in 3D graphic mode. The advantages of the program include the following factors:
- Easy to understand interface.
- An intuitive menu, so everyone can understand the essence of working in the program.
- The utility has a whole range of tools with which any idea can be implemented.
- You can download the utility for free, and this, in turn, significantly expands the circle of users.
- PRO 100 calculates the amount of materials needed to construct a sliding wardrobe with millimeter accuracy. And this, in turn, will allow us to determine how much funds are needed for the purchase.
- The system has the ability to save created objects and create your own library of tools.
- Having decided on the design and dimensions of the wardrobe, a person will be able to see in 3D mode how the object will look when arranged in the room.
Overall, the program is worthy of attention, so you should try its functionality to implement your own ideas. Video review of quick cabinet design in PRO100.
eXponent Furniture Designer
This software is most often used in enterprises involved in the assembly and sale of furniture. The advantages are:
- the ability to create a drawing in a few clicks and calculate the necessary materials for assembling a sliding wardrobe;
- after entering the necessary data, you can see the drawing in 3D mode, which will help you examine all the design details and furniture design and make adjustments if necessary;
- in the program tools you can find everything you need to draw designs for cabinets and other pieces of furniture;
- After creating drawings, the user has the opportunity to save the created objects or print them.
Among the variety of software, everyone can choose the one that best suits their preferences. The main thing is that with the help of these utilities, the process of creating a sliding wardrobe project is reduced to minimal actions and after simple processes a person will be able to see what the design will be like after its assembly.
Price
Having calculated the dimensions of all parts and determined the number of necessary fittings and fasteners, you can calculate how much the entire product will cost. You can look at prices on the Internet, and also ask how much the necessary material costs in stores in the region. It is important to consider the cost of cutting sheets.
A sliding wardrobe is a very convenient piece of furniture. Despite its large capacity, it takes up little space. If you use a built-in model, the efficiency of space use increases. Calculating the design is not so difficult; you can do it yourself. To avoid manual calculations, you can download a free program or use an online calculator.
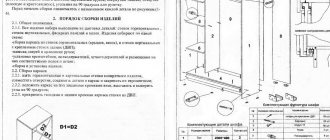
Drawings of sliding wardrobes
For those who have seriously decided to make a wardrobe with their own hands, first of all you need to acquire cabinet drawings with dimensions and a list of necessary parts and accessories. You can use ready-made sketches, or you can make an individual project. To do this, you will need to measure the place where you plan to install the future cabinet. After receiving the required data, we transfer it to paper. This will allow you to determine the dimensions of the product. We draw a sketch with our own hands, this will allow us to visually determine the thickness of the chipboard. On the resulting drawing you need to put all the dimensions, now the drawing has turned into a drawing of the cabinet.