A wardrobe is an integral part of the interior, a functional component of any apartment, house, or office space. When choosing it, many people prefer the design of sliding doors; with their help, you can save useful space, accommodate large items and items, independently design the dimensions, and individually model the number, dimensions, functionality of shelves and partitions.
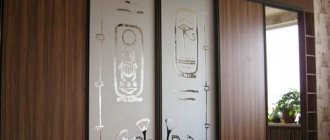
Original wardrobe decorated with fresco
As practice shows, the design of sliding doors is used for cabinets, separating spaces, niches of rooms, storage rooms, hallways, and installing interior sliding doors. Of interest is how to install doors for a sliding wardrobe with your own hands, since everything is more or less clear with the installation of its insides.
The benefits of making it yourself
You don’t need to have great construction skills to install, design, and assemble sliding wardrobe doors with your own hands. If you decide to do this, you will receive a number of advantages.
- Save money on paying a furniture assembler, designer, measurer, and sales manager.
- You will be able to independently select the necessary materials and components for installation.
- Choose an individual façade design.
- Use useful space rationally.
- Save time because you don’t have to wait for the assembly technician to become available. Often, about two weeks pass from the moment of order to the day of actual assembly.
- You will gain invaluable experience in installing sliding doors and apply it in other rooms, at the dacha, with relatives.
The only drawback of the compartment doors is that they cannot be moved. However, the fact that their doors do not need to be opened ninety degrees, which significantly saves usable space, allows you to carefully think through the installation location in a rational way that you will never want to move them.
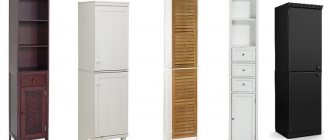
Pencil case for sliding door
The sliding door cabinet is installed at the planning and wall manufacturing stage. Installed from the finished floor level. Particular attention is paid to its upper part, where the guides and rollers for sliding doors are attached. To avoid deflections and sagging, this part must be well secured; it bears the main weight of the door structure. The door leaf is mounted and undergoes appropriate adjustment after finishing the walls. The installation is completed with the installation of platbands, extensions and frame elements of the pencil case.
Deciding on design and construction
Each house has its own world, each room has its own design. When choosing canvas for a sliding wardrobe, facing materials, you need to choose an individual design, their unique design.
The choice of canvas design is significantly influenced by the number of rooms filled with furniture, style, renovation, wallpaper color, furniture fittings, curtain material, room lighting, room functionality: bedroom, living room, children's room, hallway, kitchen, balcony, office, dressing room, storage room, warehouse.
For the living room, the facade is made of glossy, wooden materials, warm, light, dark tones. Doors can be made of combined materials: gloss is combined with matte inserts, wood, mirror, glass. The color is selected according to the color of the furniture.
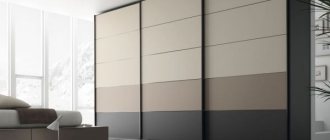
Living room interior with combined wardrobe
Shades of light, warm tones are suitable for the bedroom: white, beige, milky shades, ivory, gray, various shades of wood. Often in the bedroom there are inserts made of a mirror, a pattern on a glossy base, or frosted glass with an ornament around the area of the door or a small part.
Large wardrobe for a classic bedroom
For children's wardrobes, wardrobes are made in bright, saturated colors with images of animals and cartoon characters. It is not recommended to install mirrors in a children's room to avoid them breaking. It is not recommended to use gloss; traces of children's hands may remain on such material, which must be constantly removed.
Bright wardrobe with favorite characters for a children's room
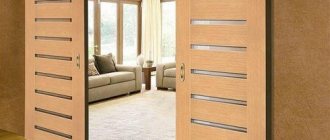
For the hallway, designers recommend using brown, dark, beige tones, or mirrors that visually enlarge the boundaries of the room.
Mirrored wardrobe for a large hallway
For interior sliding doors, preference is given to materials made from solid wood and chipboard.
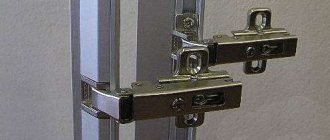
Hanging system of interior compartment doors
Drawings of flowers, plants, trees, personal photographs, and animal stickers are added to the design of the canvas.
Door designs vary:
- straight rectangular shape (the most common design, built into free corners, useless niches, along the length of the room, between rooms);
- oval in shape with rounded corners (the oval design is considered the most complex and expensive, but looks very attractive, bending around various angularities);
- full-height ceilings - the most common design;
- below the ceiling - used when, at the time of installation of the sliding structure, a ceiling has been installed: suspended, made of plasterboard with an abstract design, built-in lighting;
- with bottom and top rails - used for cabinets, separating part of a room, transforming a space into a small office or storage room;
- with a suspended structure - used as interior design;
Fittings for hanging compartment doors - cassette - when part of the structure is hidden in the walls, they are suitable for separating space, like interior ones.
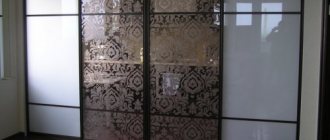
In the open position, the cassette sliding door leaf is located in a niche inside the wall
WHAT DOOR CASES DO WE SELL?
Our assortment includes three leading European manufacturers of door cassettes:
- Eclisse (Italy, 12 years warranty)
- Open Space (Portugal, 10 years warranty)
- Casseton (Czech Republic, 10 years warranty)
It is worth installing a door frame not only to save space. This is a more modern, more original interior solution. The cassette is convenient to use. The systems are designed for a long service life, and, if necessary, can be easily disassembled and maintained without dismantling the wall.
Calculation of door sizes
Calculation of wardrobe doors
To install doors you need to measure:
- height of the room from floor to ceiling,
- length along which the doors will be installed.
If the height of the room is more than 280 centimeters, then the operation of a cabinet with high, heavy doors will become very inconvenient; mechanisms with wheels will quickly wear out, which can lead to unpleasant consequences: doors falling out, getting stuck, warping. At this height, it is recommended to divide the cabinet vertically into a main and an auxiliary one, acting as a mezzanine.
For example, the height of the room = 300 centimeters, then the main closet will be 240 centimeters high, the auxiliary closet will be 60 centimeters high.
Once the width of the cabinet is determined, you need to determine how many doors need to be installed. For ease of use, it is recommended to install sashes with a width of 60 to 90 centimeters.
Depending on the dimensions and geometry of the opening, sliding doors can have 2, 3, 4, 5 door leaves
For example, the width of the cabinet = 280 centimeters, then the width of the door will be 70 centimeters, 4 pieces. Don’t forget to add a so-called gap of 3–5 centimeters to each door so that there are no gaps when the cabinet is completely closed.
The optimal ratio of door width to height should be taken into account. The ratio should not be more than 2 to 1, and less than 4 to 1.
For example, height = 200 centimeters, then its width cannot be less than 50 centimeters (4:1) and more than 100 centimeters (2:1).
Installation of sliding doors at home
First, buy in the store those parts that you will not make yourself. And this is all the fittings for moving units, guides, mortise door handles and fastening material.
First you need to assemble a U-shaped box (without threshold) from additional timber (planks). To do this, measure the height and width of the doorway, but cut the additional strip so that there is a gap of 5-10 mm on the sides and top - this is for sealing with polyurethane foam. To assemble the box, first drill holes with a countersink or regular drill to prevent the wood from cracking, and fasten the nodes with self-tapping screws 45-50 mm long.
Insert the box into the doorway and level it horizontally and vertically. At the bottom and in the middle, insert temporary jumpers from any lumber (boards, bars, etc.) so that they do not move out of place and wedge the box. Fill the gaps around the perimeter with foam and do not touch the spacers for at least 4 hours. However, this operation can be done first, and while the foam is drying, start cutting out the canvas and gluing the edges.
If the trim comes with the factory door, then there is a tongue and groove, which during installation is simply driven into the groove of the frame without any additional fastening. But if you buy platbands separately, then you will have to fix them with sealant or self-tapping screws (the heads are then closed with furniture plugs). Try to take all measurements accurately so that there are no gaps.
Now we measure the length of the thrust block. This parameter should be twice the width of the door leaf. Cut the required piece and drill holes in it for installation on the wall, close to the top trim.
Screw the stop block to the wall, but do it so that its end opposite to the opening direction is flush with the vertical casing, as in the top photo. The opposite end will naturally protrude towards the opening - this can be seen in the image below. Screw the supporting beam with self-tapping screws 100-120 mm long with plastic dowels, pitch 30-35 cm.
Measure the guide along the length of the installed stop block, cut off the required piece and drill mounting holes in it at a distance of 30 cm from each other. Then screw this aluminum profile to the stop block so that their ends are flush with each other. Here you need 30-35 mm wood screws.
Insert a pair of rollers into the guide, which, holding on to the curved edges of the profile, will serve as a sliding mechanism
Insert a pair of rollers into the guide, which, resting on the curved edges of the profile, will serve as a sliding mechanism. At the upper end of the canvas, stepping back 5 cm from the side ends, screw the brackets for hanging on the rollers with self-tapping screws, but first drill holes of a smaller diameter so as not to split the canvas. If the package does not include screws, then you can use 35-45 mm wood screws.
After fixing the brackets, hang the sliding doors on the rollers that you previously inserted into the guide. Manually tighten the locknuts on the sliding mechanisms to temporarily fix the door leaf and close the door completely.
Place a strip of masking tape under the canvas so that the markings are visible. Step back 5 cm from the edge of the canvas and put a mark with a pencil for the edge of the installation of the plastic flag, and draw a control line along the end of the canvas. This will later serve as a guide for fixing the guide flag.
Place the outer edge of the flag against the line, while simultaneously focusing on the cross mark. Drill holes for screws diagonally through the mounting holes and remove the tape. Now place the flag in its original position and secure it with four screws.
After screwing, put the blade on the rollers, while at the same time placing it with a groove on the guide flag. On the sliding mechanism, tightly tighten the locknuts with an open-end wrench, insert the clamps on both sides of the guide and immediately tighten them. The main structure of the sliding doors has already been installed, but one small detail remains - you need to close the sliding mechanism with the guide. To do this, mount a box from the same platband and screw three corners for fastening to it.
Fix the decorative box to the thrust block with the previously screwed corners onto the self-tapping screws. Now insert the inner part of the door handle into the mounting hole in the leaf and screw it with self-tapping screws. Place a metal sheath on top. Assembly is complete.
Necessary materials
Composition of aluminum profile system for compartment doors
After the design, material, construction, size, and installation location have been determined, we proceed to the assembly itself. To do this you need to purchase the necessary materials:
- door leaf,
- metal rails (top and bottom guide),
- rollers for the rolling door mechanism (lower, upper),
- buffer tape that softens impacts when sliding doors,
- silicone seal,
- profiles,
- vertical frames (profiles),
- a special adhesive film that protects against splinters if it accidentally breaks.
Structural elements that make up a lower support compartment door
How to install a compartment door in a doorway
We determine the dimensions of the doorway - the height and width of the door are measured. It is better to take measurements at several points (top, middle, bottom). The door height can be changed in the closed and open state. This is necessary to take into account possible unevenness on the floor.
The beam is installed. To do this, draw a straight line over the top edge of the box. The distance from the box to the line is equal to the width of the guide. The timber is attached exactly to the line. In this case, the middle of the beam should be located above the right side of the interior door frame if the door opens to the right. The width of the beam must be sufficient so that after installing the platbands, the door can close freely.
Upper guide profiles for sliding doors are installed. The runners are installed on the timber and secured with hardware. To check the correct installation of the runners, you need to run a roller over them. When sliding smoothly, you can begin further work. If problems arise, it is better to remove them immediately. The lower runners (rails) are installed.
To do this, you can choose one of several options:
- a part of the subfloor (or parquet, laminate, tile) is selected and the lower guide is inserted there. The lower rollers will move along it;
- the guide is installed directly on the floor (parquet, laminate), and in order not to destroy it, a threshold is installed;
- installation of the guide knife. But, since the system of lower guides is rarely used, if necessary, a so-called packet knife is often installed. Its purpose is to hold the door and prevent it from deviating from the given direction of movement.
The threshold-free sliding door system allows the door to operate without destroying the floor covering (there is no need to lay rails). The mechanism works thanks to carriages with rollers on ball bearings, which move along guides with shock absorbers and a bottom liner. The upper guide is hidden behind a decorative trim, in the same color as the door.
DIY frame assembly
Scheme of installation of compartment doors
Initially, we will proceed directly to assembling the sliding doors. The sequence is as follows.
- We attach the silicone seal to the ends of the door leaf around the perimeter. It is recommended to cover the mirror surface with a special film on the back side, which will protect it from fragments if it accidentally breaks.
Silicone seal is attached around the perimeter of the door leaf - We insert the blades into the vertical and horizontal profiles using a rubber hammer.
- We install vertical posts to the sashes from all vertical ends, hammering them with light blows of a hammer.
- We attach the roller mechanisms to the horizontal profiles, first from below, then from above.
- We glue buffer tape onto the vertical profiles of the doors to protect them from impacts.
The process of installing wardrobe doors
Requirements for the design of pencil cases
To create sliding door cabinets, you should install a niche into which the door leaf should move. The requirements for the manufacture of these structures vary. The wall, if it is not load-bearing, can be dismantled. In the place where it was located, a wall partition is re-installed, providing a niche for the panel door leaf. The partition is called a false wall.
Pencil case for sliding door
Pencil case for sliding door
The door frame itself should be a partition. At the same time, the area of the room is maintained, and the thickness of the wall does not increase. If for some reason it is impossible to dismantle the load-bearing wall, then you will need to attach a frame made of wood or metal to it, which must be covered with plasterboard.
What might be required for the job?
Sliding door mechanism diagram.
Pencil cases for sliding doors, completely ready for installation, can be purchased in the store. However, they are very massive and have a fairly high cost. Making a pencil case for a door with your own hands will cost almost twice as much. It is possible to install a cabinet door yourself, but this requires some experience and knowledge. Installation should begin at the stage of finishing floor leveling. The pencil case should be erected when the level of the finished floor is known, down to the thickness of the floor covering and underlay.
To work you will need:
- door leaf, handles, locking mechanism;
- platbands, additions;
- galvanized steel profiles;
- hammer drill, screwdriver;
- fasteners;
- sliding mechanism kit with guide;
- pencil, level, tape measure.
What can furniture be made from?
You can make a wardrobe to match the style of the room
Sliding furniture will be an excellent solution for storage issues. With its help, you can rationally use space and place a large number of different objects. It is suitable for clothing, shoes, as well as small household appliances and other small goods.
Most people are afraid to do their own assembly at home, so as not to damage the furniture. But if you do everything step by step and prepare the required tool in advance, there will be no difficulties. In addition, you have the opportunity to make a special door design to match the overall style of your room and based on your preferences.
The first step is to purchase material for manufacturing. Its quantity completely depends on the dimensions.
Basic materials for creating cabinets:
- chipboard. One of the popular and inexpensive to produce. A wide range of colors, practicality, ease of processing and reliability are the main advantages. Without experience in creating furniture, it is better to use chipboard. This material is suitable for the production of sliding wardrobes with photo printing;
- MDF is similar in its characteristics to particle board, but is more reliable due to its enhanced performance. The only negative is the low level of moisture resistance. Furniture installed in rooms with high levels of humidity quickly loses its attractive appearance, as the top coating peels off from the base.
- solid wood is ideal for creating cabinet furniture. It is distinguished by durability, durability and interesting design. The price is high, but fully corresponds to the characteristics. If you do not have experience creating furniture, this material will not be suitable, since its processing requires special skills and abilities.
To determine the dimensions of the furniture, proceed from the overall size of the room, as well as the place where you want to place it. The size of the internal filling is selected based on the items intended for storage.
Standard wardrobe size
Standard sizes are:
- height from 1.5 to 2.4 meters;
- depth from 0.6 to 0.9 meters;
- width from 1 to 2.5 meters.
Stage three: marking the profile for mounting the pencil case
A niche for a sliding door can be mounted either in a false wall or in an existing partition. To make a false wall, it is necessary to build a structure from two rows of metal profiles. When installing a pencil case on an existing partition, installing one row of the profile is considered sufficient. In both cases, the profiles are attached to the floor, to the wall and to the ceiling. When making a pencil case, the counter stand is always positioned with the cutout facing up. This will make it possible to create a technological hole for removing the roller carriages from the guide for the purpose of maintenance after complete installation of the cabinet door.