Types of shelves for flowers
Flowers in the house are an interesting decoration and an additional source of oxygen. Living plants in the interior can look very interesting, because there are varieties that have a very unusual and beautiful appearance. In order for such decorations to look harmonious, it is necessary to place them not on the windowsill, but on flower shelves and racks specially designed for this purpose.
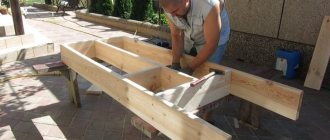
Flower shelves and racks are easy to make with your own hands. To do this, you need to use your imagination or use an existing master class.
Shelves for flowers can be of different shapes and designs. In addition, they are divided into varieties according to some other indicators. For example, according to your device.
Types of shelves for flowers:
- Mounted ones are mounted on some ledge. This could be a window sill and a chest of drawers. This product can also be hung on the balcony. There are also products that hang from a rope on the ceiling or wall and hang freely to the level you need. They are distinguished by their originality and unusual appearance.
- Wall-mounted ones are mounted, as you may have guessed, on the wall. Such decorative products can have a very different appearance. For example, they can be made in the form of a beautiful tree, with ring stands for flowers, or an original rack can be used instead of separate shelves.
- Floor-standing ones are most often used in apartments. They can have the most unusual shape or be made in the form of a classic round stand on a long carved leg.
Wall shelves are also divided into separate types. They can be straight or angular. In any case, they won't take up much space.
Separately, I would like to talk about the varieties of flower shelves according to the number of “seating” places. That is, according to the number of flower pots for which they are designed.
Varieties according to the number of pots they hold:
- Single seaters can only accommodate one flower pot. However, such products look very unusual.
- Doubles are also very compact. They are practically no different from single-seat ones.
- Multi-seat ones are the most interesting option. They usually have several tiers and can accommodate a very large number of flowers. Such products take up a lot of space.
These are the main positions by which flower shelves are divided into types. Of course, they may have different designs, but here everything depends entirely on your imagination.
Glass shelves for flowers
The main location of glass shelves is usually in the window space. On such shelves, all plants will receive the necessary portion of light. When preparing for work, you need to choose the right glass thickness. The optimal option is 0.5 cm. By strengthening the lower part with wood, this design can easily support up to ten small pots of flowers.
If handling a glass cutter causes some difficulties, it is better to seek help from knowledgeable craftsmen. By providing the required dimensions, they will easily complete your task.
DIY chandelier: manufacturing methods, examples, photos
DIY paper origami: step-by-step master classes, photo examples
In addition to the glass, you will need iron corners to attach the slats. Shelves are placed on top of the slats.
Equally important is the proper arrangement of flower racks and shelves. By following a number of simple tips, harmony is achieved between the green space and the atmosphere of the home:
If the floral variety is dominated by decorative flowers, it is better to use a wide floor rack. Its height should not exceed the middle height of the room, otherwise there will be a visual distortion of the space. When arranging flowers on tiered shelves, we use the rule from largest to smallest
Lush, larger bushes are placed on the lower floors, and we are gradually creating a transition to miniature options. When creating flower stands with your own hands, special attention should be paid to the supports. Large flowerpots require a strong and stable structure, especially if there are small children or animals in the house. A large number of plants placed next to each other on one shelf should have the same conditions for care. Add variety by inventing interesting ideas and adding small accents
Any driftwood with an extraordinary approach, with the addition of artificial accessories in the form of butterflies or bugs, will turn into a masterpiece.
The use of flower shelves is not limited only to the interior of the premises. Houses and apartments with balconies or loggias contain entire greenhouses. Owners of personal plots create incredible compositions on their territory. Restored stairs, bicycles and wheelbarrows are used as shelving. Teapots, watering cans and other old utensils can serve as a hanging shelf. Such green corners become one with the owners, and self-designed racks and shelves for plants are an integral part of a small flower paradise.
Hanging shelf on the window
Author OxyKsu.
We will need: 4 anchors with a hook (these were mentioned above), two 10mm pieces of plywood from which we will make shelves, a thin metal cable or strong rope. We fix the anchors in the upper slope, measure the required length of the cable, secure it on the hooks and in the corners of the first board using fasteners (you can screw in the same hooks as on top, but smaller). On the back side of the board we also attach fasteners, and we also attach them to the second board on one side. We connect the boards with cables so that the bottom one lies on the window sill, and the entire structure is stretched quite tightly. When placing pots with plants on the lower shelf, the loaded upper shelf will hardly swing.
This system can be used only for one shelf, which will be the length of the entire width of the window, with the only difference being that it will have to be secured on six or more hooks in the upper slope.
Corner stand options
Corner flower stands are the most useful. They allow you to make good use of space that is mostly idle. Apart from a shelf for flowers, it is difficult to put anything practical in the corner. Installation of such shelves is quite simple, since there are several support points. In the corner you can place wall shelves for flowers and floor ones. Both are easy to make yourself. In this case, a minimum of material will be consumed.
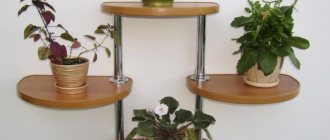
DIY from furniture tubes
To work, you will need three tubes 1 meter long, 18 flanges for the tubes, self-tapping screws, four strips of laminated chipboard in the shape of a square with a side of 40 cm. Use a jigsaw to cut off one of the corners of the shelf. This will make it look more compact. A hole is drilled in three corners with a milling cutter. It is better to do this on a drilling machine through two shelves at once. This will make it possible to avoid displacement of the holes in the shelves. The upper and lower shelves remain without holes. Three flanges are screwed onto the bottom shelf with self-tapping screws. Markings can be made using the holes in the upper shelves. Furniture tubes are clamped into the flanges. Next, two flanges are screwed on both sides of the holes in the shelves. The shelves are placed on the tubes and shifted to the required height. After this, the position is fixed using hex head bolts. The top shelf is fixed in the same way.
From chipboard you can build a hanging shelf for flowers in several tiers. It can be made according to the sample shown in the photo below. Depending on the number of tiers, rectangular or square planks are prepared. They are connected to each other by vertical jumpers made of the same chipboard. The shelves are attached to each other using furniture confirmations. Additionally, pieces of furniture pipes are installed, which complement the overall picture.
Window stand
The photo above shows an interesting version of a hanging shelf for a window opening. To make exactly such a shelf, you will need the ability to work with a welding machine. But you can simplify it and assemble a flower stand with your own hands. For these purposes, you will need a wooden board slightly shorter than the window opening and the desired width. Six or more holes are drilled into it. Three on each side of the shelf. They are necessary to insert the rope to hold the flower stand. Three pieces of rope are inserted in pairs into the holes of the shelf. Knots are tied at the ends so that they do not slip through the hole. Three holes are drilled in the lintel above the window opening and dowels are inserted into which hooks are screwed. The shelf is hung from hooks using three ropes.
This flower shelf is perfect for large windows with low sills. It is worth remembering that for all shelves for flowers that are made of wood (they can be multi-tiered or individual) it is necessary to use saucers. They will trap water and prevent it from getting onto the shelf, which would cause it to spoil. Another option would be to coat the wood with varnish, which will prevent moisture from entering the material.
How much light does a violet need?
Almost all species prefer bright, but diffused light; minor differences may be in the intensity and duration of daylight hours. For example:
- varieties with variegated or dark green leaves need brighter and longer-lasting lighting;
- light green foliage needs more shading, daylight hours are two hours shorter.
Direct sunlight is destructive to all species; they leave burns on the tender leaves. Depending on the species, daylight should last 12–14 hours a day. In winter, the duration of lighting is extended using artificial sources.
Kinds
Since not everyone can or wants to place flowers on the windowsill, there is a need to select the optimal place for them. At the moment, there is a fairly wide variety of stands that can fit in any room.
Among the most popular options:
- wooden;
- metal;
- combined;
- floor;
- wall-mounted
For indoor plants, any of the above options may be suitable, both in terms of material of manufacture and location. You can make wooden coasters yourself, since only a specialist or a person with experience in such a matter can work with metal.
A DIY wooden flower stand can have a different appearance, which depends on the number of plants that will be placed on it. If there are a lot of pots, then a multi-level design would be the best option. For one or two flowerpots, you should choose something elegant and stylish to decorate the room.
Independent construction of a product may include the use of a wide variety of materials:
- pieces of plastic;
- twine;
- wire of different thicknesses and colors;
- vine;
- threads
Before you start making the product, you should consider the option of the stand, its height, dimensions, sketch out drawings and decide on the final option. In the process of work, certain ideas for decorating an object usually emerge, but sometimes a ready-made form suggests the desired option, so there is no need to rush with it.
If a floor design has been chosen, then it is worth choosing the most suitable option. It could be:
- ladder;
- multi-level shelves;
- apartment flower bed;
- high stand;
- low stand.
The floor version is also called jardiniere. It is often used as a decorative element. It is not difficult to make such a design, you just need to choose a material that is convenient for the work.
Usually this is chipboard, wood or plastic, from which the stand itself and the base are made, connecting to each other. The stand can have any height, the main thing is that the entire structure is stable, for which the base must be at least 20 cm in diameter.
Wall stands are usually created in the form of one or more shelves that connect to each other. This option is used in cases where there is no space on the windowsill or floor for additional objects. Most often, wall shelves are made of metal or wood. The most beautiful techniques are forging and figured wood cutting. If we talk about more affordable options, then these include connecting one shelf with sides or several shelves with membranes that will strengthen the structure.
You can also come up with a variety of stands on the window that will make the room more comfortable and beautiful, and also make it possible to place many more flowers in it.
When thinking through the design, it is important to provide several important details:
- free access of light to the room;
- ease of use of the window sill;
- comfortable watering and care of flowers;
- the opportunity to admire the vegetation from anywhere in the room.
Wood, plastic and metal are most often used for window sills. The most beautiful stands are made of metal, with the help of which amazing things are forged.
Wooden and plastic products are less attractive, but more practical, because with their help you can make a small but high stand that will accommodate from 4 to 8 pots. The most popular option is to combine round wooden stands and a metal stand, which ensures the strength of the structure and its neat appearance.
The choice of option depends on the size of the room, the number of colors and the desires of the owner. You can make any stand with your own hands, the main thing is to understand the principles of its manufacture, select the right materials and make a suitable drawing.
Materials for a flower shelf on a windowsill
Plastic
PVC is not afraid of water, does not need treatment, but has low strength. Low quality plastic products quickly fade in the sun. The material is easy to process, but the brittle plastic may crack under stress. It should be cut with a hacksaw with fine teeth, and drilled with a thin drill, gradually widening the hole.
Glass or fiberglass
Typically, transparent blanks are inserted into a metal frame, but durable tempered glass can withstand heavy loads on its own. It is mounted on metal horizontal holders - round or elongated to one side and forming a supporting console.
Metal
Steel, aluminum or wrought iron. Steel rods and profiles are best suited. They can be bent and welded together, creating any shape without the use of bolted connections. A supporting frame is made from the profile. It is sheathed with boards or made with a glass insert. Holders with loops into which pots are inserted are made from twigs. The base can be galvanized pipes with couplings resembling handrails. A galvanized surface is more resistant to corrosion than a painted one, but it is easily damaged when welding. Aluminum parts are secured using screws and bolts. Forged shelves and stands are ordered from a craftsman. It is impossible to make them at home.
Solid wood and its imitations laminated chipboard, MDF
Its fibers must be protected from moisture and the effects of bacteria, since water will constantly fall on the surface when watering.
The parts are dried for several days at room temperature, then impregnated with antiseptics and coated with varnish - transparent or tinted. To emphasize the design, the workpieces are burned with a blowtorch, smoothly passing it over the entire surface. Soft layers burn and char faster than hard ones. This creates a noticeable, pronounced relief. It only takes a few seconds to achieve the desired effect. After firing, the top is brushed with a metal brush. It is better to carry out work outdoors. It's easy to start a fire indoors. As for substitutes, you can use laminated chipboard - the outer part of such boards is covered with a polymer film. It is highly resistant to abrasion and is not afraid of moisture. The ends must be protected from dampness with antiseptic impregnation and varnish, otherwise the edges will swell and crack. They do not look attractive, so they will have to be hidden under decorative trim - a plinth or a flat strip.
Another option for replacing natural solid wood is MDF; it has a denser structure and high strength. Workpieces are more difficult to process. Open edges without decorative coating should be protected from dampness.
How to make a flower stand from various materials
What options are there in terms of materials used? The simplest and cheapest is plastic. Plastic coasters are presented on store shelves in a large assortment. It is not difficult to choose any color and shape.
PHOTO: uclachoralmusic.com They are good because they are not at all afraid of moisture and do not cause trouble when cleaningPlastic structures can be floor-mounted or suspended. But they have one significant drawback - they cannot withstand a lot of weight and are only suitable for medium-sized pots.
On sale you can also find models of flower shelves made of MDF or chipboard.
PHOTO: vmebel.ru They look great, they fit perfectly into any interior, but you should remember that this material is very sensitive to moisture, so if you constantly water the flowers, you risk the surface of the shelves swelling and becoming moldy
Rattan products look very decorative. The interlacing of the stems of this tropical palm tree is often decorated with leather and other natural materials. It all looks quite decent. But such products also cost a lot.
PHOTO: hypermarketmebel-a.akamaihd.net An alternative could be products made from artificial rattan, which completely imitates the original
Glass stands can be called a universal choice. For this purpose, not only transparent, but also colored tempered glass is used.
PHOTO: avatars.mds.yandex.net In combination with glass, stainless steel is usually used as supports
But all of the options listed are industrial products. What can you use to make your own flower stand?
DIY flower stand made from cut wood
The most common and affordable base for making such a stand is natural wood. There are many advantages to this choice. Firstly, you will be one hundred percent confident in the reliability of the wooden structure. And secondly, wood can be decorated in different ways: covered with stain, varnish, or simply painted in any color. Such original and stylish flower stands will fit into most interior styles and will go well with natural furniture.
An example of how to make a wooden flower stand with your own hands:
| Illustration | Description of action |
| To create an original stand, you only need a large tree root and a couple of saw cuts of a suitable diameter. The root must be cleaned of all rotten parts | |
| The bark on saw cuts should be removed. This is not difficult to do with a regular chisel. | |
| The side parts, freed from bark, are sanded with a brush manually or using a drill. | |
| The top of the cut must be perfectly flat so that the flowerpots with flowers stand stable. | |
| On the upper parts of the root, make flat areas for attaching cuts | |
| To ensure reliable fastening, the area under the cut is first glued with PVA glue | |
| And after gluing, the saw cut is additionally fixed with a pair of screws on top | |
| Use self-tapping screws in side fastenings as well. | |
| When the stand is ready, coat it with oil, wax or varnish - whatever you like best | |
| An unusual flower stand will decorate your garden or home |
This DIY wooden floor flower stand will last your family indefinitely.
How to make a metal flower stand with your own hands
Metal flower stands can be made entirely of steel or used in combination with wood, glass or MDF. All-metal structures are especially impressive using the forging technique, when you can give them intricate shapes and decorate them with many decorative elements.
Here's how you can create a simple design without any special skills in working with metal:
| Illustration | Description of action |
| To make a simple shelf you will need a pair of stainless steel pipes, fasteners corresponding to the diameter of these pipes, and shelves that can be made from chipboard or natural wood | |
| It is better to round the corners of the shelves so that they do not accidentally injure anyone | |
| At the same distance on both edges of each shelf you need to make holes corresponding to the diameter of your racks | |
| If you took a base for chipboard shelves, then treat the edge with a special adhesive-based welt or a plastic one like this | |
| Secure the fasteners over the finished holes using self-tapping screws | |
| All that remains is to “dress” the shelves on the metal and arrange them at the desired height | |
| Place this simple flower stand on the floor or table |
How to make plastic shelves
Plastic shelves for violets can be part of a wooden or metal structure, but their manufacture is the most difficult.
If in the previous two cases you can use scraps of old pieces of furniture or shelving, then with plastic stands you will have to start from scratch, since in natural conditions there are few places where you can find smooth plastic slabs. To make the device, you will need rectangular flat plastic products measuring up to 100 cm in length, 30 cm in width and 50 mm in thickness. Most often, to obtain such material, contact a company that deals with plastic products, where they will cut out and immediately process shelves of the required size. It's not too expensive since plastic itself is a fairly cheap material.
After you have cut out the stands for the violets, all you have to do is mount them into the shelving frame or nail them to the wall using fasteners. It should be remembered that it is better not to place products made of inexpensive plastic near the window, since in hot weather this material will, if not melt, then burn out and dry out, which will lead to the destruction of the structure.
The nuances of making flower stands with your own hands: tips for different design options
DIY flower shelves, as a rule, always turn out differently, even if the artist follows the instructions exactly. Therefore, separate tips and recommendations apply for each option. Let's take a closer look at them. A professional metal profile can be used as a basis for attaching the suspended structure .
Hanging flower stand
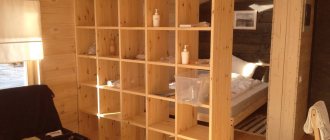
It is best to make a wall-mounted or hanging flower stand with your own hands from wood or macrame strands. This design is very light and conveniently attached to the surface. When creating this model, consider the following points.
To create a wall-mounted version, you can use the remains of plastic pipes after repairing the plumbing or heating in the house. For fastenings, it is better to install long dowels that penetrate deep into the wall, increasing the reliability of installation. Analyze the balance of the stand. Never place pots near the edge
Firstly, it is unsafe, and secondly, you put the integrity of the shelf at risk. If a sheet of chipboard is used as a rack for DIY flowers, then it is important to make sure that it is not rotten.
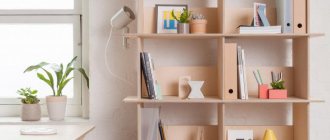
Flower supports can have a multi-tiered integral design or consist of several separate shelves. The latest models can be placed on the wall in a chaotic manner. Moreover, such options are easier to manufacture and install.
At the same time, decor and artificial vegetation can be placed on such racks. PHOTO: roomester.ru
Multi-story models
DIY flower stands are most often made from wood. They are quite comfortable and have an A-shaped design. Here are some design tips:
Try to use unpainted wood. The maximum that can be done is to coat it with varnish. In order for the pots to stand securely on the racks, it is better to abandon the grids and make them solid
Of course, if the pots are voluminous, then it is better to give preference to slatted stands. When assembling the frame, it is recommended to make reinforcing supports. Please note that the thickness of the board should be at least 1-2 cm. Otherwise, under constant load, and flower pots weigh quite decently, the shelves will begin to sag
This will affect aesthetics.
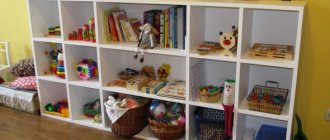
The shelves can later be used as shelves for storing toys in a children's room or for other useful little things PHOTO: homeali.ru
You can design the bookcase in a strictly rectangular format. To do this, you can use an old unnecessary table, in which several additional niches are formed.
Floor models of structures
Floor stands for indoor flowers fit very harmoniously into the interior. They try to place them on loggias, opposite windows and balconies. In other words, in those places where light reaches well.
If we are talking about a floor stand for flowers made of wood, then you can use a variety of wood materials. Even a fancifully curved branch of an old tree is suitable for decorating a shelf. It just needs to be prepared for basic use. Wooden shelf models will look great if all the furniture in the room is made of the same material.
The branch is painted, varnished, and a round or irregularly shaped shelf is nailed to each thick part of it. PHOTO: homeali.ru
Outdoor flower stands and their features
Floor-mounted metal flower stands can be elegant, curly and quite unusual. We bring to your attention the models shown in the photo, which are well adapted for outdoor conditions. Typically, such options are used for planting perennial plants or for temporarily moving indoor flowers outside during the season.
Forged stand. The pot is held in it with the help of lateral tendrils. For reliability, it is additionally fixed with wire. PHOTO: sadovoda.ru
The “Bicycle” model, in which the trunk, seat and steering wheel are used as shelves for flower pots PHOTO: lachat.ru
Options for DIY wall shelves for flowers: photo
There are also a lot of types of wall shelves, and if you make them yourself, they will cost much less than store-bought products. Using the examples presented in the photo, it is easy to make all kinds of models. It will be much cheaper and more reliable.
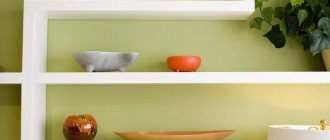
Bronze model of a florist for a classic style room PHOTO: homeali.ru
Carved shelf for indoor climbing plants PHOTO: roomester.ru
Multi-level straight shelf made of wood with reliable fastening to the wall PHOTO: roomester.ru
Making a rack with shelves for violets with your own hands
You can make a rack with your own hands, since it is not that difficult and you can use any materials. Another plus is that the size of the future rack for violets depends only on you! (do it according to your parameters)
The most common wooden rack. First you need to buy chipboard boards of the size you need. If there is a need, you need to sand out the flaws with sandpaper, and then proceed with the installation of lighting fixtures and fastening.
Photo of wooden shelving
Another option could be a glass shelving unit. To directly cut the material, you need to resort to the services of craftsmen. The glass must have at least 1.5 cm! To attach such shelves you need to use aluminum profiles, dowels and adhesive pads.
Glass shelving for windows
You can design a mobile rack on wheels. To do this, assemble a frame from a profile or timber, at the bottom of which holes are made for the wheels. Then the wheels are attached and the shelves are installed directly. You can also use your imagination and decorate it as you wish.
Another option would be a metal shelving unit. To do this, you need to have rods with a diameter of 10-15 mm and use a welding machine to create a metal frame. The shelves for such a rack are cut out of wood and fixed to a finished frame. For greater stability, you can additionally attach the structure itself to the wall using self-tapping screws.
Illuminated rack, photo
The choice is yours; it depends only on you what material your design for violets will be made of, what appearance, color, and size it will have.
DIY rack with lighting
To make a backlit rack you will need the following materials: a drill, wooden boards and beams, a level and a tape measure, self-tapping screws and screws, metal pipes, lamps, junction boxes, chokes, starters and several plugs.
It is imperative to collect all the necessary materials, since searching for them may take more time than assembling the rack itself!
Shelving drawing
You need to determine the height of your flower rack before you get started! It is better to immediately make the rack high, so as not to redo it in the future. You need to make a gap of 45 cm between the rack and the ceiling. The width of the shelves depends on the number of lighting fixtures that will illuminate the violets.
The first thing to do is to mark the height on the wall with a pencil - 40 cm from the floor. Then, above this mark we mark 4 more points at a distance of 40-45 cm. This is done in order to see where our shelves will be located.
Then you need to cut the slats and crossbars. If these are metal strips, then you should measure and cut them in advance in workshops.
Where the planks and posts intersect, we make holes and fasten them together.
To assemble the shelf, we need to cut out 3 racks and 1 support, which will only be auxiliary, which we will then remove.
The next step is to attach the slats to the stand and crossbar and fasten them with self-tapping screws. For greater strength, we can coat the part with glue. We fix the shelves in the same way.
LED lighting for a violet rack, video:
Before you begin installing the rack, you should drill holes for electrical wires in the shelves and back wall. To prevent the light from the lamps from blinding your eyes, you should install a partition on the front of the shelves. Then you need to drill holes for the hooks on which the lamps will be attached. We fix the hooks on the shelf and attach the lamps to the holes in the back. Several lamps can be brought out into one plug and connected through a carrier.
We will spend no more than 4-5 hours on the entire frame assembly. But your plants will be provided with a sufficient amount of light, and you will be able to water and fertilize them without any problems.
Watch the video: DIY illuminated violet rack
Varieties of violets
Violets, as indoor flowers, were already in Europe at the beginning of the 19th century, and they were brought from East Africa, which is considered the birthplace of violets.
Today, there are dozens of types of violets, which are not difficult to find and purchase. They are different from each other, but at the same time so beautiful and unusual. They appeal to both experienced gardeners and amateurs who admire them at home.
Varieties of violets differ among themselves: in size (standard, giant or miniature), leaf color (from light green to rich dark green), type of petals (regular, double, semi-double), leaf shape (round, oval, with smooth and uneven edges ), the shade of the flowers (solid, unevenly colored, purple, pink, blue, etc.), the shape of the flowers (classic, star-shaped, star-shaped bordered).
Subtleties of choice
When there is a desire to decorate your home with stylish and beautiful shelves for flowers, many are lost when choosing (due to its diversity). Indeed, both creative and classic sets are presented on store shelves. A few tips can help you make your choice.
- You need to buy shelves for several rooms at the same time. If the models are different in design and color, this will upset the balance of the design. You need to start from the general design concept. If you do not take it into account, the products will not look beautiful.
- The size of the glass unit matters. If the window is large, it is possible to use a model in the form of a bookcase or mini-rack.
- In order not to hide the luminous flux, you should not overload the window with the placement of massive products. Therefore, models in the form of blind cabinets that block the access of sunlight to the room are undesirable. It is not advisable to use black undertone designs for window decoration. They reduce the amount of light in any room.
- The shelf should create a feeling of lightness. This will allow you to place flowers on it without the window sill feeling cluttered.
- The manufacturing material must be resistant to watering and constant spraying of plants. The raw materials for the shelves should be easy to care for, since they will have to be constantly wiped to remove water stains and remove dust and soil particles from loosening.
It is also important to take into account the number of products: the more unusual the shape and design, the fewer shelves there should be (and vice versa). In addition, it is worth starting from the purpose of a particular room: it is no secret that the atmosphere of the kitchen, living room, bedroom and study is different
So, a certain enthusiasm is welcomed in the kitchen. Smooth lines and openwork elements are appropriate in the bedroom. In the living room you need to show the uniqueness and unusualness of the configuration. If you want to decorate the window sill of your study with a flower shelf, you should choose a simple product without frills.
When shelves are purchased to decorate the windows of verandas or closed gazebos, a different situation arises: you can buy luxurious forged structures, creating the illusion of a design ensemble. When there is only one window, they are allocated a specific functional area. For example, accenting bay windows with flower shelves will create the feeling of a greenhouse.