- Types of profiles
- Types of door systems
- Advantages of door systems
- Features of the Optima lower support system
- Nuances of assembly and installation using the example of “Optima”
- Assembly of top-hung structures using the example of “Puerta”
- Features of installing non-threshold systems
- Troubleshooting common problems
A logical question for a person who knows how to handle metalwork tools is how to make sliding doors with your own hands. It is necessary to understand the design features, as well as the operation of individual mechanisms. This will avoid difficulties during the installation process. The main thing is to strictly follow the sequence of actions.
The sliding door is represented by a structure whose leaves move to the sides. As a rule, we are talking about one or two door leaves. The installation methods are different.
Types of profiles
Before you learn how to make sliding doors yourself, it is advisable to consider the types of profiles. A budget solution would be a steel profile. But more often they prefer aluminum options with a rich color palette, wrapped in PVC or with an anode coating.
These products are distinguished by:
- light weight;
- durability;
- variety of textures and colors.
The listed advantages make aluminum profiles more popular. So products manufactured by RIAL:
- resistant to mechanical damage;
- does not fade under ultraviolet light;
- does not scratch;
- does not wear out;
- does not fade.
Company profiles RIAL.PRO
When wondering how to make sliding doors yourself, it is not difficult to understand which option to prefer. You need to decide on:
- Type of system (bottom support or suspended)
- Coated profile (anodized or wrapped in PVC film)
- Profile quality and price.
Preparatory work
The first step, which plays an important role in making a door, is preparing the space for the compartment door.
Preparing a site for installing a compartment door
If you are not careful in preparation, difficulties may arise during installation, there will be a sloppy appearance at the end of the work, this may affect the operation of the doors in the future. So:
- The old door needs to be removed.
- Clean the area from dust and debris. If there are cracks or holes, they should be repaired.
- Using a level or plumb lines, you need to check the evenness of the surface; if the walls are uneven, the door may not work correctly - it may jam.
- If there are deviations from the level, the walls need to be leveled.
After the work has been completed, it is worth disassembling what the compartment door consists of.
Types of door systems
There are support and hinged sliding systems. Hanging systems such as Puerta can be used as a room divider. Installation is not problematic if you have a drill, self-tapping screws, a screwdriver, wooden wedges, a building level, a tape measure, a plumb line, and foam.
Top-hung system "Puerta"
If the assembler is faced with the task of making wardrobe doors with his own hands, then it is advisable to arm himself not only with a level and a screwdriver, but also with:
- electric drill;
- wood hacksaw;
- screwdriver;
- ruler;
- pencil.
The operation of the hanging system is intuitive. But, wondering how to make an interior sliding door yourself, it is recommended to first take into account that the basis here is rollers with a guide rail, attached directly to the edge of the product, while elements are fixed on the sides, designed to limit movement and ensure smooth movement above the floor.
Doors for sliding wardrobes: recommended sizes
If we talk about strict restrictions on the size of cabinet doors, then there are none. You can make any length and width. But there are recommended parameters determined based on operating experience:
- The minimum width is 50 cm. Nothing will stop you from narrowing the track, but it will tilt as you move and may even jump off the rails as a result.
- The maximum door width is 110 cm. This requires considerable effort to move it.
- The optimal width is 60-90 cm.
- The profiles are 5.5 m high from the factory, but they are usually cut in half in the workshop. Thus, there is a real possibility of manufacturing cabinet doors of the required height. If the height is high, you just need to pay attention to the rigidity of the handle profile.
- Select the number of sliding doors depending on the optimal width. Choose them so that they do not block access to the contents of the cabinet. Almost no size restrictions
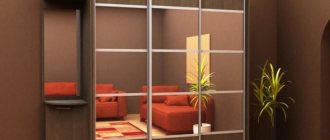
Advantages of door systems
The system, based on bottom-support guides, attracts attention due to its ease of operation. It allows you to harmoniously fit the corresponding wardrobe into the interior, taking into account uneven floors or walls.
Aluminum is rightfully considered the most practical material from which such systems are made today. It is used to create a door frame, handle profile, and guides. The design provides the required rigidity, which allows the use of various materials to further create the door.
In the lower-support versions, the load of the door leaf with a roller mechanism falls directly on the running profile, while the upper ones provide additional stability.
Top-hung systems, of which Valencia is one example, have been used relatively recently. The structure is attached directly to the top rail. The lower one acts as a retainer.
“Valencia” is presented in hi-tech style and allows you to install doors whose movement will be impeccable. This is due to the presence of:
Top suspension system "Valencia"
- excellent double rollers;
- soft closing mechanism.
Aluminum is also used to make the durable and lightweight Valencia.
The presence of a frame system makes it possible to install glass or mirror inserts. Smooth closing of the doors will be ensured by appropriate closers. Doors assembled on such a system will give any closet a stylish, presentable and elegant appearance.
Such a hinged system will allow you to assemble doors whose height and width reaches 2.5 meters.
For self-assembly, we recommend studying the article - “Assembling sliding doors on the Valencia hinged system”
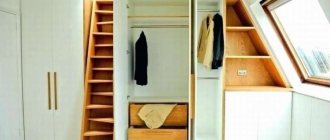
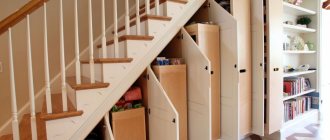
Choosing a pantry door
In Khrushchev-era apartments and other standard layouts, storage rooms are already provided. But, if there has been a redevelopment or the room does not have space for a storage room (small apartment), they are installed by hand. Then the pantry can serve for storing food, storing winter and unnecessary things. Such storage rooms may have shelves and niches. They provide basic lighting or backlighting. Such storage rooms require an individual door.
Sliding doors in a storage room with shelves
There are many doors, they are all different in design and material. How to choose a door to the pantry? There are doors:
- ordinary - on hinges;
- accordions – fold when opened;
- sliding – move in different directions when opened.
Sliding doors are installed to save space. On the free meters you can install furniture, a fireplace, a decorative element, and so on. Installing sliding doors will require tools and care.
In addition to the types of doors, they can be different in the material they are made of - wood, glass, plastic, metal, and have multiple color options: matte, bright glossy, different types of wood or inlaid with multi-colored stones.
When choosing a door, you should also pay attention to the appearance. If the room is bright, then the tone of the sliding door should be light. But, if the interior of the apartment has a combination of light and dark tones, then the door should be selected to match the overall decor.
Features of the Optima lower support system
A striking example of a lower-support product is the Optima frame system, consisting of aluminum components. When the task is how to make doors for a wardrobe, you should prefer Optima, because it is distinguished by:
Lower support system "Optima"
- reliable mechanism;
- simple assembly that does not cause difficulties;
- availability of a wide range of products presented.
Customers will also be pleased that the list of possible solutions of this design for any interior is regularly expanding.
"Optima" can withstand up to 55 kg. The door height reaches 2.7 m, width 1.2 m. The movement is extremely smooth due to the presence of rollers with bearings. The front visible part of the frame does not exceed 15 mm.
Glass, decorative panels, mirrors, MDF or laminated chipboard are used as filling. "Optima" will allow you to combine fillings. A good solution would be glass (4 mm) in tandem with MDF (10 mm).
Materials
The range of materials for the manufacture of door panels is varied:
- Tree. If financial capabilities allow, you can give preference to wooden door consoles. This is a good investment, because varnished wood looks simply perfect, especially between the living room and the kitchen. The door leaf can be either solid or in combination with other materials (paper, plastic, glass, mirror).
- A significant advantage of wood is its environmental friendliness and pliability, thanks to which it can be included in various interior styles. The only drawback is the massiveness of the finished products, so it is better to use door consoles in spacious kitchens. Wood often goes in tandem with glass inserts; such door options are popular and fit into any design idea.
- Glass. Designs made from glass sheets will ideally fit into the decor of a room in the style of hi-tech, minimalism or classic interior. The choice of these doors should be based on the strength and reliability of the material: how the glass reacts to sudden changes in temperature and whether it is afraid of impacts. If there are small children or animals in the house, you should use only impact-resistant fabric. The value of these doors lies in their ability to transmit light; they do not create a completely isolated space.
By choosing models of a certain dullness and color, you can achieve the required transparency of the structure. Then through the closed door it will not be visible what is happening in the adjacent room, but at the same time a certain amount of light will penetrate.
- MDF/Fibreboard is a high-quality budget material for kitchen consoles. Such doors are appropriate if it is not possible to install natural wooden panels or if the kitchen is too small and cannot withstand such door finishing. Visually, they are almost indistinguishable from their natural “colleagues”. Doors made of MDF and veneer are lightweight, do not require maintenance, and are resistant to temperature changes. A wide range of colors allows you to choose door leaves to suit any interior style.
- Plastic. Often used in conjunction with folding structures and sliding doors. The material is an economical option, but has a presentable appearance. This is the optimal solution for the kitchen space: plastic doors do not require special care; all you need to do is walk over them with a soapy cloth. If the kitchen is adjacent to the living room, such decoration of the doorway will look somewhat ridiculous and cheap.
Nuances of assembly and installation using the example of “Optima”
If you are interested in how to make wardrobe doors with your own hands, first of all you will need a frame system and 4 mm glass, an adjusting screw and a running profile, a carpenter's hammer and a drill with bit diameters of 6 mm and 10 mm. You can’t do without Schlegel, that is, a fleecy sealant. It is glued to the sides of the wardrobe.
Assembly begins with glass. A silicone seal is attached to the upper side, with dividers between the inserts. There is a narrow silicone seal on the glass.
Where a standard divider is installed, the upper profile of the frame is attached. A divider is installed to another mirror area. Press it tightly.
The seal is attached to the glass inserts. Finally, frame elements are placed along the width of the insert. Detailed assembly information is provided here.
Bottom profile frame
Sliding door with glass inserts assembled
For installation you will need a drill with a 5mm drill bit, a hexagon and a screwdriver, a mounting level, double-sided tape, and a mounting kit. Detailed installation information is provided here.
Making a sliding door
Even a novice master can handle a simple version of the sliding design. We will look at the main stages of manufacturing a sliding door.
Before starting installation, you must prepare all materials and tools
Materials and tools
During the work we will need the following devices:
- electric drill, screwdriver;
- chisel;
- electric jigsaw;
- Bulgarian;
- building level;
- roulette;
- Screwdriver Set;
- a simple pencil and a ruler.
In addition, you will need to prepare materials:
- chipboard sheets for door leaves;
- guide rails, rollers, fittings;
- bars with a cross section of 5×5 centimeters;
- anchor fastenings;
- decorative additions;
- self-tapping screws
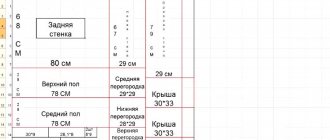
Calculations and drawings
It is recommended to draw up a drawing of the door leaf with dimensions. To do this, we will need to first measure the doorway (it is necessary to take into account the distance to the ceiling in order to determine the method of installing the sliding doors). In addition, you should take into account the distance from the opening to the corners, because in all cases it is not enough for the sash to slide out freely.
If you decide to install a frame over a doorway, then first of all you need to take into account the thickness of the floors - if there are too crooked walls, the measurements may not match, so they will have to be double-checked several times. In addition, you should make sure that the floor is level and not sloped.
This is what the measurement diagram looks like
According to the standard, the canvas has the following dimensions:
- width – from 40 to 90 centimeters;
- height – 275 centimeters.
When making a door yourself, you should not make it too large, because the rollers may not withstand excessive load.
When choosing the classic version of sliding doors, you need to make a leaf that will be 20-50 millimeters higher than the opening. The width of these doors should be 20-30 millimeters larger on both sides.
The table shows the maximum dimensions of door leaves. The possibility of deviation from these values is not excluded, but only to a lesser extent
In the case of installing a cassette mechanism, it is necessary to cut out the canvas exactly to the size of the opening, because first the mechanism itself will be installed, and only then the niche.
By combining materials, you can make the door leaf weightless. Here are some of the most popular lightweight design options.
If you think that it will be easier to make a door leaf from wooden blocks, then the following diagram of their connections will be useful in your work
In this case, you should use polished timber, which will not have to be further processed. In order to make the most accurate cuts, it is advisable to purchase specialized carpentry equipment.
The process of making a sliding door: step-by-step instructions
Step 1. First of all, we need to cut out a door leaf of the required size from a sheet of chipboard. This can be done at home, but it is better to turn to professional furniture makers. Next we need to process the edges. This is quite simple to do, using an iron or hair dryer with hot air, after which the edges can be cut off with a utility knife.
Treated and untreated chipboard edges
Important point! During work, you must use protective gloves for your hands and special glasses for your eyes.
Step 2. Now you need to take a wooden beam and measure the required length from it.
You should mark and saw off the beam using a jigsaw
Now, according to preliminary markings, we will need to fix the beam above the doorway (in our case it will be held on by four long screws)
Step 3. Now you need to measure the required length of the rails.
You can cut the metal guide using a grinder
Now you should make holes in the guide for the screws
It is necessary to place it on a chair, holding it with one hand, and drill through holes.
Step 4. Next you will need to screw the guide rail to the wooden block above the opening.
You need to hold it with one hand and screw in the screws one by one
Important point! If the guide is installed without a bar, then it is necessary to fix it a few centimeters further from the wall, otherwise the door will touch the trim when moving.
It is necessary to carefully check the correct position of the bar and the guide using a level, because the ability to freely open the door depends on this.
Step 5. Now you need to attach the metal fasteners from the kit to the door leaf.
We attach the hanging mounts for the rollers with self-tapping screws
Step 6. Now you should mark the location where the door handle is attached.
It is important not to make mistakes in the calculations and put marks on all sides
Now you need to make holes using a drill along the marking lines
This is necessary in order to place a jigsaw blade there and cut out a recess for attaching the handle.
You should also cut out the hole carefully, moving exactly along the marked lines.
Tips for choosing a jigsaw
It’s better not to rush here and, if necessary, make a few more holes with a drill on the other side.
The door handle mount should be installed in the resulting hole, after which you will need to insert the door handle itself
Step 7. The next step is to insert the rollers into the top guide.
You need to insert two rollers into the guide
Now you need to screw the door lock from below
The groove in the door leaf must be made using a grinder and a special circle.
Step 8. Next you need to hang the door leaf.
Using the screws located on the rollers, you should set the canvas to the optimal level, after which it can be secured with nuts
Next, you need to insert the clamps into the guide and wrap them up - this will be needed so that the door does not go beyond the rails
Step 9. The fastenings will need to be covered with decorative trim in the color of the door leaf.
First you need to measure the exact length of the extension, and then you will need to cut it to size with a jigsaw
The extension can be secured to small nails with decorative heads. It is important to carefully fix it on both sides. Now we need to mark and cut the side panels for our door. Then all that remains is to install them according to the same principle.
Upon completion of all work, it is necessary to check the functionality of the structure - the door should move smoothly along the guide without any obstacles.
Video - Sliding door from an ordinary one. DIY compartment door
This is the simplest option for making a sliding structure at home, which is suitable for beginners. If desired, you can also install a lower guide with rollers. In this case, it will be necessary to make a recess according to its dimensions in the floor. It is worth noting that this is a more modern option, because such a mechanism operates silently.
Important point! In this case, when hanging the door, the door leaf is first inserted into the lower guide, and then into the upper one.
Assembly of top-hung structures using the example of “Puerta”
Suspended structures are silent and comfortable. Such systems are sometimes used in residential premises as sliding partitions. For assembly you will need:
- sets of lower and upper rollers;
- profile;
- stoppers.
Top-hung system "Puerta" assembled
In addition, it is worth preparing guides, purchasing wooden beams, stoppers, appropriate fittings, and, if necessary, trims and false panels. It is important to leave space between the partition and frames. The contact of such elements is unacceptable.
Suspension systems provide for a number of restrictions on dimensions, as well as weight. Sometimes a frameless option is used, in which the doors seem to float above the floor. The absence of a threshold will be an unsurpassed solution for a dressing room, or a partition designed to separate different rooms.
For reliable assembly, it is recommended that you read the information provided on the page. Using her example, it’s easier to understand all the nuances.
Features of installing non-threshold systems
It is most convenient to consider non-threshold top-hung products using the example of “Puerta”, which has a special stopper that provides a minimum gap between the guides, as well as between the movable component of the partition. As a result, there are no backlashes. Even at home, you can create a reliable design that is free from defects and noise during operation.
“Puerta” is made in several color options. During assembly, laminated chipboard of 10 mm and 8 mm, as well as MDF panels, are used. Thanks to the wide range of anodized or film-coated PVC, it is not difficult to assemble a suitable combination for visible parts.
However, the key to proper assembly is proper calculation. A special door calculator will help with this.
Detailed information on installing Puerta.
Puerta system assembled
Types of structures
Interior sliding doors have the same essence, but their operating mechanisms are somewhat different:
- Standard. They are classified into single-leaf and double-leaf. Single-leaf doors (have one movable leaf) are best used for small rooms with tiny openings. This saves valuable space. Double doors (two movable leaves) are relevant for spacious rooms with wide openings. Both doors open in different directions, which is not only comfortable, but also makes the interior welcoming.
- Radial. It is a system in which the doors move not in a straight line, but in an arc. This is a non-standard design of a doorway, which is relevant in a room with round or curved walls.
- Accordion doors . The principle of operation of the mechanism is more reminiscent of blinds. The design consists of several narrow doors that fold into an accordion to free passage. Therefore, they are more often called folding door systems. A significant advantage is the mobility of the partition: the width of the opening can be varied at will from a narrow slot to a full passage.
- Coupe. The mechanism is similar to the systems used in wardrobes. This is the most popular solution for decorating a door partition, helping to save space in the passage between the room and the kitchen. The trick of the design is that it not only performs its direct function, but also plays the role of a wall in the room. To comfortably place furniture standing close to the walls and to the side of the doorway, use a mechanism with two leaves.
- Pencil door . Apartments equipped with a wide passage to the kitchen without walls allow the installation of a “pencil” system. A hollow plasterboard partition with a hole on the side is installed for it, which will act as a false wall and occupy part of the doorway. When the door is opened, the panel will be hidden inside the plasterboard structure.
Additional space appears along the wall to accommodate kitchen furniture. The hollow partition can be used for various household needs, such as hanging accessories or kitchen cabinets. The mechanism looks laconic in the interior and is practical to use.
Articles on the topic (click to view)
- Metal kitchen rack for appliances
- Instructions for the electric stove "classic plus"
- How to choose an electric stove with 4 burners and an oven for the kitchen
- Sofa in the bay window for the kitchen
- Lighters for gas stoves
- Small enamel kitchen sink
- Electric Turk with automatic shut-off when boiling
- Pendulum. It is used if the kitchen opening is adjacent to a narrow corridor. The uniqueness of the mechanism lies in the process of turning the door leaves: they not only move in both directions in relation to the frame of the doorway, but also rotate along the vertical axis. More often, only one door is used, opening both inward and outward.