The kitchen is an object of increased risk of pollution of the atmosphere of its internal space. Cooking on a stove fills the room with fumes from the food. This adversely affects the health of others and the cleanliness of the surfaces of walls, ceilings and furniture. Installing a hood in a cabinet is one of the effective options for cleaning air in the kitchen. We will tell you about the types of devices sold in stores, the principles of operation and installation of air ducts. We will answer popular questions from readers.
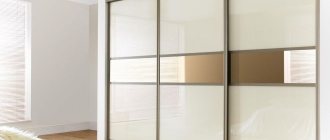
Hood built into kitchen cabinet
Principle of operation
The main and only purpose of a kitchen hood is to clean the atmosphere of the room from harmful fumes from the hob. The design of any model contains a fan and is based on two operating principles:
- Recirculation.
- Flow-through.
Recirculating
Exhaust equipment is designed to operate without installing an air duct. It operates without connection to the ventilation duct. Polluted air is purified by passing it through a filter system without being vented into ventilation, and it does not go outside, remaining inside the kitchen.
Thanks to the autonomous cleaning system, the installation of the stove and hood is not tied to the location of the ventilation shaft. The disadvantage of the recirculation method is the lack of freshness of the purified air.
Flow-through
Flow-through air cleaners discharge the contaminated stream into an outlet pipe connected to the ventilation shaft. The outflow of air masses is replenished by ventilating the room. The pressure difference creates a fresh influx from the street.
The insert into the shaft may have, in addition to the mounting hole for the outlet pipe, narrow grooves. Air is drawn in from the lower floors through the cracks. Its quality may not be very good. In this case, it is better to plug the grooves or install a blind shield with only one passage hole.
Types of exhaust modules
Air-purifying modules are distinguished by shape and method of fastening. These are dome, wall-mounted, island and fully built-in hoods.
Dome
Dome-type devices are a tent structure separate from the kitchen unit, which hangs over the stove. The dome opening can be much larger than the area of the hob. It is advisable to install such hoods in large kitchens, studio apartments or in rooms combining cooking equipment and dining room furniture. In shape they resemble a truncated pyramid or hemisphere, smoothly turning into an air duct at the top.
The Swedish holding Ikea supplies kitchen hoods from “economy” to “premium” class to the Russian market. Dome systems for air purification in kitchens are distinguished by high-quality design, ease of operation and maintenance.
Ikea dome module
Wall mounted
The devices are attached directly to the wall above the stove. They do not protrude forward, but have a flatter configuration. Wall-mounted modules have powerful supply ventilation. Due to their simple design, such hoods are available in different styles - you can choose a model to suit any design.
Step-by-step installation of a dome hood
Before installing the fireplace hood, you need to accurately orient the position of the stove relative to the outlet of the ventilation duct. Usually the stove is installed exactly along the axis of the ventilation hatch. After this, installation of the equipment begins.
- We draw an axial vertical line on the wall from the center of the hob up to the channel opening, using a pencil, level, tape measure or ruler.
- We mark the height of the lower edge of the dome and draw a horizontal line.
- On the dome, measure the distances from the mounting holes to the bottom edge of the hood. We transfer the markings of the fastening points to the wall.
- Using a hammer drill we drill holes for dowels. We insert polymer elements into them.
- To install the dome you will need a stepladder and additional workers. Leaning against the back of the hood, we align the mounting holes with the dowel sockets and drive the screws into them.
- On the wall we make a mark at the bottom edge of the air duct.
- We cut off the excess part of the pipe. Under no circumstances should you do this with a hacksaw. The saw teeth will leave jagged edges and damage the enamel. Cut with a miter saw, jigsaw or circular saw.
- The hood kit usually comes with a mounting frame. We either expand the channel opening with a perforator, or narrow it with cement mortar to fit the size of the frame.
- It is necessary to secure the frame in the channel with dowels, sealant or glue.
- We insert the air duct into the hood, and attach its upper end to the frame.
- We treat all connections with sealant.
- Before installing the air duct, you need to install a power supply point. We recommend that you do this in two ways:
Mistakes when measuring and designing a kitchen.
It is very convenient to use a jigsaw to cut out a hole. With its help, you can quickly cut an even circle with smooth edges.
As a result of all manipulations, you should get a cabinet like this:. Now you need to modify it to make it suitable for mounting a hood. To do this, disconnect the bottom.
This procedure will not take much time. After all, dowels were not used to fix the bottom, and the Euroscrews unscrew quickly enough. Now you can start marking the bottom. At this stage it is necessary to take measurements from the hood body. And then transfer them to the removed surface of the cabinet. To do this, we calculate the distance from the edge of the bottom: divide by two the difference between the value of the width of the bottom and the value of the distance between the holes for fasteners.
Typically this parameter is mm. For gas stoves and hobs, the minimum distance to the hood is 75 cm. This is due to safety requirements. After all, here we are dealing with an open flame. Strong heat from gas burners can damage the hood.
How to install it yourself
And fat accumulated in the filter can even ignite if the hood is hung too low. For electric stoves and electric hobs, including induction, a distance of 65 cm from the work surface is recommended.
According to GOST, the distance between the countertop and the upper cabinets is 60 cm. True, these documents have been reprinted over the years. That’s why the wall panels are made at 60 cm. Before the hood, it depends on whether the stove is gas or electric.
The accumulated fat must be washed off and the filters changed, or the hood must be connected to the standard ventilation of the house. The distance between the tabletop and the upper modules is mm, more is inconvenient and a waste of space. Well, fourthly, no matter how many kitchens I’ve done, we always hang the hoods at the mm level, at least it at least pulls something!!!!!
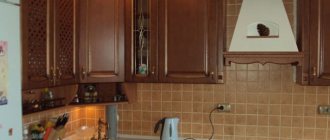
Guide to installing a built-in hood in a cabinet
If you have already dealt with tools such as a jigsaw, a hammer drill and others, then installing a hood in a kitchen cabinet will not be difficult for you. Kitchen sets for small spaces include a wall cabinet designed specifically for the built-in hood. We carry out installation in several stages.
Attention. Built-in modules are produced for 45, 50, 60 and 70 cm distances between the side walls of the wall cabinet. Using this data, you can always choose the right model of cleaning device.
- First of all, we purchase an exhaust device, which in size (width and depth) should fit tightly into the cabinet opening.
- When installing a kitchen wall, place the hood directly above the stove.
- We remove the cabinet from the wall and turn it upside down. Remove the door and middle shelf.
- We place the hood on the bottom and trace the perimeter of the device with a pencil.
- In the middle of the marking outline, drill a hole of such a size that you can insert a jigsaw file into it.
- We drank from the hole, smoothly entering the marking line. We take out the core.
- We place the hood with the ventilation hole on the shelf, ensuring that the external contours of both objects match.
- We trace the nozzle on the shelf with a pencil.
- Cut out the mounting hole with a jigsaw.
- We do the same with the top plane of the cabinet.
- We insert the equipment inside the cabinet. We fasten it with screws to the exhaust opening.
- We put a shelf on the nozzle and secure it to the side walls of the box.
- We return the cabinet with the hood to its original place.
- We thread the corrugation through the shelves and put its end on the nozzle. We secure the air duct with a clamp. We insert the upper end of the air duct into the ventilation duct. Also available with polymer and metal pipes.
- We fill all joints with sealant.
- We correctly connect power to the equipment in the same way as described in the previous chapter.
Expert opinion
Alexander Didenko
Furniture assembler at Mabaks
Advice: if the outlets of the hood and ventilation duct have a round or rectangular cross-section, and the air duct is the opposite, then there are adapters for this. Therefore, stock up on these products in advance.
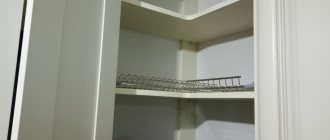
Working with the bottom shelf of the cabinet
Preparing a kitchen cabinet for installation of a built-in hood
When installing a built-in hood in a closet, you can go in several ways.
- Order a kitchen cabinet without a bottom. To bring out the air duct, you will need to make appropriate holes for it in the middle shelf and the top.
- Make a cabinet for the hood with your own hands, based on the dimensions.
- Remodel an existing piece of furniture, first remove the bottom or cut a hole according to the existing dimensions.
There is no need to disassemble the cabinet. You need to remove it from the wall and disconnect the doors. It will be more convenient to perform your actions on the floor. “Unstitch” the back wall, unscrew the side fastenings, then the bottom shelf will easily come off on its own.
When you cut out a place for a hood, you need to do it so that the body of the device fits tightly to the front wall, and not vice versa. Mark the place where you will cut with a marker, drill holes in the corners of the mark, and then cut.
How to make a drawer for a hood in the kitchen with your own hands
If the kitchen set does not have a wall cabinet for an exhaust hood, it is easy to make one at home yourself.
- We make a drawing of the cabinet parts and a diagram of its assembly.
- We prepare the starting material - a sheet of laminated chipboard or MDF. For a small cabinet you will need no more than 2 m2 of material.
- You don’t have to make a bottom, but instead install a frame of metal corners. Drill holes in them according to the location of the mounting openings in the base of the hood.
- Openings are cut out in the shelves for the air duct (see previous chapter).
- Using a screwdriver and hardware, we assemble the box body
- We install the hood in the finished cabinet. We secure the device to the metal frame with screws. You can embed the device into the bottom of the box (see previous chapter).
- It is best to secure the cabinet door with gas lifts. The vertically rising plane will not interfere with adjacent wall cabinets. Don't forget to read how to install a gas lift in a kitchen cabinet.
- We hang a furniture box with exhaust equipment on the wall above the hob. If the wall is made of plasterboard, see the article about hanging cabinets on plasterboard.
Expert opinion
Alexander Didenko
Furniture assembler at Mabaks
Advice. Use the services of a specialized workshop or department of a construction supermarket that sells chipboard or MDF to make a cabinet. Craftsmen will find for you parts of the required sizes from warehouse scraps. Order trimming of the drawer body elements there.
Answers to popular questions
Our site receives many questions from readers regarding the manufacture, assembly of furniture and installation of kitchen equipment. We will try to answer some of them exhaustively.
Is it advisable to install a built-in hood in a cabinet without an air duct?
Of course, installing an air duct is an additional, sometimes time-consuming job. You yourself must evaluate the need for a device to divert air flow directly into the ventilation duct. The volume of the room, the frequency of use of the stove, the conditions for the flow of outside air - all these are factors that influence the choice of flow or recirculation mode of operation of the hood.
If it is enough for you to get by with returning the purified air mass flow through the exhaust filtration system, then you do not need an air duct.
How to install a built-in hood with a retractable part?
The installation of cleaning equipment with a retractable part is no different from the installation of stationary equipment. It is necessary to ensure that the deployed suction panel completely overhangs the hob area of the stove.
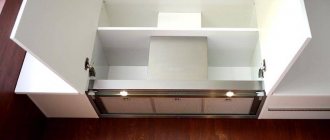
How to install a built-in hood in a large cabinet?
This is done in exactly the same way as when installing equipment that fits tightly between the walls of the cabinet. The only difference is that you need to maintain the exact position of the hood exactly above the stove. The photographs show examples of additional partitions inside the cabinet that strengthen the structure.
What to do if there is not enough power?
Compact exhaust devices often have the disadvantage of low installation power. To increase the performance of cleaning equipment, duct fans are used. They are embedded into the air duct using adapters in any accessible place.
Installation of the channel mechanism is done with the aim of increasing the power of the air flow. That is, the duct and exhaust fans operate simultaneously (in parallel). You can adjust the operating modes of the hood by installing an additional toggle switch to separately turn on the duct fan.
In some cases, the hood body is used only as part of the air duct. A powerful external fan is installed, which dramatically increases the productivity of the equipment from 800 - 1000 m3/h to 1500 - 2000 m3/h.
How to make sure that the hood does not interfere with natural ventilation?
To solve this problem, use a tee with an anti-return valve. The device looks as if an additional pipe with an open hole was cut into the air duct at the entrance to the ventilation duct.
There is a hatch installed in the pipe, which is adjusted so that when the fan is turned on, it covers the inlet. When the hood is turned off, the locking disc returns to its original state and opens the air from the ventilation.
Advantages of built-in hoods
Built-in hoods are almost invisible in the overall interior design of the kitchen.
To maximize the efficiency of a built-in hood, it should be placed directly above the hob or above the oven if it is freestanding. Air removal will be faster.
Built-in devices for removing polluted air from the kitchen have advantages from the point of view of a decorative solution. They are practically invisible. Only the retracting surface is visually determined. Whereas island and dome hoods are hard to miss in the overall kitchen interior.
Attention! It is necessary to ensure that air is not only exhausted, but also supplied from the supply ventilation. In winter, it is better to use the recirculation mode, which helps reduce heat loss. Most models have an automatic shut-off feature. This ensures high energy efficiency of the equipment.