Drilling holes and installing fittings "
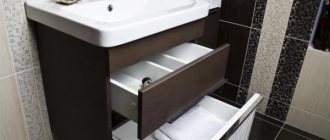
Minifix (eccentric coupler) is designed to connect parts at right angles. The main feature of this type of fittings is that the minifix allows you to connect parts without drilling a through hole on the flat side of the part. For example, you decided to make a computer desk with your own hands. And, of course, you need the table top to look aesthetically pleasing and beautiful from the outside. So that there are no through holes in the tabletop, and “hats” from confirmations do not shine on it. One solution to this issue could be the installation of minifixes in the connection of the top cover of the table with its frame.
As stated earlier in our articles, we do not particularly encourage the use of minifixes in making furniture with your own hands. What do you do with your own hands? As practice shows, even cunning furniture makers are not delighted with this type of fittings. The thing is that “manual” installation of minifixes requires precision and skill from the assembler, and also takes more time than, for example, installing an alternative type of fittings, such as a furniture corner tie.
There are practically no minifixes in our furniture drawings. However, there are situations when using an eccentric coupler is the most optimal and successful solution. Therefore, we decided that you need to have an idea of how to correctly mark and drill holes for minifixes, so that later you will not be “excruciatingly painful” for incorrectly performed actions.
Furniture connecting fittings
When buying furniture, you need to pay attention to the quality of the material and fittings. In this article we propose to familiarize yourself with the most common connecting elements. We will tell you the pros and cons of each type of connection: furniture corner, confirmat, rafix, minifix , dowel.
Dowel
Dowel (Dowel) Dowel is a connection used for making furniture from wood, chipboard, plywood.
The dowel is made of cylindrical solid wood with chamfers and rounded edges for easy installation. There are plastic dowels. Dowels of different sizes are used. They are used both to strengthen furniture joints such as: confirmat, minifix , rafix, and as independent fastening using PVA glue.
The advantages of DOCKET are very low price, rigid connection. Disadvantages - to drill parts for a dowel, precise markings or the use of a jig are required. When using a dowel in combination with glue, disassembly is impossible.
Furniture corners
Furniture corners are the simplest, cheapest and easiest to use connections. There are many options and sizes of furniture corners, they come in plastic and metal. They are also reliable when fastening furniture shelves in cabinets and pencil cases. The disadvantage of this connection is that it is not aesthetically pleasing, since it cannot be hidden.
The advantage of furniture corners is their low price and ease of installation.
The disadvantage is that the fastening is clearly visible, which has a bad effect on the appearance of the furniture.
Confirmat
The confirmat is a metal screw tie with a countersunk head.
There are confirmations with a cross or hexagonal slot. A very simple and reliable type of fastening. Confirmat is used for the manufacture of furniture from both chipboard and wooden furniture. To install it, a hole is pre-drilled with a special, confirmed drill, which drills a hole of three diameters at once. The last, largest diameter makes it possible to hide the head of the confirmat. After installing the confirmat, for aesthetics, you can close the head of the confirmat with a special plastic plug. To strengthen the connection and prevent the parts from moving relative to each other, I use a dowel.
Advantages of confirmation: reliability, ease of installation, low price.
The disadvantage is through drilling of parts, which worsens the appearance. When reassembling, the threads are broken and the fastening becomes loose.
MINIFIX
Minifix - furniture eccentric coupler is used to connect parts. The minifis consists of two parts: a rod and an eccentric. Sometimes a fitting is used to securely fasten the rod.
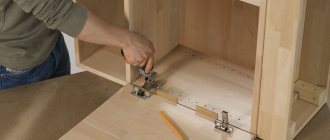
Thanks to various types of minifixes, parts can be connected at any angle, not just straight. Also, thanks to the minifix, you can increase the length of the parts. To install the minifix, you need to drill three holes, which makes using this mount quite difficult. Drilling is done with a 15mm Forstner cutter and drills using a jig, since the drilling must be very accurate for this fastening.
Minifix
Rafix Rafix is similar to minifix , it is also used in visible places where it is necessary to hide connecting elements to assemble furniture Rafix elements: table tops, furniture sides.
More often they are used for fastening shelves, since they are not reliable enough for mounting a cabinet. Unlike the minifix, it has an estcentric in a plastic case and a short rod. To install it, 2 holes are drilled (for minifix, drill
3) Advantages - aesthetics. Disadvantages: high price, not designed for high loads, difficult to install. Furniture corners There is a wide variety of furniture corners, plastic and metal, of different shapes, sizes, and purposes. Furniture corners are one of the simplest, most reliable, and cheapest fastenings in furniture. Easy and quick to install. Very reliable for fastening shelves and furniture frames.
Confermat, Minifix , types of connections, types of furniture fittings, furniture connecting fittings
READ DeWALT 18 Volt Screwdriver Review
Lesson 34 – Minifix eccentric tie
Eccentric couplers of various modifications, due to their advantages, have recently become widespread.
They are the optimal choice for furniture that is subject to periodic assembly and disassembly, while the joints do not wear out and retain their properties. The second niche occupied by eccentrics are connections in which it is necessary to hide the presence of fittings (for example, a tabletop or shelf). The visible part of the eccentric is located inside the product body in places that are difficult to see.
In this article we will look at how to install minifix
We will consider the creation of a screed based on VB35 from Hettich separately
The minifix eccentric consists of three parts: a rod, a fitting and an eccentric. In some modifications, there are no fittings, and the rod is wrapped directly into the part (this connection is less resistant to assembly and disassembly, but is easier to manufacture).
To make such a screed you will need the following tool:
Forstner cutter 15 mm, cylindrical drills - better for wood, but also for metal 10 mm (or 5 mm when installing a self-tapping rod) and 7 mm, marking tool (pencil, carpenter's square, ideally a universal jig).
As an example, I will give the procedure for installing a 42 mm minifix self-tapping screw.
On both workpieces we mark the connection line (from the edge of the part it should be the same L1=L2).
On the face of part No. 1 we mark a hole for the rod. To do this, retreat half the thickness of the perpendicular part from the edge. For 16 mm laminated chipboard it will be 8 mm.
We drill a blind hole with a diameter of 5 and a depth of 8-9 mm (it is advisable to put a limiter on the drill, for example, a rubber ring). In the case of using footers, the hole diameter will be 10 mm with a depth of 11 mm.
The rod is screwed into this hole (the fitting is hammered in and the rod is screwed in).
On the face of part No. 2 we mark a hole for the eccentric. Having stepped back along the connection line 34 mm (for clarity, I drilled a marking hole with a thin drill), using a Forstner cutter we drill a blind hole 11 mm deep. Be sure to drill on a flat, hard substrate to avoid pushing through the laminate with a drill from the other side.
At the end of part No. 2, in the middle of the connection line, drill a hole with a diameter of 7 mm and a depth of 30 mm (the drill should fall into the hole for the eccentric).
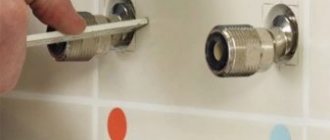
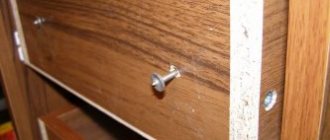
We insert the eccentric into the hole (it must be completely recessed, flush with the surface of the part)
We assemble the parts by plunging the rod into the 7mm hole and tightening the eccentric.
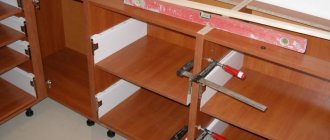
The connection is ready. For greater strength, it is advisable to reinforce it with dowels (I sometimes use simple barrel shelf holders as dowels). This is noticeable in the pictures.
Next we will move on to a rather rare but interesting screed - VB35 from Blum
Lesson 35 — Eccentric coupler VB-35
Return to Lesson 33
ruki-zolotye.ru
Installation of minifixes (ties) during the manufacture of furniture from OSB and plywood
A decorative plastic plug is installed on the eccentric. There are also thin self-adhesive plugs, like those that are hung on confirmat hats, only with a slightly larger diameter.
Assembly and disassembly of the connection unit on the minifix occurs using a regular flat-head screwdriver.
Simple minifixes. I managed to put together several types of simple minifixes. see photo.
Minifixes on the left, 2 pcs. — under the slab 18 mm. (this can be seen by the size of the eccentric). Also, the minifixes on the left are installed without a coupling; they are directly screwed into the part. To do this, drill a hole, like for a shelf holder.
READ Hammer Makita 2450 Gearbox Repair
Minifixes on the right, 3 pcs. — under the slab 16 mm. All three are installed via a coupling. Although the two middle ones can also be installed directly. One of the minifixes is shortened by the size up to the eccentric 25 mm. (used mainly for table tops in office furniture).
With simple minifixes, you often come across ones whose size to the eccentric is 30 mm. In general, this size does not depend on the standard, but on the “invention” of the minifix manufacturer.
There are also mini-fixes, corner (hinged) and tie-down (double-sided).
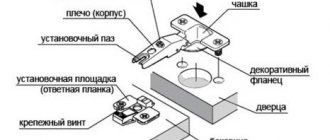
minifix and its installation diagram. Here, the “X” dimension is the size along the surface of the part, and not along the axis of the rod. With different connection angles, this size will change, while the size of the rod does not change.
Minifix coupling, installation diagram. It is also called an eccentric coupler.
How to find out the size for the minifix eccentric.
It's very easy to do. Minifix head = 3 mm. thick. And 3 mm. you need the rod neck so that the eccentric grabs the head. This means that 6 mm must be subtracted from the length of the rod. - this will be the size for the eccentric. Also with a corner minifix. You need to take the size of the rod from the center of the joint and minus 6 mm.
(all links open on a new page)
Minifix (eccentric coupler) is designed to connect parts at right angles. The main feature of this type of fittings is that the minifix allows you to connect parts without drilling a through hole on the flat side of the part. For example, you decided to make a computer desk with your own hands. And, of course, you need the table top to look aesthetically pleasing and beautiful from the outside. So that there are no through holes in the tabletop, and “hats” from confirmations do not shine on it. One solution to this issue could be the installation of minifixes in the connection of the top cover of the table with its frame.
As stated earlier in our articles, we do not particularly encourage the use of minifixes in making furniture with your own hands. What do you do with your own hands? As practice shows, even cunning furniture makers are not delighted with this type of fittings. The thing is that “manual” installation of minifixes requires precision and skill from the assembler, and also takes more time than, for example, installing an alternative type of fittings, such as a furniture corner tie.
There are practically no minifixes in our furniture drawings. However, there are situations when using an eccentric coupler is the most optimal and successful solution. Therefore, we decided that you need to have an idea of how to correctly mark and drill holes for minifixes, so that later you will not be “excruciatingly painful” for incorrectly performed actions.
Homemade conductors
First of all, it should be noted that the simplest models of jigs are very inexpensive, so making a template for dowels with your own hands is not always advisable. In addition, you need to take into account that models for confirmations are the easiest to make. Options for dowels have a more complex design.
To independently create such a device, you need drawings that are easy to find in open sources. There are also instructions in different forms. They describe the creation of various types and variants of templates for dowels: with one and several holes, from different materials, etc. The starting materials can be represented by improvised raw materials such as wooden blocks, fragments of reinforcement and plates, etc. So, a square one will do reinforcement 10x10 mm. In addition, you will need plumbing tools and equipment such as a drill and grinder. To create more complex jigs, a welding machine is required.
READ Petrol trimmer does not hold idle speed
Creating a template for dowels yourself involves several stages. At the first stage, the reinforcement is cut into fragments, the length of which is determined by the dimensions of the product. Next, holes are made for drilling, for which you need to know their parameters. They have a diameter of 5 mm and are 8 mm from the edge of the jig and 32 mm from each other. To increase ease of use, it is possible to equip it with a stop. It can be a plate bent at a right angle and fixed to the product. The parts are fixed using a clamp and fastened with threaded connections. In addition, sometimes homemade conductors are equipped with trays for chips in the form of fragments of plastic bottles.