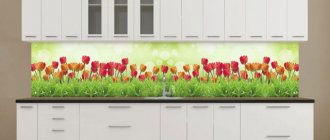
- Definition of the concept
- Where is it used?
- Theory of the issue
- Technological features of the procedure
- Consecutive stages of work
- Additional accessories
- Tips and recommendations for the master
- Conclusion
Installation of plumbing is a very important task when carrying out construction or repair work. Since living without properly organized communications in a house or apartment will be quite problematic, special attention should be paid to this issue. Later in the article we will look at the specifics of how to install eccentrics for a mixer yourself.
Theory of the issue
When a master independently installs a mixer, he is faced with the following problem: the indicator of the distance that separates the pipes through which water is supplied and the same parameter for the corresponding tap pipes do not correlate. This leads to the fact that it is impossible to connect the mixer directly to the pipes.
It is for this purpose that this article discusses the question of what eccentrics are, since such devices, when rotated from one side to the other, allow the master to adjust the distance between two bushings.
Often, designs of this kind are already included in the purchased kit along with the mixer itself, so the installer does not have to “reinvent the wheel” - he just needs to read the instructions and act according to the recommendations specified in it.
It happens, however, that the kit is sold without such devices or the dimensions of the eccentrics are incorrect. In such a situation, you will have to purchase the installation mechanism separately.
Eccentrics included
If the design turns out to be shorter than you would like, you can purchase an additional adapter - it will help adjust the dimensions of the product.
Nuances of self-installation
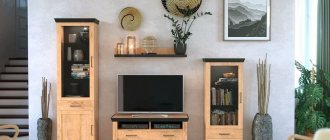
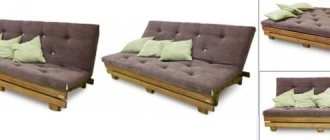
If you decide to use open shelves in the kitchen, there may not be a need to use such elements. But for classic wall cabinets, the use of screeds will be a great addition. This will allow you to connect them smoothly and neatly relative to each other.
Now we’ll figure out how to attach the parts. Having selected the appropriate sizes, get to work. Here, the material used to make the kitchen does not play a key role. This can only affect how and with what you will make the hole for the tie element.
Installation is performed in the following sequence:
- First you need to secure the furniture itself to the walls. If you combine all the cabinets on the floor, and they are hanging, then hanging them will be extremely difficult;
- Using clamps, secure the walls in the correct position. For a small cabinet, a couple of clamps will be enough. It is attached at the bottom, and the second at the top;
- Place marks 10 cm from the corners. Make holes along them. The size of the hole depends on the diameter of the tie;
- Insert a nut with internal thread into the hole;
- Insert the screw on the other side. Start tightening gradually;
- Make sure the connection is tight but not too tight;
- Do the countersinking. This procedure is performed with a countersink. A recess is drilled for the fastener head. The countersink can be replaced with a wide drill, and enter the furniture a short distance to the point of drilling the hole for the tie.
To hide the heads of the ties, special hats and decorative overlays are offered.
As you can see, there is nothing complicated in this procedure. This work can easily be done with your own hands.
If you have any questions or want to share your observations on this matter, leave feedback.
Subscribe, comment, tell your friends about our project!
Source: vmk-mebel.ru
Technological features of the procedure
Installation of eccentrics for the mixer is an important component of its installation. The process is divided into two sequential operations:
- direct fastening of structures;
- tap connection.
Before you begin installation work, you must ensure that access to water is blocked. This will help prevent the possibility of unintentionally flooding your neighbors.
First, carefully assemble the structure completely without using a sealant. The procedure is necessary to make sure that the finished product will not have any distortions, and all mounted connections will seamlessly connect to each other. In a situation where you come across too short eccentrics, you can replace them with other analogues or purchase screens designed for structures.
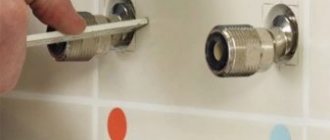
Connecting the tap via eccentrics
Any device consists of two parts - a wider and a narrower component. During the installation process, after you have managed to carefully unscrew the old eccentric on the mixer, be sure to carefully wrap the short thread with flax.
Such threads can be replaced with a fluoroplastic product - it can be a tape. In any case, the product must be wound so that it cannot under any circumstances scroll around the base.
A special paste is applied to the threads, intended for use when working with threaded connections. A sealant made from silicone is also suitable. If neither the first nor the second means is available, oil paint will do. As a last resort, leave the mixer untreated - by and large, nothing should happen.
Advantages and disadvantages
Like any type of fastener, an eccentric connection has its positive and negative sides. Let's look at them using a table as an example.
Table 1. Advantages and disadvantages of an eccentric coupler
| screw-on | 8 (6) mm | Determined by the length of the rod: | ||
| From the end part of the part to be fastened, perpendicular to the hole for the eccentric, the center of the hole is at a distance of 8 mm from the edge of the part | drill with 8 mm drill bit | |||
| under the base of the screw | 5 mm | 11 mm | on the surface of the second part | drill with 5 mm drill bit |
| under the bushing (futorka) | 10 mm | 11 mm | on the surface of the second part | drill with 10 mm drill bit |
| Advantages | Flaws |
| 1. Furniture can be assembled and disassembled quickly and effortlessly. 2. Possibility of repeated assembly and disassembly of products. 3. The most reliable and durable mounting option. 4. Does not spoil the appearance of the product. 5. Possibility of fastening products at different angles. | 1. High price of fasteners. This increases the cost of the product as a whole. 2. The installation technology is quite complex. 3. The need for perfectly accurate calculations for marking locations for fastenings. |
What does an eccentric coupler look like when it's in place?
Consecutive stages of work
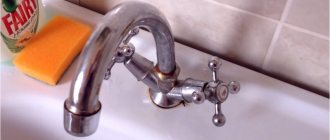
The next operation is to manually screw the long eccentrics to the structure. Make sure that the device is correctly aligned with the thread itself, only then screw it tightly using an adjustable wrench or wrench. It is better to perform several successive rotational movements with the tool. Carefully check that the flax threads that were wound directly onto the threads do not wrap around - this will disrupt the functionality of the entire structure. If this still happens, it is better to dismantle the entire system, remove any remaining flax from the threads, and then re-wrap it with a sealant.
Install the eccentrics in such a position that it is easy and convenient to screw the mixer body nuts to them. In this case, the structure itself must be mounted evenly and not warp.
After the faucet is installed, you can proceed to the installation of reflectors, which are also called decorative screens.
Making a furniture screed: correct installation according to size
Use furniture screed only during production. Traditional fasteners are not recommended to be used in this case. A special screed is characterized by special properties that allow you to hide the fasteners and significantly facilitate the assembly of furniture in general.
Several types of furniture ties are used in production. Let's consider their features and application.
Eccentric coupler
This type of fastening is used in the factory production of furniture, because it involves a rather complex process of drilling holes. Furniture eccentric screed consists of an eccentric and a pin. Each of these parts is inserted into different parts.
The main advantage of this fastening method is its concealability. It does not spoil the appearance of the furniture. In addition, this fastening method allows you to repeatedly assemble and disassemble furniture. This information is relevant for people who are accustomed to frequent moving.
An eccentric furniture coupler allows you to connect various parts at any angle.
Installation features
It is quite difficult to use this method independently when making furniture. The holes are not only difficult to drill, but it is also impossible to further correct the joints during assembly of the parts. The main difficulty when drilling is making a hole for the eccentric. This is a blind hole that requires the use of a Forstner drill. For a standard eccentric, you need to use a drill with a diameter of 1.5 cm.
To make a hole for the eccentric, it is necessary to correctly mark the part. Afterwards, holes are made for the eccentric using a Forstner drill. At the end of the part, a hole is made for the rod using a drill with a diameter of 8 mm. The parts are connected to each other and fixed by turning the eccentric 180 degrees clockwise.
The sampling depth should be about 12 mm. And the thickness of the laminated chipboard panel is 16 mm. Only 4mm of undrilled wall thickness remains. The difficulty of installing a furniture screed yourself lies in the risk of drilling through the part. To do this, when drilling holes for the eccentric, drills with limited depth are used.
Confirmat
Confirmat furniture screed is the most common type. Its popularity is due to its ease of use. Compared to other types, assembling furniture with confirmat is much easier and faster. Especially if you have to prepare holes for fasteners yourself. This fastener allows you to connect two parts together at an angle of 90 degrees.
To reliably connect the parts to each other, it is necessary to drill 2 holes in them. In one part, the hole should be equal to the diameter of the confirmat head. At the end of the second part, a second hole is made with a diameter corresponding to the thread of the part.
It is often necessary to use 5 and 6 mm drills for this procedure. In order not to replace components, you can purchase a combination drill in stores, which allows you to simultaneously drill different holes.
Confirmat is a universal type of furniture screed, which has its own application features and disadvantages.
Be sure to use a dowel with the confirmation. This is a special wooden rod. Its length is up to 30 mm, and its diameter is 6 mm. The dowel acts as a guide, which prevents parts from moving during tightening. This connection method allows for high precision when connecting.
This screed method allows you to disassemble and reassemble furniture several times. But remember that laminated chipboard material does not tolerate such manipulations well. Often, after the first disassembly, the furniture screed does not hold the parts well.
The confirmation must be carefully wrapped. It is better to perform this procedure manually or set the screwdriver to minimum speed. Otherwise, the thread of the fastener will act as a drill, which will finally break the already prepared hole.
To “sink” the head into the body of the part, you should use a key. Actions should be performed carefully and slowly, as the thread may break. In some cases, it is necessary to additionally make a counter. Confirmat is a fastening element that remains visible after use. Therefore, you must first purchase special stickers or plugs that will reliably hide the fastener head.
Special types of ties
Unique connecting fasteners are often used to create exclusive furniture. Among special types of screeds, fasteners for countertops have become widespread. Its main purpose is to connect the two halves of the dining table surfaces.
Two C-shaped ones and a pin are placed in the lower plane of the tabletop. To do this, a cylindrical recess is drilled into it. It is also necessary to mill the groove. You will need at least 2 ties for one table.
Furniture corners
This fastener does not guarantee a secure connection. Therefore, it is used to fasten parts that are subject to minimal load. Often these are decorative elements, for example, mezzanine shelves or the base of a wardrobe.
Both plastic and metal components are used. The former are currently more popular. They have a more attractive appearance, are not inferior to their metal counterparts in strength and allow you to hide the fasteners.
Furniture corners are secured with self-tapping screws to two mating parts. The fastener is hidden by snapping the lid.
Shelf supports
There are a large number of these fasteners. Conventionally, they can be divided into 2 groups:
Each of these groups can be divided into the following types:
- with fixation;
- without fixation.
Shelf holders for laminated chipboards are used to securely fasten shelves in a closet. Fixation is ensured by an eccentric. It consists of the fastening element itself and the rod.
The shelf holder is installed in the body of the shelf, and the screw is installed in the cabinet wall. To do this, holes are drilled in the wall and shelf of the cabinet. These are often standard sizes. Using a Forstner drill, holes are made in the shelf for the holder. Hole in the wall - using a wood drill. Make sure that the shelf supports are located at a distance of 2 cm from the front and rear ends of the shelf.
Install the shelf holder into the prepared holes with a rubber hammer. This will ensure it is securely fixed inside.
Locking shelf supports are characterized by an eccentric mechanism that ensures a strong connection between the cabinet wall and the shelf. In addition, they act as additional reinforcement of the structure and increase its rigidity.
Shelf holders for glass are secured with self-tapping screws 16 mm long to the cabinet wall. The distance from the fastening element to the rear or front end is at least 5 cm.
Shelf holders for glass with fixation are equipped with a special screw that securely fixes the glass and prevents it from falling out. Fasteners without fixation are presented in the form of an angle or rod.
Additional accessories
Note that if the kit, along with the mixer itself and eccentrics, contains additional gaskets, then the insulation will no longer be useful. When such devices are made of paronite, do not forget to first lower the structures briefly into cool water. When it comes to silicone or even rubber material, the gaskets can be attached immediately, without prior preparation.
Next, the tap is attached manually, using an adjustable wrench, all nuts are tightened.
So, by and large, we answered the question of how to install eccentrics for a mixer.
How to make furniture with hiding places with your own hands: all the secret places
To connect two parallel walls of cabinets, you can use ties made of different materials. Most often on sale there are products based on nickel-plated steel, galvanized and chrome-plated steel. I can’t say that one of the options has total superiority over its competitors. The main thing here is good workmanship. Plus, sometimes you have to make a selection by color. If the furniture is black and the screed is just silver, it looks beautiful, the fastening is still visible.
Tips and recommendations for the master
Wall eccentrics
First, you should unpack the purchased faucet and assemble all the components without using flax or gaskets. This is necessary in order to make sure that the parts are free of any defects and that they scroll freely.
It happens that the eccentrics provided in the kit do not fit in size - they can be wider, narrower, longer, or shorter than the parameters required for correct installation.
Do not forget that flax or its analogue - insulation, fluoroplastic tape - should be wound only in the direction of the thread itself, and not in the opposite direction to it. Before you proceed to installing the mixer itself, check that the insulation must be tightly and securely wound, and that they do not rotate along with the thread.
Don't forget to use a special lubricant that must be applied on top of the already wrapped flax. Silicone-based sealant and oil-based paint also work well.
Fit the eccentric manually, making sure that it is seated correctly on the thread. After that, use a wrench (can be an adjustable wrench or a wrench) to finish the job.
The devices should be positioned so that it is possible to easily screw on the nuts necessary for installing the mixer. The tap itself should be installed very carefully and carefully so that no unevenness is formed. Don’t be afraid to tweak, adjust, or adjust the way the faucet is positioned. Check several times how well the nuts fit with the eccentrics. After all this, do not forget to screw or attach decorative screens - the technique for installing them depends on the type of mixer. The procedure can also be carried out manually; these structures do not carry any additional functional load, but simply play the role of decoration.
About the eccentric coupler
An eccentric coupler, or, in other words, rastex or minifix, is one of the most practical, durable and convenient types of fastening furniture elements together. The use of such fasteners allows you to disassemble and reassemble furniture without damaging the material from which the furniture is made.
With the help of a minifix, you can easily assemble T-shaped and L-shaped elements when it is not possible to make grooves in them. Often this option for connecting parts is used when assembling tabletops on dining tables and computer tables, the top and bottom parts of cabinets, chests of drawers, and cabinets.
This type of fastener is hidden, and as a result, it can be used without fear that the appearance of the structure will be damaged.
An eccentric connection is a hidden type of fastener, and therefore it is invisible, but, nevertheless, it gives strength to the structure and is not afraid of reuse.