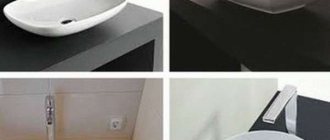
Compared to conventional wall-mounted washbasins, a countertop sink in a bathroom allows for more efficient use of space. This is true not only for small bathrooms - in large rooms you can also find a use for the freed up space.
And such sinks look great when installed on a countertop; they become a decoration of the room, and not just a plumbing fixture.
Features of choosing and installing washbasins
When you start to take an interest in the existing types of overhead bowls for washbasins, it seems that the imagination of designers has finally given free rein after many decades of forced creative abstinence.
Indeed, it is the overhead options, due to their original design, that allow you to create such a variety of shapes.
Shapes and sizes of overhead sinks
There are models so unusual that it is simply impossible to install them in the first bathroom you come across; you need to create an interior based on the design of this very sink. Manufacturers produce them in the form of a cup, an open flower bud, and a flowing stream of water.
Finding a suitable washbasin will not be difficult at all, including for a steampunk interior.
But when choosing an overhead sink for a bathroom countertop, you need to evaluate not only the design, but also the ease of subsequent use. For example, small washbasins can only be used for washing hands, and even washing a child in them is inconvenient, since water splashes outside the bowl. Washing your hair or washing large items when cleaning is out of the question.
Small countertop sinks are more of an option for a guest bedroom in a large house, plumbing fixtures that won’t have to be used often
Washbasins come in oval, round, triangular and rectangular shapes. Overhead shells of unusual, abstract shapes are also common, in the form of a drop, a boat, a stone with a recess, or a flower. They all come in different depths and widths—everyone chooses the appropriate size individually.
In small bathrooms, rational use of space can be achieved through several techniques: a functional cabinet is placed under the washbasin, not too wide so that the sink protrudes, but there is room for movement. A toilet flush device is built into the cabinet
Bowl-shaped countertop sinks have gained wide popularity. It is the small models that are not entirely convenient; it is unlikely that you will be able to wash your face in them without getting the countertop wet. But large washbasins are both beautiful and practical.
The size and depth of the sink is especially important if you use a countertop made of materials that do not tolerate contact with water - MDF or wood
Features of choosing a sink for a countertop
The first thing you need to pay attention to when purchasing is the presence of a hole for the tap. It is not always necessary, because the mixer can be used in common - for the bath and sink. But most often, in the case of a countertop sink, they install a free-standing faucet on the countertop or connect a faucet built into the wall.
If you really like the model, and it has a hole for the mixer, the installation of which is not necessary, then in this case it can be closed with a decorative cover, colored or chrome
Another important point is the presence of an overflow hole, which protects against flooding when using a sink with a closed drain. The overflow can be through or built into the sink, which is connected inside it with a common outlet into the siphon. If the overflow hole is through, then a special siphon is connected to it with separate water outlets from the overflow and drain, which are then connected into one outlet.
The smaller the sink is chosen, the lower the mixer should be, otherwise water will splash past the bowl
Before purchasing, you must carefully measure the location of the sink so as not to make a mistake with the size, and when purchasing the product, make sure there are no cracks or chips.
Installation
We lay out the tools and accessories in advance so that they are at hand. It is also advisable to decide on the mixer and siphon so that everything is installed at once, otherwise it will be difficult to install later. How to attach a stainless steel sink to a cabinet? This is not difficult if you have already completed the assembly of the frame itself.
- L-shaped fasteners are installed, either included in the kit or purchased separately.
- Attach fasteners from the inside and mark under them the places where you need to screw in the self-tapping screw. Drill a hole (not through) 0.5 cm above the mark, screw in a self-tapping screw and install the fastener. Do the same actions in other places of the structure.
- Next, assemble the plumbing product, attach the siphon with all the gaskets to it, and attach the mixer.
- Treat the ends of the walls with sealant. It is needed so as not to protect the furniture from moisture.
- Now you can start fastening it - put it on a furniture frame, where the fastenings are placed on self-tapping screws.
- Carry out plumbing work to connect the water supply and drainage in the kitchen.
- After attaching the stainless steel sink to the cabinet is completed, you can check it for leaks. The sink fills with water. Check if water is seeping out at the junction of the sink and siphon.
- Installing doors in a kitchen cabinet is the final stage, which will become the final point in plumbing work.
The sink is secured to the cabinet with fasteners and a sealant. This is the most reliable method, quite durable.
So the question of how to install a stainless steel sink on a cabinet has been resolved. If the work is done correctly, it can stand for a long time.
Many people attach the sink to the countertop. There are options when, when ordering kitchen furniture, the need for a hole in the countertop for installing plumbing is specified. Then there will be little work involved in installing the sink.
If there is no specially allocated space on the countertop, then you will have to do everything yourself.
- Mark the contours on the surface with a pencil. Take into account the margins from the edges (5 cm). Take measurements for the bowl.
- Make a hole in the corners of the outline.
- Apply masking tape to the outer side of the outline so that the surface around it is not damaged when working. Before cutting the opening, secure the part to be removed from below so that if it falls, it does not damage the surface underneath.
- Treat the ends of the countertop with sealant, assemble all the plumbing elements (mixer and siphon) and install. This will prevent moisture from getting under the structure, thereby spoiling the appearance of the furniture by deformation and delamination.
- Secure with clamps (included with purchase).
So, having looked at how to attach a stainless steel sink to a cabinet with fasteners and to a countertop, you will notice that doing this is not as difficult as it seems.
The most difficult thing is to make the hole correctly. If it turns out to be larger than expected, the paws will not be able to hold the sink.
Material for the production of washbasins
Despite the constant search by designers for new ideas and materials for production, washbasins made of sanitary porcelain and sanitary ware remain the most popular. This material is resistant to scratches and cracks, and does not collapse under the influence of temperature changes. And although they can split from an impact, this still happens quite rarely. The traditional white color of the material will suit almost any design.
Glass sinks look airy and elegant. The disadvantage of such washbasins becomes obvious after you start using them - every drop of water, when dried, leaves a mark. Since it is unlikely that anyone will wipe it after each use, such a washbasin does not look very neat. From this point of view, frosted glass behaves much better.
Natural or artificial stone sinks can be made from marble, stone chips, sand and a binder. It would seem that this is a very durable material, but even with stone products problems can arise if used incorrectly - small cracks appear, or even completely split.
The manufacturer describes how to properly care for such washbasins in the product instructions. Most often, there are recommendations to wipe them dry and not to use too hot water.
Like any product made from natural material, a countertop sink made of stone always looks expensive and elegant.
Wood sinks are also produced, using hardwood with a beautiful texture. Washbasins arouse interest simply by the choice of material, and in combination with a successful design they can become a real decoration of the bathroom.
The wood from which washbasins are made is treated with special oils that prevent water from penetrating into its pores. Caring for such a sink is quite difficult. It cannot be cleaned with detergents containing high acids or alkalis, or with abrasive substances.
To produce sinks from natural wood, oak, teak, and bamboo are used. Some of them require periodic treatment with special oils
They also produce overhead sinks made of acrylic. The material is more familiar in connection with the production of bathtubs, but washbasins made from it are also deservedly popular. Strength, lightness, resistance to temperature changes, ease of maintenance, as well as the ability to create the most incredible design solutions make acrylic attractive to both buyers and manufacturers.
Washbasin above the washing machine - is it convenient?
If there is very little space in the bathroom, then the sink can be installed on the countertop above the washing machine. This will free up space that could be occupied by a regular washbasin, and in its place you can install a spacious laundry basket and make a cabinet for detergents and cleaning supplies.
To install a sink on a countertop located above a washing machine, choose low, or rather flat, models
But perhaps this option is not suitable for a home in which all or some family members are below average height, since a washbasin installed on the countertop above the washing machine will be located quite high.
You can install a water lily sink above the car. It does not require a tabletop to be installed as a support - it is hung on the wall, the connected siphon is located as close to it as possible
The main difference between water lily sinks and overhead sinks is the presence of mounting elements for mounting on the wall. This solution looks less sophisticated, but in small baths it is the only possible one.
To ensure that the future use of an overhead sink on a bathroom countertop does not cause inconvenience, you need to calculate its height before installation. You need to focus on the standard height of the washbasin - about 0.8-0.85 m, while the permissible deviations are about 20 mm. The approximate height of the washing machine is 85 cm. The thickness of the countertop can be from 2 to 7 mm.
Here you should also add the height of the sink, which can be very different. Consequently, having carefully calculated all the values, you can already decide whether or not to refuse to install a washbasin above the washing machine.
There should still be some space between the countertop and the washing machine, because the equipment creates strong vibrations during operation.
When installing a washbasin above a washing machine, you must also take care to position the equipment correctly. Vibrations can make the countertop and sink impossible to use. Therefore, a small gap is left on all sides of the cabinet. It is necessary even if the machine has an imbalance control function.
You can “win back” a few centimeters if you use a built-in sink. The washbasin is placed slightly to the side of the washing machine and is “recessed” into the countertop. For this purpose, special built-in or mortise sinks are used.
Installation details
Experts say that installing a built-in sink is a more complex process.
Usually the kit always comes with a cardboard template that shows exactly what hole should be cut in the countertop. If it is not there, then you will have to use the design itself. To begin with, the template is placed on the surface and its contours are traced using a pencil. First you need to secure the cardboard tightly with tape. After the template is outlined for the first time, you should step back one or one and a half centimeters and re-outline the template. It is the second line that is used when working with a jigsaw. Then a drill is used in the work, with its help a connector for the jigsaw is made. The drill must have exactly the same parameters as the tool itself.
Following the jigsaw, sandpaper is included in the process. With its help, you need to thoroughly clean the surface and completely get rid of sawdust. Once the hole is cut, the sink is fitted.
Which countertop to choose for the sink
The overhead washbasin does not have fastenings for wall mounting and can be installed on any flat surface. This can be a cabinet or a wall-mounted shelf made of MDF, wood, artificial or natural stone, or glass.
To install MDF countertops under the washbasin, a material with a laminated coating is used. The coating itself is not afraid of moisture, but at the joints between it and the edge or at the cut points (for example, if the washbasin is built into the cutout of the countertop), the slab, when wet, absorbs water. This leads to its swelling and delamination of the laminate.
You can use a countertop made of MDF, but you need to do it correctly - protect it from prolonged contact with water, wipe dry after use
A wood tabletop is a beautiful and environmentally friendly material that fully justifies its use both in terms of aesthetics and practicality. But there is one thing. Wood itself does not serve well not only in direct contact with water, but also in conditions of high humidity. Therefore, it is important that the manufacturer of such products knows his business well - after all, properly processed material can even be used for the production of bathtubs and sinks.
You need to care for a wooden tabletop in much the same way as for a product made from MDF - wipe dry, protect from mechanical damage
A countertop made of natural stone is most often used under built-in washbasins or a sink is cut into them themselves. But they can also be considered as a support for a counter-mounted washbasin; the main thing is to choose compatible materials.
Another option for decorating the surface for a washbasin is tiling or mosaic. The basis can be a shelf, niche or wall ledge. This countertop is easy to care for, it is not afraid of moisture, does not scratch, and there are no visible stains on it.
Glass surfaces are suitable for interiors in the style of Hi-Tech and minimalism. They are made from fairly thick and durable glass and if you do not expose them to shock, they can be called quite safe. Glass is not afraid of moisture and can be washed with any detergent. One of the main disadvantages of the material is traces of water drops and stains.
The glass countertop gives the impression that the washbasin is floating in the air. Beautiful chrome siphons are used to connect to the sewerage system
Installation
Each owner can screw the siphon on himself without the involvement of a plumber. The installation should be carried out very responsibly, paying attention to every detail. Negligence will result in constant leaks or the formation of unpleasant odors in the room due to gaps between the components of the device.
The main requirement during installation work of this type is the tightness of the fasteners.
Therefore, much attention is paid to high-quality fastening of components. The gaskets included in the kit are often either too thin or made of low-quality rubber
Therefore, it is advisable to purchase third-party gaskets.
How to install a countertop washbasin
A sink installed on a countertop is connected in almost the same way as the models we are familiar with. The only significant difference is that it does not need to be fixed to the wall. Procedure for installing an overhead sink:
- Shut off the hot and cold water supply.
- Shut-off valves for water supply are screwed to the cold and hot water outlets.
- To seal the thread, use FUM tape or flax with a special paste. 5 turns of the tape in a clockwise direction are enough. Wound with high quality, it does not slip onto the hole and completely covers the thread.
- The taps are turned clockwise. If they are angular, they should be turned with the hole up.
- A supply hose is installed on each tap and tightened by hand. The presence of a sealing rubber eliminates the need to use seals for this connection.
- Next, you need to check the quality of the connection of the taps and hoses - turn on the water, make sure there are no leaks. At the same time, the pipes and hoses are washed so that the dirt accumulated in them does not get into the mixer.
- Then a cabinet is installed in a permanent place or a table top or shelf is installed.
- If necessary, two holes are drilled in the cabinet for the sewer pipe. The first hole is made at the bottom of the cabinet. To do this, measure the distance from the wall to the center of the drain in the floor. Measure and mark the same distance from the edge of the cabinet and drill a hole using a drill with a round attachment.
- If there are several shelves inside the cabinet, a hole is also made in them, but of a smaller diameter.
- Using adjustable legs, the cabinet is leveled.
- The next step is installing the siphon. Install the corrugated tube with the larger diameter end into the drain. The upper end is connected to the siphon body, and the length of the corrugated tube is adjusted.
- The siphon grille is screwed onto the sink. Take a rubber ring designed to seal the connection with the drain hole of the washbasin and put it on the siphon. Tighten the connecting nut by hand.
Installing a faucet involves connecting flexible hoses and fixing brackets to it.
In the case of installing a countertop sink on a shelf screwed to the wall, it is necessary to replace the usual plumbing siphon with a beautiful nickel-plated analogue. It is not very cheap, but not only will it not spoil the interior with its appearance, but it can also complement and decorate it.
The siphon connection is carried out without special tools. All parts are tightened by hand, without applying excessive force.
How to make and assemble it with your own hands?
The work process will look like this:
According to the existing diagram, we prepare the necessary parts. They are cut from lumber with a jigsaw or saw. If laminated chipboard was chosen as consumable materials, all edges are trimmed with PVC film. This will prevent the material from swelling during operation.
The assembly of the cabinet begins with the manufacture of the sidewalls. In our case, their dimensions will be 87 by 60 cm. Small rectangles measuring 6 by 11 cm are cut out at the front at the bottom of the parts. Now the crossbars are attached to the sidewalls. They are made of plywood, 8 mm thick. The width of the crossbars must be at least 12cm. Since these details will not be visible, there is no need to over-process and refine the details. But for long-term use, it is better to treat the plywood with an antiseptic. The cross members are attached to the sidewalls in different ways. They can be fixed with steel furniture corners or screws. Next we proceed to install the bottom. Its dimensions will be 70 by 50 cm. The bottom is attached with screws to the crossbars. Now you can attach the upper crossbars on which the sink will be installed. The first crossbar is positioned vertically and is fastened so that it does not protrude beyond the cabinet. The rear wall of the cabinet will be attached to this crossbar in the future. We place the second upper cross member horizontally. The next step in making a sink cabinet with your own hands will be fixing the back wall. There will be no load on it, therefore, it can be made from thin plywood or pressed cardboard. It will be much easier to cut holes for communications in these materials than in thick chipboard. Now you can begin assembling the front frame. When making shelves and doors, the dimensions indicated in the drawing are taken. The next step is to install the mortise shelf on casters. Next we attach the cabinet doors
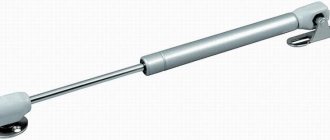
Here special attention is paid to the loops. They must be of high quality and able to withstand loads
A good choice would be hinges with closers. The final stage of assembling a cabinet for a sink is installing handles.
Conclusions and useful video on the topic
How to install a countertop sink on a cabinet:
Overhead bathtub: 75 ideas for your home in photos:
To summarize, I would like to say that a countertop sink in a bathroom is very beautiful, not hackneyed and simply functional. Moving away from the traditional perception of the bathroom only as a place for hygiene procedures, you understand that it can become a full-fledged relaxation room. Therefore, you want to make the room stylish, cozy and harmonious, and an overhead sink will take an important place here.