- the two parts of the loop are connected.
Using a marking template
Installing a hinge on a glass door
Installation of hinges for glass cabinets is carried out according to the following scheme:
- All work begins with marking and selecting an area to install the loop. The marking rules are identical to the previous situation;
- Using a drill, the hinge is attached to the wooden frame of the cabinet. To do this, holes are drilled for fasteners, and the hinge is fixed using a screwdriver or screwdriver;
- The loop is attached to the glass using clamps. The glass surface is inserted into the loop. Rubber gaskets are installed on each side between the glass and the hinge to protect the glass from damage. The hinge is fixed with bolts.
You can learn more about the method of installing hinges for glass doors by watching the video.
The instructions show the installation of hinges, which does not involve drilling glass. This method is most preferable, since it eliminates the possibility of the door splitting. How to install a hinge if you need to drill glass is shown in the figure below.
Installation of a hinge if it is necessary to drill glass
Installation of hinges for metal cabinets can be carried out using one of the presented technologies. The installation method depends on the type of hinge used.
Adjusting the hinges
Most cabinet hinge repairs involve adjusting the unit.
Adjustment of a standard four-hinge hinge is made in three directions:
- vertically;
- horizontally;
- according to installation depth.
Aligns the position of the cabinet door relative to the furniture body
To adjust a furniture hinge, you must:
- identify the problem that has arisen, that is, determine in which direction the shift has occurred;
- tighten or loosen the corresponding bolt located on the hinge body.
The need to select and install furniture hinges arises when purchasing furniture and assembling it yourself or after a breakdown, for example, as a result of unsuccessful transportation. The choice of hinges depends on many different factors, the main one of which is the method of opening the door. You can install the loop yourself. This work does not cause difficulties for novice craftsmen and completely inexperienced people. The main thing is to apply the markings correctly.
Source: furni-info.ru
How to calculate the dimensions of cabinet doors and drawers
The front part requires utmost attention - after all, it is the quality and finishing of the doors that determines the design and “status” of the furniture. It is important not only to choose beautiful facades, but also to correctly calculate the dimensions of the cabinet doors, with uniform gaps for trouble-free opening. Errors in calculations are unacceptable, because most often it will not be possible to redo the facade, you will have to order it again. This means time and additional costs.
You can read how to calculate the fronts for a wardrobe here. This article will describe the process of calculating the sizes of swing doors and drawers for cabinet furniture (including kitchens).
Operating parameters of furniture hinges
Despite the many differences, products are selected and installed according to operational requirements. This assumes that furniture hinges have the following parameters:
- strength and wear resistance - no squeaking; looseness; falling out of the groove fastening; persistence of electroplating;
- fully equipped - fastening element and decorative cap; matching color of coatings and size fit;
- trouble-free load bearing;
- ease of installation;
Furniture hinges, the types of which are presented, are quite capable of ensuring the long-term survivability of apartment furniture. The main attention should be paid to the selection of quality and suitability for the intended purpose.
In addition to those widely used, there is a segment of less used hinge options, but still necessary in furniture production. These include:
- mezzanine furniture hinges - designed for fastening horizontal facades that open to the top position; the essence of the mechanism is determined by the presence of a spring; can be used for kitchen cabinets;
- gallery furniture hinges - suitable for fastening facades to false panels and racks located near the wall; also serve as fasteners to the “blind” walls of cabinets and cabinets;
- secretory furniture hinges - the device resembles an ordinary card loop; the secretory version is used for fastening horizontal facades that open to the lower position; The name was acquired from the secretary - a small cabinet with a folding lid-table;
- bar or pendulum furniture hinges - also reminiscent of a card loop; provide a 180° turn, due to which it has many additional definitions: reversible, double-sided, spring, swinging; used in fastening decorative doors of American saloons and bars, hence its name;
- card - furniture hinges, types of which are used when connecting folding facades; attached to both planes of the structure, allowing them to be rotated 180° - in one line; used for folding tables;
- furniture heel hinges – used for small lightweight facades and attached to internal corners; can be installed with preliminary insertion;
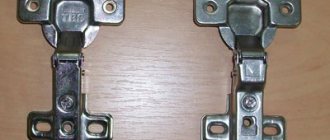
A four-hinged hinge consists of two components - the hinge itself and the mounting strip. Based on the principle of pairing the component parts, the system has several definitions:
- Slide-on is the most commonly used type of fastening loop.
- Key-Hole - the head of the screw holding the hinge goes into a hole with a keyhole configuration;
- Clip-on – connects to the mounting plate by snapping; does not require tools or fastening hardware.
Continuing developments by designers will bring the world new furniture hinges, the types of which will repeatedly allow the consumer to enjoy functional elegance and thoughtful comfort.
Minimum and maximum cabinet door size
For a swing facade, the dimensions are strictly limited by the ability of the furniture hinges to support its weight. If the load is disproportionate, the cabinet doors will inevitably sag and adjusting the hinges will only give a temporary effect. The weight of the facades is capable of tearing fasteners out of the side walls. Therefore, at the design stage it is necessary to correlate the desired dimensions of the facades with the possible ones, according to the technical characteristics of furniture hinges.
Usually, when determining the number of hinges and the size of the cabinet doors, they rely on the following table:
The maximum permissible width of the facade is about 500-600 mm. For large sizes, it is worth considering the option with two swing doors or sliding systems.
The maximum permissible height (length) of the facade is about 2200 mm. If you make the door longer, it will be inconvenient to open it.
The minimum dimensions are limited only by considerations of aesthetics and functionality. If the cabinet body is narrower than 300 mm, the hinge mounting pads should be screwed in before assembling the body itself.
Bunk bed for children: which one to buy
The presence of a closer allows for the most precise adjustment. It is performed in the vertical, frontal and horizontal plane.
Moreover, such hinges save even in situations where the floor itself is uneven. By adjusting, it is possible to compensate for this shortcoming, and as a result, the furniture with doors still looks perfectly level.
What can you say about such hinges with a closer? Share your impressions in the comments.
Thanks to everyone who is with us! Don't forget to subscribe and invite your friends to join us!
Hanging the facades, installing furniture hinges on them and adjusting them is the final stage of assembling cabinet furniture with your own hands. Whether the furniture will delight you with its aesthetically neat appearance depends on how smoothly you can adjust the hinged cabinet doors. Or irritate with an unevenly aligned façade and the constant creaking that accompanies the opening and closing process.
The principle of calculating the dimensions of swing doors and drawer fronts
According to the generally accepted standard, the gap between the sashes should be about 1.5-2 mm. To calculate the size of the front for the drawer, the same gaps are used. And not only so that it “looks” the same with the doors. But also because the loaded box sags a little, and the gap serves as a kind of “insurance” that the facades will not rustle against each other when they are pulled out.
For kitchen furniture, it is customary to subtract 4 mm from the dimensions of the niche. For example:
- For a cabinet with dimensions of 720x400 along the front part, the door will have dimensions of 716x396.
- For a cabinet with dimensions 720x600, two doors with dimensions 716x296 are installed.
But many people find that a gap of 4 mm is too much. Therefore, leave 3 mm, as for all other cabinet furniture. This is completely acceptable and not an error.
Nuance! When subtracting 3 mm for gaps, do not forget that you are calculating the final dimensions for the cabinet doors. If these are facades made of laminated chipboard and will then be edged with 2 mm thick PVC, then this should be taken into account. And subtract not 3 mm, but 7 (+2 mm will be added on each side, total 3+2+2). The same applies to façade options with aluminum ends and other types of edges.
To calculate the dimensions of drawer fronts, the same principle is used: subtract 1.5 mm from each side.
For example, in a cabinet 720x400 it is planned to install three drawers, two narrow and one wide. We divide the cabinet according to the height with the desired capacity of the drawers, let it be 180+180+360, as for kitchen furniture. We get the dimensions of the facades:
If you decide to leave a 3 mm gap on all furniture:
If the facades are designed for a 2 mm thick PVC edge:
For the internal facades of the cabinet, the calculations will be similar. You should only subtract 3-4 mm from the internal dimensions of the niche.
Installation of hinges
Installing hinges on a cabinet door with your own hands is not very difficult. First of all, you need to decide on the choice of canopies suitable for specific facades. Then prepare the entire tool:
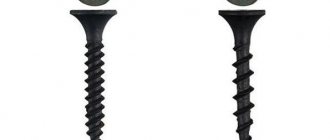
- Drill
- Screwdriver
- Roulette
- Awl
- Milling cutter
- Template for marking
- Pencil
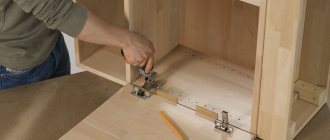
The next stage is determined by the question: how to install hinges on the cabinet?
Accuracy of marking is an important part of the work. You should choose a place for milling under the cup. Installing the hinge correctly means doing it at a distance of at least 10 cm from the end of the door. The template will indicate the milling point. The cutter must be clamped into the drill chuck and a recess must be made on the back side of the facade no more than 12 mm. The drill must be kept strictly vertical when milling. Door hinges are inserted into the recess and secured with self-tapping screws. Mounting strips are attached to the box. The alignment of the cups and mounting strips is required.
Hinge adjustment made easy
There is no need to think about how to adjust the hinges on the cabinet door so that they do not hang crookedly, but evenly. You need to take a screwdriver and start adjusting. To achieve an accurate result, the cabinet must be level. They are adjustable in three directions: up - down, right - left, closer - further.
To change the position of the facade: up or down, you need to loosen the screws on the mounting strips, install the facade in the desired position, then tighten the screws again. The front is adjusted to the right or left using an adjusting screw located in the knee of the cup. To change the position of the facade, the adjusting screws are tightened or unscrewed.
To adjust the gap between the facade and the frame, the fastening screws on the mounting strips are loosened, and the cup with the elbow is recessed or pulled forward. The mounting screws are tightened after adjustment.
How to calculate the dimensions of corner cabinet doors
The main difficulty in calculating doors for a corner cabinet is determining the width of the sash. To do this, first calculate the width of the opening. Here you will have to remember school mathematics and the well-known formula - the square of the hypotenuse is equal to the sum of the squares of the length of the legs.
Let's take as an example a wall-mounted corner kitchen cabinet, standard dimensions 600x600 and side depth 300 mm.
With a sidewall thickness of 16 mm, the length of the legs will be (600-300-16) = 284 mm.
We calculate the opening in two steps: 284x284x2 = 161312, without the square root of 401.63. Round up to 401.
When calculating the width of the façade for a corner cabinet, one nuance is taken into account: due to the furniture hinge, the door will “move forward” a little and will not fit tightly into the opening. That is, it will come out on a large diagonal and the gaps will form on their own. Therefore, it is not worth subtracting 3 mm from the opening size, as for ordinary cabinets. In our case, we can round up to 400 mm.
But the height is calculated similarly to conventional cabinets. In our case, for a kitchen module with a height of 720 mm, it will be 717-716 mm (depending on how the rest of the kitchen facades were calculated, with a gap of 4 mm or 3 mm).
If the opening width is more than 500 mm, then there is a reason to install not one, but two sashes. When calculating the width, it is necessary to take into account the gap between the facades so that the doors do not interfere with opening to each other. That is, with an opening width of 600 mm for a corner cabinet, the width of each door should be about 298 mm.
Important nuance! This calculation method is only valid for facades whose thickness is comparable to the thickness of the cabinet body sides. For example, the body is 16 mm laminated chipboard, the facade is 16-18 mm thick laminated chipboard or MDF. If the facades are much more massive, 20-22 mm thick, then a gap is simply necessary to open them and it can be significant, up to 10 mm.
Installation
To install hinges with a closer, the insertion method is used. To work you will need a drill, a screwdriver (preferably a screwdriver), a milling cutter and a ruler with a pencil.
If the door is small and light weight, you can limit yourself to one hinge. But it’s better when paired elements are mounted.
The work is performed in the following sequence:
- Markings are made on the door for fitting installation points;
- If you plan to install 3 hinges, one must be placed strictly and evenly between two elements (top and bottom);
- Hinges cannot be installed in the area where the fittings will join drawers or shelves;
- The overlay elements should be attached to the facade and the bowl body should be outlined;
- A special hole is made in the circled area using a milling cutter;
- Next, holes for the screws are drilled;
- The strip is mounted and the fittings are installed on the screws;
- The special hinge platform is mounted on the body of the furniture itself;
- The position of the curtain wall is adjusted using the central screw.
Regardless of the angle of rotation, there are no significant differences in the installation of fittings.
A little practice and watching a visual video will allow you to quickly master the technique of installing hinges with a closer.
Adjustment
When installation is completed, the structure should be adjusted in vertical and horizontal planes. Due to this, the facade will fit more tightly, become even and allow the doors to open and close perfectly smoothly. Still, the presence of different gaps between furniture parts causes some irritation. Do you have it too?
As for adjustment, several rules and recommendations are followed:
- first you need to adjust the gaps in the vertical plane, and then in the horizontal;
Dimensions of beveled end cabinet doors
Often a row of kitchen or wardrobe cabinets ends with an end module with a beveled door. Its width is calculated by analogy with the previous option with the only difference.
Initially, you also need to calculate the width of the opening. Here you need to be prepared that the basis will not be a regular triangle with equal legs.
Add 8-10 mm to the resulting opening width, depending on the thickness of the sidewalls. This is necessary so that the facade is covered by the end and it does not “look through” against the general background of the single façade part.
Advice! Do not try to calculate the dimensions of the radius front for a cabinet with a concave or convex shape. As a rule, this is useless - most manufacturers limit themselves to producing standard shapes of certain sizes. Here they act from the “opposite”: they find out the dimensions of the door and design a cabinet for it (or use ready-made diagrams, usually developed by the manufacturers themselves). And the remaining modules are “adjusted” to the resulting corner.
Put the loops
The first thing you need to do before you start installing the hinge on the door is to carefully mark the seat, as well as the place where the hinge is attached, both on the cabinet itself and on its door. Depending on the size of the door, you may need to install two, three or even four hinges at the same time. It is worth paying attention that the hinges should be installed no closer than 15-20 cm from the edges of the door. The depth of the seat should be no more than 1.5 cm, since chipboard, which is used for furniture, usually has a thickness of 1.8-2 cm , and by deepening the seat by more than one and a half centimeters, you risk breaking through the outer layer or simply deforming it.
When drilling the grooves, monitor the position of the drill; it must be strictly perpendicular to the surface, so as not to damage the surface of the chipboard, and also in order to make the most accurate seat. Also note that the drill must be well sharpened, otherwise chips and cracks may appear, and the drilling process itself will be much more difficult. After this, the question of how to install hinges on the cabinet is practically resolved; all that remains is to insert the hinge into the seat, then use small screws to secure its holder lugs to the door.
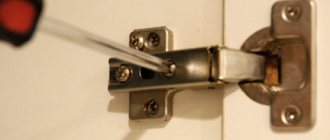
The second step will be to install the hinge mount on the cabinet itself. Again, the first step in this matter will be marking, placing the door in its place and snapping off the movable part of the hinge with a pencil, mark the place where it adjoins the cabinet wall. Then, by moving the door away, you can proceed to installing the fastening; it is usually made in the form of a small metal plate with grooves for attaching it to the cabinet wall and with grooves for connecting it to a hinge. Once you have installed the holders, you can begin hanging the door. Having put the door in place, you need to first fasten the top hinge, then the bottom one, and then everything that is in the middle.
After the hinges are installed and the door is already weighed, all that remains is to adjust the cabinet hinges so that the door fits tightly and so that it does not warp over time. Usually, for this purpose, there is a special bolt in the hinge itself, on its fastening to the cabinet; by unscrewing it, you press it harder against the cabinet body. When adjusting the hinge in this way, you need to be careful not to tighten it too much, otherwise it will slam when closing, which will negatively affect the condition of the entire furniture.
Standard sizes of kitchen cabinet fronts
It is always cheaper to buy facades of standard sizes than to order non-standard ones. It's also faster: custom ones will have to wait for them to be made, while standard ones can be purchased in stock. Therefore, when designing a kitchen, we start from a table of standard sizes of facades. The result will be significant savings. With the right approach, non-standard facades will only be needed for end modules. Which, however, can be made in the form of open shelves.
The layout of standard sizes of facades on kitchen cabinets can be more clearly represented in the drawing.
It is also recommended to take a tabular form from the manufacturer in advance - for example, Ikea’s standards differ significantly from the generally accepted ones. And already design the kitchen based on what you have.
By the way, kitchen facades can be equipped with almost any furniture in the house: good options can be selected for making children’s rooms, wall slides in the living room and other low cabinet furniture.
Source: shkaf-info.ru
Furniture hinges for cabinet doors: how to choose a model with a 45, 60 and 90 degree closer
In modern production, a large number of accessories are used. In this article we will look at furniture hinges for cabinets. These are mechanical devices for opening and closing swing doors. There are many different models sold in stores, and before purchasing, it is advisable to know which option will suit your facades. We will tell you about the design and installation features of canopies.
Types of loops by design
They are hinge units that connect the doors to the cabinet body. Various design solutions make it possible to leave the door leaf open at a certain angle. Based on the method of fastening facades, you can choose the following models:
- Four-jointed.
- Mezzanine.
- Pianos.
- For glass doors.
Quadruple joint
The most common and popular are 4-hinge furniture hinges. They are distinguished by their versatility and high reliability. There are three types of four-hinged hinges, which differ from each other in the method of fastening the shoulder cup to the striker:
Slide-on. The protruding part of the strike plate fits into the shoulder. Fastening is carried out with a fixing screw. The connection has notches on both sides. The length of the arm can be lengthened or shortened by securing the connection with notches.
Clip-on. This system allows you to do without a screw. The parts of the loop are connected by a latch. Such canopies are called quick installation models. The cabinet door can be removed and replaced without tools.
Key-hole. The cup arm is placed with a hole on the counter plate screw. The edges of the opening are inserted under the screw. The mounting hole resembles a keyhole.
Their varieties are used depending on the position of the closed door relative to the wall of the cabinet body. There are the following four-hinged types:
- invoice;
- semi-invoice;
- loose-leaf;
- corner;
- inverse;
- adit.
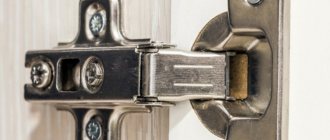
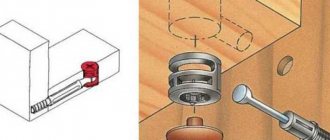
Invoice
When the door is closed, the hinge fits tightly onto the end of the side wall of the cabinet. They are mainly used en masse in rectangular designs of kitchen furniture. The loop consists of a cup with a shoulder and a striker plate. How both parts are connected can be seen in the figure.
Overhead rotary hinges are installed in bedroom and living room closets, bedside tables and chests of drawers. The mechanisms ensure a tight fit of the doors to the entire perimeter of the furniture opening.
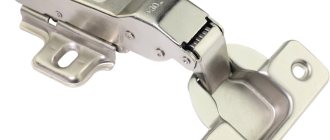
There are overhead mechanisms that do not require deep excavation in the facade mass. They are used when the thickness of the door leaf does not allow making a full recess for the cup. The hinges are fastened without insertion only with screws.
Half waybill
Such designs are used when hanging doors on one wall on both sides. They are placed in wardrobes of several sections, separated by partitions, so that adjacent facades do not interfere with each other when opened. For this purpose, the shoulder is made with a slight bend. The part allows you to maintain dimensions between open sashes of 5 - 10 mm.
Insert
The internal or inset design is designed so that when the door is closed, its facade becomes inside the cabinet opening at the same level as the end of the side panel. The minimum opening angle for the door leaf is 90 degrees.
Unlike previous models, the shoulder of the inset design is more curved. The installation of inset hinges is no different from the installation of other 4-hinged models.
Corner
You should install hinges for corner kitchen cabinets where you want to hang the doors at a certain angle to the side of the cabinet. Various models are designed for installation angles of the facade in relation to the side of the body of 30, 45, 90, 135 and 180 degrees.
Select a corner hinge model using the following table:
Closed façade corner
| Cabinet design | |
| 30 - 60 degrees | Beveled end housing |
| At 45 degrees | Trapezoidal body |
| 120 – 135 degrees | Two facades opening with an accordion |
Inverse
Carousel or inverse hinges (crocodile, crab, transformer) are designed to open cabinet doors almost 180 degrees. The open façade is in line with the plane of the load-bearing part of the body. The complex shape of the shoulder allows the door to rotate completely 165 degrees. The transforming loop can be of overhead, semi-overlay and internal design.
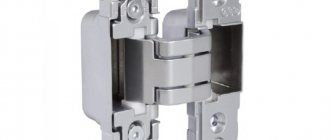
Shtolnaya
The straight or adit model is secured with a counter strip to the false panel of the cabinet. The panel looks like an additional strip installed close to the sidewall. Wall hinges are usually installed in kitchen cabinets and corner cabinets under the sink.
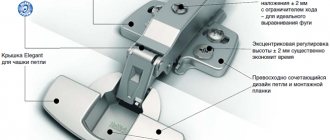
All types of four-hinged models from companies such as the Austrian Blum (BLUM), the Spanish Amig (AMIG) and other equally well-known manufacturers are equipped with built-in or overhead door closers.
The device provides slow, soft closing of doors without knocking. To do this, you only need to push the door slightly and it will continue to move slowly until it closes completely. You can install a separate door closer next to a simple facade opening mechanism.
Source: made-box.ru
Drilling holes
Installation is carried out with all the rules:
- The depth of the hole for the furniture hinge should be about thirteen millimeters. If possible, the insertion of furniture hinges should not be deeper, otherwise the front side of the canvas may crack;
- The diameter of the hole depends strictly on the cup of the loop. Tools must be completely aligned with their axis to prevent damage to the surface;
- A sharpened cutter will help protect the blade from damage and chips;
- Do not rush while drilling, otherwise there is a risk of doing it sloppily;
- It is worth paying attention to the dimensions of the cups and their dimensions when installing furniture hinges;
Having drilled one hole, proceed to the next and so on until all the holes for laying the hinges are prepared.
What tools should I use for this?
The bowl must be secured to the facade, and the bar to the body of the bedside table. The furniture hinge must be inserted into the hole, which must be made in advance. The shoulder of the loop becomes a kind of bridge, now connecting both parts. To make holes for such loops, you need to prepare the following tools:
- screwdriver or drill;
- special drill-mill;
The diameter of the cutter for the hole for a furniture hinge is 35 millimeters or 25-26mm. It is selected depending on the size of the loop cups. To create holes for such hinges, you can also use a simple drill.
A multifunctional drill, with attachments that are easy to replace, is quite suitable for such work.
The middle spike must be installed in the center of the circle, outlined using a specially prepared caliber. Automatic calibration is used on the corresponding machines, but at home the master cannot do without a specialized electric tool.
During installation, hinges require a high level of care and precision. The chance to complete exactly the required niche is the most important advantage of the so-called Forstner drill. It can provide a stop that will prevent you from penetrating further than required. And the teeth of the drill do not allow it to deviate from the intended “course”. The end result is an almost perfect hole. And due to this, the cup fits into the recess quite tightly.
But the above-mentioned drill also has one significant drawback, which manifests itself when working with a solid piece of wood. This is low quality, which is to be expected if the instrument was not made in a factory. This is why you should choose tools exclusively from official companies. And, of course, don’t forget about warranty cards.
Depending on the type of panel you are working with, the cutter can get quite hot. Due to this, it can burn the edges and wood that is removed from the recess. That is why, when working with such a foundation, you should not forget about breaks in work. So that the drills have time to cool down at least a little. Working in three or four sets will be ideal. Particular attention should be paid to breaks when working with MDF sheets. If the activity is carried out with chipboard sheets, parts made of strong alloys can make recesses for hinges really quickly and without much stress.