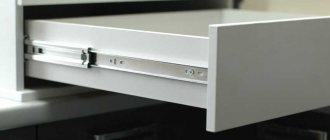
Types of ball guides
Despite the simplicity of their design, ball guides can have different shapes and a unique set of functions. Theoretically, they can be divided according to the following characteristics:
- availability of the possibility of disassembly into collapsible and non-dismountable;
- the number of so-called steps (there are two-section and multi-section);
- the type of construction itself is single-level and multi-level.
Typically, the cost of non-separable mechanisms is slightly lower than their fragmentable counterparts. But the whole point is that when installing the latter, it is necessary to use special methods for producing rails and methods for attaching balls to them. It is with the help of these balls that the device can be assembled and disassembled freely without the danger of losing small parts.
The price issue may also vary depending on the number of stages provided and the number of levels that are used in the system. That is, the more complex the design of the mechanism itself, the higher the price.
Advantages of ball guides
Unlike other drawer pullout mechanisms, this type has many clear advantages. Among them are:
- affordable price;
- smooth running, especially in contrast to regular old wooden guides;
- high strength and build quality;
- durability, wear resistance;
- ease of installation.
Full extension ball guides are used in various furniture: chests of drawers, cabinets, kitchen furniture, tables and various other retractable structures.
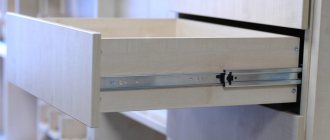
Attaching ball telescopic guides
On the outer side of the drawer, draw a horizontal line clearly in the center and screw half of the guide along it.
Then you need to draw the same horizontal line on the inner side of the chest of drawers.
You can accurately calculate the distances and parameters for fitting drawers into a chest of drawers using the drawings of the furniture product. To do this, we simply measure the appropriate distances from the bottom of the chest of drawers, at which we fix the second half of the guide.
After marking and securing all the guides, you can move the boxes into their places and consider the work complete.
Role in furniture production
And although the useful properties of telescopic devices have been evaluated in various fields of activity, such mechanisms are mainly used in the process of manufacturing various furniture.
One example of such an application is wardrobes using folding hanger rods, various cabinets for shoes and chests of drawers, and cabinets with drawers. That is, any furniture that allows you to save space or increase the comfort of using furniture.
It is worth noting that ball guides have a positive effect not only on convenience, but also on the efficiency of using furniture. After all, getting and putting things away is much easier and more comfortable, and free access makes it possible to take up useful space in the closet.
How to avoid installation errors
If the guide rails themselves are screwed at the same level, strictly opposite each other, and the drawer does not warp in any way during the extension process, then everything will “work” well.
This is the main rule in installing any box - maintain alignment.
The second rule is the need to correlate the height of the sides of the box itself with the height of the facades. Before you start “distributing” them in height. I recommend immediately making marks with a pencil on the end of the body, noting the position of the facades, in order to have a visual representation.
The main pitfall is the irrational distribution of the guides in terms of the useful volume of the box itself.
For example, in the photo, the drawers in the pencil case function absolutely normally.
But due to the fact that the top drawer was “lifted up” too high, its capacity was greatly reduced. It would seem that the middle drawer is more spacious. But no. The lower edge of the front of the top drawer “does not allow” the middle drawer to be loaded along the entire height of the resulting niche.
In fact, this point is not critical. And if you don’t highlight it, the owner himself won’t even notice. But the one who did it will definitely remember that it would have been better differently.
Calculated box dimensions
To properly install the full extension ball slides, several steps are required. Some requirements must be observed, especially if you create furniture yourself.
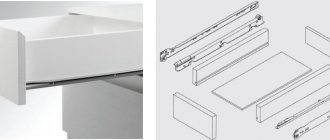
Primary requirements:
- In retractable structures without taking into account the facade, the width should be 26 mm less than the width of the attachment point. Thus, there must be a gap of 13 mm on each side in order to install the guides.
- The length of the drawer and the length of the extension device itself must match exactly. On average, this is from 25 to 80 cm. Intermediate sizes are usually made in increments of 5 cm. Moreover, this design usually does not reach the back wall of the cabinet by approximately one centimeter.
- Unlike previous measurements, nothing affects the height of retractable containers except the desire of the owners. Typically this is from 80 to 250 mm. However, this indicator may differ significantly upward.
Installation of ball telescopic guides
On the side of the drawer, horizontally, strictly in the center, mark a line and screw one half of the guide along it.
Now we need to mark a similar horizontal line on the inside wall of the chest of drawers.
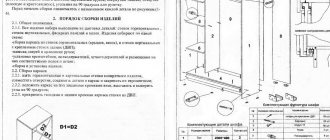
I took the exact distances and dimensions from the drawing of my chest of drawers; you can use the drawing of your furniture product, approximately as shown in the figure:
That is, we mark 417 mm from the floor on the sidewall and mount the telescope at this height.
This completes the hardest part of the work; now we screw the two halves of the guides strictly along the line to the drawer and to the side and move it into place.
Installation of guides
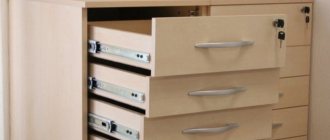
In order to install these devices, it is necessary to remove their inner part, for which you should press the black antennae. Both halves of the guides are attached to the outer side of the drawer and to the inner surface of the cabinet, chest of drawers or other furniture.
Algorithm of actions:
- First of all, you should decide on the direct mounting location. To do this, mark the fastening line on the outside of the drawer side. It can be done in the center, or it can be done on the bottom. One half of the ball structure must be attached to this marking line using screws.
- On the inside of the cabinet itself, it is necessary to make a similar marking in the form of a line. The location of this marking directly depends on the height of the box. The remaining halves of the guides must be screwed into place. After this, the drawer can be placed in place, check the free movement of the mechanism during extension and closing.
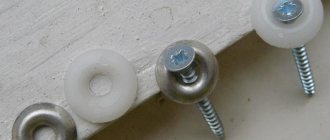
It is worth noting that there are quite a few different holes on both halves of this mechanism. And each of them has its own purpose. Thus, oblong horizontal holes are necessary for the purpose of moving and adjusting the guides horizontally. And the oblong vertical holes are for adjusting and moving the bar up and down.
After the final adjustment has been made, screws or self-tapping screws must be screwed into special round holes in order to firmly fasten the main elements of the ball guides.
Usually the whole process in practice looks like this:
- The bottom rails should be installed approximately 30mm from the bottom of the cabinet.
- Depending on the dimensions of the drawer fronts, the location of the remaining parts will also vary. During operation, they should not touch or rub against each other. Therefore, during installation, it is necessary to take this into account by making the distance between the guides, which are installed on the cabinet wall, 2-3 mm greater than the height of the facade of the retractable structure itself.
- The guide parts must be screwed strictly along the intended marking line.
- After the parts are temporarily secured, you should try to insert the drawer into place through the oblong holes. If the previous steps are performed correctly, you will hear a slight click that occurs when the latch is activated. This means that the guides can be permanently secured through round holes. If you do not hear a click, then you need to make adjustments by slightly moving all the parts up and down, as well as back and forth. Before making adjustments, you should slightly loosen the mounting screws.
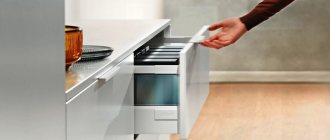
DB4461 is a modern model of ball drawer guides, which is equipped with a soft closing mechanism using a soft closer. This mechanism makes it possible to fully extend the drawer, gaining access to all its contents. In this case, smooth closing is carried out using an oil closer.
On average, this mechanism can withstand at least 50 thousand closings and openings. The device is designed for a weight of up to 25 kg, while it is absolutely silent in operation. There are other models of similar devices, which makes it possible to completely select the mechanism depending on your needs.
Instructions for replacing guides
To replace broken roller runners, you need to use a screwdriver to unscrew all the fasteners and remove the strips. Ball-type ones are more difficult to remove: pull out the drawer as much as possible, press the latch down with your fingers, and smoothly pull the structure toward you. Dismantle the planks from the side walls of the furniture, removing all the screws.
Installing new guides for dresser drawers is not difficult: they all have a similar design, and the holes for the fasteners match. There is no need to mark. The strips are applied to the holes remaining from the screws and screwed. Check the correct position and, if necessary, adjust it by loosening the fasteners.
Having learned how to properly mount the guides, you can independently repair failed elements or install new ones on your own furniture. When choosing the optimal option, you should take into account the planned load: if it is large, you should give preference to ball structures.
Did you manage to solve your problem using the recommendations from the article?
Yes!
46.06%
No. More answers required. I'll ask in the comments now.
37.9%
Partially. There are still questions. I'll write in the comments now.
16.03%
Voted: 343
Helpful installation tips
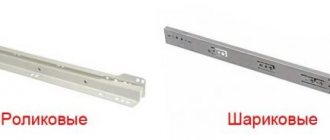
It should be noted that many people often confuse ball drawer slides with their roller counterparts. Therefore, when choosing a mechanism, you should pay attention to many factors. Thus, roller products are mainly painted white. In this case, the drawer is pulled out using plastic wheels. Experts say that these devices are less convenient and wear-resistant, so they are not worth installing. During operation, you can often hear a squeak, and the plastic wheels often break down over time and also fly out of the guides themselves.
If the bottom of the box is inserted into special grooves, then it is better to secure it using thin self-tapping screws with edges. Otherwise, the contents may begin to fall out along with the bottom. In case of heavily loaded drawers, a double set of guides can be used.
What you need to know before you start installing drawers
The principle of attaching the runners to the sides of the cabinet is the same for almost all retractable systems. As a rule, 2 mm are removed from the front edge and then screwed along the outer mounting holes and several central ones, depending on the size of the guides themselves.
The only difference is the calculation of the height at which the skids are mounted.
There are three main types of drawer slides, with different slide positions:
- Along the bottom edge (bottom). The simplest and most cost-effective roller guides are installed strictly under the bottom of the drawer frame itself, overlapping on the fiberboard. As in fact, the most expensive options for equipping drawers are tandem boxes. They are also installed on the lower level of the drawer frame.
- In the center of the side of the box. Ball telescopic ones give greater freedom during installation - they can be mounted at any level of the sidewall of the box box. But it’s still better to stay at the central one. As practice shows, installation and adjustment are greatly simplified.
- With top mount. For metaboxes (metalboxes), the roller guide runners are located along the upper level.
In each case, the box will “sit” completely differently. Let's look at the example of a drawing of a regular chest of drawers with three drawers. To make the task easier, let’s assume that the boxes begin to be installed from the bottom of the side of the cabinet itself, without deduction for the base box and bottom. This is possible in the following option.
- The height of the sides of the cabinet is 668 mm (with the height of the chest of drawers without legs being 700 mm).
- The height of the drawers is 150 mm with the height of the facades being 221 mm.
How to install roller guides
The bottom is captured by part of the runners that are attached to the box at a height of 8-10 mm, depending on the thickness of the bottom (fibreboard).
Let's take the distance from the bottom to the lower edge of the facade to be 20 mm (usually it ranges from 10-30 mm).
The installation diagram of the roller guides will look like this.
There will be no harm in rounding the values. Take not the height level 32/255/478, but round for convenience to 40/260/280. The main thing is to secure the roller guides equally on both sides.
How to install ball guides
With a similar tolerance under the bottom of 20 mm, the installation diagram of the ball guides will look like this.
The difference is that it is customary to install ball guides in the center of the sidewall. Since they come in different widths, it's easier not to move them higher or lower.
Also, the values 99/322/545 can be rounded and made, say, 100/330/550.
How to install metaboxes on a drawer
A distinctive feature of a drawer with metal sides is its fastening along the top edge. The main thing here is to choose the right height of the metaboxes relative to the vertical of the facade. It can be 54 mm (optimal for installation in a narrow niche under the built-in oven in the kitchen), 86, 118 or 150 mm. If a deeper drawer is required, it can be “expanded” using one or two rows of special rails.
In our case, it is optimal to take a 150 mm metabox; the installation diagram will look like this.
As in previous options, rounding is acceptable for convenience: instead of 134/357/580, it is quite possible to take 130/360/580.
How to install fronts on a drawer
Fronts on drawers are always installed after “testing” and alignment of the inner box.
First you need to make sure that the box moves freely and smoothly, does not warp during movement and does not jam.
Only then, with the help of special linings (chipboard scraps, a wooden or plastic ruler will do), is the uniform position of the facades pretended.
Then, using double-sided tape, the facade is fixed and attached from the inside using 4x30 self-tapping screws. The through fastening of the handle also “holds” the facade. But it is worth drilling for the handle only after the facade is securely fixed.