The difference between installing a built-in dishwasher and a freestanding model is that additional design is required for the front wall - the machine door.
It is assumed that the decorative panel is selected to match the surrounding interior, and then the facade is installed on the dishwasher.
If experienced craftsmen cope with this operation quickly, then for beginners the task seems quite difficult. To understand the features of facade installation, you should carefully study the instructions and become familiar with some of the installation nuances. And we will tell you about all this in detail in our article.
How to install a dishwasher under the façade
Before starting work, read the installation instructions and make sure you can handle the job.
Remember to follow safety precautions. It is useful to watch a current video, for example. First, installation of communications is carried out: water supply, sewerage, electrical network. Only after a test check can the PMM be secured in a niche, under the tabletop, and a decorative panel hung. Fastening is done with bolts (screws, self-tapping screws) included in the kit. Along with fasteners, gaskets, instructions, you will find a stencil. Applying it to the cabinet walls, countertop (depending on the PMM model), draw the locations of the holes for fastening. They are easy to make with a hammer drill. Do not make through holes; drilling ¾ of the wall thickness will be enough. All that remains is to screw on the countertop protection and place the dishwasher in the cabinet. Last steps:
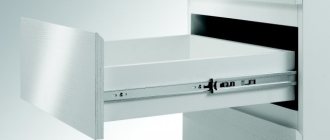
- Attach fittings, slider mechanism (if necessary).
- After attaching the stencil, determine the attachment points on the inner surface of the facade.
- Use a narrow drill to drill points, not all the way through, to avoid damaging the exterior finish.
- Remove the transport screws from the door (if equipped).
- If you are working without an assistant, try temporarily fixing the facade on the door with double-sided tape so that you can easily screw in the fastening bolts in the right places.
- Check the tightness of the fit, the quality of fixation, locking, and the presence of interference when opening and closing.
Communications
A standard dishwasher needs three things from a switching point of view:
- Water supply.
- Drain.
- Electricity.
Water
As for water, you will need a drain from the kitchen faucet. A standard tee will come in handy. Where to install is decided depending on the specific case. Sometimes it is better to place the part under the sink. Traditionally there is a flexible pipe connection. Between them, cut a tee with a branch. Sometimes there is a place under the mixer. In this case, the tee is mounted there.
Before installation, the taps supplying the apartment with cold and hot water are turned off. For safety. The de-energized system is disassembled by inserting a dishwasher tee into the selected location. Ultimately, the bending radius of the hose should not be less than the maximum permissible for the selected hose model. A tap is built into the water supply path to shut off the water if necessary.
Draining the water is done in a similar way. The only thing is that in some dishwashers we find outlets with U-shaped pipes at the end, which easily cling to the edge of the sink. This is a good way out of the situation if there are no prejudices against a hose sticking out in plain sight, which, by the way, can be easily removed after the cycle is completed.
The drain is cut in the same way as the water supply. A splitter is purchased and installed under the sink. The dishwasher hose is connected to the corresponding tee fitting. The drainage and water intake are located nearby. Accordingly, you get two hoses running side by side.
It's not easy to get to the car wash. At least two methods have been found:
- remove the back wall of the cabinet compartment where the dishwasher is built in;
- Drill holes in the side walls to the sink.
The first method is good when there are cutouts in the transverse partitions on the back side of the furniture at the bottom for hoses. In reality, they are intended for baseboards, but they can be quite wide. In extreme cases, you will have to expand it a little, this is better than drilling holes in the walls for installing a dishwasher.
The action is carried out using an ordinary grinder. You'll have to move the furniture away from the wall. To prevent pieces of polish from breaking off, the direction of rotation of the sanding disc should press the varnish layer against the board. You will have to work on both sides, carefully. Before you begin, you should think through in detail the location of the dishwasher hoses and draw seam lines with a pencil. It is acceptable to use a drill, electric jigsaw, and other carpentry tools.
The walls are modified in the same way. Grind the holes made with special drills with abrasive. When installing, carefully ensure that the minimum bending radius of the hoses in the retracted position of the dishwasher does not go beyond the established limits.
Electricity
Unlike most appliances of this type, built-in dishwashers are equipped with cords and plugs. You will need to place the socket within the reach of the plug. A piece of 230V cable and a socket will do.
It's hard to push communications through the threshold. Simply nailing the wire with nails and clamps will not work. The feet of passing people will fray the cord. Someone gets electrocuted while cleaning the floor.
If access to the central network is on the other side of the doorway, it is better to lay the cord behind the trim or nail it with small nails. Or, using an angle grinder, cut a groove the size of a wire on the back side of each platband.
The dishwasher socket is attached to the baseboard. Where it is easy to reach once the furniture is finally in place.
At what stage should the façade be attached?
The dishwasher is installed in several stages. The main connection is considered to be connection to communications: water supply, sewerage system, dedicated power line.
Decorating the front side is usually done at the very end, when the rest of the work has already been completed.
The housing is pulled out of the niche to provide access to the car door from all sides. But during the fitting process, it is better to push the machine into place so that the panels of the dishwasher and neighboring modules are at the same level
Is it possible to run the dishwasher without the decorative trim installed? It is not recommended to launch before installation work is completed for several reasons.
Only a dishwasher that is completely closed on all sides can fully perform its functions; in addition, the panel plays the role of an additional sound and heat insulator.
Sometimes they mask the machine first and then make the connection. This option is appropriate if there is a delay in connection for objective reasons, for example, at the same time the riser in the toilet is being replaced or a new power line is being laid.
In order not to waste time, decorate slowly.
When to hang a façade
The façade panel is fastened after all other communications have been connected to the machine. The device must be tested at idle to ensure that all mechanisms are working properly. And only then should you start hanging the façade plate.
Since it is necessary to accurately adjust the dimensions, the installation process includes alignment of the PMM in height, slope, and fastening to your own or adjacent cabinets.
In some cases, the design of the machine itself or kitchen furniture requires a specific installation approach: installing an additional false panel, adjusting the base strip, etc.
Each model has its own installation features. Sometimes manufacturers of furniture sets indicate which models of dishwashing units are best suited for their products. Large holdings, of which IKEA is the most famous, produce cars themselves in addition to furniture. In such cases, installation of the front panel is carried out without problems.
Preparatory activities
Experts recommend that before attaching the facade panel, preparatory work is carried out, during which the necessary materials and tools are prepared.
Tool
To perform installation work, you will need special working tools, among which are the following:
- Screwdrivers. These are common tools that are found in almost every home. Most often they are used if it is necessary to screw in screws and screws. Screwdrivers may differ in purpose and size. The choice of suitable models depends on the type of fastenings used.
- Roulette. When carrying out installation work, it is necessary to take various measurements. For this, a tape measure is used, with which you can take measurements.
- Screwdriver. This is a hand-held electric tool that is often used for driving and unscrewing self-tapping screws, screws and screws. You can also use it to drill holes into which fasteners will be installed in the future.
- Marker or pencil. They will be needed to mark the places where the mounting holes will be drilled.
- Awl. This tool is used if you need to pierce holes in fragile surfaces. It is recommended to use a strong awl to prevent it from breaking during the piercing process.
Materials
To install the facade you will not need as many materials as tools. Among the most important materials are:
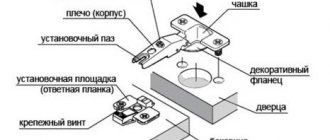
- Stencil. This is a very important detail that can help when installing the facade. With its help, the places where the mounting screws will be installed are marked. To use a stencil, you need to attach it to the panel and mark the places for fastenings.
- Scotch. For installation work, it is recommended to use double-sided tape. You will need it to attach the façade to the surface before screwing in the screws.
Preparation of tools and materials
No special tools are required to secure the façade trim. The same items that are used to install the dishwasher as a whole will be useful:
- drill;
- screwdriver;
- awl;
- screwdriver;
- tape measure or ruler;
- pencil or marker.
If you don’t have a power tool, then one screwdriver is enough - you can screw in the screws by hand if the holes for them are pre-drilled.
The drill bit is selected according to the diameter of the screws: the holes should be a little tighter so that the fasteners are held firmly in the sockets
The work is simplified by the presence of a stencil for the façade overlay included in the delivery set. It is a large sheet of thin paper with marked attachment points.
The stencil is placed on the back side of the decorative panel and the places where the screws are screwed in are marked.
In addition to the tools, you will need double tape. Several “Velcro” pieces of tape will come in handy when you need to try on the facade. It is not recommended to immediately “mount” it on screws, since an error of 2-3 millimeters will mean all the work is in vain.
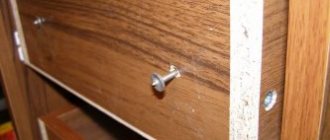
Don’t forget about the handle, without which opening the door will be problematic. It is also fixed with self-tapping screws, which are screwed into the back of the panel.
To ensure that the surfaces of the door and facade adjoin as tightly as possible, the heads of the screws should be recessed into the canvas.
It is easier to attach the workpiece than a homemade overlay. If you make the panel yourself, you may need carpentry tools, sandpaper for sanding, antiseptic impregnation and paint to finish the entire surface or just the ends.
Photos of dishwashers with furniture fronts
In any case, a facade masking a dishwasher will help create the desired interior without the difficulty of selecting equipment of a certain design. In addition, it will protect equipment from aggressive factors and extend its service life.
The difference between installing a built-in dishwasher and a freestanding model is that additional design is required for the front wall - the machine door.
It is assumed that the decorative panel is selected to match the surrounding interior, and then the facade is installed on the dishwasher.
Experienced craftsmen cope with a simple operation quickly, but beginners should carefully study the instructions and become familiar with some of the installation nuances.
The range of models integrated into kitchen units is much wider than their free-standing counterparts. This is explained by the principles of ergonomics and space saving inherent in the concept of constructing a kitchen interior.
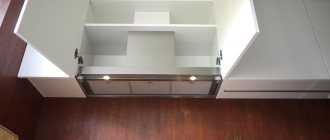
To install a built-in dishwasher, you will need a separate cabinet, or rather, a niche in the set. It differs from a regular kitchen cabinet in that it does not have a back wall or bottom.
The equipment is built inside furniture modules and decorated with facade panels so that when closed it is completely hidden. This installation method allows you to maintain the kitchen interior in the same style.
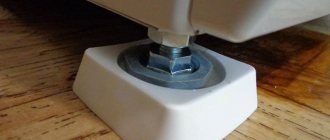
The machine is installed directly on the floor, on 3 or 4 support legs. The absence of a rear wall allows for free placement of the water supply and drain hoses.
The cabinet must have reliable walls to which the dishwasher body is attached, and a “roof” - the countertop. The front panel is not fixed to the walls, like conventional cabinets, but directly to the car door.
No need to experiment with fasteners
: Manufacturers have provided installation features and prepared special holes for self-tapping screws.
What is a facade for PMM? This is a decorative panel, most often made of the same material as the front surface of the entire kitchen unit. It is made from MDF, plastic, laminated chipboard, solid wood or combined materials.
The fasteners are not visible from the outside, since installation is carried out from the inside, from the side of the machine door. Self-tapping screws are screwed into the holes and partially, not completely, enter the panel fabric
Where do you get decorative panels? There are several ways to make it:
- ordered together with a kitchen set if the dimensions of the machine are known in advance;
- make it yourself from the doors of a disassembled kitchen cabinet;
- if there is no suitable “extra” facade, they are selected in a similar style and color design.
The first method is considered the most practical: when ordering, all dimensions of the car are taken into account, so the facade “fits” perfectly.
Installation instructions
Before installing the front on the dishwasher, you should prepare the listed tools and available materials, and also carefully study the instructions for the upcoming work.
Determining the dimensions of the decorative panel
To determine the dimensions of the facade, it is not necessary to perform complex calculations or create diagrams. This nuance is already provided by the manufacturer, and the instructions for the dishwasher include the required values (width, thickness, length, allowances).
In most cases, the width of the panel corresponds to the width of the device, because... the side door has the parameters of the body. For a standard 60 cm model you will need 598 mm. A 45 cm dishwasher front will have a width of 448 mm.
As for the height, it may differ depending on the placement of the facades of adjacent cabinets.
The use of surfaces with increased length is allowed if this is provided for in the design project
In this case, it is important to make sure that the remaining part does not interfere with the opening of the doors.
Provided that the panel is in contact with the base, it is better not to touch it, but cut off the edges of the base, following the contour.
Choosing the right fixation method
Before attaching the trim parts to the built-in dishwasher, you must select the appropriate mounting method. This stage requires compliance with basic rules and recommendations. If you act in your own way, this can lead to the fact that over time the facade will fall off or “move” to the side.
When using nails instead of self-tapping screws, the possibility of various troubles during the dismantling stage cannot be ruled out. Expensive devices have a long service life and often last longer than a wooden set.
Fixing the façade of a built-in dishwasher using glue is not allowed. The surface of the panel installed in this way will fall off due to the loss of properties of the adhesive composition due to temperature fluctuations or, conversely, will harden.
It is also unwise to use glue as a retainer - the panel will quickly fall off under its own weight or any mechanical influences.
We carry out the installation sequentially
When installing the door for the Electrolux PMM, it is important to make sure that the unit is placed level. Any tilt is not allowed and may result in incorrect fixation of the panel.
The next nuance is to check the dimensions. They must match the dimensions of the decorative facade. If everything meets the required standards, you can begin work and hang the panel.
After completing the fastening, all that remains is to check for gaps and backlash. Any such defects must be corrected.
After finishing decorating the front part, it is important to secure the body on the sides. To do this, just remove the top tank under the dishes, find the holes and secure the screws there
To prevent common mistakes, you should follow these expert recommendations:
At the sizing stage, it is important to use a tape measure or ruler. Actions “by eye” can worsen the decorative appeal of the facade and make it unpresentable. When choosing screws, you need to consider their length
It is important that they fit securely and tightly into the structure on one side and do not come out on the other side. Otherwise, it will cause the panel to become deformed. If you use a paper template, you should securely fix it on all sides. If you do not have a power tool, the work can be done using a screwdriver. However, having a screwdriver makes the job more efficient and faster. The handle is fixed taking into account the location of the fittings on other items of the kitchen set. To avoid closing the door during installation, you need to place several books or other heavy things on it.
When using an old cabinet door as a front trim, at the fitting stage you will need to familiarize yourself with the location of the fastening points
It is important to ensure that they do not coincide with the new holes. Otherwise, the screws will pop out and the panel will partially come off
To simplify the work ahead, prepare for possible nuances and perform everything in the best possible way, it won’t hurt to watch training videos with a detailed overview of each stage.
Types of dishwashers
Modern dishwashers are divided into three main types:
- Tabletop;
- Freestanding;
- Built-in.
The smallest machine is a desktop model. Its dimensions allow the unit to be installed directly on the countertop. Free-standing models only require connection to the power supply and communications; they are installed as a separate module or in the niches of a kitchen unit. It is the built-in models that cause the most difficulties when installing communications and installing the machine itself, which will be discussed below.
The advantage of a built-in dishwasher over other models is that they do not destroy the integrity of the designer’s idea or simply do not violate the aesthetics of the interior of the room. Built-in dishwashers are hidden under a box that is part of the kitchen unit, and their facades are covered with decorative facades. If your kitchen is small, then the built-in model is just for you.
Even when placing an order for a new kitchen, the installation of a built-in dishwasher can be ordered from specialists. But this is not always convenient due to extra costs. In addition, in order to correctly accept the work in order to avoid further troubles, you should delve into the nuances of the installation carefully.
Useful tips
Here are some useful tips for your attention that will not only allow you to connect your dishwasher correctly, but will also extend the life of the equipment:
- Installing a drain hose into a sink is extremely unsafe, although it makes the connection process much easier. The danger is that the waste water drain may fall out of the sink and flood the neighbors below.
- Electrolux equipment is very demanding in terms of installation rules. The maximum tilt to one side should not exceed 2 degrees, so be sure to check this point with a building level.
- If you decide to buy any model from Siemens, be sure to look at the dimensions of the case and check it with the manufacturing standards of the furniture into which it will be installed. Very often, Siemens neglects technical standards and creates non-standard dimensions, as a result of which difficulties arise when installing a dishwasher in a finished kitchen.
- Do not connect the grounding contact to gas or water pipes under any circumstances. The grounding must be connected to the grounding bus of the apartment panel. We talked about how to make grounding in an apartment in a separate article.
- The air gap between the wall and the back wall of the equipment should be at least 5 cm, which is quite enough for air circulation.
- The kit necessarily contains connection rules and a visual diagram for a specific model. You only need to rely on it, because... All conditions are purely individual, although they have much in common.
- It is not recommended to use surge protectors (extension cords), because they very often cause accidents and fires. If there is no other way to supply power, it is recommended to make an electrical extension cord yourself. This method of connecting a dishwasher via an extension cord can be used as an exception.
- If you decide to place a free-standing dishwasher next to a stove, refrigerator or oven, connect a separate line from the distribution box to each appliance so as not to overload the outlet installed near all devices.
We also recommend watching the visual video instructions for proper use of the dishwasher:
Dishwasher operating tips
https://youtube.com/watch?v=vUIT6ixqu18
That's all the instructions on how to connect a dishwasher to the water supply, electrical network and sewerage system with your own hands. We hope that the information was useful and interesting for you. We also recommend that you familiarize yourself with the main malfunctions of dishwashers, so that in the future you will be familiar with how to repair appliances at home!
Types of Dishwashers
Dishwashers in the kitchen, designed to make the housewife’s work as easy as possible, should not create discomfort, disrupt the design or take up a lot of space in a small kitchen. Before you build a dishwasher into your kitchen, you need to choose one of the design modifications that are made. For ease of use, dishwashers are available in three main size groups.
There are several variations of household appliances for automatic dishwashing
- Full size.
Their height ranges from 82 - 87 cm, width 60 cm, depth 55 or 60 cm. They serve the most dishes (up to 17 sets) and can stand alone in the kitchen or be built into the kitchen furniture partially or completely. In partially built-in designs, the panel control of the machine remains outside, completely built-in - located on the upper edge of the open doors of the machine. - Narrow.
They differ from the previous class only in width (from 45 to 49 cm), they wash no more than 9 sets of dishes, depending on the model. The type of arrangement in the kitchen area is similar to full-size types. - Small compact modifications
have all the dimensions of full-size machines, with the exception of the height - it is 1.5 - 2 times lower, as for the number of dishes washed at the same time, their ceiling is 5 sets. In the kitchen, they are installed directly on the top of the countertop or mounted in a niche of the kitchen cabinet as a separate module. One significant drawback of this type of machine can be noted - unlike other models, due to their design features, they do not provide water supply to the lower basket with dirty dishes, which worsens washing quality.
Mounting methods
It is no secret that fixing the panel is very important; special attention must be paid to it.
There are two ways to attach the facade.
Partial fastening . In this case, the panel covers the main part of the door, while the control panel remains visible.
Full installation. The dishwasher door is completely covered by a panel.
The most common fastening is using self-tapping screws. They are screwed in from the inside. It is necessary to choose the correct length of screws. This way you can avoid seeing the screw heads on the outside of the panel. Another common fastening is hinges. They can be purchased complete with the facade. They are attached near the bottom edge of the dishwasher.
It is strictly forbidden to attach the facade to any kind of glue. During operation, the dishwasher door can either heat up or cool down, depending on the dishwashing mode. Due to such differences, the glue may lose its properties and, as a result, the panel will fall off. It is also possible that the glue will firmly stick the panel to the device door, which is also inconvenient. If dismantling is necessary, it will be impossible to peel off the panel. Another mistake is to glue the panel with tape. This fastening is not enough to hold the panel. While the machine is operating, the facade may simply fall off.
What is required to install the facade?
If installing a dishwasher is a rather complicated procedure, then you can install a façade on it yourself.
For these purposes you will need the following equipment:
- furniture panel (in this case, its appearance will directly depend on the design of the kitchen unit);
- suitable tabletop;
- yardstick;
- screwdriver;
- necessary accessories.
How is the facade installed?
There can be several ways to install dishwashers: installing the equipment in a ready-made kitchen unit or separately from it. You will only need to hang the door in the first case, and performing such a manipulation is very simple, since well-known manufacturers have described in detail all the necessary steps in the instructions.
To hang a facade on a Bosch machine, follow the following algorithm:
- To begin with, the equipment is mounted in the designated place at the required height using special screws. It should be noted that built-in models are already equipped with ready-made templates, using which you can easily install the furniture facade to the door of the dishwasher.
- Fastening elements are attached to special grooves located on the machine body. Next, you will need to replace the small “original” screws located on the inside of the door with longer fittings with nuts. Thanks to this, the furniture facade will hold more firmly. Finally, all that remains is to attach the handle and decorative elements to the door.
- Installation of the facade can be done in another simple way. Before directly fixing it to the bolt, you need to apply double-sided adhesive tape. Experts also recommend that when connecting equipment to the electrical network, use a cable that has a cross-section of 1.5 mm. As for the outlet, it must be grounded. The required parameter is 16 Amperes.
You can see how to install the front on a dishwasher in the video. All recommendations given should be followed exactly. If they are followed correctly, the decorative door will be installed without any effort and with minimal time. If you don’t have confidence in your own abilities, then you can always entrust this procedure to experienced craftsmen who know all the intricacies and features of its implementation.
Hello, dear reader! I’ll tell you about the nuances of installing a dishwasher under the countertop. There is a lot of information on the Internet about connecting the machine to communications, but the topic of integration into the kitchen set is not covered. Although the topic deserves a separate article.
Thank God, there is enough experience in installing a dishwasher in the kitchen to eliminate unnecessary movements and thoughts on your part. You will know exactly what to do. The result is a perfectly executed installation.
- Dimensions of the niche in the cabinet for the dishwasher
- Dishwasher Mount
- Correct placement of the dishwasher in the kitchen
- What to do with the plinth under the dishwasher
- Video on the topic
- Conclusion
Stages of installing the facade on a built-in dishwasher
If the installation of equipment is a very complex process that is best entrusted to a specialist, then the installation of the facade can be carried out independently.
Before installing the front panel, the machine itself must be securely fixed by attaching it to the side walls and table top.
To fasten the panel, use the following tools and components:
- facade;
- table top;
- screwdriver;
- set of accessories;
- measuring tape.
The process itself consists of two stages:
- installation of the facade at the required height. For this purpose special screws are used. Next, you need to determine the distance from the attachment point to the edge of the dishwasher facade. To do this, use a tape measure to measure two indicators: the distance from the top mount to the countertop and the size of the gap between the countertop and the front of the other cabinet. Then subtract the second from the first parameter. According to the data received, you need to make notes. To do this, you can use a pencil or colored tape;
- installation of fasteners and accessories. First the handle is attached. To do this, a hole is drilled on the front side of the panel for the handle screw. If you drill from the back, a chip may form on the furniture, especially if the coating is enamel or acrylic. Next, according to the notes made, shallow holes for fastenings are drilled - about 3/4 of the panel thickness. You don't have to drill, but then the fastenings won't be as reliable.
At the end of installation, be sure to check how the door opens - it should not rest against the base.
Often, built-in models have special ready-made templates that make it easy and quick to attach the front to the dishwasher door. If you doubt your abilities, try first practicing on an unnecessary piece of MDF or chipboard.
What materials are facades made of?
- Most often, modified plywood sheets are used, treated with a special compound that protects devices from sudden changes in temperature and humidity, and this always happens when equipment is operating. In addition, they do not harm human health and the environment.
- Natural wood panels are used very rarely; they require a special protective coating, so the cost is too high.
- As a budget option, you can use chipboard panels, but in this case you should carefully choose the top coating: it should saturate at least half of the sheet as best as possible, otherwise the material will quickly take on an unsightly appearance from moisture. And as temperatures rise, formaldehyde can be released into the air, which can negatively affect health.
Experts have an extremely negative attitude towards their PVC facades; they very quickly become unusable and the layers are destroyed.
It will also be helpful to learn more about how to install a small, narrow dishwasher under the sink.
Facade purposes
The facade of the dishwasher is a decorative panel element made from furniture materials. The main purpose of the facade is to hide the dishwasher in the kitchen furniture, making it part of the kitchen interior.
- there is no need to select the appropriate color of the machine; it fits perfectly into the interior, since it is a common part of the kitchen;
- the control panel buttons are almost invisible, children will not press them randomly;
- has soundproofing properties, the sound of the dishwasher is not so audible.
Dishwasher panels are made from a finely dispersed fraction; this is a medium-density wood fiber board. The thickness of the board is usually standard 16 mm (furniture thickness) and is covered with a film that completely replicates the texture, texture and color of the furniture.
In some dishwasher models, the open door can only be locked after the appliance plate is installed.
Purpose and features of the facade on the dishwasher
Before you begin installing the dishwasher front, you need to understand the purpose of this part. The front surface is a special decorative protective panel that is installed on the front of the dishwasher.
This product is made from various materials. However, most often when creating panels, the materials used in the manufacture of kitchen furniture are used. Externally, this part looks like an ordinary cabinet and therefore it is not easy to guess that there is a built-in dishwasher behind it.
Facade panels have a number of advantages that you should familiarize yourself with before using them. Among the advantages are the following:
- Improving the interior of the kitchen space. With the help of such a façade you can complement your kitchen design. Also, the use of such products simplifies the choice of dishwashers, since you do not have to select equipment that would fit the kitchen furniture.
- Dishwasher protection. The panel installed on the front of the machine reliably protects the equipment from mechanical damage and contamination. Most often, facades are installed to provide additional protection for household appliances.
- Soundproofing. It is known that during operation the dishwasher makes a lot of extraneous noise. After installing the facade panel, the equipment begins to work less noisily.
- Strength. Facade panels are highly durable and therefore difficult to damage. They are able to withstand even strong impacts on the surface.
Additional recommendations from experts
If you are furnishing the kitchen of a new apartment or house, it is best to start not with a set, but with built-in appliances. And already select furniture for it.
When the door of a built-in PMM, which is already used, is attached, as a rule, it turns out that the standard template included with the machine is lost or thrown away. In this case, you should not mark, relying only on measurements; you need to make a new template. Take an old panel as a sample and place a large sheet of paper on it.
Installation of the facade panel takes little time and is completed without problems. But only if complete parts are used, and the panel itself exactly matches the PMM model. If this is not the case, fastening is a complex task, which is difficult to solve without the involvement of a specialist. A good solution in such a case would be to turn to the services of a company that installs dishwashers on a turnkey basis, not only by inserting into utility networks, but also by installing a decorative facade panel.
Useful video on the topic of installing a built-in dishwasher:
Did you manage to solve your problem using the recommendations from the article?
Yes!
46.06%
No. More answers required. I'll ask in the comments now.
37.9%
Partially. There are still questions. I'll write in the comments now.
16.03%
Voted: 343
Door and front dimensions. Canopy and mount
The dimensions of the decorative panel depend on the size of the dishwasher. This can be narrow - 45-60 cm, full-size - from 60 cm or compact equipment - height 50-60 cm.
What to do if the dishwasher front is too long? You won't be able to cut it, as you will ruin the appearance of the set, because it is laminated on top and covered with decorative film.
What you will need for work:
- Screwdriver Set;
- roulette;
- fasteners;
- door handle.
Attached is a full-size template drawing, screws, self-adhesive tape, and fastenings. You can figure out how to secure the panel by following the instructions. For an experienced master this will take no more than 10-15 minutes.
Sequence of work when mounting
- Place the dishwasher in the prepared niche.
- Attach the cabinet to the cabinet panels.
- Make connections to the drain and water supply.
- Prepare holes for the handle using a Phillips screwdriver and an awl.
- After fixing the handle, you need to calculate the distance (Z), which will help place the facade flush with the rest of the kitchen doors.
- Take a tape measure and measure the distance between the door of the adjacent cabinet and the countertop, as shown in the figure (X).
- Then measure the distance from the mount to the tabletop (Y). Calculate: Z = X-Y.
- Place the template on the inside of the door.
- Use an awl to mark the locations for the fasteners.
- To make the fastenings more secure, drill holes ¾ of the way through the door.
- How to remove old screws? Sometimes the panels are tightened with short screws, but their length is not enough to fasten the facade. Therefore, you need to hang the panel, unscrew the old screws and install long self-tapping screws.
After installing the dishwasher under the façade, try closing the door. If the decorative part rests on the base, it means there was an error in the calculations. In this case, you can make a gap in the base as thick as the facade.
You can attach a decorative panel to Hansa and Miele appliances yourself.
Adjust the mechanism: tighten the bolt that secures the tension cable. Since the door is hinged, it should close easily with a gentle push of your fingers.
The video will help you make the correct hanging:
How to select and calculate the size of the façade for a built-in dishwasher
The dimensions of the facade for the dishwasher are selected according to the dimensions of the equipment.
The standard panel size is:
- width - 45 or 60 cm;
- height - 82 cm.
There are also more compact options with a height of 60 and even 50 cm. Please note that some manufacturers may “round off” the width of the equipment. For example, instead of 50.2 cm, simply indicate 50 cm. Therefore, before purchasing a cabinet with a front, be sure to measure the car yourself.
After all, if you purchase a facade of the wrong dimensions, it will no longer be possible to cut it or adjust it to the size of the equipment. If you try to do this, the integrity of the decorative coating of the panels will be compromised.
The height of the facade should be slightly larger than the car door. The thickness of the products ranges from 1.6 to 2 cm.
Types of materials and decor of furniture facades for a dishwasher
Various materials are used to produce dishwasher fronts.
Basically it is MDF. Since it is he who is able to withstand temperature changes and high humidity that occur during operation of the equipment. In addition, they are safe and do not contain substances harmful to human health.
Natural wood is rarely used in the production of furniture for a built-in dishwasher, since it is a very expensive material that requires a high-quality top covering.
If you want to save money, you can purchase a facade made of chipboard - it will cost the least. But keep in mind that if the integrity of the protective layer is damaged, the product will quickly lose its shape. In addition, when heated, it will release toxic fumes.
To give the structure the desired color and texture, a decorative coating is used. Modern solutions make it possible to disguise a dishwasher in such a way that it will be impossible to understand that behind the façade there is hidden equipment and not an ordinary cabinet.
The facade for a built-in dishwasher can be finished with the following materials:
- enamel coating;
- plastic;
- glass;
- metal;
- veneer (thin layer of wood).
Possible errors and problems
There are several possible problems that people may encounter during the installation of façade panels. These include the following:
- Choosing the wrong façade. Some people initially choose the wrong panel, which is not suitable for the dishwasher. In this case, you will have to independently adjust the dimensions for the dishwasher or buy a new façade.
- Incorrect marking of mounting holes. There are times when people make mistakes in the process of marking places for future fastenings. This causes the dishwasher door with the panel attached to be difficult to open and close.
What characteristics should you pay attention to when purchasing?
First you need to decide which model you want to purchase. There are two types:
- fully built-in dishwashers, the control panel of which is completely hidden;
- partially built-in.
Among the latter, there are devices that are not installed in a finished kitchen, but are intended to be placed next to other furniture. One of the most important characteristics is the width of the dishwasher. If a large number of people live in the house, then you should purchase a device whose capacity is equal to 12 sets of dishes. In cases where capacity is not of great importance, models designed for 9 sets are purchased. There are also machines for 6 sets of dishes.