How to attach fronts to drawers
A kitchen set assembled with your own hands, and this is not so difficult to do, requires the installation of handles on the kitchen facades. It would seem that there is nothing complicated here, drill holes and screw the fittings onto the screws.
But, as practice shows, very often screwed handles begin to interfere with the full opening of furniture doors, this is especially noticeable on corner facades, or blocking of neighboring cabinets or cabinets occurs.
Therefore, before installing the handles, you need to try them on.
By the way, it should be noted that handles in the form of rails or brackets can be positioned in different ways: all horizontally, all vertically, or combine the installation. So, if you are ready to install handles yourself, then prepare the following tools:
- Drill with a drill 4 or 5 mm in diameter.
- Pencil and ruler (wooden or metal).
- Square.
- Screwdriver.
Calculation of markings for handles
It will be very convenient if you first make a template from cardboard with precisely drilled holes for fastening. That is, by applying it to the facades of the kitchen set, you can avoid long operations associated with setting the fit dimensions of each handle.
Setting dimensions and drilling the façade
Let's start by installing handles on the doors of the kitchen unit.
- The door is placed on a flat surface, let it be a table.
- In the corner where it is necessary to install the handle itself, a distance of 5 cm is set aside from one and the second edges.
- Two mutually perpendicular lines are drawn through the points. Their intersection point is the place of the first fastener. In order for the lines to turn out to be mutually perpendicular, it is necessary to use a square to draw them, applying it to the edges of the door.
- Now you need to accurately measure the distance between the mounting holes on the handle itself.
- This value is transferred to the door from the point of intersection of the two lines. If the fitting element will be installed vertically, then the displacement must be carried out downwards, if horizontally, then to the side. The second location for fastening the fittings is indicated. In this way, the exact location of the handles on the facades is determined.
- Now we need to drill. This operation is performed from the front side of the facade. The thing is that when the drill comes out of the material, it may delaminate and chips may appear along the edges. And although they will be closed with the fittings themselves, there is always the possibility of a large chip or crack appearing. Of course, this all depends on the quality of the material used and the sharpness of the drill used. Therefore, when drilling, be careful and carry out this operation carefully.
- So, two mounting holes are drilled, now you need to insert two mounting screws from the back side. Install the handle on the front side and attach it to the facade, screwing in the screws with a screwdriver. If it is not pressed tightly against the door and is loose, then you will have to remove it, put washers under the heads of the screws, and put the fastening back on.
Installation and adjustment of drawer fronts
So, the first thing we will do is insert our drawers without fronts inside the cabinet. And now a very interesting and quite responsible part of the work begins. We need to align and evenly secure the fronts on the drawers. In general, when calculating facades, I always make the distances between them 2mm.
This is enough to, as they say, “get to size”, and “in case something happens” there is a small margin for maneuver.
Another convenient point when installing facades between which there is a 2mm gap is that you can simply put a 2mm thick PVC edge between the upper and lower facades and be sure that the gap is “caught”.
However, life is an unpredictable thing, and the life of a furniture maker is generally unpredictable chaos, depending on many external factors. Well, let's say you calculated all the gaps between the facades at the rate of 2 mm. And the sawyer Vasya took it, and missed a bit, and made your facades 1mm lower. As a result, at each joint you have a 1mm lack of façade height. Well, your lower façade may not end up looking particularly beautiful.
Therefore, no matter what, before you start installing the facades, you need to carefully measure everything and make sure that at the time of installing the facades you have a gap of 2 mm - this is exactly the gap that you need. If the sawyer Vasya did “take down” 1mm, then, probably, you need to make a gap between the facades of 3mm or take a baseball bat and go to Vasily’s house, well, invite him to play baseball or somehow otherwise agree with him that he remade the facades. Although, as for me, 3mm is not critical. The main thing is that everything is beautiful, uniform and organic.
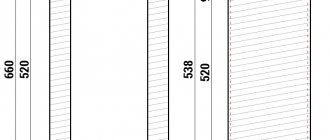
So, you have measured everything and determined that your distance between the facades will be 2.7 mm. How to do it? Yes, very simple. We measure the internal space for the facades. Ours is 500mm. Then we measure the height of all facades. In our case, the total height of all facades is: 164mm*3=492mm. We have a difference: 8mm. We have three junctions. It turns out that each joint accounts for 2.7 mm. It turns out that simply adding a 2mm edge won’t work, but we can still take it as a guide.
How to attach fronts to drawers
Now we need to set (adjust) the facades. But first, we need to figure out how exactly we will attach these facades to the drawer. The most popular and widespread method of fastening facades is to fix them with 3-4 screws measuring 3.5x30mm. Or as furniture makers say: “Put it in the thirties.” Which in translation means: “Fix with screws 30mm long.”
Why exactly “thirty”? Well, everything is simple here too. Our chipboard thickness is 16mm. “Thirty” goes right through the front wall - this is already 16mm for us and crashes into the facade, which has the same thickness, and stops 2mm from its front side. As a result, we have a rigid fixation of the facade, as well as an aesthetic appearance of the product. However, I want to warn you that facades are different.
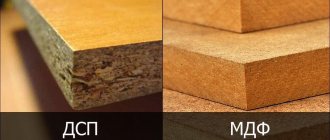
For example, facades made of milled MDF panels are not 16mm thick over their entire area. Here you need to carefully calculate the places where the facades are attached and make sure that it is in these places that your screw will not get into the thin area of the facade and will not come out from its front side. Well, if your drawer fronts have a uniform thickness over the entire area, then don’t bother too much with calculating where to fix the front.
Because no matter where you screw them, you still have no risk of ruining the facade by screwing it through with a screw.
In general, having decided on the places to drill holes for the “thirty”, we take a drill in our hands, load a drill with a diameter of 2 mm into it and drill through holes for 3.5x30 mm screws in the front wall of the drawer. Then we take a screwdriver and screw in the screws so that their tips do not stick out from behind the front wall and do not interfere with further installation of the drawer fronts.
Let's start installing drawer fronts
There are many ways to install drawer fronts. Furniture makers came up with them not because they have nothing else to do, but because there are situations when something is not available in production, and then they have to be sophisticated in solving this or that problem. After all, the work still needs to be done. I will tell you about the simplest and most convenient way to install a drawer front. After all, you have nowhere to rush, and if you don’t have something in stock, you can always safely go to the market or hardware store and buy it. After all, the main thing for us is quality. Right?
Necessary tool for installing a furniture façade
To quickly install a facade, you will need a certain set of tools and materials, which almost every owner has:
- Screwdriver;
- Screws 4x30 mm;
- Clamp;
- Double-sided tape;
- A feeler gauge to determine the size of the gaps between facades.
Before installing the facades, the entire structure must be assembled and the drawers inserted into the chest of drawers. It is important that the product stands on a flat surface to avoid errors during installation.
First you need to take and cut several strips of double-sided tape, and then stick them on the ends of all the boxes. To do this we need to do the following:
- Double-sided tape
- Adhesive tape to the ends
After gluing, you can remove the protective films from the tapes, and actually “install” the facade in a trial mode, leaning it against the structure of the chest of drawers. The facade needs to be glued in a perfectly level position, so it needs to be leveled. For a chest of drawers, it is best to make mortise handles so that they fit perfectly into the design of the facade; you can also read the article on kitchen handles, and if you need a handle for the kitchen, after reading the article you will make the right choice.
To create a horizontal gap between the facades (everyone chooses their own size at the detailing stage), it will be convenient to use a feeler gauge. If you do not have this device at hand, then any solid object of a given gap thickness will do.
The most important thing in installation is the successful and smooth installation of the first product. After this, the process will go much faster, almost automatically.
Idea: When assembling a wardrobe, you can safely use drawers.
After “gluing” the facade, it needs to be fixed with something so that it does not “move” when screwing in the screws. For example - a clamp. After you have fixed the products, you need to screw in the screws (from the inside). Step – 15-20 cm.
- Fixing the facade with a clamp
- Fastening facades to drawers with screws
Then we take and apply the feeler gauge (create a gap) and install the facades one by one, according to the algorithm described above.
Apply a feeler gauge to determine the gap
Using a feeler gauge, you can achieve high accuracy in creating a gap, but to align the sides of the façade, you need to rely on good eyesight and straight hands. To increase accuracy, you can use a flat vertical bar.
As for the possible gap between the front and the drawer due to the tape, if you tighten the screws properly, it should not occur.
Attaching the facades
That, in general, is the whole process. Fast, simple and without loss of quality. The edge is glued, the facade is installed. Good luck in your future work.
How to attach facades – Installing furniture facades on drawers – a little trick
Hello, friends!
We have already discussed with you how modules with drawers are designed and how to correctly calculate their position in the boxes.
But, in my opinion, there is another serious question on this topic - how to properly hang facades on them.
I have come across guides on this issue on the “net” more than once, and each time I was slightly surprised, to say the least.
Some teach that in order to do this, you need to screw self-tapping screws into the front side of the box.
Then, placing the façade against the frame, cover it with these self-tapping screws.
This will be the marking.
Regarding this method, you can give a lot of arguments “against”, but I will give two - the fronts need to be attached to the boxes only when the box itself is set diagonally (accordingly, it already has a back wall).
But, if the back wall is packed onto the box, then it will not be possible to push the drawer so that it hits the facade with self-tapping screws.
Even if the module has a stiffening rib instead of a back wall, there will also be a certain inconvenience - you need to clearly fix the facade in the desired position.
At the slightest shift, the procedure will need to be repeated.
And in this case, it will be quite difficult to determine which of the tiny dents left by the screws is working...
The second, fairly common “option” is when everyone does this using double-sided tape.
Here the problem is approximately the same as in the first case.
In a word, all these methods are not successful.
I'll show you how all this can be done as accurately and quite quickly as possible.
But first, the following conditions must be met:
- The box must be aligned diagonally (must be geometrically correct).
- The drawer located in it must also have the correct geometry.
Along the front edge, holes are drilled in it.
Their number depends on the size and weight of the facades being installed.
If they are small, then there can be three holes, and if they are large, then four (do not forget that if a handle is planned on the facade, then it will also serve as a fastener).
We measure the position of one of the holes made on the box relative to the entire module (with the necessary indents), and transfer these coordinates to the docking side of the facade, marking them with an awl.
The point is that we need to align everything with respect to one self-tapping screw, and then tighten all the others.
The coordinates of the hole for the second facade are measured relative to the first, and so on.
When installing, the main thing is to maintain the verticals along their side edges (sometimes this is done even due to the fact that there is a slight distortion along the horizontals, since nothing is perfect, and boxes, no matter how you assemble or display them, sometimes still turn out slightly skewed (sometimes this is even facilitated by the curvature of the slab from which they are made).
And finally, install the handles:
This is not a complicated scheme, so use it.
It is also worth adding that the method in question is good in the case when there is no access to the inside of the drawer from the outside, or when the box has an upper horizon.
In the case where there are body strips on top of the box, all this can be done even easier.
It lies on the back wall, the fronts are laid out and exposed on it, and simply secured from the inside one by one.
You can read about the nuances when installing frame MDF here, and if you are still interested in interesting options, look here.
That's all.
See you.
www.sdmeb.ru
how to make, instructions with photos
Today I will tell you about one modification of the method of attaching fronts to drawers. I was recently refinishing a kitchenette for a good old lady (it was necessary to install drawers in an unused niche for a washing machine). And then a misfortune happened - I didn’t take countersunk head screws for installation, which are recessed flush with the back surface of the facade and do not interfere with attracting it to the front part of the drawer. In general, I had to figure out how I did it and how my story will go.
So, traditionally, all the boxes were marked, seated and installed first. The drawers sit on simple ball guides.
Considering that the facades had to be mounted vertically (I didn’t have the opportunity to put the box “on my back”), as usual, I used double-sided foam tape. We glue it into strips 3-4 centimeters long and cut it with a stationery knife.
On each box you get two strips of tape - this is quite enough. We drill mounting holes in the front of the drawer (for mounting the fronts). With this method, a pair is enough, since two more screws will be replaced with screws from the handle itself.
We proceed directly to the marking of the facades themselves. Using a tape measure, we find the center of each facade and mark it with a simple pencil.
To simplify the markings, I used the conductor of the Cheron company. It is applied to a given risk. After that, with a pencil we simply mark a couple of points according to the center-to-center distance of your handles.
A couple more marking points appear on the façade.
We lay the facades on a rigid substrate and use a 4 (or 5) millimeter drill to drill through holes. Here it is quite important to keep the drill as perpendicular to the surface of the part as possible. At this point, the work with the facades can be considered complete. We proceed directly to their installation.
Peel off the protective layer from the tape.
We align and glue the first facade onto this tape.
After that, in the holes drilled for the handles, using the same drill, we drill through holes in the front part of the drawer itself.
From the inside, these holes are expanded with a 10 mm drill - under the head of the mounting screw. To a depth of 10-12 mm. It is very important to use a drill stop at this stage. Otherwise, it is very easy to fall deeper than necessary.
Then we put screws in the resulting holes, check that they protrude 3 millimeters from the outside of the facade, and screw the handle with them.
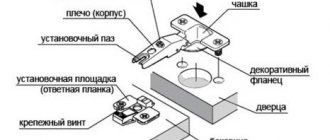
Installation of furniture facade
Installing a front for a box made of chipboard (which, for some reason, hardware manufacturers call “wooden”) is not as simple a task as it might seem at first, inexperienced glance.
And this problem occurs often: roller guides, “telescopes”, hidden mounting guides, etc.
As a rule, our furniture makers use one of two installation methods:
- The first method is “tattoos”. Self-tapping screws are used as “tattoos”, previously screwed into the drawer panel right through (plus 3-5mm).
- The second method is double-sided tape. The facade is first glued and then secured.
Both methods are labor-intensive and require highly qualified furniture assemblers. But even with high qualifications, it is not always possible and not for everyone to clearly set the facades with a gap of 1 mm. At best - 2mm, or (as it turns out) 3-4mm.
The presence of special fittings, such as “facade eccentric” (for example, Blum) does not work.
How do our European colleagues solve this problem? Firstly, it is necessary to take into account that the average skill level of their assembler is much lower than our statistical average. Forcing him to display facades “on tattoos” for some “pathetic” 3000-4000 € per month is unrealistic. Paying twice as much is not profitable. Everything is designed for medium and low skilled workers. Even the hinges are only for quick installation and with eccentric adjustment. So that, God forbid, the collector does not spoil anything...
And installing a facade “with tattoos” or “with tape” is already “higher mathematics”. For example, in kitchens, only guides with the ability to adjust the facade are used: “tandemboxes” or “metaboxes”.
Guides for “wooden” drawers are used only in furniture where clearly aligned fronts are not required. For example, wardrobe drawers. Just not in kitchens. Although hidden guides are cheaper than tandem boxes and no worse.
With the exception of façade installation.
The latest trend from “fitters” is 3D facade adjustment for hidden guides. The option, designed for low-skilled assemblers, is designed with only one purpose - to attract kitchen manufacturers.
But this is how it is in Europe. In America it's different. Their furniture makers are very fond of hidden and telescopic guides.
Actually, American furniture is a different story. A completely isolated market with its own concepts about the correct technology for making furniture. Perhaps in the near future we will prepare a series of publications about the specific differences between American furniture.
In short, “American exceptionalism” is to blame for everything. If here, thanks to Mikhail Zadornov, Americans are considered stupid, then in America, you won’t believe it,
Europeans are considered “stupid”.
They, poor people, can’t come up with anything good. Especially in technology or furniture. All the best things are invented and produced only in America.
Many American furniture makers, using Salice or Blum fittings, do not even realize that the first is Italian, and the second is Austrian. The inscription “made in USA” is misleading (the above brands have their own factories in the USA).
However, let's return to our facades. The salary of an American assembler is no lower (and sometimes higher) than a European one. And making him suffer with tattoos and tape is not economically profitable. The solution to this problem is a special device.
For all operations that require at least some hint of qualification, special devices are developed to make the “life” of the assembler easier. Some devices make us smile (like the $800 dowel machine), while others make us want to take our hats off.
The device we are considering in this article belongs to the second category. Everything is quite convenient and simple. Developed by Rockler (USA). We will not describe the operating principle. Everything is clear from the pictures and videos.
A similar device, but without an adjustable horizontal stop, is also offered by Tork Craft (South Africa).
As we can see, the American adaptation is cooler...
This device is inexpensive - $40. Even our thrifty furniture makers can afford it. Unfortunately, as far as I know, this hardware is not available in the CIS. Only coal is transported to Ukraine from South Africa. From America to Russia? I'm sure this device is probably under sanctions. However, I don’t see any particular problems - you can do it yourself.
As for another task: installing a furniture handle, for the domestic furniture maker this is “not a problem.” However, let's look at another device from Rockler. Perhaps it will be useful to someone.
Copyright © 2021. Copying materials is permitted only if you provide a working link to this article or the website https://www.fdforp.com