What is a book table
The design features are that the tabletop consists of two or three parts, which are mounted on butterfly-type curtains. If a table is not used, the side parts of the tabletop are positioned perpendicular to the floor.
But if necessary, the tabletop unfolds and rests on additional legs. In this case, the area of the tabletop increases several times.
Table assembly
When cutting out the bars, make sure that they are all even and of the same shape. Sand them thoroughly to remove chips, bumps and splinters. It is best to coat them with varnish before assembly, providing protective functions. The countertop also requires some preparation. If you are using an old board, you should clean it well and then use the same varnish. But. in general, plywood with an average thickness of 2 centimeters is quite suitable for this role.
When making a book table, be sure to use a drawing. Even small discrepancies can affect the strength of the final structure, and gradually becoming looser, it will serve you for a much shorter period of time.
To avoid the need for updating, use a tape measure and a building level in your work, and also tighten all screws tightly and additionally coat the joints with glue.
Types and features of tables
There are a variety of models:
- With one side part of the tabletop or with two;
- With and without a bedside table in the central part, from which drawers extend;
- With a different number of additional legs;
- With or without wheels;
- Equipped with folding chairs.
Book tables can have modest dimensions even when unfolded.
Tables differ in the material they are made of, in the quality of the fittings, and in the shape of the table top, which can be either rectangular or with rounded corners. Each person has his own idea of what kind of table-book he needs.
There are many types of book tables available on the market.
If the models available in stores do not meet the requirements or are made of low-quality material, or the assembly leaves much to be desired, you can always read the instructions on how to assemble a table book and make the furniture yourself.
Detailing and components
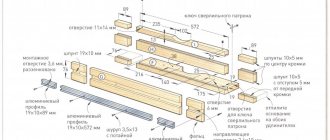
Let's look at how to make a book table with your own hands using the example of a table made of chipboard without internal filling, with 2 pairs of legs on wheels, made in the form of narrow boxes.
A 16 mm thick chipboard sheet is sawn into the following parts:
- Table top wings – 2 pcs., 800x600 mm.
- The central part of the tabletop is 1 piece, 800x250 mm.
- Sidewalls (central supports) – 2 pcs., 724x250 mm.
- Central stiffeners – 3 pcs., 708x210 mm.
- Vertical strips (racks) of leg boxes – 8 pcs., 644x60.
- Horizontal (overhead) strips for leg boxes – 8 pcs., 340x60 mm.
- Stiffening ribs for leg boxes – 4 pcs., 308x110mm.
Experts recommend using thick metal butterfly hinges instead of traditional piano hinges; they are more rigid and reliable. It is more convenient to make the legs on wheels only if you implement your project, carry out drawings and detailing yourself, do not forget to take into account the height of the wheels when calculating the height of the legs.
You will also need:
- butterfly loops 45 mm long – 18 pcs.;
- corners – 4 pcs.;
- linear caster wheels 29 mm high – 8 pcs.;
- clamps (holders) for the upper wheels of the legs – 4 pcs.;
- adjustable supports or thrust bearings – 4 pcs.;
- self-tapping screws 4x16 - 100 pcs., confirmations 75x5 and plugs for them in the color of the chipboard - 45 pcs.;
- edge for sealing open cuts of laminated chipboard - about 30 m.
After cutting, the parts are edged.
Instead of the usual flat edge, you can run an edge profile along the edge of the tabletop.
How to make a book-table with your own hands
There are several stages of work:
- Design;
- Selection of materials and tools;
- Creation of all details;
- Assembly;
- Decor.
You definitely need to understand exactly what kind of furniture you want to get started.
First draw what kind of table you want.
You can draw the table itself before making the drawing, this will simplify the task.
Attention! Many book table sizes are standard. For example, it is impossible to make the side parts of the tabletop very large; this will affect the height of the table and it will not be very comfortable to sit at it. This must be taken into account when creating a diagram.
Calculation, diagram and drawing
The standard dimensions for a table of this type are 80 cm wide; the central tabletop can be of different sizes, but most often the dimensions are 25x80 cm. This is due to the fact that the book-table often has to be moved, so it should not be very heavy.
The drawing will help you make a table faster.
When assembling a table yourself, additional stiffening ribs are usually provided on additional legs. Many people are tempted to add extra legs on wheels, or even put the entire table on wheels. But this is not a very practical solution.
You can make a book-table yourself without having any special skills.
The fact is that it is indeed easier to move such a table, but it will also be less stable during use. Therefore, it is better to supplement the legs not with wheels, but with rubber or felt pads.
When designing a table, it is important to remember that a rectangular tabletop will look neater when the table is folded, and rounded corners will protect from injuries when the model is unfolded; this is very important, because the transformer is rarely in the unfolded state, which means that the owners of the house and their guests are out of habit will be injured on the corners.
A book table is a portable compact piece of furniture.
Each master can make a specific drawing himself, and it may differ depending on minor differences in the furniture.
Tools and materials
For work we will need:
- Chipboard sheet;
- Pencil;
- Ruler;
- Edge;
- Butterfly loops;
- Screws;
- Screwdriver;
- Sandpaper;
- Hammer;
- Bars;
- Metal corners for attaching the central tabletop to the base;
- File or jigsaw.
Tools and materials that you may need when carrying out restoration work on chairs.
This list may differ, for example, if you want to make a table on wheels.
Attention! Don't skimp on butterfly hinges. Install 4 small curtains or one long curtain for the entire length of the connection to secure the side table top. If there are fewer fasteners, the table will last less, because the weight of the tabletop, distributed over a small number of screws, will lead to rapid breakage of the furniture.
Materials and tools
To make such a model of a table-book, you need to cut the following blanks from laminated chipboard and fiberboard according to the specified dimensions: In addition, to make the table you will need:
You will also need the following tools:
- pencil, tape measure; Phillips screwdriver or screwdriver; hex wrench (4 mm); jigsaw; hammer.
Please note: Laminated particle boards are difficult to cut at home. You can draw up a cutting diagram and go to a workshop where specialists will cut out the table parts.
Manufacturing process
Assembling the product is quite simple if you have the slightest skills and high-quality tools. First you need to construct a base of beams. This will be the box itself and the side legs with additional retractable hinged legs.
However, before proceeding directly to manufacturing, it is worth thinking through everything to the smallest detail.
It is advisable to provide stiffening ribs in the middle on the additional legs and on the base box. At the first stage, it is too early to install the side legs on the hinges; you just need to process all the details for their spectacular appearance. All structures need to be sanded, varnished and set aside while the master works on the upper part.
Perform all actions very carefully.
We cut out the tabletop blanks. We decorate them with a piping and install the central part on the base. After this, we turn the workpiece upside down so that the three component surfaces lie side by side and form an even sheet. In this position, the tabletop elements are connected with hinges.
The simplest one consists of a central part, a tabletop - one or two, and legs.
Only after this, without turning the table over to its natural position, do you need to install additional legs. Make sure that they fit tightly to the tabletop; the slightest miscalculation will result in the table surface being uneven when unfolded.
Option #3. DIY wall table
Let's look at an example of how to make a small wall-mounted folding table. It will be useful in the country house, in the garage, in a small kitchen.
Step 1. In order to make a folding folding table, you will need wooden blanks, door and piano hinges. In this case, plywood is also used for the tabletop.
The table top will be made of plywood
Step 2. First you need to decide on the size of the tabletop and make markings on the blanks.
Marking is being applied
Step 3. Then you need to saw off a piece of plywood - the future tabletop - along the marked mark.
Cutting plywood
The future tabletop is being trimmed
Step 4. Next, the surface of the countertop needs to be sanded.
Sanding the table top
Step 5. After this, you need to make blanks for supports under the tabletop. Each of them will have three parts.
Blanks for supports are made
The supports consist of three parts
Step 6. The support parts need to be connected to each other using self-tapping screws and corners.
Support parts are connected
Step 7. In the selected location near the wall, you need to attach the tabletop supports at the same height. They must turn, so they need to be secured using piano hinges. A wooden block is attached above them, to which the tabletop itself must then be attached.
Supports are fixed to the wall
The supports must turn
Step 8. The tabletop is attached to the block using hinges. The table is ready. You can see how it looks when folded in the photographs. If desired, the table can be varnished or painted.
Countertop installed
Folded wall table
Where to put such a table
The advantage of a do-it-yourself table-book based on drawings and diagrams that a person created himself is that you can make furniture to suit any interior. Some people install such furniture in the nursery so that the children have a place to play, but it is enough to lay out the table to create a surface on which the children can both draw, assemble puzzles, and learn their homework.
A table in the living room will allow you to receive guests at any time, and quite a lot. Such furniture is in demand both in offices and stores.
This type of furniture is perfect for studios, lofts and just small apartments.
A folded table-book can be used in the interior as a coffee table, and it can be installed either directly against the wall or in the center of the room or near a window.
A table assembled by yourself will last longer than a budget model, which is comparable in price to this product. Therefore, go for it - and you will enjoy the fruits of your hands for many years and be proud of the result.
Dining table book: original design with pipe legs
Standard kitchen tables are inconvenient in a small space, so a book table with folding tops is the ideal solution. Of course, you can buy a ready-made table or get creative and make your own folding table . Thus, when guests come to you and begin to admire how good the book table is , you can casually mention that you made the book table with your own hands .
The instructions can be read on the website, the master class is below in the photo. If necessary, you can adjust the height by screwing the pipes tighter or looser. You should also glue felt pads under all the legs to avoid damaging the floor. An ideal solution for a small kitchen. Photo source: www.smallspacedesigner.com/diy-drop-leaf-table/