Stools with three or four legs, attached to a hard or soft seat using threaded metal axles through a metal frame or curved metal plates, have become widespread. Usually, to make the stool more stable, the legs are installed at an angle, which leads to uneven load on the threads, the legs unscrew, the threads deteriorate, and they begin to wobble and fall out. To avoid damage to the threads, if any weakness is detected in the fastening of the legs, they must be tightened in a timely manner.
When beautiful kitchen fronts became available, I replaced all the doors and drawer fronts with modern MDF ones. The color changed and Soviet-made stools with rectangular seats the color of blue sky and dark legs began to stand out, introducing disharmony into the kitchen design. I decided not to buy new stools, but to remake the old ones; fortunately, the old kitchen façade still had doors in good condition made of laminated chipboard in a suitable color.
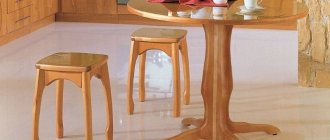
According to the shape of the seat, the stools could be made round or rectangular, with right corners or rounded. The choice fell on square-shaped seats with rounded corners. It is more comfortable to sit on stools with seats of this shape, they are easier to manufacture, the corners do not damage the walls and doors of kitchen cabinets when they touch, and it is easier to cover the ends of the seats with furniture edges.
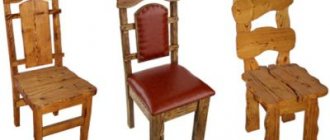
Interesting stool with broken legs
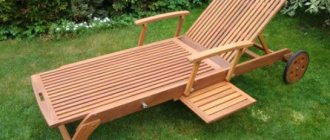
Hello to all those who love to work with wood, today we will look at how to make an interesting stool. If you don’t look closely, from afar it seems as if the stool is floating in space and has no pieces of legs. The author managed to do this trick using epoxy resin. The homemade product looks interesting, but there are some doubts about the strength of the structure. Of course, the strength of the legs will largely depend on the strength of the epoxy resin, it must be as strong as possible. Overall the project is not difficult, but you will need a lathe, circular saw and other machines. If the project interests you, I suggest you study it in more detail! Materials and tools used by the author:List of materials:
- thick boards of durable wood (or beams);
- boards for sitting; — chipboard; - silicone sealant; — epoxy resin (crystal transparent); - wood oil; - wood glue. List of tools:
- circular saw; — band cutting machine; - Miter saw; - drill, screwdriver; — milling machine; — thickness planer; — orbital sander and polishing machine. Stool making process:
Step one. Blanks for legs
The legs will need strong beams; the author didn’t have any, so he decided to cut them himself. The starting material was a thick board, which the author tried to break into two parts. The board turned out to be very strong, the author even tried to run over it with a car. As a result, the board was cut into beams and only then the author managed to barely break individual beams. The idea is to get natural ragged edges, like the legs are broken.
To be able to pour the resin, we make formwork for it; the author used chipboard as the material. We twist the formwork with self-tapping screws and seal the joints with silicone sealant. Additionally, film can be placed in the formwork. We place blanks for the legs into the formwork and fill them with epoxy resin. As for the resin, it should be durable and crystal clear, then everything will look more interesting. The transparency of the resin will be affected by air bubbles, which are best removed with a hairdryer or by heating the resin.
Step three. seat
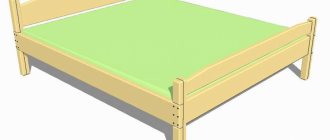
While the resin hardens, we will make a seat for the stool; we also make it from bars or pieces of boards. We glue the beams together with wood glue; for reliability, you can use dowels. To make everything look more interesting, you can glue together different types and colors of wood. When the glue dries, cut off the excess using a band cutter to make a circle. We process the edges on a milling machine and carefully grind the workpiece to a perfectly smooth state.
Step four. Finalizing the legs
We disassemble the formwork with the legs filled with resin and cut them again on a circular saw. The author broke one leg due to careless handling; as a result, it was glued together using quick-drying epoxy glue.
Next, each leg is carefully processed on a lathe and carefully polished to a perfectly smooth state. Epoxy resin must be polished to become clear again, but even after polishing, the resin will not be 100% clear. To restore the crystal transparency of the resin, it needs to be coated with varnish, oil, etc., but this will be done at the end.
Step five. Mounting unit and assembly
We make a fastening unit so that the legs can be securely screwed to the seat; for this you will need bars or thick, strong boards. The finished parts can be glued to the seat, but it is better to use glue with screws.
Well, then we finalize the legs and screw them with screws and glue to the seat. To prevent screws and holes from being visible, the author uses wooden plugs.
Step six. Final touches
Finally, we align the legs in length if the stool is crooked or wobbly. That's all, now we coat the stool with oil, thanks to which we will highlight the real beauty of the wood. The oil will also help the resin become even more transparent.
That's all, now the homemade product is ready, the stool looks great. Using a similar technique, you can make an interesting levitating table. This is the end of the project, I hope you liked the homemade product and found useful thoughts for yourself. Good luck and creative inspiration if you decide to do this again. Don't forget to share your ideas and crafts with us!
SourceBecome the author of the site, publish your own articles, descriptions of homemade products and pay for the text. Read more here.
Repair of stool leg fastenings
Before moving the legs from the old stool, you need to check the reliability of the legs, depending on the fastening design, to the mounting frame or slats. If, when screwing the stool leg until the thread stops, it continues to turn, then you can try to restore the rigidity of the fixation by winding a thick thread or flax fiber onto the thread, which plumbers use when threading metal pipes.
If you cannot firmly fix the leg in the mount using thread sealing with thread or flax, it means that the thread is completely damaged and the stool mount needs to be repaired.
Repairing the stool fastening can be done in two ways, using a stud with an M10 metric thread and a nut, or using an M10 bolt instead of a threaded stud. The final result of the repair will be the same and which method to use depends on the presence of nuts or bolts.
Fastening the stool leg with a nut or bolt
Depending on the hardness of the materials from which the stud and fastening strip are made, the threads may be damaged either on the stud or in the strip and this can be easily determined visually. If the thread is damaged in the bar, but is in good condition on the stud, then simply unscrew the stud from the stool leg by 10 mm, insert it into the fastening bar and screw the nut onto the stud.
You need to unscrew the stud using pliers, placing a piece of leather between their jaws and the thread of the stud so as not to damage the thread. If you can’t unscrew the pin from the leg with pliers, then you need to make edges for an open-end wrench on opposite sides at a distance of a few millimeters from the end of the pin, or, by holding it in the pin in a vice, unscrew it.
If the thread on the hairpin is completely damaged, you can unscrew it from the leg and screw the damaged end back into the leg. Thus, the thread at the fastening point will be new again, and if the thread in the fastening strip is still good, then it will be possible to do without fastening with a nut.
If, when repairing a stool using an old pin, it was not possible to securely fasten the legs, then you can fasten the leg to the seat of the stool using a bolt.
The thread in the stool leg is metric M10. Therefore, it is enough to tighten a bolt about 80 mm long instead of a stud. Thanks to the presence of a hex head, the bolt can be easily tightened with an open-end wrench with the required force.
After repairing the fastening elements of the stool legs, you can begin installing them on the new seat that was made. Usually, when removing the fastening elements of the stool legs from the old seat, the screw slots deteriorate, and often the screws themselves are covered with rust. It is better to replace them with new modern self-tapping screws 12 mm long. Before screwing them in, it is advisable to drill out the places where the screws are screwed in to the depth of its length with a drill diameter equal to half the diameter of the screw. Then, when screwing, a bump will not form around the screw, and the fastening strips of the legs will fit snugly to the plane of the seat.
The gap between the mounting strip of the legs and the seat of the stool is usually small and you will need to make a hole in the seat for the heads of bolts or nuts. The sample can be drilled using an electric drill with a perk-type drill. But be careful not to drill through the seat. If you don't have a drill, this job can be done with a chisel.
Repairing a cracked stool leg
After modernization, the stools served for more than 10 years, and suddenly I discovered that the leg of one of them began to sway.
When analyzing the cause, it turned out that the wooden leg had cracked at the thickened part along its length. As a result, the pin was not firmly fixed in the leg.
The hairpin was about eight centimeters long, the leg had a crack on only one side, and therefore in this case the easiest way to repair the stool was with epoxy resin.
Five milliliters of epoxy resin was prepared in a plastic bottle cap. Epoxy resin hardens within a few hours, so you can work without haste.
Next, all the prepared epoxy resin was poured into the threaded hole of the cracked wooden stool leg. The resin is quite thick, so I had to help it flow off with the flat blade of a screwdriver.
Now all that remains is to screw the leg onto the hairpin. At the base, the stud also needs to be lubricated with epoxy resin. A day later, a check showed that the leg was firmly held on the pin, and I hope it will last for many more years after repair.