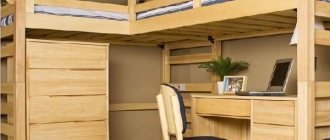
Assembly
Log table with dimensions
- Let's mark the prepared log for sawing. After that, using a chainsaw, we will divide it into the necessary parts. You can do this yourself or hire a sawmill. The services of professionals will cost a certain amount, but the likelihood of damaging the log will be reduced.
- Carefully cut the logs for the tabletop lengthwise. Make sure the cut is even. The halves of the logs will be positioned with a flat surface up, so they form the table top. Longitudinal sawing of logs
- After sawing, clean the resulting parts from the bark. This can be done with an ax or chisel and hammer. Carefully cut away the bark, being careful not to damage the surface of the log.
- If necessary, cleaned logs are processed with a grinding machine. This way you can achieve a smooth surface and hide wood defects.
- Putting the details together. We cut out a round groove for each log, on which another will lie on top. Try to adjust the size of the groove to the part as much as possible, this way you will achieve greater stability. Log fastening
- We connect the folded logs with self-tapping screws. To do this, we make a hole 15 centimeters deep in the top log. Then we place a self-tapping screw in the hole and tighten it with a screwdriver. We connect all the logs in series.
- We fix the table cover on the resulting stands. This is done using the same screws. For beauty, you can disguise the screw caps with metal caps. Metal decorative caps
- We thoroughly impregnate the finished table with a protective composition. Apply three to four coats to best preserve the wood. The drying time of the impregnation is eighteen hours, after which a layer of varnish can be applied. Do-it-yourself log table for a summer house
Preparation
- First of all, you need to prepare a drawing, which will indicate the parameters of the component parts. If you are going to align the logs used on one side, then you need to make a three-dimensional diagram. You can choose the size of the table, as well as the shape of the tabletop, but maintain the proportions to make the table strong and stable. Your diagrams and drawings may be formatted like the ones below.
- Prepare the logs. Check the amount of work material with your plans. If there are not enough logs, you will have to:
- limit yourself to a simpler option - make a table on log legs;
- do not abandon the idea, but purchase additional material.
- Remove the bark from the logs using a hammer and chisel.
- Process the cleaned material with a plane. On the lower parts of the trunks, remove a small layer of wood, making the contact surface smooth. This way the logs can be stacked one on top of the other. The cutting width should be at least 4-5 cm. Using another method of laying - “in a bowl” - requires more labor. A semicircular depression is cut into each upper log. Then the top log is laid on top of the bottom one. In both the first and second cases, additional fixation with screws, dowels or fittings will be required.
- Give the base parts a neat shape at the ends. To do this, cut the edges of the lower and upper logs at 45 degrees. Continue this bend along the trunks towards the center, making the intermediate elements shorter. The shortest one will be the central log.
- Be sure to sand the sharp edges to make the elements of the future table safe.
- Proceed to preparing the holes for the reinforcement. In the log that will be located below, it is enough to drill only half the thickness. In each log located inside, you need to make several through holes at a distance of 30-40 cm. In joining logs, the holes should match, and the drilling angle should be 90 degrees. You need to do the work with a drill whose diameter is the same as that of the reinforcement you are using.
- Using a plane we correct uneven areas and rough areas. Carefully sand the surface of the parts with sandpaper. Start with a coarse-grained abrasive paper, such as a four-grain sandpaper, and then use a finer one.
Types of log tables
Furniture made from logs will ideally fit into the design of any garden plot of a country house. The table can be placed on the veranda of the house, under a canopy or in a gazebo. It will look cozy against the background of a log house.
Based on the shape of the tabletop, furniture can be divided into several types:
- rectangular structures are very convenient and functional, as a rule, they have enough area to freely accommodate all family members;
- furniture with rounded edges will suit the original interior of a room with interior decoration made of natural wood;
- a table made of rounded square logs is perfect for a small gazebo.
The size of the table will depend on its location and the maximum number of users. The main feature of the design is the original shape of the legs. They are usually made from halves or whole logs. Furniture is made from wood of various species. Such material remains after the construction of a private house, garden buildings, and auxiliary buildings.
Wooden cuts
Previously, small tree cuts that were so useless to anyone went into the furnace. Now, various products from wooden saw cuts are at the peak of their “boom”. Not just like that.
Items made from wood cuts look very beautiful and very solid. Free material, in the form of dry branches in the forests, is another plus for various kinds of products from saw cuts.
- Garden paths are made from saw cuts
- Floors in the house are made from saw cuts
In today's article, we will tell you step by step how to make a table from wooden saw cuts
Assembling a table base from logs
- Reinforcement and glue will help make the assembly of the structure reliable and durable. Insert metal pieces into the joining logs. The rods must fit exactly into the holes. If they peek out slightly, cut off the same amount at the end of the metal fastener. Disassemble the structure for final connection.
- Fill on ? glue the bottom hole, then insert the reinforcement, put the next log according to the drawing on top (we recommend numbering all the logs used accordingly in the drawing).
- On top-mounted logs (the rods are in them), fill the holes with glue to the very edges.
Leave the resulting design. The glue must dry.
Installation
Assembling a table, both from rounded logs and from regular ones, primarily depends on what kind of furniture you plan to make. But, in any case, there are several main points that are the same for both complex designs and very basic simple tables.
- Drilling holes for reinforcing bars - in the log that serves as the basis for future furniture, that is, in the lowest one, the holes should not be through. A depth of half the thickness of the part will be sufficient, but in all the following elements they must be through.
- All holes should be 30 cm from each other, this is the most optimal distance that will ensure the strength of the entire structure.
- All drilled holes must be tightly filled with epoxy glue so that the rods do not dangle in them.
- The places where the parts are attached to each other should be well aligned and not too deep, ideally within 5-6 cm, this will prevent possible cracks during further use of the furniture.
Create a drawing
Before you begin installing the table, you need to make a drawing on a sheet of paper. Here the dimensions of the structure are plotted and a log layout diagram is selected. You can make a drawing on paper in several projections.
A three-dimensional drawing made in computer programs is considered more convenient. You can examine a piece of furniture from all sides, select dimensions, and also determine how a particular type of wood will look. The table, which is designed with a special program, can be adjusted to suit the specific interior of the room.
Kinds
Chairs and tables
Such products will be a great addition to a summer house or outdoor gazebo. The lower parts of the table or chair are usually made in the form of a cross-joint of logs. This method increases the strength and stability of the future structure. Table tops with seats are panels made of folded logs, cut in half lengthwise.
The surface is smooth, wide and durable. Sometimes, instead of small logs, one halved trunk of an old large tree can be used for the top. Such a table or chair looks especially massive and majestic.
There are the following types of log tables.
- Rectangular models , which are the most common option. It has a large capacity and is simple in design, since it has no unnecessary parts, it is not so difficult to assemble. The model range of this type is quite voluminous: the length of the tabletop can reach several meters, or maybe a little more than one.
- Square tables . This type will fit perfectly into square rooms or small gazebos. It will be convenient for at least 4 people to sit behind such a structure.
- Round . They are characterized by an attractive appearance and convenience, because you can sit at the table from any side. It is especially convenient to use stools or chairs with such a table.
- Oval . They can be several folded boards with sawed-off corners or an oval cut of a thick old trunk.
Stalls
Log benches are available on the market in a variety of configurations.
- Garden bench without back. It is an ordinary elongated seat made of lengthwise sawn and processed logs. The legs for such a bench can be thick stumps of obsolete trees or sections of wide logs.
Sitting constantly due to the lack of a backrest is quite uncomfortable, but this model serves well as a temporary seat.
- Bench with back and armrests . This option is intended for connoisseurs of wooden furniture. The backrest is made from halves of logs left over from the production of the seat. Armrests are most often made from the remaining scraps or branches that remain after working with wood.
- Stationary benches. They represent a fairly well-known element of country furniture, namely a table with benches built into it on the sides. Such a bench will stand on the street all year round due to its size and weight, so you need to be prepared to process this structure at least once every couple of years.
Armchairs
Such chairs resemble royal thrones. The furniture is made of solid logs and looks very massive and majestic. This choice of material makes the back of the chair and its armrests very comfortable. Such furniture can be made either using several logs, or from a solid thick trunk of an old tree by sawing or burning.
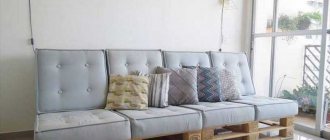
Sofas
The sofa will be an excellent addition to the interior of a country house, cottage or loft-style apartment. As a rule, such a piece of furniture is made not from halves of longitudinally cut logs, but from whole round timber. This adds massiveness to the sofa. It has a back and armrests, which makes it comfortable, and its large dimensions allow you to stretch out on it and properly relax after a hard day at work. As a rule, sofas are filled with mattresses to make them more comfortable.
However, thick and fluffy animal skins carelessly draped over the wood will look most harmonious on this type of log furniture.
Beds
A bed made of solid wood has a number of advantages over its conventional “brothers”. Such furniture can retain heat for a very long time, keep you warm at night and will not allow your back to get cold. A log structure will add coziness to the room and fill it with the pleasant smell of coniferous or other wood, and the eye will be pleased with the sight of a stylish and unusual bed.
Such furniture is strong and durable, and also creates a pleasant atmosphere for sleeping. At the same time, a bed made of logs is environmentally friendly, which will allow you to place it even in a children's room.
Drawing
Before you start working with a log, you need to make a drawing.
Think about what the table should look like. Write down your desired dimensions.
It will be nice if you can make a three-dimensional drawing.
This is necessary if you plan to grind logs.
A regular three-dimensional drawing of a table can be replaced, but then you will need to make three drawings: the length, height and width of the table.
How to decorate a gazebo with your own hands
The facade decoration of a wooden house is discussed in detail in this ARTICLE
Tabletop
The upper part can be assembled in two ways. Let's consider the first of them.
Method 1
While the glue that holds the wood to the reinforcement dries, we move on to assembling the tabletop. If you do not plan to put anything heavy on the top, then you can cover the top with a sheet of chipboard. To decorate, cover it with self-adhesive paper. This method of making a tabletop is only suitable if the height and width of the table does not exceed 1 meter.
Method 2
If you want the table to be more elegant and beautiful, you can attach treated beams. The entire rough surface is processed with a plane and sandpaper. When you are sure that all the parts have a uniform structure, you can file all sharp edges to avoid the possibility of injury.
Wipe the finished table first with a damp cloth, then with a dry one. Now you can start varnishing the finished product. You can apply the protective solution in one layer. This is enough to protect the surface from bad weather.
Various furniture made from logs
To create such furniture, it is not necessary to immediately buy material. Sometimes it is enough to look around and select drying trees on the site that cannot be rejuvenated by cutting branches and fertilizing. When we cut them down, we get a mass of wood that can be used to create, for example, a bench from logs.
For this, a base is selected that will be processed. Having marked the cut points with an electric saw, we cut the log in half and construct a back and seat from both parts. To fasten them together, strong branches cleared of bark are used, in which holes are drilled with a drill and a steel rod is inserted.
Garden bench support made of logs.
To prevent the metal from moving freely in the resulting space and the bench from becoming loose, the most common PVA glue is used to work with wood. It needs to be poured into the recess and a rod inserted there, allowing the structure to dry. In order for the bench to last longer, before assembly, all parts must be thoroughly sanded, all damage must be removed, and cracks and cavities must be filled with a special grout.
If the owner does not have steel rods at his disposal, and it is difficult to purchase them, you can use ordinary nails, removing their heads. A prerequisite when creating furniture: treatment of all parts with impregnation, which subsequently eliminates rotting, mold formation, and colonization of bug colonies. After assembly, when the furniture is already firmly installed, the surfaces are covered with layers of varnish, which will give a well-groomed appearance and protect from bad weather.
The back with which the bench is equipped can also be decorated using not boards, but 2-3 forged intricately curved rods, which are not so difficult or expensive to buy. Additions made from wicker, which is very easy to work with, will look no less impressive. It is durable and can be used to create a high back or armrests if the log is not large enough.
Tools for making furniture from logs.
If the owner has coniferous logs at his disposal, he needs to take care to get rid of the resin, which, especially on hot days, will actively release, staining clothes.
To neutralize resins, several compositions are used to choose from:
- acetone and water in a ratio of 4 to 1;
- a solution of acetone and caustic soda in a ratio of 20 to 4;
- potash and soda ash in a ratio of 5 to 6.
The mixture is thoroughly rubbed into the bark-free wood several times and washed off. After this, the material is dried naturally or using a hair dryer.
A simple “wild” bench without a single nail
How to make a bench is already clear. To get a bench, you only need to attach the backrest. It can be attached without a single nail, screw, etc.
To do this, take two bars of triangular or trapezoidal cross-section. We get it from one, sawing it in the middle. A triangular section is needed to make a dovetail connection between the bars and the seat and backrest.
Dovetail connection: trapezoidal tenon into trapezoidal groove.
In the half-logs for the seat and back, triangular (trapezoidal) grooves for supports are cut out so that the wide part is inside the half-logs. Then all the elements are connected in these grooves. In the video you will see that it is easier than it sounds in words:
But this is more difficult than it looks. The main difficulty is to cut grooves of the desired shape at the desired angle in the rounded surface of the half-logs. Without certain dexterity and experience in working with a chainsaw, this is not easy.
There is a simpler option - do without the dovetail, use self-tapping screws or nails to attach the backrest supports to the bench. The supports are attached to chocks, which serve as legs; they can also be attached additionally to the seat mass. The back can be secured in the same way by cutting out moon grooves in the supports themselves, if they are thick enough. We get approximately the following:
Simple and stylish - a bench made of logs.
To make the benches and benches described above, you need initial logs from approximately 35 cm in diameter (if we take the same ones). This is dictated by the comfortable parameters of the bench or bench itself. Its height is 40-50 cm. The height of the seat plane is about 1.5 times the diameter of the log. The final calculation depends on the depth of the groove, but it is not necessary to cut it deep.
Another important note:
For two benches, it is advisable to cut the log in half, but for a bench, it is better to move the cutting plane away from the diameter plane, so that the beam for the back is smaller than for the seat. Firstly, your bench will be 5-10 cm higher, which is important if the log is not thick enough. Secondly, do not forget about the center of gravity of the bench.
If the half-log for the back is as massive as the seat, and the back is sloped, then the structure may be unstable. This problem can be solved if you rigidly attach the seat to the lower supports, but you will also be sitting on this bench! And you'll want to sit back!
To prevent the center of gravity from shifting so that the bench will tip over or wobble, the top of the backrest should not extend beyond the vertical axis passing through the extreme points of the lower supports and legs. It is better if the legs protrude further than the back of the bench.
The relative position of the extreme points of the rear legs and the back of the bench
Another significant parameter. There are various original design benches, chairs, etc., but for a standard bench or chair, the backrest slope is within 30° from the vertical axis.
Materials and tools
Prepare everything you need for work:
- Logs with a diameter of 30 cm. The harder the type of wood, the longer the table will last you. And if it is an oak round timber, the result of your skill will be inherited by your children and then your grandchildren.
- Stain or other wood impregnation agent. This treatment will protect the material from rotting and parasites, and will make it more resistant to aggressive external factors.
- Axe.
- Bit.
- Hammer.
- Chainsaw.
- Electric drill with thick drill bits.
- Nails, large screws.
- Sandpaper.
- Universal glue (preferably epoxy).
- Grinding machine with attachments of different grain sizes.
- Stain to improve the protective qualities of wood.
- A varnish that is suitable for treating wood.
Tools
The materials you need to stock up on are logs and, if necessary, stain. The tools you need to acquire are:
- saw and hacksaw;
- drill with large drill bits;
- plane;
- screws and nails;
- “Moment” glue for wood and metal;
- hammer;
- a piece of leveled reinforcement;
- sandpaper.
How to do it yourself?
There are many different step-by-step instructions on the Internet to help you make this or that chopped piece of furniture. If you wish, you can even find a diagram with the very chair or armchair that is so missing in the house or country house. It is necessary to understand that most of the work in production is carried out with a chainsaw. It is this that serves as a tool for preparing material, processing it, creating small parts, etc. Therefore, first of all, you need to learn how to properly handle this device.
The choice of material should be approached responsibly. It must be free from rot and insects, otherwise the furniture can quickly become unusable. Before starting work, it is recommended to sketch out at least the simplest drawing, which will indicate how many logs are needed, what shape and size, where to leave space for fastening, etc.
The best way to fasten logs together is the “paw” method, when each element has a piece cut out crosswise at the point of contact. Thanks to this, connecting two parts of the future sofa or bed will not require labor, and the structure itself will become even more durable.
For inspiration
Any material can be used to make garden furniture if you get creative. Any snag, branch, or stump. Below are photos that confirm this.
Using curved branches to decorate the back of the bench and armrests
Wild-style bench made of half-logs and crooked branches
Designer bench made of logs and branches with an awning from rain and sun
Designer swing bench made from driftwood and naturally shaped branches
Simple and elegant
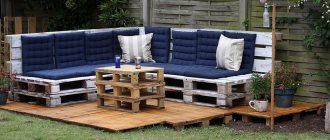
Outdoor dining area
Any dish tastes better in the fresh air. Every owner of even a tiny backyard tries to create an environment in which it would be possible to have outdoor meals, even if we are talking about short breakfasts. Depending on the needs and size of your family, you can arrange either a small area for short meals or a spacious dining table for entertaining guests outdoors. It is noteworthy that both options can be implemented on your own.
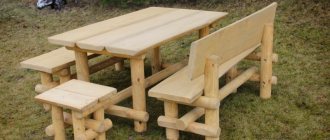
One of the simplest, but at the same time practical ways to organize a dining group in the fresh air is to make a table together with benches. The model shown in the photo will require a minimal amount of material, but will be quite spacious. The only drawback of such a dining group is that if you need to increase the number of people sitting at the table, you can only do this with 2 seats (you will need chairs or stools).
You can arrange a dining area or segment for short meals (breakfasts and afternoon snacks) like a bar counter. This is easy to do using building blocks and wooden beams or boards. The only thing that needs to be selected for such a tabletop is bar stools with the appropriate height.
Labor and cost
Sawing and processing logs is a labor-intensive process that takes from an hour to two. Sawing gutters and fastening logs with self-tapping screws will require skill; this task can also take two hours.
The price of the table will depend on the type of wood chosen. A box of self-tapping screws 6 x 200 in the amount of 500 pieces costs 2.5 thousand rubles. Some stores sell them individually, so you can save a lot of money.
One can of impregnation costs about 600 rubles, depending on the manufacturer. The varnish will cost approximately 200 rubles per 0.2 liter. The funds spent on protecting wood from rotting will result in many years of use of the table.
A simple way to make a “wild” stool from thick wood
... which you won’t be ashamed to put in your home. Look how easy it is:
Please note that it is not at all necessary to master a chainsaw, since the scale of the workspace allows you to correct the unevenness of the first cut.
Such a stool will fit into the interior, as well as a table made of logs, especially in a log house in the “wild style”.
Another method of making a stool, where you don’t even need to cut anything out:
A thick enough piece of wood can make an excellent chair. If you burn it, sand it and varnish it, you get an exclusive product that would be a pity to take outside:
Tools for making garden furniture
The set is, in general, standard. If you have a workshop, then most likely you have everything you need there. You may need a hammer, mallet, screwdriver (drill), grinder or grinder, axe, plane, stapler, saw...
In order to build a bench or other furniture in a “wild style” quickly and without extra effort, it is advisable to have a chainsaw or electric saw at your disposal. This will make your work a lot easier! Because the main idea in wild furniture projects is the use of half-logs as structural elements.
Of course, it is more convenient to cut whole logs and blocks with a chainsaw. But if you don’t have one, this doesn’t mean that you don’t have the technical ability to build a bench or table yourself. You just have to split the logs with a cleaver and wedges.
In fact, it is possible and not as difficult as it seems. Here is a video on this topic:
In this video they use a cleaver - an ax for chopping wood. Its difference from a carpenter's ax is that the working, piercing part has a noticeable expansion, and the sharpening angle of the blade is wider. You can also use an axe, you just have to drive in the wedges earlier.
On the left is an ax, on the right is a cleaver (the width of its blade may be thicker)
With this method of halving a log, it is important that the log splits along the plane of impact and that the crack does not go sideways. Much depends on the quality of the log. Firstly, it must be dry. In principle, it is advisable to work with dried lumber when building garden furniture, because raw timber can become deformed during the drying process, crack, and your bench, bench or table will become uncomfortable, unstable, or simply lose its aesthetic appearance.
Secondly, if you are splitting a log with a cleaver to obtain smooth materials suitable for building a bench, then it should not be too twisted. That is, the fibers must run more or less evenly, because the crack will go along them. Minor irregularities and deformations along the split surface can be removed with a plane and grinding. In addition, “wild” furniture does not have to be perfectly flat!
Features of operation
A table made of wood can be destroyed due to moisture and direct solar radiation.
To increase the service life of a log structure, compliance with the following rules:
- do not place hot dishes on the countertop;
- constantly clean the table from dirt;
- monitor the condition of the varnished coating and periodically update it;
- install furniture in a gazebo or under a canopy.
If the table is placed in the garden, before the onset of winter you need to bring it indoors, first cleaning it from dust and dirt. The storage room must be dry and well ventilated.
Recommendations for masters
To ensure that wood furniture pleases you for a long time, there are some tips that should not be neglected:
- Be sure to protect wooden furniture from precipitation and temperature changes. For this purpose, you can find special solutions and compositions in stores.
- Be sure to treat all corners and surfaces that come into contact with the body. This way you will protect yourself from splinters and other injuries.
- Don't neglect drawing up a drawing. This will help you calculate the amount of material and think through all the details.
In these simple ways you can assemble an amazingly beautiful wooden table.
After watching the video, you will learn how to make a table from a log with your own hands.