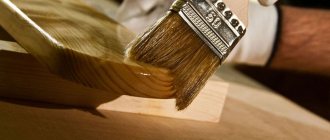
Everyone knows that things and decorative items that are made with one’s own hand can serve not only for practical purposes. They will bring a unique atmosphere of coziness and comfort to the interior of their owner’s home.
Recently, interior elements in the hand-made style have gained immense popularity among both skilled housewives and famous designers.
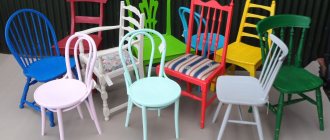
One of these items is a soft chair seat. Such a creation will make your furniture comfortable and become a unique highlight of the room’s interior. Of course, provided that the colors, materials and manufacturing techniques are chosen correctly. This will be discussed in more detail in this article. We will tell you how to make a soft seat on a chair with your own hands.
- Crochet Pattern
Types of chair accessories
Before you get started, you need to understand how to decorate your furniture. Let's look at the most common accessories:
- Chair seats are covers that can be made from a variety of materials. They help protect furniture from damage, soften the seat of a chair or chair and serve as an additional decoration;
- If you don't want to attach the covers to the furniture, you can sew or tie the cushions. They can be removed upon request;
- Chair upholstery or bedding can be described as upholstery that covers not only the seat but the entire chair. In most cases they are made of fabric.
Helpful hints! Seat materials should be selected in accordance with the interior design. If the room is pastel, bright accessories look out of place.
Simple carpet seat
This is one of the easiest ways to hire a nanny. And also, why not use an old, unwanted carpet to create original furniture decorations?
Carpet materials are quite soft and pleasant to the touch, but at the same time resistant to deformation and density. To make a furniture cover from a carpet, you need to cut a square or circle, depending on the shape and size of the chair seat.
Remember to leave another 5-10 cm around the edges to secure the lid. To maintain the shape of the product, the edges must be covered with thick or woolen thread, this can be done manually or using an Averlock (a special marking device).
If you have a fabric or strand that goes well with the color of the rug, you can make a custom frame for the seat.
Seats made of fabric or patches
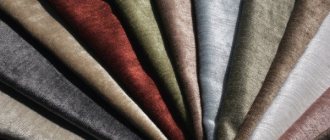
Chair covers can also be made from thick fabrics such as denim, drapery, tweed, etc.
If you know how to quilt, you can combine different types of fabrics by simply sewing the quilt together. The main thing is that the fabrics match each other and the product looks neat.
To sew upholstery, you need to cut a piece of fabric that matches the shape and size of the chair seat (similar to a carpet seat).
Recommendation! To soften the seat, you can sew a piece of thin foam, synthetic or felt fabric to the back of the seat.
How to make a fisherman's chair read this article: //612./dom/mebel//- //612/rybalki.html
How to crochet a seat
There are many options and models for producing knitted upholstery for chairs and stools. You will find various diagrams on the Internet.
Thick wool threads are great for knitting seated women. The fairly common Grandmother's Square pattern will look good on square or rectangular chairs.
For round seats or chairs, you can tie a circle using the "half pedestal with cape" technique. Threads can be either monochrome or colored.
Let us add that for knitted blankets you can use not only ordinary yarn, but also knitwear, jeans, satin and much more. The choice depends on your imagination. Old knitted or denim products should be cut into strips 0.5-1.5 cm wide, and the knitted material is ready.
If you want to learn how to make an ax yourself, we recommend reading the article: //6.//kak-sdelat-topor-svoimi.
To prevent the product from sliding off the chair, it must be secured in place. There are several ways to secure it:
- For square chairs, it is enough to sew four small elastic bands in the corners of the seat;
- To attach the seat to a round chair, you need to attach the round gum to the product. This is done by sewing the fabric to the lid, leaving an opening for the gum to fit through. A rubber band inside will hold the case in place;
- You can attach the cover to the back of the chair as follows: Sew two tie rods to each corner of the finished upholstery and attach them to the seat.
How to reupholster a chair
So, if all the necessary materials and tools are ready, then you can start reupholstering. There are different models of chairs, so I think it makes sense to tell how this is done, using a specific example: there are old chairs that do not have much historical or artistic value, but overall they look good, but cats and children have completely worn out the upholstery:
The photo on the left shows the best surviving chair, the right shows the chair after reupholstery. Before reupholstering, a layer of foam rubber about 2 cm thick was glued to the seat; when reupholstering, the old foam rubber was replaced with a new one 4 cm thick. The back was quite rigid, some softness was provided by batting about 5 mm thick. When reupholstering, a layer of foam rubber 4 cm thick was added to the back.
First the chair is disassembled so that new fabric (leatherette or leather) can be stretched over the seat and back, if the back is soft. Then the old upholstery and remaining foam rubber are removed from the seat if the foam rubber has decomposed. In this case, the foam rubber left a thick sticky mass stuck to the plywood of the seat; it is impossible to completely remove such a mass:
Theoretically, it would be possible to cut out the foam and stick it directly onto the sticky mass, but I prefer to isolate the remains of the old foam from the new, so I placed a polyethylene gasket between the seat plywood and the new foam, which I made from a large bag.
The easiest way to mark foam rubber is to place the seat or backrest on the foam rubber . The foam rubber is cut so that there is a margin of about 1 cm on all sides:
cut foam rubber with anything, but I prefer using a wallpaper knife:
For these chairs it was necessary to sew covers; the design of the seat is such that if you simply stretch the wallpaper fabric over the seat , there will definitely be folds. After the covers were sewn, upholstering the seat was no longer difficult:
Since the design of the chair involves attaching the seat to the side of the legs, holes had to be made on the sides of the upholstered seat, and so that the upholstery around the holes would not unravel, the fabric around the hole was stapled.
In this case, the sides of the seat will be almost completely covered by the legs, so when stretching the fabric, the main attention was paid to the front and back. If the design of the chair is such that the seat is visible from all sides, then you need to first hammer in one or three staples in the front in the middle, then one or three staples in the back in the middle, then a pair of staples on the sides. You need to stretch the fabric so that the foam wrinkles half to two-thirds of the height. After this, the upholstery fabric, leatherette or leather is stretched at the corners. On the side of the seat where you drive the staples, folds will inevitably form; there is nothing wrong with that, the main thing is that the folds are not visible from above. The closer to the edge of the seat you shoot the material, the smaller the folds will be.
READ How to cut a PVC window sill
That's basically it. It was even easier to upholster the backs of the chairs, since the covers were already sewn and all that remained was to shoot the upholstery fabric from the bottom of the back. Well, you’ve already seen what the chair after assembly.
And you also have a unique opportunity to help the author financially. Once the transfer is successfully completed, a thank you page with an email address will open. If you would like to ask a question, please use this address. Thank you. If the page does not open, then most likely you made a transfer from another Yandex wallet, but in any case, there is no need to worry. The main thing is to accurately indicate your e-mail when making a transfer and I will definitely contact you. In addition, you can always add your comment. More details in the article “Make an appointment with a doctor”
For terminals, Yandex Wallet number 410012390761783
Ymoney card number 4048 4150 0452 9638 SERGEI GUTOV
For Ukraine. hryvnia card number (Privatbank) 5168 7422 4128 9630
Similar chairs were upholstered, but the back did not fit exactly into place. There are gaps left on the sides. Do I need to reinforce it with self-tapping screws?
In chairs of this type, the cover on the back must be sewn very precisely and be pulled over the back with great difficulty. Otherwise, there will be wrinkles, which cannot always be removed with staples or screws.
Note: It is possible that your question, especially if it concerns structural calculations, will not appear in the general list or will remain unanswered, even if you ask it 20 times in a row. Why is explained in sufficient detail in the article “Make an appointment with a doctor” (link in the header of the site).
How to sew a pillow
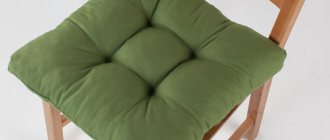
Chair cushions can also be sewn or knotted. We will stop making fabric pillows:
- First, sew the upholstery or pillow from a thick material. The best way to create a design is to outline the contours of the chair on calico. A piece of transparent paper should be placed on the seat and folded at the edges. Line fold marker with marker or pencil;
- Place the tartar on the foam and cut the base of the cushion to the desired size and shape;
- Before cutting the part into fabric, you need to place it on transparent paper. Mark the seam allowance on the fabric to be approximately 1 cm. The result should be 2 pieces;
- The finished samples are folded and aligned (the parts must be sewn from the seam side). Before sewing the pieces to the machine, we recommend removing them so that the fabric is in a fixed position;
- Machine stitch the pattern on three sides, leaving the back for inserting the foam pad;
- Turn the factory-prepared pillow forward and insert the foam. For a more decorative effect, you can sew buttons to the unfinished side of the pillowcase, insert a zipper, or sew a secret seam.
In this video you will learn how to tie a round seat to a chair:
Page 2
Would you like to update your interior with a new piece of furniture? You can make a chair made of natural wood with your own hands, which not only looks great, but is also useful in everyday life.
In this article you will find valuable tips and tricks on what materials to choose, where to start making wooden chairs and what tools to use.
Pre-assembled plans with dimensions make carpentry easier for beginners.
Mounting options
You can attach a cushion to a chair with your own hands in different ways. The most popular option is lace-style ties. But there are other methods.
| Type of fastening | Peculiarities | How to do it |
| Ties (ropes) | The ties must be made from the same fabric as the product itself; in some cases (if the seat is plain), it is possible to choose a contrasting option | A pair of thin ropes are attached to the corners. They are tied in a knot under the seat of the stool |
| Velcro | Over time, they become dirty and cease to perform their function, so they require periodic cleaning. | Four Velcro strips are sewn to the edges by hand or machine |
| Elastic bands at the corners | The fastening should not be too tight | A drawstring with an elastic band is sewn to the seat, then the product is put on the chair and aligned around the perimeter |
Making a bar stool with your own hands, instructions for three models.
Any fastening is sewn only after the seat itself is sewn. After this, the product must be tried on and aligned. The cover should not cover the seat. An option that is too spacious is also bad, it will slide.
You can use colored ribbons made of any synthetic material as ties. Before working, you need to singe the ends so that the fabric does not fray.
Ties
Velcro
Rubber bands
Which tree to choose
A natural wood chair can be made from the following types of wood:
- Governing body;
- bar;
- array
- Protocols.
In most cases, a combination of several types of materials is used, each of which has its own function when designing a chair.
You can buy ready-made materials or, if you have the necessary equipment, make them yourself. This requires quality protocols. When choosing logs, pay attention to their appearance: the presence of branches, cracks, fungal diseases. Inspect the top layer of wood - sometimes logs are painted to improve their performance.
If you decide to purchase lumber for a chair, you should take into account the following recommendations:
- Tires and slabs must be dry, with smooth edges and no cracks. Pay attention to deformations - only minor deviations are allowed, as well as the presence of holes (diameter from 2 to 4 mm), symptoms of rotting, and mold.
- The thickness of the panels reaches 100 mm, and the thickness or thickness of the panels is 100 mm.
- Solid wood is a material containing only natural wood without impurities. Selecting a solid involves finding the tree species that are best suited for making a chair.
- Chairs are preferably made of oak or mahogany - these varieties are known for their excellent decorative and practical properties (strength, durability, ease of use).
- Other suitable materials are pine and beech.
Important: Store wood, rods and plates in a slightly larger volume than designed for production, as there is a possibility of damage or breakage of one of the parts.
How to make a pillow from pompoms
A seat made of pompoms will have a bright and unusual appearance. To make it, you should take thicker yarn, preferably 2 - 3 colors that match each other . We will also need scissors and a special mesh for needlework .
Making a pompom is not difficult at all.
- Wind the desired amount of yarn around your fingers or cardboard. You should end up with a thick ring of thread.
- It is tied in half and the edges are cut.
- The result is a fluffy ball of thread.
Each of these pompoms needs to be tied to a net . If you wish, you can lay out a certain pattern from them.
Some fabric should be sewn to the back of the mesh to hide the knots of thread that secured the pompoms. The product can be supplemented with ribbons or yarn ties at your discretion.
IMPORTANT! These seats look very harmonious in a children's room. By touching multi-colored pompoms, the baby will develop his tactile senses.
Drawings with dimensions
The process of making a chair begins with a drawing. If this is your first product, then it is best to avoid complex designs and try to make the chair a simple design with fabric seat cushions. You can use the following drawing (all dimensions are in millimeters):
If you are interested in how to make a cover for a chair, we recommend reading the article: //6.//mebel/stulya/1234541/stulya/.
Materials and tools
When making a chair, the following materials are required:
- Sheets (thickness - 10-15 mm);
- Rod (parameters - 40 x 60 mm and 40 x 40 mm);
- Sanding paper;
- Foam and durable fabric;
- self-tapping screws;
- Furniture glue.
If you are going to produce tires yourself, you will need special equipment. Woodworking tools:
- Construction stapler;
- saw;
- Furniture security guard;
- sycamore;
- Chisel;
- ...this is the guy who is a duck;
- Puzzle;
- screwdriver;
- Roulette.
How to make a fisherman's chair read this article: //612./dom/mebel//- //612/rybalki.html
Description of work stages
Step 1: Prepare a bar: one for the back of the chair (80 cm long), another for the front legs (44 cm). Make holes in the blocks at the same height - they are necessary for the base. The finished parts should be placed on top of each other, and the leg cuts should be aligned. Mark the position of the holes.
You should make two holes in the adjacent chair legs to create a sort of rectangle that sits on your legs.
Step 2: Using a chisel, drill holes into the markings. Get rid of sawdust, clean your feet.
Step 3: Create 2 longitudinal stripes and 2 steps (horizontal pieces connecting the bottom of the chair legs). To do this, take 4 beams with markings of future peaks. Their dimensions should be about 10-12 mm. Mark and cut the tenons as carefully as possible so that they fit snugly into the holes. Make sure there are no gaps.
Step 4: The next step is to install the seat back. It is better to take a cutting board as its basis. Punch holes in the inside of the back supports to adjust the height and thickness of the backrest - there are slots to secure the backrest. The seat is secured with screws. To ensure the chair is sufficiently rigid, attach small brackets.
Step 5: Sand the outside of the chair back and legs so they are round and then sanded.
Step 6: The base of the future chair should be painted and polished. It is best to buy a water-based, odorless varnish. Wait for the components to dry completely.
Step 7: If you want to make a chair with an upholstered seat, take the foam of your desired size and wrap it in a thick, fairly thick fabric. Attach the foam to the seat using a staple gun.
Step 8: The process of assembling the wooden stool begins immediately after processing all the components. The pegs should be well lubricated with glue and punched into the grooves with a hammer. In order not to damage the varnish of the chair, it is necessary to use strokes as carefully as possible.
Step 9: The last step is to attach the seat and backrest to the base of the chair. Use suitable drill bits to attach self-tapping screws to furniture. Screw caps may be coated with adhesive. PVA and sawdust. Mix these two ingredients and apply them to the flat cast iron. After painting the chair, the screws become almost invisible.
Having mastered the manufacturing principle, you will be able to adopt more complex designs in the future - chairs with figured legs and backs, with armrests, carved chairs and self-repair of wooden chairs. You may want to make an original high chair to feed your child or surprise famous authors with an unusual design.
Watch a video master class on making a chair from solid wood:
Page 3
Fishing enthusiasts must adopt a static position that waits a long time for a bite, so the most important condition is the right choice of chair.
Sitting on the grass or sandy beach is not the most convenient or healthy solution - just laying down a piece of tarp. Your legs and back are leaky, and the soil moisture in the coastal area can lead to colds, so you'll need a chair.
The models presented in tourist or fishing equipment stores do not differ in variety, special comfort or cost.
A cleaner whose hands are well acquainted with the tools of a carpenter is quite capable of making a fishing chair on his own. If there are scrap wooden rods or aluminum pipes in the house, then useful homemade goods will cost the family budget practically free.
Removing old casing
Remove old upholstery very carefully. The old back and seat cover can be used as a pattern. Under the soft part of the seat there may be a piece of plywood or furniture rubber. The latter may stretch and need to be replaced. Be especially careful when removing staples near an exposed part of the wood to avoid damaging the painted part.
When the upholstery is removed, it's time to check the strength of the wooden part. All weakened joints must be glued, where possible fixed with 14 mm staples.
Quality and structure of the fishing chair
In order for your home fishing chair to be truly comfortable, you need to consider what characteristics and design the product has:
- Durability. A chair must support the (sometimes significant) weight of its owner in order to last long enough and not become a disposable item;
- Stability. The design of the product should provide comfort to the fisherman in all aspects of the coastal topography (uneven and loose bottom, dirty shore, sandy beach);
- small size. Even if you go fishing in your own car seat, it should be compact because the trunk is not a dimensionless space;
- light weight. When a person goes to a fisherman, he tries to reduce the load so that the high chair is light enough;
- simple production technology. Manufacturing fishing chairs using clean and simple technology only if the product is of high quality and does not take much time to manufacture.
Home walking chairs come in a variety of designs, but require a strong connection of parts and a simple folding mechanism.
The following types of mobile chairs are distinguished by product type:
- Chairs with chairs. Folding chairs are the most comfortable to carry due to their lightness and compactness;
- Chairs with backs. Folding versions of models with a backrest significantly reduce the load on the back and make fishing very comfortable;
- Camping chairs. If you can get to the fishing area, it is better to use armrests with comfortable armrests and an adjustable backrest. This will allow the fisherman to avoid back pain and excessive muscle tension.
Folding Fishing Chair Drawing
What materials can a chair be made from?
Home fishing chairs can be made from various materials, including those left after renovation or other work:
- Wooden sticks can become the basis for the entire structure;
- Wooden planks are used as seat and back elements;
- Aluminum pipes and profiles serve as load-bearing parts;
- Scrap leather or tarpaulin is used to remove the seat;
- Plastic parts can also make a chair that is durable yet lightweight;
- Fastening elements are selected depending on the design features (the seat and backrest can be attached to the base on leather or fabric strips or with screws, the base parts are secured with screws, bolts or staples).
For example, two products were selected - a chair with four traditional bases and an original three-legged camping chair.
How to get your child’s own chair to read this article: //6.//mebel/ /—
How to attach a seat to a chair
A chair seat, especially one made of slippery fabrics, can easily slide out of place. Therefore, special ties are used to secure the seat on the chair. They can be sewn from the same fabric from which the seat is made, or you can use bias tape. The ties are sewn on the wrong side of the product.
Knitted seats can be fixed to a chair using crocheted ties, or you can sew decorative ribbons or braid to the product. The second option is preferable, since knitted ties tend to stretch over time and sooner or later will lose functionality and decorativeness. Ribbons or braid, successfully matched to the tone of the product, will add elegance to it and will last no less than the seat itself.
Folding fishing chair on four legs
A simple and very comfortable fishing chair consists of plastic tubes and a small tarpaulin.
We cut eight parts from one pipe: four more authentic ones (50-60 cm) under the vertical support, four more (35-40 cm) forming the seat and safe lower links for the stability of the product.
We remove two pieces of canvas: a wide double strip for the seat and a narrow double strip for the bottom pullover.
Let's go to the meeting:
- Screw the two long plastic pieces in the middle together;
- Pairs of long sections of pipes are connected by short ends, and we get a sliding structure;
- Short sections of plastic pipe are covered with a double folding canvas strip that forms the seat;
- The lower parts of the chair legs are covered with a narrow strip of canvas that serves as a divider;
- Adjust the tension of the screw so that the chair can be easily folded.
Fishing chair on three legs
An original three-legged stool can be easily made from the following parts:
- three round leg rods (length about 60 cm);
- a triangle made of thick leather or dense fabric;
- Mounting screws (one loop, the other long);
- three locking washers and three finished washers, as well as two nuts.
Preparing parts and assembling the chair is carried out in several stages:
- measure 25 cm on the bars and drill and also make holes in the top cutouts to support the saddle;
Tip: If you don't have round stones to make chair legs, cuts from a shovel or other gardening tool are ideal.
- On the leather part we punch holes in the corners, and on the canvas seat we finish the corners with metal blocks;
- Attach the two legs with a long bolt and insert a second eye bolt between them;
- Fix the third leg with the intermediate bolt and adjust the tension so that the tripod can be folded down easily;
- Screw the prepared seat piece to the upper ends of the legs;
- Attach a long strip of leather to the chair so you can carry the folded product over your shoulder or attach it to a backpack.
Having mastered the manufacture of a folding chair for fishing, you can begin to create a more complex model - an armchair or a comfortable chair with a backrest.
How to make a boat chair with your own hands. PVC Watch the video, okay?
Page 4
When it comes to children's furniture, first of all it is necessary to take care of comfort, reliability, durability and safety, including environmental protection.
The best thing is a wooden high chair. Of course, the modern wooden chairs on offer are of great value if they are made from truly valuable and high-quality wood.
Why don't you make your own baby chair? This article will help you choose the best materials for chairs, get detailed instructions and recommendations for making and decorating them.
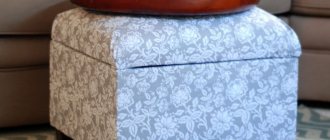
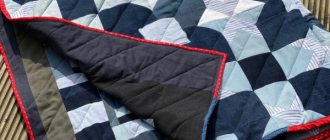
Crazy patchwork seat
A soft seat cushion made using the patchwork technique is not only a good way to make a chair comfortable, but also to recycle various remnants of fabric that have accumulated in the house.
Algorithm of actions:
- We are preparing materials: bright scraps of fabric, filling (holofiber or padding polyester is a good option), braid. A sewing machine will speed up the process of assembling the pillow.
- Let's make a pattern. To do this, using the measurements of the chair seat, we draw a paper model of the future seat. Using a paper pattern, scraps of fabric are laid out in random order (checkerboard, in a circle, in sections). Additionally, the back side of the pillow is cut out from a single piece of fabric.
- Sew the pillow. According to a pre-made layout, the fabric flaps are sewn together. Folded right side inward, the patchwork fabric and the whole side of the pillow are stitched together.
Important: when assembling, leave one corner of the pillow unsewn.
- Filling the pillow. Through a hole in the corner, the seat is filled with padding polyester or holofiber.
- The final stage. The hole is carefully sewn by hand. Braid ties are sewn at the corners.
Article on the topic: Outdated: what previously fashionable trends in the interior should be abandoned
Types of children's high chairs
What chairs are available for children? Modern manufacturers offer a wide range of chairs for children of all ages.
They may differ in purpose, design, material and other criteria.
Many models can be produced independently of each other.
The most common and practical types of high chairs are the following:
- A simple high chair is a regular high chair with a backrest, as described in this article.
- The reclining chair is a versatile chair with rich functionality. It should be possible to change the angle of the backrest, adjust the steps, attach the tabletop, etc.
- Rocking chair - the name of the chair speaks for itself. All children, without exception, love to swing on such a chair. Modern models offer the possibility of using the rocking chair as a rocking chair.
- The Transformer is a set of chairs and tables that can be set up and used in a variety of ways. When assembled, the transformer serves as a practical high chair; when disassembled, it serves as a simple high chair and table, standing separately.
How to make a cardboard shelf with your own hands: //6.com//// -Svoimi—Svoimi321-Svoimi4123455441
Some models have adjustable leg height and backrest position, and the high chair “grows” with the child.
If you have little experience in carpentry, it is better to limit yourself to making a regular high chair without additional functions. The main thing is to understand the basics and operating principle, and in the future you will be able to create more complex models of chairs.
When making a chair, it is recommended to use environmentally friendly materials with high strength. In most cases, the following materials are used:
- Natural wood;
- Plywood;
- Chipboard.
The production of children's furniture (chairs, beds, tables, etc.) from plastic pipes is very common. After assembly and decoration, you get very attractive and unusual designs, but their reliability and durability are very questionable.
It is recommended to choose wood, plywood or wood. Chipboard Since these materials are absolutely safe for children, they have a long service life and other positive characteristics. With the help of this article you can make a high chair out of wood.
Important: Before you begin assembling high chairs, the ends of all parts must be made of the following materials: Chipboard must be covered with furniture edge. It not only performs decorative functions, but also prevents the release of formaldehyde.
The following structural elements must be prepared for the construction of the chair in accordance with this drawing:
- 1 - top rod (1.9 x 4.1 x 16.5 cm);
- 2 — two rear legs (3 x 3 x 55 cm);
- 3 - carved beam (1.4 x 4.1 x 16.5 cm);
- 4, 6 — stripes in the middle and bottom (1.4 x 2.9 x 16.5 cm);
- 5 - Double-sided seat (1.4 x 10.5 x 26.3 cm);
- 7 - two kings and two slats on the sides (1.4 x 2.9 x 17.7 cm);
- 8 - two front legs (3 x 3 x 30.5 cm);
- 9 - two handles and two front stripes (1.4 x 2.9 x 19.5 cm).
For the feet, it is recommended to use pine stones with a cross-section of 3 x 3 cm.
The legs of the chair should gradually be as follows: The back legs should be up to 1.9 cm from the center of the chair, and the front legs should be up to 2.4 cm from the center of the chair.
Tip: To make assembling the bands and kings as easy as possible, only reduce the outer edges of the pieces. This ensures that the inner edges are parallel to each other.
How to build a spiral staircase with your own hands: //6.com//123451/lesnica/-://6-
Knitted seats for stools and chairs
Knitted items are always associated with warmth and softness, so chair covers, knitted or crocheted, give furniture a special charm and attractiveness. A simple hand-made method works wonders: magical flowers can bloom on old chairs, and faceless stools can become original Art Nouveau items.
What is needed to create “clothes” for a stool?
- What to knit the seat from, natural or synthetic threads, what colors to combine, everyone will decide for themselves. In our case, it is thick acrylic brown, yellow and blue yarn.
- We will knit with a thick crochet hook.
You will not need a pattern to make the future seat. But the crochet pattern will tell you more clearly how to work.
Detailed description
For crocheting we will use a pattern of small volumetric parts, the so-called popcorn (cones of several columns). It will make the stool seat structured and attractive. Since the stool we are designing is square, when working in the corners you should make additions (knit 2 elements from 1 arch).
- Let's start knitting a square. Cast on 8 chain stitches and close them into a ring with a connecting post. In the first row you need to make 3 lifting chain stitches, then knit 4 double crochets from the ring.
- You can form the first bump: remove the hook from the working loop. Insert it into the third lifting loop, then again into the working one. To assemble a group of stitches into a cone (“popcorn”), you need to crochet a working stitch through the first loop.
- Knit 4 chain stitches and make 5 double crochets from the ring. Pass the hook through the top of the first stitch, then through the working loop through the top of the first stitch. Repeat twice, complete the row: 4 chain stitches, connecting stitch to the first bump (top).
- To knit the second row, make 3 lifting chain stitches. From each arch, knit 2 cones, with 4 air loops between them, and 3 air loops on the sides of the square. The first cone will be made up of lifting loops and 4 double crochets, and all subsequent cones will be made of 5 double crochets.
- Third row. Crochet 2 cones from the corner arches, and between them - 4 air loops. On the sides of the square you need to make 3 air loops, then a cone from the arch and 3 air loops. Finish this row with a connecting post at the top of the first cone.
- Knit subsequent rows in the same pattern. Don't forget to knit 2 cones from the corner arches. Whereas on the sides of the square you need to make one cone from the arch every 3 air loops.
Choose and arrange the colors of the threads from which you knit the square yourself. Choose a range to match the color of the interior and in accordance with your taste priorities. The cover will look bright and harmonious if you use the brightest yarn in the center, then, gradually approaching the edges, move on to darker shades. To change colors, knit a row, cut and fasten the thread, then attach the new color material.
- Having completely knitted the square to the size of the stool seat, knit an additional 2 rows of cones without adding to the corners. In the last row - bumps through 2 air loops. This way you will narrow the edge of the cover.
- Place the crocheted cover on the stool and secure the corners along the bottom of the seat.
Description of work stages
It is important to pay attention to the safety of high chairs: Avoid sharp corners, cracks, cracks, cracks, cracks, cracks, gaps between structural elements, as well as unevenness and other defects.
To give the top beam an attractive appearance, it can be rounded. The carved rod is designed with all possible patterns in every way, but without any sharp corners.
In this case, the parts are secured with wooden skewers and glue, but other methods such as nails, furniture scales or self-tapping screws can be used.
In spikes, the most durable hidden elements are rectangular ones, which are inserted into holes pre-treated with glue.
For additional fastening of bolts, you can use through pins (diameter 6-35 mm).
Chair assembly:
Step 1: First, the back legs of the chair and the adjacent crossbars must be secured in the chosen manner.
Step 2: Attach the front legs, remaining cross members and stems to the structure.
Step 3: Attach the top, cut and middle crossbars to the back legs (attached at the same height as the seat).
Step 4: Use a special tool, a connecting screw, to make sure that all parts are glued together as securely as possible. It is designed in such a way that the parts are located close to each other.
Step 5: Once all the bottom slats and legs are securely attached, attach the two-panel seat to the base of the chair. For added security and durability, secure the panels with pre-drilled pins after the glue has dried. If the seat boards partially protrude from the floor, the protruding ends should be removed with a chisel.
Important: When using a clamp, make sure the parts are connected at right angles. This torque can be controlled by the joint angle.
How to make a chair with a back: //6.com.com///-Your-
Material selection
Restoring an upholstered regular chair or some kind of bar, kitchen, or office chair with a back requires a large, but simple set of tools and materials.
The first step is to decide on the fabric that will be used for the upholstery. Most often this is done:
Now think for yourself. I just want to add that all the materials presented, except genuine leather, have good performance indicators.
After all, what is important in the material of the seat? Durability, ability to retain shape, be washed without consequences, easy to clean and wash.
The leather looks beautiful and rich, but is easily susceptible to scratches and other defects. If you have an expensive chair made of leather or faux leather, then it is better to give preference to artificial leather. It is cheaper and much more practical.
The price depends on the specific material and its volume. Take with reserve, as you will have to make allowances. Some even find some materials at home and use them to reupholster chairs.
In addition to upholstery fabric, do not forget to take filler if the design of the chair requires its use. Foam rubber 40-50 mm thick with a density of 30-50 kg/m3 is best suited. It would also be a good idea to take a padding polyester that fits between the foam rubber and the upholstery material. This will allow the upholstery to slide easily, which will make it much easier to tighten and secure without wrinkles.