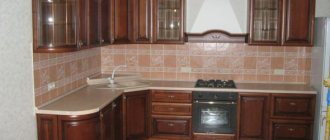
A good quality kitchen set can last for decades. But time passes, and the shine of the new furniture fades, stains, chips and scratches appear, and your favorite set or any of its cabinets are no longer pleasing.
There are two ways out of this situation: do some repairs and buy new furniture, or update existing cabinets and pencil cases. Moreover, in the second case, the cost of the issue will be minimal, and you will not have to deal with rearrangements. All you need is decorative self-adhesive film.
Unlimited possibilities of self-adhesive film
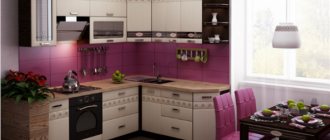
Kitchens covered with film look impressive both in photos and in real life. Surfaces are updated using vinyl or other film. The range of this material is amazing in its diversity, and the price pleases with its affordable price.
Decorative “self-adhesive” imitates:
- natural wood of different species;
- natural stone;
- ceramics and tile texture;
- leather and fabric.
In the photo - imitation wood.
Its texture can resemble patterned silk, a colorful tapestry or cute chintz. The material is produced in matte and glossy versions. There are films with holographic and mirror patterns. And all this can be combined with each other, creating interesting effects, changing an ordinary kitchen cabinet beyond recognition, as in the photo below.
The price of the film depends on the manufacturer and the decorative surface.
Vinyl “self-adhesive” is quite practical because it:
- not afraid of moisture;
- does not fade in the sun;
- does not respond to temperature changes.
With its help, you can completely update the design of both the kitchen and the bathroom, transform the kitchen cabinet or the entire set.
Adhesive film is a good budget replacement for a full-fledged repair. Of course, you need certain knowledge and skills, but the video will help you quickly understand the intricacies of the process.
How to update an old countertop made of natural and artificial stones?
The optimal method of restoration is polishing and grinding, because the tabletops have an identical texture throughout their entire thickness. Care must be taken with cast stone applied to the base in a thin layer; it will only withstand 2-3 polishing updates. In the future, it is optimal to improve it in the same way as wood or plastic - by gluing, painting, glazing. The same methods can be used to transform a stone if the set has already become boring.
Before you get tired of the set, scuffs and scratches form on the stone surface, it’s time to sand and polish it. Required tools:
- Sander.
- Polishing machine.
- Polishing paste.
Which film should I choose?
First of all, you need to look at the thickness of the material and the manufacturer. German “self-adhesive” tapes are of good quality; their price depends on the thickness.
Dutch and Italian manufacturers have proven themselves to be excellent. You can choose something from budget series or take a closer look at exclusive products, but then the price will be quite high.
The most inexpensive are Chinese adhesive decorative materials from unknown manufacturers. However, low price should not be the main selection criterion, otherwise a beautiful kitchen decorated with self-adhesive vinyl film can quickly lose its appearance.
Not all adhesive materials intended for promotional products can be used in the interior. Some of them are designed for short-term use. Choose high-quality decor, and then the restoration will be durable, and a simple kitchen cabinet will become an interior decoration.
The color can be any. If you want to take a creative approach to kitchen design, place photos of fruits, vegetables or flowers on the facades, thereby decorating ordinary old furniture. The drawing can also be applied using photo printing.
Decoupage technique
To remake a table, you can use such a popular method as decoupage. Decoupage is the decoration of an object by attaching a design to it. Often, napkins and any drawings, pictures, fabrics, or decoupage cards are used for such applique. Decoupage card is a specially designed decoupage paper that can be purchased at any specialty craft store. With its help, you can easily and quickly give an old table a very beautiful look.
- decoupage card;
- decoupage glue or PVA;
- aqualak;
- clear acrylic varnish;
- basic acrylic paint;
- primer.
The following tools will be useful when working:
- sandpaper of 2 types - coarse and fine-grained;
- fan brush;
- roller
First, the table is prepared for future work - it is sanded and primed. Next, you need to successively apply 2 layers of base paint, after which the table is left to dry completely.
It is very important that the paint is completely dry before further work, since the areas left undried will most likely change color under the varnish layer - the appearance of the furniture will be ruined
If you plan to make a table in a vintage style, you should sand it again: first with coarse-grained sandpaper, then with fine-grained sandpaper. In some places you can even intentionally rub off some of the paint. But if this style does not fit into the interior, you just need to carefully walk over the tabletop with fine-grained paper 2 times so that further layers lay down and stick better. Next, you need to apply aqualak to the surface of the table and gently sand it when it dries.
Now you should cut out pictures from decoupage paper and carefully arrange them in the desired order. You can completely cover the tabletop or simply make a pattern, for example, along the edge. When the location of the pictures is determined, you need to mark it with a simple pencil so as not to get lost during the work and not spoil the layout.
Then the pictures need to be soaked in a container with water for 5 minutes and then glued with PVA glue, slightly diluted with water, or with specialized glue for decoupage. In this case, each picture must be smoothed with a fan brush, otherwise unsightly wrinkles and folds may form, which will then be very difficult to remove.
When the glue and pictures have dried, the tabletop is again treated with fine-grained sandpaper. Then you should remove dust particles with a cloth and cover the table with varnish. The varnish is applied in 2 layers, with the last painting done no earlier than the 1st layer has dried.
To paint a wooden table, you can use such an interesting method as decoupage.
Remaking a table using decoupage technique will require the following materials and tools:
- PVA glue or special decoupage glue.
- Decoupage card or napkins.
- Transparent acrylic varnish.
- Aqualak.
- Primer.
- Basic acrylic paint.
- Fan brush.
- There are two types of sandpaper: fine and coarse.
- Roller.
The sequence of decorating a wooden table using decoupage technique:
- Prepare the table for future work - sand it and prime it.
- Apply 2 layers of base paint in succession and leave to dry.
If you are making a table in a vintage style, you will need to sand it first (first with coarse-grain paper and then with fine-grain paper). Apply Aqualak to the surface of the table and carefully sand it after it has completely dried. Cut out the pictures you like from decoupage paper and carefully arrange them in the desired order. The tabletop can be completely closed, or you can lay out a beautiful pattern with pictures, for example, along the edge. Mark the location of the pictures with a simple pencil so as not to get confused or confuse the layout during work. Soak the pictures in a container of water for 5 minutes, then glue them with glue that was previously slightly diluted with water.
- When the glue and pictures have completely dried, sand the tabletop again with fine-grained sandpaper.
- Remove dust particles with a cloth and cover the table with varnish. The varnish must be applied in two layers, with the second painting of varnish carried out no earlier than the first layer has completely dried.
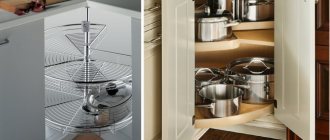
Technology of pasting furniture with polymer films
If you decide to update your kitchen furniture using self-adhesive film, then first prepare the base. It should be understood that the decorative covering will not hide potholes and bumps, it will only disguise the stains, so all unevenness must be removed before pasting. A video with tips will simplify the workflow.
12 rules for working with self-adhesive tape
- The fittings and doors must be removed, and each kitchen cabinet (facades and frame) must be inspected for the presence of depressions and bulges.
- If there are defects on the furniture, all irregularities are filled with putty and sanded well.
- To calculate material consumption, you will need measurements of all parts of the kitchen unit. You need to carefully measure all the parts that you plan to paste over.
- All dimensions are transferred to the back side of the film. It is usually made of white paper, on which the drawn lines are clearly visible.
- When cutting, you should always leave a margin of about 1 cm. This will help in your work: if you start gluing the vinyl at the wrong angle, the margin will make it possible to correct the situation. All excess is easily cut off with a breadboard knife.
- Decorative self-adhesive film is cut with a stationery knife, curved lines are cut out with scissors.
- Then you need to degrease all the surfaces to be decorated so that the “self-adhesive” does not come off over time. Window cleaning liquid or other products are suitable for this. Grease stains need to be treated especially carefully so that the decorative finish does not come off.
- Pasting of kitchen units is carried out on a dry and clean surface, otherwise the “self-adhesive” will begin to bubble and peel off from the base.
- The film must be applied evenly.
- The backing is removed in several stages: first, only a few centimeters are peeled off, after gluing them, a little more is removed, and so on until the entire panel covers the part to be decorated.
- Smooth out the plastic decor from the middle to the edges. Air bubbles must be removed during operation. It is convenient to work with a plastic scraper, stroking the surface with a soft cloth.
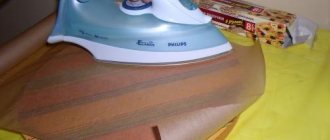
- Small air inclusions are removed with a needle. The finished part can be processed through the fabric with a warm iron.
Coloring
The method is quite simple, but requires careful surface preparation. The main advantage of this method is the ability to paint the facade in any color. If you want to make your kitchen bolder, you can choose a bright shade, such as blue, green or orange. A win-win color is white, as well as many light shades, incl. beige, gray, cream, etc. Imagine in advance what the kitchen will look like and get creative.
At the same time as painting the facades, they can be slightly transformed using moldings, special strips that are glued to the surface and give it an interesting relief.
The sequence of actions is as follows:
- remove the facades from the furniture, dismantle the fittings and glass. Those elements that are difficult to remove can be sealed with masking tape;
- It is most convenient to remove old varnish or paint using a sanding machine. If PVC film was used as decoration, it is better to use a hair dryer. The temperature will melt the film and make it easier to remove. It is better to work in a respirator so that small particles of the facade and the pungent odor of PVC do not enter the respiratory tract;
- if there is serious damage, they must be filled with putty and then sanded;
- the surface is rubbed with sandpaper, then the dust is removed and degreasing is carried out;
- if you plan to use moldings, they are attached at this stage. You can choose smooth or textured planks; there are products that imitate stucco. It is better to sand the planks in advance, then they are cut into pieces of the required sizes. Often moldings are attached along the contour of the doors, or they are formed into a pattern closer to the center. Usually a connection at an angle of 45 degrees is used. After you are sure that the figure is laid out evenly, the elements are glued, you can use glue for wooden products. It is allowed to use nails without heads;
- MDF, chipboard and wood absorb moisture well, so it is better to pre-coat them with a primer. The one designed for woodwork will do. It is better to apply two layers;
- Now you can start painting. It is better to use acrylic paint or auto enamel. The first is cheaper, the second is better in terms of moisture resistance and resistance to mechanical damage. You can use a brush, roller or spray gun. The paint is applied in 2-3 layers depending on the required color saturation. To guarantee, some craftsmen cover the facades with a layer of transparent varnish;
- when the paint has dried, the masking tape is removed, the fittings are returned to their place, and the facades themselves are hung on hinges.
If painting seems too banal to you, then use glisal, a translucent glossy paint. It is applied in exactly the same way as acrylic paint, but while the coating dries, you can create an interesting texture on the surface. Using a sponge, bag or other available items, you can make a geometric design or an ornate pattern. If anything happens, part of the drawing can be removed with a roller. The result is an unusual result that will appeal to lovers of ethno-style.
Difficulties in work and their solutions
Problems often arise with processing the ends and shaped parts of kitchen units made of MDF or other material. An industrial or household hair dryer will be a good helper in this case.
The restoration will go faster if you work together: one person stretches the material by heating it with a hairdryer, the other carefully glues it to the base.
It is easier to apply the self-adhesive tape evenly on a damp surface. To do this, lightly moisten cabinets and doors with a spray bottle. Water will not allow the material to immediately grasp the surface and will provide an opportunity to correct the work.
When cutting the material, you need to make allowances on each side. For parts with ends, do not forget to make cuts in the corners. First, they paste over the part itself, and then proceed to the ends. The rounded ends of MDF facades are treated with a hairdryer for a better fit.
Decoupage
A huge advantage of decoupage is that it does not limit your imagination and allows you to change the tabletop beyond recognition, with little effort.
For the work you will need:
- PVA glue;
- Pictures;
- furniture varnish.
To decorate your table, you can purchase ready-made pictures for decoupage, sold in any craft store. But motifs cut out from paper napkins or pictures from magazines and books are quite suitable.
You can design a drawing on a computer and print it out - this way you can see the whole picture in advance and decide on the drawing before starting work. Stages of work:
- Before work, thoroughly wash the old countertop and treat it with any degreasing agent - a swab moistened with alcohol will do;
- Dilute the glue in a ratio of 1:1;
- Moisten the selected motifs with it and glue them to the tabletop. The composition is created based on your taste, the main thing is not to overdo it with the number of motifs, otherwise the tabletop will look tacky.
- Carefully straighten the glued pictures - there should be no bubbles under them;
- Wait until the tabletop is completely dry;
- Cover the dried surface with varnish;
- Wait for the varnish layer to dry and apply a second coat;
- To prevent new decorations from being erased from the tabletop during wet cleaning, repeat the varnishing operation 3-4 times. For ease of use, the varnish can be purchased in aerosol packaging.
This hand-made table design will be in a single copy. This will make the interior design unique and memorable.
We also recommend watching the video instructions:
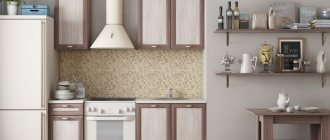
Restoration of facades with decorative film
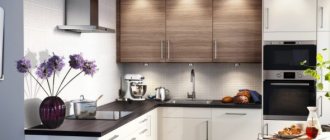
The appearance of the kitchen largely depends on the cladding of the facades. If your kitchen has smooth doors without a relief made of chipboard, then they can be easily covered with vinyl film.
Updating kitchen MDF facades with convexes will be easier if you use an industrial hair dryer. Only a well-heated film can take the desired shape. If there are decorative details on the facades, they must be removed before pasting.
Replacement of the old film is carried out only after removing the previous layer. Remember that decorative film is only applied to prepared surfaces.
It should be taken into account that in production, MDF film facades pass through a special press, which makes it possible to obtain a smooth surface without flaws. At home, MDF can only be covered with self-adhesive.
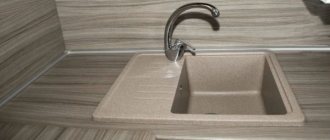
Decorating with tiles
In order to update the countertop with your own hands, you can use ordinary ceramic tiles. This decor can be done by anyone. You can choose ceramic tiles, mosaics, composite tiles. Stacked mosaic tiles, which come in a variety of colors, look very good.
Important : A very original design in the kitchen is obtained if you use the same tiles from which the apron above the work area is made to decorate the countertop.
It is advisable to combine the tiles on the countertop in size and shades - this way the design will be more original
Also, tiles can be combined with mosaics. Today, mosaics can also be purchased in the form of large tiles, which greatly facilitates and speeds up the process.
To work you will need:
- ceramic tile;
- tile adhesive;
- grout.
The countertops are washed and dried. Then glue is applied to it and the tiles are laid. After everything has dried, grout is applied.
Tile decor is suitable for updating work area countertops. The tile easily withstands intensive use and is not damaged by wet cleaning using chemicals. Also, tile decor is ideal for updating countertops and window sills. But for the dining table this is not the best option.
You can see the principle of laying tiles on a countertop in the video below:
Examples of finishing countertops with slabs (photo)
Interior renovation using film
Designers love polymer films. They have good plasticity and decorative properties; with their help you can quickly update almost any surface. Material suitable for decoration:
- tiles in the bathroom or kitchen;
- wall panels;
- doors;
- different furniture.
Films are available in different colors, with and without patterns. With their help, you can update your kitchen set and change old furniture in your home without extra costs. After all, the price of even the most expensive film will be cheaper than a new headset.
Restoring tiles using vinyl is not difficult. It is important to choose the right drawing here. Delicate chintz designs or films with textured embossing are suitable for the kitchen.
Complete the design with a decorative kitchen apron. Its restoration using film usually does not cause difficulties. The main thing is to carefully read the instructions on the roll.
Before gluing the tiles in the bathroom, you need to carefully prepare the surface - degrease it well. Otherwise, the film will quickly peel off.
Tabletop care
To ensure that the consequences of the restoration are pleasing for as long as possible, you should follow simple rules:
- Use cutting boards to cut food.
- Do not place hot dishes on the countertop.
- Do not use abrasives to remove dirt; replace them with gentle products.
- Do not subject the surface to shock.
- Wipe the countertop dry after each wash.
If you don’t want to bother with restoration, order a new work surface. At E-stoun.ru you can choose various materials to suit every taste and budget. The craftsmen do everything turnkey: design development, manufacturing and installation of countertops.
What to do if the film comes off?
It will take time to reupholster kitchen MDF facades. And I don’t really want the film to come off after a month or two and the film on the headset or cabinet to peel off. If you follow the gluing technology and operating rules, this should not happen.
But if in some places the film moves away from the base, it can be glued. You will need a syringe and glue (for example, “Moment” or “Titan”). It is inserted under the film and pressed into the restoration site.
With the help of adhesive-based films, you can give a new breath to MDF kitchen facades and kitchen units made of any material. An ordinary, neatly papered cabinet and set looks quite aesthetically pleasing. Follow the instructions and enjoy the results of your work.
Cannot be restored
Sometimes repairing an old countertop is more expensive than buying a new one. Here the choice is obvious - it is better to replace it. There are a huge number of options today, so you can choose one for every taste, color and budget. Also, when choosing, you should take into account the overall style of the kitchen unit.
There are five types of tabletops:
Tabletops made of fiberboard or chipboard, covered with a layer of plastic on top for greater resistance to moisture and elevated temperatures, are the best option in terms of price-quality ratio. They are also distinguished by a wide variety of textures, their care is extremely simple, and their resistance to various types of damage is quite high. Joints coated with a high-quality water-repellent sealant will significantly extend the service life of the surface and will also retain its original shape. Disadvantages of plastic - scratches and stains may remain.
Worktop with a plastic outer layer - a modern composite in the kitchen
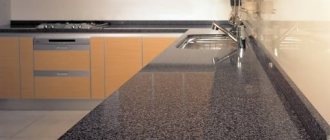
Stone planes are divided into two subtypes: artificial stone or natural. Their distinctive features are high strength, resistance to any external influences (moisture, temperature, etc.), and attractive appearance.
Kitchen countertop made of natural stone
A practical and less expensive option is an artificial stone countertop.
The main disadvantages are heavy weight, high cost, and in addition, if any part of the tabletop is damaged, it will have to be completely replaced.
Metal tables are made of stainless steel and are used primarily in professional kitchens. They are resistant to mechanical and chemical influences, they are not afraid of moisture and high temperatures, and the price is also not bad. This material has no particular disadvantages, but some are inclined to argue that it contributes to the loss of beneficial properties of products cut on such a table.
Dimensions
A mandatory requirement is the correct size of the kitchen countertop. Basically, all standard table tops are 60 centimeters wide. In small kitchens you can see smaller sizes.
These options are made directly to order. The length of the tabletop is made directly to the exact size of your set. There are options in which the tabletop smoothly transitions into the window sill. Therefore, you absolutely need to think through all the details for making this product in advance.