At first, beginning decoupage artists are faced with the question of which napkins are best to use for decoupage and how to properly make decoupage from napkins with their own hands. This material is the first thing people pay attention to when getting acquainted with this type of needlework. Therefore, in this article, we will talk about where to buy napkins for decoupage and how to work with them correctly.
Selecting napkins for decoupage work
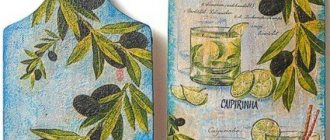
Most often, ordinary napkins consisting of three layers are used in decoupage for beginners.
They are available for sale both in regular stores and in supermarkets. Their size is usually thirty-three by thirty-three centimeters. On the eve of the holidays, on the shelves of hypermarkets you can find napkins with really interesting decoupage themes. By purchasing a pack of napkins, you save your money. But be prepared for the fact that the sets may contain unexpected motifs that may not always be to your taste. After all, when purchasing, we only see the top and bottom images, and what is inside, alas, remains a mystery to us. By looking at specialized craft stores, you can choose special three-layer decoupage napkins for yourself. This material is sold individually and is more expensive than ordinary napkins. The main advantage is, of course, the variety of choices.
In addition, you can use napkins for decoupage with one layer. In this case, you will have to thoroughly search for interesting motifs, because original drawings on them are quite rare. If we talk about the technology of working with such napkins, then it is no different from the others. The only thing is that there is no need to separate them.
Read
Creating volumetric decoupage using various materials
When purchasing napkins, choose:
- Material with a plain light background, on which the borders of the pictures have clear outlines;
- Napkins with background images of small patterns and ornaments of the same color combination. With their help, you can do decoupage on the side parts of products and on their internal surfaces;
- Material on which an interesting collage is applied, as well as motifs that can be used in full, and not in separate parts.
How to properly glue material using an iron
This option of working with a napkin is suitable for a flat wooden surface. Here, in addition to a napkin, you need to stock up on glue and parchment with a non-stick coating. Before work, it is necessary to lubricate the surface with a primer. After the wood has dried, apply PVA glue to it. You need to wait a little so that the edges of the product are already dry, but the middle is not yet. At this moment, place a napkin on the product, put parchment on top and iron it. The result is a perfectly smooth surface.
Advantages and disadvantages of decoupage napkins
For beginning needlewomen, it will be useful to get acquainted with these features of the material used.
First let's talk about the advantages:
- Variety of choice. Original colors, shades, beautiful vintage images, images in Provence style, Country style, marine, floral themes and much more, all this gives needlewomen a huge field for creativity;
- Small thickness. This property allows the napkins to organically merge with the surface being decorated. And after applying layers of varnish and sanding the surface, the outlines become completely invisible.
But, unfortunately, decoupage napkins have more disadvantages:
- Due to the fact that images can often be intertwined, and pictures are partially cropped, tearing out details with your own hands violates the integrity of a particular motif;
- The selected napkin sometimes has images that are too small or too large;
- The quality of the selected napkins is not always acceptable. During the decoupage process, you may find that the colors spread and the outlines of the pictures are doubled. This occurs due to the displacement of the second paint layer during production;
- Since the design on the napkin is applied in a dotted manner, in the case of background painting, it will be necessary to redraw it completely in order to hide the difference from the background of the napkin and the drawn background.
How to glue a napkin
The main condition for fixing the napkin is to separate its top colored layer with your own hands, with the printed image, and gluing it to the surface.
In addition, there are several methods for fixing a napkin in decoupage:
Using a file. This is the most universal method that will help you easily connect the napkin with the surface to be decorated. To better understand how this happens, watch the video for beginners, which shows this process in detail;- Using a glue stick and iron. Convenient when working with a flat surface on which an adhesive layer of a glue stick is applied. Next, a napkin is placed on the plane, baking paper is placed on top of it, and this layering is already ironed on top with an iron. When heated, the napkin is connected to the surface, after which it is additionally fixed with a layer of glue.
- Using a fan brush. To make decoupage in this way, you need to place a napkin on a plane and drip water in the middle. After this, using a fan brush, you need to gradually and carefully stretch the water, adding more as you go. As you work, you must carefully lift the napkin along the edges to straighten the folds.
Read
Creating paintings and panels with your own hands using decoupage technique
LiveInternetLiveInternet
6 Master Classes on gluing napkins. Decoupage. Lesson #1.I signed up for online decoupage lessons.
A wonderful master class arrived today! I hasten to share this “treasure” with you.
The material is posted with the permission of the Author.
So... Bon voyage!
What methods of gluing napkin motifs will lead to the best result?
Beginners most often receive information that they need to take PVA glue and apply it to the napkin motif from the center to the edges. In fact, everything is not so simple: now there are many different ways of gluing napkin motifs to a surface, and not all of them allow you to glue a napkin without folds.
The currently most commonly used methods that allow you to do this most accurately are the “file method” and “water + fan brush”.
There you will also learn about the differences in preparing a napkin motif depending on further actions.
————————————————————————————————————-
Now I will tell you how to glue napkins for decoupage without folds.
In general, my personal opinion is that in decoupage there is no concept of “how to do it right.”
Everyone chooses the method that works best for them, and there are a great many of these methods!
————————————————————————————————————-
To begin with: the napkin can be glued as a whole, or in parts.
This usually depends on the pattern and the surface on which the napkin is applied.
For example, you won’t be able to stick a whole napkin onto a spherical surface without folds, no matter how much you want—you need darts.
Secondly, the question of “cut or tear?” is decided.
1. If the design has clear boundaries (for example: a separate flower), we definitely cut it out.
2. If we are working with a drawing whose background we will need to complete, trying to hide the border between the napkin and the background, we tear the napkin with our hands.
————————————————————————————————————-
Before applying the napkin, be sure to tint the surface of the workpiece with white paint , otherwise the napkin will lose its brightness, because after coating with varnish it will become half transparent.
The result will be disappointing: the napkin will take on the background color and may become almost invisible.
————————————————————————————————————-
Now about gluing methods, they can be combined into two types:
1. First, apply glue to the surface to be decorated - then apply a napkin.
2. First, apply the napkin to the surface, and then apply glue or varnish; the glue will saturate the napkin through and through - and it will stick.
————————————————————————————————————-
For gluing , by the way, you can use a variety of glues : specialized potches for decoupage, PVA glue, diluted PVA glue, glue stick, even egg white, or you can glue it directly onto the varnish (in the case of varnish, the napkin adheres to the surface almost tightly, so for beginners, it’s better to use PVA glue - it’s cheap and easy to wash off if something doesn’t work out).
Now about the tools: you can use brushes or spread the glue with your fingers. Some masters believe that you can do everything more accurately with your fingers, because their sensitivity is higher.
I prefer to work with a flat brush (fan brush , synthetic, no. 4 or larger):
Let's start gluing!
————————————————————————————————————-
Method 1: PVA glue and decoupage.
We dilute PVA glue 1:1 and, applying a napkin, begin to smooth the napkin, moving from the center to the edges.
You can do this with a brush or your fingers, but the main thing is to move a little in different directions so that the napkin is saturated with glue evenly.
In this case, the edges of the napkin must be lifted evenly so that any wrinkles that arise are immediately removed.
A popular method on forums is “pour a puddle of glue into the middle of a napkin and smear it with your fingers in a circular motion.”
The author of this technique is kzero . Excess glue is then removed with ordinary napkins.
————————————————————————————————————-
Method 2: Glue stick (or PVA) and iron.
This method is suitable for large flat surfaces.
The surface is smeared with glue, dried with a hairdryer, and covered with a napkin.
The napkin is spread out as much as possible and covered with baking paper on top. Ironed.
Cover the top with another layer of glue. It turns out very smooth:
————————————————————————————————————-
Method 3: Polyethylene file and decoupage.
For this method, take a regular plastic file into which we put business papers.
The cut out napkin for decoupage is placed on the file! facing the file ! and pour water on top.
Using your fingers, carefully straighten the napkin onto the file. It's not difficult in a puddle of water 
Excess water is drained.
Next, it is very convenient to try on the location of the pattern to the surface to be decorated:
And then carefully apply the napkin along with the file to the surface:
The most important thing is that at least one edge of the napkin sticks to the surface,
then the rest of the napkin will begin to stick behind it.
Well, in the end, you need to coat the napkin with diluted PVA glue.
————————————————————————————————————-
Method 4: Auxiliary: spray.
The napkin is first sprayed with water from a spray bottle so that it stretches.
Then dry and, if necessary, iron.
Thanks to this method, the napkin stretches less when glued and fewer wrinkles are formed.
You can also spray the napkin with aerosol acrylic varnish and, after drying, iron it.
This will make the napkin “stiff” and will not stretch and wrinkle so much.
You just need to take one thing into account: when sprayed with varnish, the napkin ceases to be permeable to water or glue, which means you must coat the surface with glue BEFORE applying the napkin.
————————————————————————————————————-
Method 5: Removing the consequences. After the fight they wave... with sandpaper)))
If we glued a napkin and it dried with a crease, all is not lost.
The fold itself can be gently sanded with sandpaper.
The most important thing is not to overdo it, otherwise you will erase the design of the napkin.
————————————————————————————————————-
Method 6: My own method.
For this method, a fan synthetic brush and water are used.
The napkin is fixed with varnish or glue after its application.
Try it and you will succeed!
————————————————————————————————————
Author: Alisa Luchinskaya. her website...
Source: DCPG Decoupage Lovers website
————————————————————————————————————
Additional material:
(click on the picture)
Creating a background.
| Fan brush. | Vintage key holder. |
—————————————————————————
Dear Friends, I bring to your attention!
Video course “Crackleur educational program” from Alisa Luchinskaya.
Let's learn by doing! Creative success to you Dear!
With love!
Alyona.
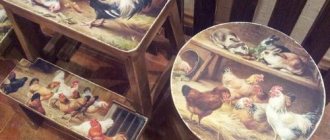
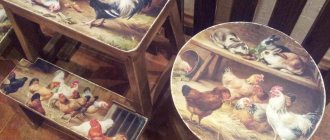
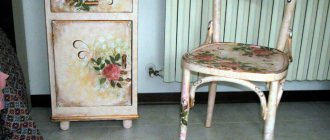
Master class on decoupage of a chest of drawers with napkins
Having understood the theory, we invite you to consider a visual master class with photo and video samples on decoupage of a wooden chest of drawers with napkins in the popular Provence style.
In order to make this master class for beginners, you need to prepare:
- small chest of drawers If you plan to use an old product in your work, be sure to clean it using sandpaper;
- white acrylic paint;
- napkins for decoupage in the Provence style;
- PVA glue;
- brushes;
- acrylic based varnish.
So, at the first stage, you need to take the prepared chest of drawers and tighten all the fittings on it. After sanding the surface, white paint is applied to the object. This stage is also called priming. In addition, you can apply more than one coat of paint, but several with preliminary sanding and drying of each, to achieve a smooth and even surface.
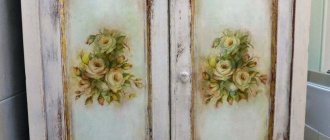
Since Provence style was chosen as the decor, select several options for napkins in this theme for decoupage. Often, “Provence” is mainly associated with delicate lavender. In the photo online you can view several options for napkins with themed images in this style.
From the prepared napkin, you need to cut out with your own hands the selected plot in the Provence theme relative to the size of the facade located in front. Separating the top colored layer from the design, glue it along the top drawer, as in the photo. The napkin is placed on the plane of the box. Next, PVA glue is applied in the center. After this, with careful movements of the brush you need to make smoothing movements from the center of the picture to its borders. In this way you can gradually remove air bubbles from under the motif.
At the next stage, the master class gets rid of unnecessary parts of the napkin located along the edge of the object. It’s convenient to do this with your own hands using a toothpick.
Read
Learn how to decoupage shoes and leather accessories
Based on this scheme of actions, you will need to do similar decoupage on the remaining drawers, as well as the partitions among them.
At each stage, do not forget to let the item dry. After drying, take a knife and carefully separate the drawers in the places where they will open.
Next, the master class will demonstrate how to give an item an aged look. In the photo you can see how to do this simple process. To do this, take a toothbrush, onto which purple paint is applied. Next, use your hands to press down on the fibers of the brush to spray the paint across the surface of the dresser.
The master class is completed by coating the pre-dried product with several layers of acrylic-based varnish, each of which must be dried. You can view and evaluate the result of decoupage of a chest of drawers in the Provence style in the photo.
For beginner decoupage artists, we recommend watching video tutorials on decoupage with napkins, which will help you learn this process from experienced craftswomen.
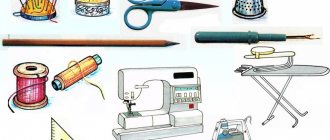
Necessary tools for decoupage
Depending on the gluing technique, different tools may be needed. For beginners, to work with the simplest and most common technique you will need the following tools:
- napkins with the required pattern;
- small scissors with a sharp blade;
- decoupage glue (as an alternative, you can use PVA glue, but it will need to be diluted with water in a 1:1 ratio);
- varnish;
- brushes;
- decoration item;
- acrylic paints (if desired, paint the background or missing fragments if the design of the napkins is not completely satisfactory).