- Examples of calculation of openings for different PMMs
- Tools
When purchasing household appliances, every owner wants its facade to fit organically into the interior of the kitchen, bathroom or utility room. Therefore, many immediately ask themselves the question of how to install a built-in dishwasher (hereinafter also referred to as a dishwasher, PMM) in the opening of a kitchen unit with their own hands.
Built-in dishwasher fits harmoniously into the surrounding interior
Types of dishwashers
First, decide which type of dishwasher is best suited for your kitchen. There are 3 most common ones.
Built-in
It is installed directly into a niche, and after installation it will be part of the kitchen set: the matching facade cleverly disguises the machine as an ordinary cabinet, so it always looks organic in the interior.
Read about the secrets of choosing a stylish and ergonomic kitchen set here
Pros:
- spectacular appearance;
- optimization of free space;
- ideal for small kitchens.
Minuses:
- such an installation most often requires thought at the stage of installation of the kitchen unit;
- It is not always possible to install a dishwasher according to all safety rules due to lack of free space.
Can be built into any section of the headset. Simply remove the old module and fill it with the machine. Often the compartment directly under the sink is used for this. The advantages of this solution are closely located communications - less fuss with hoses and wires.
An alternative option is to the right or left of the sink. You will have to worry about connecting the hoses, but there is no need to increase their length excessively.
Any built-in solution is always a compromise: you have to sacrifice, for example, space for storing kitchen utensils.
If the configuration of your kitchen set provides for a pronounced pencil module, then it is optimal to place the PMM there. At least, such a solution fits entirely into the logic of the user interface of the average housewife.
Most full-size dishwashers are available in a width of 60 cm. This corresponds to the default width of the cabinets of any kitchen unit, and you do not have to do any additional work to adapt the module to the appliance.
Main selection criteria
It doesn’t matter where you are going to buy your PMM - on the Internet or in a chain store - in any case, you will have to make a choice between a dozen models. This is a rather grueling (and sometimes painful) process. The worst thing you can do is lose your head and fall for cheap marketing gimmicks.
Dimensions
Most models are available in 2 standard sizes:
- width 60 cm;
- 45 cm wide.
The first option can be found much more often in the interior, as it ideally matches the standard width of the kitchen module. The second one is considered narrow, it is more difficult to fit it in, since it is necessary to completely change the original configuration of the headset.
In terms of height and depth, most dishwashers on the market meet generally accepted standards:
- 82 cm built-in models - this height is similar to that of any kitchen set or table, 85 cm - free-standing;
- 55 cm is the depth of built-in dishwashers, allowing you to freely place inside all the hoses and wires necessary for connecting to communications. Free-standing ones have a depth of 60 cm.
If you are going to install a dishwasher directly under the sink, then there is a reason to use a lowered version with a height of no more than 45-50 cm. Especially if you combine a dishwasher with a compartment for storing dishes in one module.
When selecting, also take into account how many sets of cookware a particular model is designed for. In standard full-size PMMs, you can wash up to 12 sets of dishes at the same time. For families of 2-3 people, it is quite possible that a “stripped-down” model for 8 sets will be enough. Especially if there is an acute issue with the availability of space for large equipment.
Number of programs
Here, as is the case with any household appliance: you want everything - and cheaper. However, in life, alas, this does not happen: and you have to pay a lot extra for pleasant functional “goodies”.
In the cheapest models, as a rule, the set of washing programs appears in a stripped-down form:
- automatic selection - the equipment itself determines the desired mode;
- quick wash - in case the dishes are slightly dirty;
- intensive cleaning is the process of treating the dirtiest dishes.
Most often, even such a basic set is quite enough to solve most business problems. However, there are also extended functionality:
- delicate mode - when in contact with thin glassware;
- eco mode - washing at a water temperature of no more than 55 degrees;
- rinse and half load;
- delayed start, etc.
A useful thing is a timer that allows you to program the machine to turn on. In case you have activated a special reduced tariff for electricity consumption at night.
You shouldn’t chase expensive models with innovative software: it’s better to decide in advance what functions you really need. There are countless cases when sophisticated household appliances are used at only 10-15% of their potential.
Energy efficiency class
Advanced filling is, of course, nice and sometimes even great, but choosing a truly high energy efficiency class seems to be perhaps the most important point when buying any dishwasher.
Everything here is extremely simple: the higher the class of equipment, the less electricity it consumes. You can find out the exact numbers using the markings on the machine itself. As a rule, it is located on the back. Also, information must be present in the product passport and instructions.
Let's be clear: for earlier models, A was considered the highest energy-efficient class. It gave the minimum energy consumption for 1 cycle of use. In recent years, you can increasingly see the A++ and A+++ markings. This is still the same top class, but optimized, so dishwashers with similar markings consume even less kW. These are the ones you should focus on when choosing - especially if you are going to load the machine often.
For the most economical ones, we have prepared a small table in which we have collected popular units with the highest energy efficiency class (A+++).
| Model | Type | Minimum price (RUB) |
| Hotpoint-Ariston HSIO 3T235 WCE | built-in | 48 000 |
| Bosch SMV68MX03E | built-in | 76 150 |
| Zanussi ZDLN5531 | built-in | 37 300 |
| Electrolux EES948300L | built-in | 46 220 |
| Bosch SPS2HMW3FR | freestanding | 36 390 |
| Indesit DFO 3T133 AFX | freestanding | 60 600 |
Conditions for installing a dishwasher in the kitchen
The main condition is the availability of free space for the installation of such fairly large equipment. Especially important for modest-sized kitchens. And if with free-standing appliances everything is simple - it can be installed on almost any area of 0.6x0.6 m, then with built-in models you will have to think a lot about which compartment of the kitchen unit is best sacrificed in order to organize integration.
So pick up a tape measure and take measurements. If you already have some dishwasher models in mind, compare the data received with their dimensions - and draw very specific conclusions about whether this or that solution is suitable for you or not.
Other conditions for installing PMM in a finished kitchen:
- the presence of all communication nodes (sewage, water supply, electricity) within meter (maximum 1.5 m) accessibility;
- allocation of a separate 220V power line with mandatory grounding and a waterproof socket;
- convenience of location (don’t forget about the working triangle rule);
- a distance of at least 40 cm from the hob, radiator and other heat sources;
- cannot be placed close to the washing machine;
- Do not place the microwave oven on a compartment with a dishwasher installed - electromagnetic waves negatively affect the electronic components of the dishwasher.
Finally, one more point is the connection to the water supply. Contrary to popular belief, it is not necessary to connect the machine to hot water. Moreover, without protective filters that regulate the temperature, it may even fail over time, so a cold water source is sufficient.
Materials and tools
Videos often show the installation process, but they forget to mention the necessary materials and tools.
Some components are already included with the dishwasher.
A mandatory component for installation will be the protection of the countertop from its inside.
When planning to begin installation work, be sure to ensure that you have the following components:
- moisture-resistant euro socket (preferably with a protective cover);
- three-core copper wire;
- difavtomat;
- tee with brass tap;
- fum tape for sealing joints;
- gaskets;
- clamps;
- siphon for 2-3 outputs;
- adjustable wrench;
- pliers;
- screwdrivers of various types;
- level;
- roulette;
- drill;
- drill.
Additional equipment may be needed. Here you need to focus on your specific situation. This is the standard set.
If embedding is not possible
You will not be able to install a freestanding dishwasher in an already finished kitchen if:
- there is no way to raise the entire kitchen to a height of 85 cm - and this does not include the countertop;
- The cover cannot be removed from the machine.
Expert advice
Valery
installation wizard
Removing the lid from a dishwasher is not as easy as it seems at first glance. Firstly, in most cases the warranty is void. This is understandable: adjustments are being made to the product, so you will rightly be refused when you contact us for repairs. Secondly, in many models this action can lead to direct damage to the machine. And finally, even if it can be removed quickly and “painlessly”, it is not a fact that the height will be exactly what is required.
In this case, all that remains is to place free-standing dishwashing modules on the floor or countertop and carry out minimal camouflage work so that the equipment is not too noticeable and does not spoil the interior.
An extremely resourceful option. Of course, questions remain about the aesthetics of such placement, but it is infinitely convenient and reliable.
In fact, the options for freely placing a dishwasher are limited only by the convenience of connecting it to three communication nodes: water supply, sewerage and electricity. Therefore, always keep this point in mind and use it to filter all the ideas that appear in your head.
Connection to the water supply system
A tee with a corner tap is installed to the water riser, where the branch with the tap will be used to connect the dishwasher. A tidal hose, which is included in the package, is connected to this branch. If rigid pipes are used to connect the machine, a coarse filter must be installed in front of the shut-off valve. This is necessary so that the dishwasher heating element does not need to be replaced as soon as possible.
Connecting a dishwasher to the water supply and sewerage system with your own hands is a simple process
An easier way to connect the dishwasher to the water supply is to connect the tidal hose directly to the sink faucet. Disadvantages of this method:
- During the machine's operating cycle, access to the tap will be limited.
- The tidal hose on the tap does not look very aesthetically pleasing.
This method is not very convenient due to its simplicity, but is acceptable as a temporary option.
We also recommend that you watch a video on how to connect the dishwasher correctly:
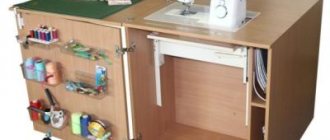
Installing a Freestanding Undercounter Dishwasher
This is the most convenient way to embed a dishwasher into an already installed kitchen set. Use it if you have a cabinet that is slightly larger in size than your typewriter - and it is located no more than 1.5 meters from the communication nodes.
First, completely dismantle the old compartment: remove not only the shelves and fastenings, but also the walls, including the back, and the base. Then connect the drain and inlet hoses: the first is connected to one of the siphon outlets, the second - through the installed tee to the pipe.
The tabletop will be protected from swelling under the influence of steam by a metal sheet that covers its lower part. You can also use insulating film instead, but it will not be as reliable. Different manufacturers have different approaches to solving this issue. You can choose your preferred method of protection yourself and arrange it yourself.
Whether or not to decorate a decorative facade is a question that remains entirely at your discretion. In addition, there are different dishwashers, and there are models that look good in the room without any cosmetic frills.
How to install a dishwasher
There are several ways to install dishwashers in the kitchen, the features of which should be familiarized in advance.
Cabinet installation
Some people choose to build these products directly into their kitchen cabinets.
Preparatory work
Before installation, preparatory work must be carried out, consisting of several stages.
Communications
First, you need to prepare communications for further connection of the device.
Clean cold water
Before installing dishwashers, you need to make sure that they receive cold and clean water. To do this, the device is installed near the location of the water pipe equipped with a special threaded connection. It is she who is responsible for the flow of fluid into the system.
See also
How to install a sink above the washing machine in the bathroom with your own hands
Electricity
It's no secret that any household appliance runs on electricity. Therefore, you need to install the machine so that it can be connected to a source of electricity. Experts recommend placing equipment close to outlets.
Sewer system
All dishwasher models automatically drain waste liquid into the sewer system. To ensure that contaminated water is drained without problems, the machine is installed near the sewer pipes, to which a drain point can be connected in the future.
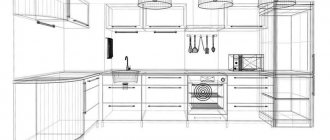
Selecting a location
To choose the most suitable place for a dishwasher, you need to take care of accessibility to all of the listed communications. Therefore, a place in the kitchen is selected that is close to both the water pipe and the sewer and an outlet.
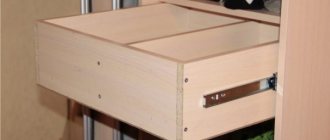
Kitchen cabinet remodel
In order for the structure to fit in the cabinet without any problems, it must be altered in advance. First you need to get rid of the bottom shelf, remove the door with the front plinth. After this, the cabinet will only have the top tabletop with the walls and back panel. The dishwasher must be attached to the side walls using mounting screws.
Preparation of the water supply and sewer system
You also need to prepare the water pipe in advance, which is responsible for the flow of water. Additional fittings are installed on it, which parallelizes the water supply. This allows you to simultaneously provide water supply to the washing machine and dishwasher.
In addition, you must first replace the sewer pipe with a tee in order to connect the dishwasher through it.
Electric outlet
When used intensively, the dishwasher consumes a lot of electricity. If it is connected to an outlet that has multiple appliances connected, the network will become overloaded. Therefore, experts advise connecting to separate outlets with high-quality grounding.
Additional work
Sometimes people have to do additional installation work. These include the creation of holes that are responsible for the output of the power wire and water supply hoses.
Machine installation
The dishwasher installation process is carried out in several stages.
Installation of the “facade”
The front side of the device door must be covered with a special panel, which is made in accordance with the design of the kitchen. To install the front panel, special fasteners are installed on the dishwasher doors. They are made of thin metal or plastic.
Tabletop protection
Experts recommend taking care of additional protection for the countertop in advance. It may deteriorate due to exposure to steam that enters its surface when the device door is opened. You can use metal, plastic or tape to protect wooden surfaces. Some models of machines are equipped with protective metal sheets that are installed under the tabletop.
Installation in a free-standing module
There are times when there is no free space in the cabinets for new equipment and therefore you have to install it separately. To locate the dishwasher, select a site close to all necessary communications. When installing the machine, you need to make sure that it stands well and does not vibrate during operation.
See also
Reasons why the washing machine does not drain water and what to do, DIY repairs
Niche installation
If there is a special niche in the kitchen, it can be used for installing dishwashing equipment.
Preparation
Before carrying out installation work, they are engaged in preparation.
Tool
First you need to prepare the tools with which the work will be carried out.
Screwdriver
A screwdriver is an electrical tool that is used to loosen or tighten screws. It can also be used to drill holes in which fasteners will be placed.
Screwdriver
Some people don't have a screwdriver, so they have to use regular screwdrivers. This tool allows you to tighten screws and screws by hand. To install the dishwasher, you will need straight and Phillips screwdrivers.
Hammer
You may need a hammer to drive the nails. This tool consists of a handle and a metal head. For work in the kitchen, use small hammers that will not damage the kitchen furniture.
Fum tape for plumbing connections
To seal threaded connections, it is recommended to use fum tape. It is made of durable and reliable material that will prevent possible water leakage at the junction of water pipes.
Sealant
It is recommended to use sealant to treat pipe joints through which water may leak. It is applied to the surface of water and sewer pipes that are connected to the machine.
Double tape
For additional sealing of connections, double tape is often used. This is a high-strength adhesive material, sold in rolls and resistant to temperature changes and high humidity levels.
Connection details
There are several parts that will come in handy when installing a dishwasher:
- inlet and drain hoses;
- corner type tap;
- rubberized gaskets;
- filters for water purification;
- siphon;
- tee.
Electric outlet
It's no secret that the dishwasher must be connected to a separate outlet. If there is no free outlet nearby in the kitchen, you will have to install it yourself. It is contraindicated to connect equipment to overloaded outlets.
Checking the complete set of the built-in model
Before starting installation, it is necessary to study the equipment package in detail. The dishwasher must be sold with all the necessary fasteners and parts that will be needed to be built into the niche.
Common mistakes
Only those who have heard about them are insured against errors when installing PMMs. We equip you with the sad experiences of others through simple examples from practice.
The machine is installed tightly to the wall
This poses little threat to the equipment itself, but the hoses may become pinched. As a result, water circulation is disrupted and the dishwashing process deteriorates. In some models, an error may even pop up on the screen indicating that the operation cannot be performed at the moment. There is only one conclusion - urgently fix the jamb. Moreover, it is not difficult: the hoses can be hidden in boxes.
Treacherous tilt and leak
This happens when the legs of the machine are not adjusted or the balance was disturbed when the equipment was directly installed in the cabinet.
It will be good if you can restore it by working a little magic on the legs. It is bad if the machine needs to be removed from the compartment again and adjusted again. In any case, the final verdict rests with the construction level.
Expert advice
Valery
installation wizard
Some models are equipped with a special screw on the front that allows you to adjust the rear leg without having to remove the machine to the surface. This greatly simplifies the adaptation of technology in cases where you have to deal with a not very smooth surface.
Socket for connection near the sink
A common amateurish mistake that can lead to a short circuit and even a fire due to water getting into the outlet. Remember that the connection point must be protected from moisture, and it is recommended to use a separate power line.