There is a creator in each of us. At a certain period of existence, a person, as an individual, needs to do something with his own, not always with golden hands. These impulses are embodied differently for everyone. This directly depends on the degree of skill.
Original handmade products
It has become a fashionable trend to produce handmade products - soap, decorative items, jewelry, paintings, watches, interior items, and much more. A furniture maker with carpentry skills can easily make a chest of drawers, a table or a chair from natural wood with smooth lines and carved details.
What should those who are bursting with creative impulses, but have no special skills, do? The process of designing and gluing furniture from cardboard will help you “express yourself” - a cheap option, it helps to turn unnecessary boxes, pieces of wallpaper or a liter of paint into a full-fledged and worthy piece of furniture for a child’s room or living room.
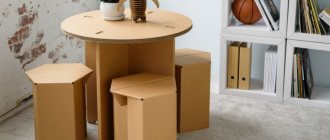
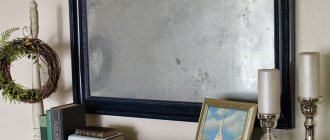
Mini chest of drawers made of white cardboard
Anyone can make a chest of drawers from cardboard or other available materials. When purchasing household appliances, boxes are left behind. We throw them away, despite the thick walls. By gluing the cardboard in several layers, we get an object with the required strength.
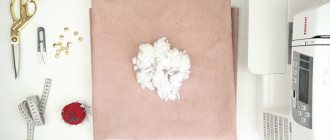
Multi-colored chest of drawers made of cardboard for sewing accessories, covered with fabric
Cardboard furniture: design and construction
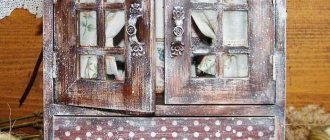
Beautiful small chest of drawers made of cardboard using decoupage technique
There are several options for making cardboard furniture. You can make separate patterns for the side walls, top, bottom, and then glue all the parts together. Another option is to insert smaller boxes into a large box from a refrigerator or washing machine. The walls will come out stronger.
If you cover the inner surface of the shelves with bright fabric or colored wallpaper, and the outer surface with plain wallpaper, you will get an original, open shelving unit. The shelves can hold books, photo frames, vases with flowers, and other decorative items.
Chest of drawers made of cardboard
Having subjected the cardboard to external and internal decoration, no one will guess that you made the shelving unit or chest of drawers from cardboard boxes yourself.
White chest of drawers made of cardboard with drawers of different sizes
More about materials
Approach the choice of materials with full responsibility. The correct approach to this issue is much more important than the process of creating furniture itself.
Cardboard
The cardboard that you will use must be durable, double or triple. If you take a regular cardboard box, you will need to compact it by covering all sides with another layer of cardboard.
For the inner boxes, single-layer cardboard will be enough, but for the frame this option will not work.
I used a large TV box as a frame to make the base easier. You can also make anything you want from individual pieces of cardboard, but it will take more time.
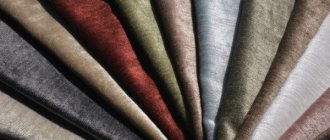
You don't have to use wallpaper. Any thick paper or self-adhesive film is suitable for gluing cardboard. On the Internet I came across an option where the needlewoman covered the box with crumpled paper and simply painted it on top with acrylic paint - why not. There are no restrictions here, but when choosing a decoration method, consider its functionality and durability.
If you decide to glue wallpaper, choose the simplest paper ones; it will be more difficult to work with other types. It is also easier to glue if the outside of the wallpaper is not rubberized, but also smooth, so joining them and making them overlap is easier.
Initially, I only had regular PVA glue of medium thickness. Then, at a stationery store, I bought glue from another company, which turned out to be much thicker than mine and resembled jelly in consistency. By diluting this PVA with water, I saved a lot.
By the way, keep in mind that you will need a lot of glue if you want all the parts to be well connected. It took me about 5 bottles of 400 ml each for one chest of drawers. Therefore, if you are not a spontaneous person like me, it is better to purchase a liter jar of glue in a hardware store in advance.
Features of cardboard and necessary tools
Cardboard is suitable for design and decoration, providing a wide variety of original shapes
When starting to realize your creative ideas, think about the design of the future product and the place where it will be located. Cardboard as a material has advantages and disadvantages.
Advantages and disadvantages
- Strength. A hand-made cardboard chest of drawers can withstand decent loads.
- Low cost. You can do without any investment at all if you have a supply of cardboard in the house or you know where to get extra.
- Environmentally friendly. Easy to dispose of after use. Cardboard is a natural material and is not capable of polluting the environment.
- Flexibility. If desired, the object can be given any shape.
- Shortened service life. Cardboard is not wood; it cannot last 20-30 years. With careful use and high-quality assembly, cardboard will last 5 to 10 years.
- Use in dry rooms. Cardboard is afraid of moisture. You can't put such a thing in the bathroom.
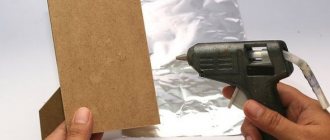
The main material from which the product will be made is cardboard. For it we take glue “Moment” or “Titan”, PVA. Some people use a glue gun. A ruler, a stationery knife, and a pencil will also come in handy.
Tools for making cardboard furniture
For decoration we use wallpaper, furniture film, fabric, acrylic paint, and fittings for drawers.
Small homemade chest of drawers made of cardboard, decorated with fabric
What can be done
At first glance, you might think that cardboard is a fragile material that requires special handling. On the one hand, this is correct, on the other hand, having chosen the desired type of cardboard, you don’t have to worry about its further use. Cardboard furniture will be durable and practical if you follow the sequence of work and recommendations for using tools.
To choose an option for making a furniture product yourself, you need to consider several proposals:
- Toy furniture made of cardboard - it is profitable and creative to make your own furniture for dolls. If children require the purchase of a new house for Barbie with all the accompanying accessories, the solution would be to produce this option with your own hands;
- Book shelves are considered one of the simplest cardboard products. They don’t take much time to make, and the books don’t put much stress on the cardboard;
- The original table will not be a dining table on which dishes are constantly located, but a small coffee or coffee table. A child can perform developmental tasks on such a piece of furniture, because it is designed for a light load;
- Chest of drawers - this kind of furniture is convenient for storing documents or papers; children’s accessories will also fit here. It is easier to make a chest of drawers from cardboard boxes from large appliances, such as a refrigerator;
- Shoe rack - an original shoe stand in the form of triangular cells will fit comfortably into any hallway. Entering the room, all guests will be surprised at how convenient and practical the rack turned out to be;
- A small chair for children - since cardboard is not intended for heavy loads, furniture for children is what you need. A small chair for your baby will become his favorite object, where he can draw or play.
As you can see, furniture made of cardboard is easy to make. To make it you need the simplest material and a minimum of tools.
Table
Shoe rack
Chair
Dresser
Shelves
Toy
Required materials and tools
Regardless of what type of furniture is chosen for self-production, the list of materials will remain the same. This necessarily includes the main raw material - cardboard.
To make the products durable, you should give preference to three-layer cardboard. The quality of the material can be checked by cutting.
If you purchased a single-layer analogue in advance, do not be upset. This option works well for making a dollhouse and furniture for dolls. If you use it to work on real furniture, you need to glue several layers of cardboard to give it greater strength.
List of materials and tools for work:
- Scotch tape - it is better to buy paper, regular and double-sided;
- Stationery or sharp construction knife;
- Scissors;
- Tape measure and long ruler;
- Pencil and rubber band;
- Sandpaper – for cleaning cuts;
- Kraft paper;
- Glue – depending on the type of cardboard, you may need PVA, hot melt glue or Moment.
If all the listed materials and devices are prepared, you should proceed to the manufacture of the selected furniture. Experienced cardboard craftsmen recommend that beginners choose simple work to start with, for example, shelves or a table.
Rules for working with cardboard
In order for furniture made with your own hands at home to turn out not only beautiful, but durable, a number of rules must be followed. They will help you make high-quality products that will appeal to all household members:
- Gluing layers - when working with single-layer cardboard or to strengthen furniture, it is necessary to glue the material. When gluing cardboard together, try to place the layers perpendicular to each other - this is how they give increased rigidity;
- Choice of glue - people who have already made furniture from this material recommend using Moment glue. It does not get wet after application and instantly holds product parts together. You can also purchase a glue gun and thermal sticks, which melt when heated, creating a glue trail;
- Why do you need kraft paper? Kraft paper is used to cover the edges and joints of furniture. With this move, the furniture looks neater. Before gluing, the joints are cleaned with sandpaper. You need to remember that the paper cannot be cut - it must be torn with your hands. This way the layers will become smooth, without transitions;
- Features of cutting - during the manufacture of cardboard furniture, special attention is paid to cutting the material. Usually a stationery knife is used - it is important that it is always sharp, because the accuracy of the parts depends on it. If thick cardboard is difficult to cut, you can use a jigsaw.
Using a jigsaw, the work goes much faster. It is important to carefully cut the parts and avoid mistakes, because the tool is too powerful for cardboard.
Cut cardboard with a knife
Select the type of cardboard you need
Use kraft paper
Choose your glue carefully
Step-by-step instruction
To ensure that production goes quickly and is not accompanied by problems, there are step-by-step instructions; a master class on cardboard furniture consists of a step-by-step description of each action. It begins with the creation of a drawing, followed by the formation of parts and their strengthening. The final stage is the assembly of furniture. Each of the stages must be considered separately.
Create a drawing
The first thing you need to do is make a drawing of the furniture. To begin with, draw it on a regular A4 sheet so that you can see a smaller version. In such a sketch, it is important to write down all the dimensions and respect the scaling. If you have the skill to work in special programs that allow you to develop product models, you should use them.
The first drawing must show the product in a general three-dimensional form. Next, you need to draw a projection of the furniture with a top, side, and rear view separately. The next step is to depict the details of the product: each detail must be drawn separately.
When the drawing is ready, it must be transferred to sheets of cardboard:
- Using a tape measure and a long ruler, draw on the surface of the raw material with a pencil, measuring the required dimensions;
- For work, you may need a square so that the corners of the future furniture are even in the drawing;
- When drawing on thin cardboard, try not to leave scratches with a pencil, and when making furniture from corrugated cardboard, draw clear and deep lines;
- It is necessary to cut out parts in compliance with all indentations and possible distance margins.
- You can use ready-made patterns or come up with your own product that meets specific sizes and preferences.
Forming parts
It is worth noting that when cutting out parts there should be no visible bends. If the work is done on a box of household appliances, it is better to cut on smooth edges. From six-layer cardboard you can make your own furniture of increased strength, for example, a shelf for shoes or books.
Interior decoration
Options
- Furniture is covered with decorative paper (napkins), then varnish; such a coating will give interesting nuances, depending on the subject chosen.
- Decorating with fabric will give the furniture a “boudoir” look.
- The chest of drawers is decorated with tissue paper using glue with colored pigments added to it.
- Furniture is painted with acrylic.
Instructions
After applying a leveling coating to the cabinet and drawers, the structure is sanded and then painted with acrylic paint.
Attention! You need to paint the fronts of the drawers, but you shouldn't paint the inside because the paint will peel off. It's better to do it on paper.
How to make handles? There are many options:
- made from polymer clay,
- buy ready-made ones in the store,
- use cotton cords.
If cotton ropes are provided, two holes are made in each box with a drill. After this, the cords are prepared. Cut to the intended size. Then a knot is tied at one end, and the other end is dipped into the wax, waiting a few seconds until the wax hardens. The "waxed" end is then rolled between your fingers to form a hard edge. This will allow you to easily thread the cord through the hole in the box. After the handles are threaded, tie a knot on the other side.
Making pens
You can make absolutely any handles for drawers. It is enough to show your imagination. Depending on its style, they can be:
- bottle caps;
- various beads or studs;
- small ropes attached to the inside of the boxes;
- buttons;
- wine bottle corks and much more.
In our case, satin ribbons will act as handles for the chest of drawers. To do this, you need to make two holes using an awl, then thread our satin ribbons through them and tie them on the inside of the box.
Here we have such a neat and pleasant-looking chest of drawers made from cardboard boxes!
Manufacturing
Finally, having completed all the preparatory stages, feel free to proceed directly to this moment. The main thing is to have a sharp stationery knife, thanks to it you
You can accurately separate the parts without damaging them. It will take place in the following sequence:
- Using a stationery knife, you need to cut out the back and side walls, as well as the shelves, based on the pattern.
- All of the above components are made in several copies. Their number will depend on the thickness of the cardboard. We thicken the parts by gluing identical parts.
- We connect the components according to the drawing.
- We hide the ends and joints with paper and glue.
- Future chest of drawers are assembled in a similar way.
- Then follows the stage of decoration and installation of fittings.
The last point will depend solely on the author’s imagination. The chest of drawers can simply be painted. For those who like a more creative approach, self-adhesive paper with drawings on it is a good choice. Handles must be selected in such a way that they match the style of the overall design of this furniture component. Often, creators decorate the surface of the product with crumpled paper and then cover it with acrylic paint.
Let's start the lesson
The master class “How to make a chest of drawers” will help you cope with this task without any problems.
To create a chest of drawers from cardboard you will need the following materials:
- Stapler;
- Cardboard boxes or sheets of cardboard;
- PVA glue;
- Stationery tape;
- Acrylic paints (shades depend on your own imagination and desire);
- Brushes;
- Scissors;
- Awl;
- Various decorative elements for your choice.
First of all, on a piece of paper we draw the so-called desired result.
If you are going to make a chest of drawers for the first time, we strongly recommend that you create a “mini version” using plain paper. This way you can save yourself from damage to the prepared materials. Based on the sketch you have drawn up, you can begin further steps to create a chest of drawers.
We create the basis of the future chest of drawers. Based on its size, we will select drawers. For boxes you will need six boxes of the same size (for example, cereal or baby cereal). You can also assemble and glue boxes from a single sheet of cardboard. In our case, we will use ready-made oatmeal boxes.
Using scissors or a utility knife, cut the box crosswise, as shown in the photographs. The cut parts of the box must be bent inward to strengthen the walls of future boxes. You can secure the bent parts of the cardboard using PVA glue or a stapler. Similar actions must be done with the remaining five boxes. Thus, all six drawers are ready for the future chest of drawers.
Using your imagination, you can cover the boxes with self-adhesive film, decorative or wrapping paper, craft paper, and even fabric. Or you can simply paint it with paints, for example, acrylic. In this case, the method of gluing the boxes with decorative paper is used. After which, the parts must be left to dry.
In order to make shelves for drawers, you will need thick corrugated cardboard. It is necessary to cut strips from it so that it is possible to wrap two adjacent boxes, namely:
- the width of the strip should match the length of the drawers;
- strip length = two heights and four widths.
In order for the fold to be as accurate and even as possible, you first need to mark the strip by gently pressing the scissors. Because the cardboard is quite dense and thick, it would be advisable to draw parallel strips with a distance of 2 millimeters from each other.
After the work has been done, you can begin gluing the internal parts of the resulting shelf using the same decorative film that was used to design the drawers. To ensure that the edges of the shelf and the cut are hidden, be sure to fold the edges. By gluing the edges and thereby forming a complete shelf, you can first check the operation of the future chest of drawers. To do this, two drawers need to be inserted into the shelf. They should slide out without problems, after which it is necessary to make two more such shelves. In total, you should get three shelves with six drawers.
- The next step will be to connect the three prepared shelves together. To do this, you need to put them on top of each other and coat them well with PVA glue. Then, using some kind of weight, you need to press it down and leave it to dry thoroughly.
After the glue has completely dried and the shelves are firmly attached, you need to cover the back of the chest of drawers with a solid sheet of cardboard using glue. Apply glue to the bottom of the chest of drawers, its lid, and also to the sides. Next, from corrugated cardboard you need to carefully cut out the back, top of the chest of drawers, its bottom, as well as the side parts, fix them with glue on the resulting chest of drawers. After that, we cover everything with paper.
Miniature chest of drawers
For most needlewomen, the question often arises of how to place all the necessary little things. I also encountered the same problem when I decided to try making jewelry with my own hands. All earrings and other accessories necessary to create attractive accessories should always be at hand, which, unfortunately, is not always possible. To solve this problem, I decided to make a miniature chest of drawers that could accommodate all my trinkets and, at the same time, would not take up extra space. To make this miracle I used:
12 matchboxes; PVA glue; scrapbooking paper; plain white A4 paper; thick cardboard; beads; wire; beads; satin ribbon 5cm; acrylic paint; scissors. The first step was to carry out all the necessary actions with the boxes. To do this, cut out rectangles from the selected scrap paper that match the size of the short side of the inside of the box.
Carefully stick them on the right places.
Using any sharp object, make a hole in the middle and attach the handle of the future drawer to it.
This is how I made my pen. I strung one bead onto a small piece of wire, leaving it strictly in the middle.
Then, folding the remaining ends of the wire in half, twisted them and pulled them through the bead.
Now we drag them through the hole in the box and bend the ends in different directions.
The outer part is ready. Now you should do the interior design. I used satin ribbon and regular PVA glue. We cut out the following design from a piece of tape.
Then, carefully singeing the edges so that the threads do not fall off, we glue it inside the box.
While the boxes are drying, glue the remaining parts of the matchbox into sections of three.
Using a foam sponge and acrylic paint, I tinted the edges of the box, which will be visible when assembled.
While all the components of the future masterpiece are drying, you can work on its bottom. To do this, cut out the following figure from cardboard. I have it one centimeter larger than the future base made of boxes.
Then, cut out the same square from scrap paper and glue them together.
We cover the side of the structures where the grater is located with a rectangle of scrap paper.
Using a piece of plain white paper, we fasten all our boxes together like this.
And glue it all to the prepared base.
While the lower part of the future chest of drawers for small items is drying well, let’s work on the upper box. To do this, cut out the following design from thick paper.
The square in the middle is equal in size to the box structure. The sheet should be cut along the red lines. Now we wrap all the edges in a box and glue them together.
I decided to cover the outer walls of the box with the same scrap paper.
The next step was to make a cover for the outside of the chest of drawers. To do this, we cut out two squares from corrugated cardboard: one is equal to the base, the other is 1 centimeter smaller - equal to the structure itself.
For the convenience of further decoration, we cover them with plain paper.
Carefully cover the larger one on top of regular paper with scrapbooking paper and glue the squares together like this. (photo24) I decided to decorate the top of my box with a motif.
Now the whole process is over.
One more piece of advice in parting. It is better to make the bottom of such a chest of drawers also from corrugated cardboard. After drying, the bottom of my creation began to ripple, since it was only made of several layers of paper. As a result, you can store small items in drawers, and larger items in the top box.