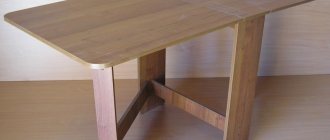
The title of the article is about a chair, but rather, we will talk about a stool made by hand using the technology of casting a part from epoxy resin. What is the difference, you ask, in the number of legs. We will make a three-legged stool. You can’t make a chair out of epoxy resin; a three-legged chair is nonsense. In addition, the 4 points of the legs of a classic chair are much more difficult to align on a plane so that they simultaneously adhere to the floor, so that the product does not limp or jump on the floor when trying to sit on it. A seat with three legs is initially deprived of this drawback, even if the floor is not a flat plane and there are height differences on it.
Materials
To make a designer chair/stool, you will need
- Epoxy resin class Dekor, ART or D3 - from 1 kg, complete with a separate container containing hardener.
- High-quality, defect-free, cuttings of thick branches with intact bark - an arbitrary quantity, but 3-4 of them should be straight and long enough to make legs for the product. The length of the leg is selected in such a way that the distance from the upper plane on which one sits down to the lower point of the leg standing on the floor is within 42-43 cm - the standard chair height for an adult.
- Wood scraps (veneer, planks) with neat cuts of arbitrary shape.
- Polyethylene - it covers the surface of the table/workbench on which the epoxy resin polymerization process will take place. It is needed to protect the table surface, since drops and splashes of hardened epoxy are almost impossible to remove.
- An old plastic bucket with a round or oval bottom, or an unnecessary plastic canister with a 4-corner cross-section - for making the shape of the future seat.
Additionally, you can prepare a transparent dye for polyester and epoxy resins - if you have an idea to paint the epoxy mass in some color. All kinds of small fillers: beads, cosmetic glitter and other small components introduced into the still liquid mass of epoxy resin to increase decorativeness.
Devices and tools
To work you will need:
- Saw (hand saw will also work).
- Level (required!).
- Sander.
- Plastic spatula (preferably disposable).
- Cotton work suit, lint-free, hair cap. This is necessary to prevent foreign inclusions from getting onto the hardening epoxy surface.
The room where the casting will be done must be well ventilated. Ideally, you need a hood, and it’s very good when you have a workshop with a fume hood (cube) - epoxy resins release harmful substances (formaldehyde, phenols) during the hardening process.
Expert opinion
Oleg Vasiliev
Master of making furniture and interior items from epoxy resin. She creates unique items to order in her own production.
Ask a question to the master
Similar harmful substances are released by polyester resin and some other filling compounds, for example, epoxy-phenolic ones, which are not used in furniture production. Epoxy resin itself, even in liquid form, does not release substances into the air; a respirator and gloves are needed when working with it so that it does not get in the form of microscopic droplets inside during breathing and on the skin.
Features of the material
Epoxy resin is often used in workshops on making jewelry, crafts, sculptures and interior items. Particularly popular is transparent epoxy, which has enormous scope for imagination. The composition of epoxy for pouring includes synthetic oligomer compounds, alcohols, and a number of other components. To obtain the desired properties, it is necessary to pour a hardener into the product - only after this can the resin harden.
Depending on the amount of hardener and the introduction of other substances, the resin for products can acquire different characteristics. It has the ability to harden or turn into glue, be super strong or rubber-like. To fill dining tables, you need to use solid resins, both for creating new furniture and restoring old ones. It is this coating that will be abrasion resistant and durable.
Advantages and disadvantages of epoxy countertops
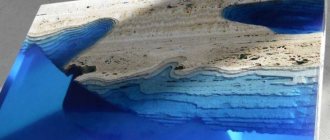
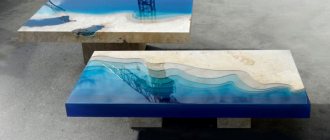
A huge advantage of the products is their unique design. The tabletop can have any appearance that the user desires. To decorate chairs, coffee tables, kitchen tables and even desks, different materials are used - pieces of wood and glass, stump cuts, stones, foil and glitter, sawdust and sand. Shells, marble chips, pebbles, souvenirs and money, dried flowers and leaves are also used. The resin can be painted in any color, up to the most saturated tone, to achieve the effect of a landscape, sea, river, etc.
Other advantages of the products are:
- completely waterproof, washable;
- tolerance of many household products;
- no shrinkage during operation, preservation of shape and original color;
- absence of deformation and reaction to moderate mechanical stress.
When choosing this technology, you need to take into account its disadvantages. The cost of a table for the kitchen, living room, countertops for the bathroom will be high. The consumption per 1 m2 of epoxy is high; it can take 10-20 liters of resin or more. If the sequence of actions is violated, at the slightest mistake air bubbles will appear inside, which are difficult to get rid of.
Related Posts
- Do-it-yourself stone tabletop: step-by-step master class with photos! preparatory work, drawing creation, materials and tools
- What sizes can the countertops have? standards for chipboard and other materials
- How to embed a sink into a kitchen countertop: the correct DIY installation process
- What are window tides, what types are there? how to install it yourself?
- Do-it-yourself vibrating table: design drawing for the production of paving slabs, step-by-step assembly
- How to paint wood with stain and varnish it
- How to glue fiberglass correctly?
- How to seal the joint between the bathtub and the wall? 8 popular options
- How to update old tiles in the bathroom
- Alabaster: what is it? how to divorce? where to apply?
- The door handle creaks: causes of the problem and solutions
- How to cut metal using a grinder
- Why does the air conditioner gurgle when not working when there is wind?
- Bar counters for the kitchen: photos 50 examples
- Homemade Russian stove on the street under a canopy
- Options for making shelves for the garage with your own hands
- Fum tape technical characteristics, how and how much to wind on the thread
- Making a stand for a drill with your own hands: instructions, drawings, video
- Do-it-yourself tabletop made from furniture board
- How to make a garden swing from wood?
- What and how to drill into the tiles so that they don’t crack?
- Connecting the toilet to the sewer without corrugation
- Sealant for sewerage
- Why line the roof and ceiling with clapboard and how to do it correctly? nuances of the procedure
- Technology of painting wallpaper with water-based paint
Read with this
- Do-it-yourself stone tabletop: step-by-step master class with photos! preparatory work, drawing creation, materials and tools
- What sizes can the countertops have? standards for chipboard and other materials
- How to embed a sink into a kitchen countertop: the correct DIY installation process
- What are window tides, what types are there? how to install it yourself?
- Do-it-yourself vibrating table: design drawing for the production of paving slabs, step-by-step assembly
- How to paint wood with stain and varnish it
- How to glue fiberglass correctly?
- How to seal the joint between the bathtub and the wall? 8 popular options
- How to update old tiles in the bathroom
- Alabaster: what is it? how to divorce? where to apply?
Operating procedure
The order can be arbitrary (a synonym for this is a complete lack of order), but it is still better to plan the stages of work and follow them so as not to get confused in materials, tools and sequence of actions.
- The bottom (or the flat side of the canister) is cut off from the plastic container along a carefully drawn line. Then another line is measured higher, at a distance equal to the thickness of the future seat, and a cut is made along this line. We get a ring, an oval ribbon, a closed rectangle with rounded corners - in a word, what shape and size the stool seat will be.
- A sheet of fiberboard with a size slightly larger than the planned casting is placed on the table (workbench). checked with a level, if necessary, achieve a perfectly horizontal plane. This is done so that the epoxy resin, due to the slope of the surface, does not accumulate more in one place than in another, and the thickness of the stool seat is the same in all directions. The fiberboard is glued end-to-end with double-sided tape for ease of removal after the epoxy has hardened.
You still need regular, one-sided tape. When using double-sided tape, it will be problematic to tear off the hardened workpiece from the formwork.
- A mold for filling is placed on the surface of the leveled fiberboard covered with tape. On the outside, the gap between the fiberboard covered with tape and the adjacent edge of the mold is sealed with hot glue so that the epoxy resin poured inside the mold does not leak out.
Expert opinion
Oleg Vasiliev
Master of making furniture and interior items from epoxy resin. She creates unique items to order in her own production.
Ask a question to the master
It is more reliable to seal with ordinary, and the cheapest, silicone for plumbing and construction work. True, you will also need a pistol to go with it.
- From branches of different diameters, select three (or 4 for a 4-legged chair/stool) branches of approximately the same diameter (4-5 cm) for the legs and from 3 to 8 cm to fill the volume of the form. The rounds are sawed off for laying into the mold.
- Gasoline (aviation gasoline or for lighters) degreases the surface of the mold, wooden rounds and other fillers, as well as the surface of that part of the legs that will be recessed into the seat.
- The legs are installed - double-sided tape is useful for this. Rounds from branches of different diameters are placed closely in a pre-selected order. They will also serve as a decorative element and help save expensive epoxy resin. Try different options for laying rounds, try to combine them with geometrically sawn planks and veneer trims. The criterion is only your sense of beauty, and even the originality of the resulting composition.
Useful to know > How to make imitation water from epoxy resin, basic principles
- To ensure that future legs retain their position and do not “go” to the sides, temporarily connect those ends that will then stand on the floor with light wooden slats, creating a relatively rigid frame.
Filling the form
If you decide to leave the resin transparent and not colored in the mass, pour the hardener into the epoxy resin in the proportion specified in the instructions. Remember that the lack of hardener will cause polymerization to be too slow, when instead of a day or two you will have to wait twice or three times longer, and it is not a fact that it will harden completely, but the frozen mass will stick to your hands for a long time. An excess of hardener will cause a sharp increase in the temperature of the ongoing reaction. So much so that the mass may boil with the formation of bubbles, which will hopelessly ruin the work begun.
Important! The temperature can rise not only from an excess of hardener. It may also depend on the shape of the vessel in which the resin and hardener are pre-mixed. The closer the overall dimensions of such a vessel are to a ball or cube, the greater the likelihood of spontaneous boiling of the mixture. This is especially true for epoxy resins, where amines are used as a hardener. Therefore, the diluted mass must be poured into the mold as soon as possible. By changing the spatial distribution configuration, such a mixture, coming into more contact with air, will self-heat by no more than 2-3°C degrees.
During this period of time, ventilation of the room where the work is carried out is very important: it is during pouring and at the initial stage of cooling that a maximum of aldehydes and phenols, which are very harmful to health, are released from the polymerized mixture.
If it was decided to paint epoxy in the mass, then the dye for it must be introduced after or while the bulk of the substance is mixed with the hardener, but not before.
Expert opinion
Oleg Vasiliev
Master of making furniture and interior items from epoxy resin. She creates unique items to order in her own production.
Ask a question to the master
Personally, I always add dyes after mixing the resin with the hardener.
Epoxy bracelet
An unusual craft made from epoxy resin - a beautiful ladies' bracelet. To make crafts you need to acquire a mold. You can cast it yourself from silicone or purchase it ready-made.
Mix epoxy resin and hardener according to instructions. Stir the solution until it is completely homogeneous. Let it sit for a while to let the air bubbles go away.
Take dry leaves and cut off excess parts so that they do not protrude from the mold. You can use other decor - twigs, berries, flowers, beads, sparkles, etc.
Pour the prepared solution into the mold. Pour in gradually so that no voids form.
Using a toothpick, carefully lower leaves or other decor into the resin. Wait for the resin to harden. To speed up the process, the product can be placed in the oven for 10-15 minutes at a temperature of 80°C. This will also remove any bubbles.
After this, leave the mold with the resin for 24 hours for final polymerization. After hardening, remove the finished bracelet from the mold.
If there are sharp edges, simply sand them down with fine-grit sandpaper. Treat the product with acrylic varnish. After hardening, the bracelet can be used for its intended purpose.
How to achieve stability on 4 legs
To ensure that a four-legged chair or stool does not come out “lame”, before pouring epoxy into the seat mold, the easiest way is to align all future 4 points of contact with the floor along the same plane. By doing it literally: by applying to these points a piece of a very rigid and flat plane made of chipboard, fiberboard or thick, flat plywood. And fix them in this position until the very end of hardening of the epoxy resin poured into the mold. Now, if the product “limps”, it will only be on an uneven floor.
Useful to know > Furniture made of wood and epoxy resin: can you make it yourself?
The minimum curing time you need to give epoxy resin is 24 hours. It is better not to rush things and allow the polymerization process to complete until the last molecular chains are included in the process, and this may take 48 hours.
After this, you will need to make some effort to tear off:
- The surface of the future seat is from a layer of adhesive tape glued to the fiberboard.
- Plastic mold from the end of the seat.
The second will most likely be impossible without cutting the side of the mold, after which it will be relatively easy to separate from the casting.
Epoxy chair: range of products offered and handmade variations.
A chair made of wood and epoxy combines originality and practicality. Let's learn how to make it with our own hands. Furniture made of epoxy resin is an undoubted trend in recent years. More often this material is used to make tables and chairs. The unique appearance of epoxy products helps transform the interior. At the same time, you can even make them yourself.
Types of chairs Furniture made from epoxy is divided into the following groups:
- Made only from epoxy resin and hardener. These chairs are usually made in the shape of cubes or other three-dimensional shapes. Decorative items - flowers, leaves, ornaments - are often placed in the painted mixture.
- Epoxy-coated products: ordinary furniture made of chipboard and wood is used as a base. The top layer has rather protective properties. However, this option is interesting for the author’s restoration of old stools.
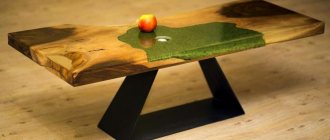
- Made from wood and epoxy resin. Wooden fragments alternate with transparent ones in a chaotic manner. In this way, you can make a solid (cubic) stool from the above materials or just its seat.
- The most popular option is the third, combined. Such furniture looks the most natural and perfectly complements the eco-style interior. A striking example is filling a stump with moss.
Advantages and disadvantages An epoxy resin chair is not only beautiful, but also practical furniture. Their advantages are:
- Variety of solutions and uniqueness of each product. Thanks to the characteristics of the raw materials, each stool made from it is a one-of-a-kind product.
- Durability. The material is difficult to damage - cracks and chips are practically excluded.
- Wear resistance. Thanks to its UV resistance, the resin does not deteriorate externally over the years.
- Moisture resistance. This parameter is very important for eco-kitchen due to the susceptibility of wood to rot.
- Easy care. No special processing required. This furniture is easy to clean.
Chairs also have disadvantages. These include exposure of the surface to abrasive compounds and powders when washing, as well as the risk of releasing toxins at high temperatures. Both disadvantages can be neutralized by proper operation.
A separate issue is the price of products. On the one hand, the advantages include the hypothetical availability of chairs due to the low cost of materials. On the other hand, stools made to order by craftsmen require decent payment for original handmade work. Handmade products: how to make it yourself The reasons for making a chair in one of the proposed options from epoxy resin with your own hands vary. This includes the creation of a unique piece of furniture to suit the owner’s taste, significant savings, and, finally, a banal interest in hand-made items in home decoration. The easiest way to make it with your own hands is not a whole object, but only the seat of a stool. Especially for a newbie.
Note! Before starting the pouring process, you must wear rubber gloves, a painting paper suit and a cellophane cap so that hairs and dust from the skin do not fall onto the product. For added safety, a respirator should be used since large volumes of liquid are involved. Resin is dangerous at very high temperatures, but it is better not to ignore this measure.
Work on creating the chair seat will be carried out in the following order: 1. Prepare the solution. Hobby kits are equipped with resin and hardener, which must be mixed in the proportions specified by the manufacturer in the instructions. Knead the solution thoroughly to achieve homogeneity. It is important that any air bubbles come out.
It is important! If you plan to fill it with colored resin, you must first add a coloring pigment to it and only then a hardener. 2. Cover surfaces. The place where the seat will be filled must be covered with polyethylene. Epoxy will be very difficult to remove if it gets in there. 3. Prepare the workpiece. Placing the form is one of the most important steps. It must be placed perfectly level so that the surface does not have bevels or sagging. Be sure to use a level. The form must be dried and degreased. 4. Place a wooden base in the workpiece if you plan to combine raw materials. It needs to be primed with an epoxy mixture. When using fillers, they are also laid out at this stage (clean and grease-free).
Creative DIY epoxy resin table
5. Fill with epoxy. After mixing, until the hardening process begins, it is liquid and will easily spread over the surface. But if necessary, it can be distributed to the edges with a stick. 6. Wait 10-15 minutes and remove any air bubbles that appear. 7. Place a canopy over the product to prevent dust from entering and leave to harden for two days. It is better not to strive to artificially accelerate hardening. 8. Sand and polish the seat. Connect it to the legs. So in 2 days without special skills you can make a unique chair with your own hands.
Bringing it into “marketable condition”
The surface of the cured resin will be slightly uneven due to unevenness of the matrix and traces of adhesive tape. The surface will need to be sanded using a sander. Just don’t get carried away, change the skin to increasingly finer ones in time. Otherwise, you will remove such a layer that the wood of the rounds and filler dies filled with epoxy will be exposed.
But it will still not be possible to achieve glossy surfaces by sanding with sandpaper; it will be somewhat matte, which will not allow the wood or any filler enclosed in the transparent thickness of epoxy to “play.” Therefore, after grinding and turning the sharp edges of the seat, it is advisable to dilute a small amount (50-60 ml) of epoxy resin again and coat the outer and side surfaces of the seat with a spatula. Having first placed the chair/stool on a surface covered with polyethylene so that it is not spoiled by accidentally dripping drops, and having previously secured a canopy on top to protect it from dust and debris.
Attention! During sanding (especially if you have a rotary, circular sander), some heating of the surface occurs. Which provokes the release of additional portions of aldehydes and phenols. In addition, the dust generated during grinding is extremely harmful to health. Therefore, it is advisable to supplement the work suit with safety glasses and a respirator. Or at least a thick cotton-gauze bandage.
Expert opinion
Oleg Vasiliev
Master of making furniture and interior items from epoxy resin. She creates unique items to order in her own production.
Ask a question to the master
The dangers of releasing harmful substances described here and earlier relate, rather, to polyester resins and some other compositions for pouring. Epoxy resin, once fully cured, is completely inert under normal conditions. It does not emit any harmful substances, including during mechanical processing and heating to significant temperatures. Inhaling its dust is no more dangerous than inhaling sand, although it requires protection with a respirator.
Kinds
With all the variety of countertop designs, it is not possible to describe every original solution.
The first fundamentally distinctive option is countertops with a base. This classification applies to any material, from metal to plastic, but we are currently interested in wood. The base can only perform the function of a base if decorative elements are placed on it, or it can also combine a decorative function when the base itself is decor.
Tables with a base can withstand high loads. It is necessary to understand that the hardened resin itself has mass, so large slabs require a solid base. The latter can be used slab, chipboard, veneer, solid wood, slats, boards, bars. Finally, we should not forget about restoration work in which the base is an old countertop.
If it is not planned to place high loads on the tabletop, then the base is not made. Epoxy resin is poured into the mold, and wooden elements are placed inside the mass as decoration. They can be located at different depths, but for this you will have to fill them in layers. Often the resin is tinted. Dyes are added to the composition before mixing it with the hardener. This type of tabletop is produced for small dining tables, coffee tables and decorative tables.
A third type of countertops has been identified - combined. An example would be compositions in which a wooden slab or slab is the base, but its area is smaller than the area of the countertop. The introduction of this type was not fundamental, because these countertops could be classified as both the first and second types. However, the division presented above allows you to decide when purchasing or before making your own resin furniture.
Useful tips
If you use branches in the bark for the legs, then sooner or later it may fly away from the wood as a result of drying out and mechanical stress. Therefore, before fixing such legs in the thickness of the epoxy, you can first dilute a small amount of it and coat the surface of these future legs with it - which will significantly increase their mechanical strength. To actively impregnate the bark right down to the wood, after coating with a layer of epoxy resin, you can dry the workpieces in a large oven, which will speed up the polymerization process of the resin.
Useful to know > What products can be made from epoxy resin with your own hands, what are the difficulties
If the floor on which such a product will stand is not tiled, but linoleum or laminate, cover the points of the legs adjacent to the floor with pieces of felt or insulated linoleum, this will prevent both wear and tear on the surfaces of the legs contacting the floor and the floor covering itself.
If you and those around you liked the chair or stool you made, and to complete the set you want to make more, try to maintain stylistic unity by making the next ones similar to the first, only better.