Some building materials are used in other areas. This is how ordinary plaster turned into artistic or decorative. They even make panels from it now. Another such example is epoxy resin. They make very beautiful and non-standard furniture from it. In particular, tables, bar counters, chairs. It’s just that the price tag is completely inhumane, but very beautiful. As it turned out, the technology is not that complicated, although there are many subtleties. But making a table from epoxy resin and wood with your own hands is quite possible.
Wood preparation
Choosing wood for an epoxy resin countertop is a big deal. The brighter the wood pattern appears, the more interesting the result will be. But the wood must be seasoned and dry. And the cuts need to be of considerable thickness, with interesting edges. Essentially, this is an unedged board, but of expensive wood species. In order not to be confused with building material, such cuts are called slab and they must be kiln dried.
You can even use stone as a base
Having received the wood, you need to figure out how to decompose it. The tabletop can be assembled from several boards “with a river” of epoxy between them. The edges can be made of resin or wood. The array can be located on one side, the other will be transparent. You can use round dies, which are obtained when sawing thick and not very thick trees. If there is no wood with a beautiful edge (or it is too expensive), the relief can be made manually using a router. If the boards are narrow, we glue them together, placing them on dowels. In general, there are a lot of possibilities.
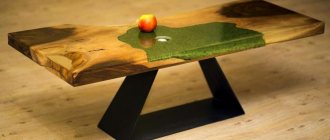
This epoxy resin table is made from two elm (elm) boards
After we have figured out how everything will look, we begin processing the wood. It is necessary to remove the bark and remove defects. Defects - dry and crumbled knots, holes gnawed by insects, chips, cracks. If there is rot or “blue” anywhere, we remove it with a router until the wood is clean. In general, we clean and polish everything, maintaining the natural shape or adding relief to the best of our imagination and abilities. We also sand the plane of the board, exposing the wood grain, emphasizing it if desired. You can use any means. The same stain, wood oil, can be burned with a lamp, then sanded using a wire brush, etc.
Wood primer is needed if you don’t want to see bubbles in the resin
Before the main pouring, you need to “prime” the wood with the epoxy resin that you will use in your work. First we fill in all the small cavities and holes that were discovered during cleaning. We poured it in and periodically warmed up the flooded areas for two to three hours. Air comes out of the cavities, the pores of the wood. If the resin is not heated, bubbles will remain in the thickness of the resin. If you want to achieve transparency, bubbles must be removed. So we warm them up. After drying, sand the filled areas, leveling them flat with the board. Then we cover the board completely with a thin layer of resin - we stabilize it, simultaneously expelling air from the pores.
Peculiarities
The store will likely stock a number of two-component compounds consisting of a base material and a hardener. In this form, epoxy is most suitable for work. Before mixing, the components remain in liquid form for an indefinitely long time, which means that the master can begin preparing the composition and pouring it when it is convenient for him, without time restrictions.
During the polymerization process, the compound retains its volume without shrinking. The transparency of the resin does not change when exposed to ultraviolet radiation, so the countertops retain their aesthetic appearance throughout their entire service life. The fluidity of the resin allows you to decorate the tabletop slab in a variety of ways. Despite the strength of the material, the resin can melt when exposed to high temperatures. Surfaces cannot be polished or ground using an angle grinder.
The cost of epoxy resin is difficult to estimate objectively. For one kilogram of compound you will have to pay from 700 to 1500 rubles, depending on the brand and manufacturer.
If we compare the cost of production with the cost of the finished product, the material turns out to be relatively inexpensive. Alternative options exist, however, in order for them to have similar strength, waterproofing, and durability, additional processing will have to be carried out, which will entail an increase in costs.
Epoxy resin performs several functions at the same time. In addition to creating a transparent surface, it serves as a material to stabilize the wood. The compound not only covers the wood from above, but also penetrates into the smallest pores. By the way, if photographs, natural materials, or plant flowers are used as decoration, then under a layer of epoxy they remain in their original form for a long time. Some designers see shading as a way to preserve family photos.
The potential of resin in artistic creation should also be appreciated. By varying the color, the master can create an imitation of bodies of water, the starry sky, and flora. Ideas of an abstract nature are also interesting. By adding a phosphor to the composition, luminous elements are obtained. In addition, the dielectric properties of epoxy make it possible to install electrical circuits for lighting. LED strips are usually used as a light source.
Useful to know > Which epoxy resin manufacturers are located in Russia
Creating a Shape to Fill
After the wood has been prepared, a thin layer of composition has been poured over it, while it dries, we begin to create the form. It will be necessary to place a wooden blank in it. The size of the form can be either close to the length of the board or larger. In the second option there will be strips of epoxy along the edges.
To create a mold, any sheet material with a smooth surface is suitable. The smoother the shape, the less effort sanding will require. The form is assembled with sides that are several centimeters higher than the planned thickness of the tabletop. After assembly, the joints are sealed with sealant, which must be carefully leveled. Wrap your finger in cling film, moisten it in water and smooth it to perfection. But this must be done quickly. Sealing must be thorough, otherwise the resin will flow out of the mold. But it’s far from cheap, and it’s not easy to remove traces.
If there are clamps, you can fix the dies with their help, rather than using a weight
You can make a mold from laminated chipboard, or from plywood, but it will need to be covered with something. For example, wax, a special release agent. The simplest and cheapest option is to cover it with film, but it should lie smoothly, without any waves or unevenness. You can seal it with tape in two layers. Glue joint to joint, without overlaps. We glue the second row, moving it so that the seams of the bottom row are covered with tapes approximately halfway along the length. The tape should also lie smoothly. It can be replaced with vinyl film, but it will need to be heated in the corners so that it lies flat.
You can make a glass mold by placing the sides on sealant. For easier separation, grease the glass with a layer of fat. Don't neglect lubrication - there will be much fewer problems. In general, when making a table from epoxy resin, you can use your imagination even during the preparatory processes. The technology is very flexible, there are many options.
What epoxy resin to use for countertops
There are a lot of epoxy resins and the price range is considerable. Let’s say right away that a cheap one is not suitable for a normal result. You need a transparent one that does not become cloudy or change color over time, and these are expensive compounds, for example, 3D MG-EPOX-STRONG. They are often classified into a separate category: epoxies for countertops. When choosing, you need to pay attention to the following parameters:
- Minimal layer.
- Maximum layer.
- Time before pouring the second layer.
- Time until final drying.
For this table made of wood and epoxy resin, Crystal 76 was used. It took 10 liters (for the river and the filled gap near the wall).
The fact is that there are resins that can only be poured in a small layer at a time. Let's say the maximum layer is 10 mm. And the next layer can be poured after 24 hours. If you need to make a tabletop 6-7 mm thick (4 cm wood, plus 1-1.5 mm at the bottom and top), it will take a whole week. And this is just to fill in layers. There are epoxy resins that can be poured in a layer of up to 6 cm or more.
If you are going to make a table from epoxy resin for the first time and have not dealt with this material before, it is better to choose those that are poured in a thin layer. With them it is easier to ensure the absence of bubbles. Although, you may like the “frozen soda” effect. If you want to tint the resin, you need to buy special dyes. When pouring layer-by-layer, the dye is diluted in one of the components before adding the hardener. This way the color will be uniform.
How much resin is needed
How much epoxy resin do you need for a table? It's not easy to answer. The tabletop can be of different sizes, it can be small or thick. There may only be a small “river”, or perhaps most of it will be made of epoxy. In principle, you can roughly calculate the volume of the countertop that you plan to make. Estimate the percentage of wood that will take up, the rest will be epoxy resin. So we calculate how much epoxy resin we need for a table for our own case. Some who make only a “river” will use 4-6 liters, while others may require 20-30 liters or more.
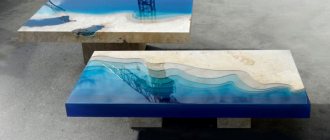
This epoxy and wood coffee table took 12 liters of epoxy to make.
Let's look at an example. We will make a rectangular tabletop measuring 100*60 cm, thickness - 7 cm. Wood will take up most of it - about 2/3. We convert the values into meters and multiply: 1.0 x 0.6 x 0.07 = 0.042 m³. To convert this figure to liters, we multiply by 1000. We get 42 liters. That's a lot. But this is if you make the countertop entirely from epoxy resin. Approximately 2/3 of the volume will be occupied by wood. Epoxy will account for only 1/3. That is, we divide the resulting figure by 3 and get 14 liters. That is, to make a table 100*60 cm you will need about 14-15 liters of epoxy resin.
Technology of pouring epoxy resin onto a countertop
The wooden base of the table was laid out in the prepared form. We placed a weight on it so that the wood was pressed tightly to the base. The less it flows between the piece of wood and the base, the less consumption will be.
Epoxy resin is a two-component composition. Consists of resin and hardener. If you want to make the epoxy colored, add a few drops of dye to the resin and mix until the color is uniform. Pour into another container and repeat mixing. If this is not done, unpainted stripes will remain along the edges and at the bottom, which will be visible. Having finished mixing, pour the required amount of tinted resin into a separate container, add hardener, mix for several minutes. Pour into the mold.
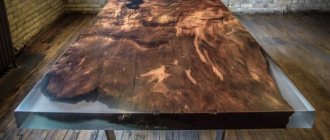
A table like this requires a lot of resin.
The first layer is the base layer. Some of it still flows under the wood. It should not be less than the minimum allowable. The resin is fluid and levels itself, but you should not pour it in one place. It is better to distribute more or less evenly over the entire surface. We wait the allotted time before applying the next layer and repeat the operation. Do this until we get the desired thickness.
How to pour without bubbles
In principle, there is an epoxy resin that is less susceptible to the formation of bubbles - from the Art-Array series . But the bubbles come from the wood. If you have not previously coated it with a thin layer of resin, there will be more of them. If processed, less. But be prepared for them to happen. Therefore, for the first time we recommend using thin layers of resin. This makes it easier to ensure there are no bubbles.
Resin may be opaque
The trick is to warm up the resin for two to three hours after pouring. This will allow the bubbles to come to the surface. You can use a hair dryer for these purposes. Some people use gas torches, but open flames and epoxy resin are a dangerous combination. Better, after all, a hairdryer. So, after pouring each layer, we warm it up with a hairdryer.
Criterias of choice
The wide range of epoxy resins available on the market today often makes it difficult to choose the right material. Experienced craftsmen recommend that when purchasing a synthetic mixture for making countertops, pay attention to the following qualities:
- Transparency of the material. This feature is necessary to create various visual effects.
- Volume conservation. During hardening, the resin should not shrink significantly.
- Low level of viscosity. Very viscous material may leave bubbles after mixing.
- Quite a long curing time. The slower the epoxy mixture hardens, the easier it is to create different patterns.
- Fill layer. When choosing a material, you should consider the size of the countertop. Some epoxy resins are designed for pouring thin products.
The epoxy resin should have a low viscosity level.
It is best to purchase a synthetic composition designed specifically for the manufacture of countertops. This resin has all the characteristics necessary for such a product. It is also necessary to take into account the cost of the material, since a fairly large amount of it will be required to cover the table.
Polishing and finishing to a glossy shine
After final curing, the epoxy resin and wood table requires polishing. The resin does not look transparent - this is normal, do not be upset. If you poured a transparent compound, this is what it will be. But it requires careful sanding. To begin with, it is better to use a tape one - it covers more area; for finishing, an eccentric one is more suitable. But you can also cope with an angle grinder with speed control and an appropriate attachment.
We take large grains first, then smaller and smaller ones. If there are more or less significant differences, we start with 80 or 100, then step by step we reduce the grain. The finishing touch is already 1000, 1500 and 2000. Not all resins are polished equally well. If even after using 2000 pieces of sandpaper there is not enough shine, try polishes for cars and headlights. You can make a homemade polishing paste: goi paste + grease. And first rub with a rag, and polish with a soft polishing attachment.
You don’t have to level the relief, but just cover it with a layer of epoxy resin
You can achieve shine not only by polishing. This does not mean that sanding is not necessary. Necessary. But if the shine is not enough, and the surface is already smooth, you can coat the tabletop with a glossy varnish, preferably water-based. And even better - yacht. Then the surface will not be afraid of moisture and hot. Apply varnish as usual - in several layers. Intermediate sanding is hardly necessary, unless there are puddles or debris. Sand the last layer to the desired gloss level.
Other filling options
A table made of epoxy resin and wood does not have to be made only from expensive slab. Radial cuts of trees can be perfectly adapted. And the radius is far from important here. You can make a frame out of wood, which you can install on the tabletop - on plywood 10 mm or so. Lay out the saw cuts in this frame - according to the pattern or randomly. In this case, the tabletop will not need to be removed from the base - this is the simplest option. For self-production for the first time - the simplest solution.
You can make a table from wood cuts and epoxy resin in different forms
Please note that it is better to choose wood with flaws. In this case, these are not defects, but a highlight. Rotten ones generally look exotic. Especially if you emphasize the difference in colors and textures using deep color.
Designer furniture made of wood and epoxy resin. The second one is definitely not the same
A very interesting effect when using not only tinting, but also various additives. For example, glitter, powder that gives a metallic effect, even broken colored glass or mirror shards give a very interesting picture.
Using pearl powder with stained wood
You can use stone instead of wood. The weight of such a table will be substantial, but the strength will also be great. Layered rocks look great. It is advisable to have skills in working with stone. This is more difficult than sanding wood. When preparing, you need to fill the voids well so that all the air comes out.
Epoxy resin and stone table
Use pebbles, natural or painted gravel. These stones can be laid out in a fairly thick layer - the resin will still flow into the gaps. Often found in combination with wood. By the way, if you “missed” the amount of epoxy resin, you can add pebbles to the poured resin. This way you can get the desired level.
Pebbles and gravel are also used
Human imagination is limitless. They make furniture from epoxy by pouring various pieces of iron into it. Car parts, wrenches, bicycle or moped chains, etc.
Metal is also used
Using the same principle, you can make chairs or stools. You can cast cabinet legs in the same style. They even began to pour LED garlands into epoxy. Why not a night lamp or a leg with soft lighting. By the way, there are glow-in-the-dark additives in epoxy resin.
Can be used both as chairs and as a tabletop support
How to make and what to fill a tabletop from a cut of wood?
From our article you will learn how to make and fill a tabletop from a cut of wood and how you can make a tabletop from end cuts of wood with your own hands.
So you are renovating. And you need the right work surface. Of course, it’s easier not to bother and purchase a ready-made countertop from the manufacturer. A high-quality countertop made of quartz agglomerate, glass or natural stone – the choice is huge! But if you want something unusual in interior design, what should you choose?
Tabletops made from saw cuts are unusual solutions for a modern interior, standing out against the background of classic rectangular tables. To buy such an item in a store, you will have to shell out a round sum, but not for the materials, but for the design work. If you wish, you can be creative and make a tabletop from end sections of wood with your own hands. How? Let's figure it out.