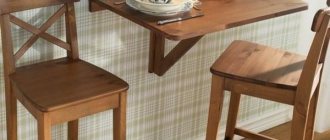
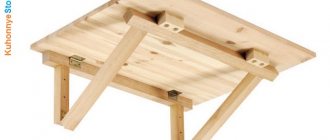
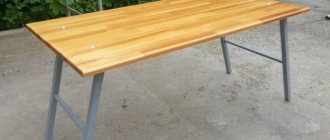
Folding table for balcony
For this table model you will need the following materials:
- plywood 60 x 70 cm; bars (20 x 40 mm): 46 cm - 4 pcs., 32 cm - 2 pcs., 72 cm - 4 pcs.; block or handle (section diameter 24 mm, length - 32 cm); bolts , nuts, screws.
Stages of work:
Step 1. We file down the edges of the tabletop and round them with sandpaper.
Step 2. We round both corners on one side with 46 cm bars. On the other hand, we round off only one corner with sandpaper.
Step 3. We make the inner surface. In two 46 cm bars (which were rounded earlier) we drill holes using a special Fortsner drill. DO NOT drill through the holes!
Step 4. Since the table legs will fold, let's call them internal and external. We round all the corners of the 72 cm bars and file them with sandpaper. We make cuts for the transverse bars, which will fasten the 2 bars together.
Distance – 16 cm from the bottom. The second cuts are made on another pair of legs, 5 cm higher from the first cuts. 32 cm bars are inserted into the cuts.
Step 5. Place the inner and outer legs next to each other, mark the spots and make cuts on the outer legs. This results in a compact design.
Step 6. Fasten the legs together with bolts in an X-shaped manner. Distance – 50 cm from the bottom.
Step 7. Make holes for the tabletop holders in the upper part of the legs.
Step 8. We place the bars for fastening the table top (46 cm blanks) next to the cross beam. The distance is 5 mm. Place the unrounded part towards the inner legs.
Step 9. We carefully fasten the workpiece and the inner legs of the table with bolts. You should not tighten the bolts too much; all parts of the structure should move freely.
Step 10. We attach the remaining two pieces of 46 cm each to the outer legs.
Step 11. Place the table top face down on the floor and lay out the structure on top. We make marks along which we will attach the tabletop to the legs.
Step 12. Turn the table over and attach the tabletop using self-tapping screws, which we screw into the front side.
Step 13. Sand the entire table with sandpaper and apply a layer of water-repellent and antifungal impregnation.
Step 14. Decorate the table or simply paint it or cover it with acrylic varnish.
For working on a laptop
Installing a wall-mounted folding table in your room eliminates the need to cram a bulky computer desk into your apartment. If you sit at the computer for just a couple of hours a day, then this alternative is perfect for you.
But there are a couple of nuances. When working at a computer, you need to have space where you can stretch your legs. Otherwise, your knees will start to hurt very soon.
Therefore, the table must be long and wide enough.
Well, you’ll still be able to work only on a laptop, since moving a desktop computer all the time is not an option.
DIY transformable picnic table
Option 1
A picnic is an occasional event, so it is convenient to use furniture that is easy to fold and transport. There are different options, here is an example of how to make a transformable picnic table with your own hands from inexpensive materials and in a short time. Essentially, these are two benches that, if you slide them together and turn the backs, turn into a comfortable table. There are no complicated secret mechanisms, one fastening bolt serves as a rotary hinge, the second bolt serves as a lock. Everything ingenious is simple.
Another note, the width of this table is 1.20m, this is purely for economy, although most adult sizes are 1.80m. You can make the table longer by adding supports. See step-by-step photos and diagrams; assembly is not difficult.
View the embedded image gallery online at:
Photo source www.ana-white.com/2011/05/picnic-table-converts-benches
Option 2
This version of a transformable picnic table is a little more complicated, but the principle is similar. A comfortable table turns into two cute benches. It differs in the method of fastening and the shape of the benches. As you can see, here the fastening of the tabletop is overlapped. If this method is not very convenient for you, you can change the size of the table top. See the step-by-step photos for the assembly procedure.
View the embedded image gallery online at:
Photo source www.buildsomething.com/plans/P5DAC6A8E2D6C2FA7/ConvertiblePicnicTableandBench
DIY making
In order to save money, many people make furniture on their own. A homemade design must be of high quality and meet all the requirements for it. To do this, before starting work, you should think through all the nuances related to color, configuration and material.
The creation of such models requires preliminary preparation of drawings, which reflect the nuances associated with the specifics of the interior. There are various options for implementing folding systems, each of which has a specific technology.
Required tools and materials
The procedure for manufacturing a folding system will consist of several types of work, each of which will require certain tools.
For carpentry work you should prepare:
- hacksaw for sawing wood;
- a file with a large notch;
- cycle;
- sanding paper;
- hammer;
- carpenter's hammer made of wood (mall);
- a device for drilling holes in wood (brace);
- countersink drills;
- awl;
- Screwdriver Set;
- chisel;
- blunt knife;
- miter box.
The structure can be made of wood and can withstand significant loads. For this design, massive material covered with iron is used. Building such a model is not at all difficult.
In this case, along with carpentry tools, you should also have plumbing types on hand:
- hacksaw for working with metal;
- types of files;
- chisel;
- metal scissors.
Do not forget about the measuring tool in the form of a square and a building level. Reclining systems at home are usually constructed from fragments of old furniture or purchased the necessary material in hardware stores.
Its main types are as follows:
Sheets of plywood with a thickness of more than 10 mm, easily withstanding mechanical shocks and not subject to delamination. Chipboard
To make a folding structure out of them, you will need certain skills and the ability to use a plane. Glued slabs that provide the ability to cut the table top to any configuration and size.
Screws and self-tapping screws, dowels or metal corners are usually used as connecting elements.
Step-by-step assembly instructions
The process of constructing a folding model attached to the wall does not require special knowledge.
To create it you will need:
- table top;
- fastening materials;
- loops;
- supporting element.
It is advisable to make a preliminary calculation of the parameters of the system being manufactured. The recommended thickness of the tabletop should vary from two to three centimeters. This size will provide strength without making it heavy.
Any width is allowed, but it should not exceed the distance from the floor to the object to which the structure is attached. The length of the tabletop will depend on the functional features of the model and its location.
To make the structure reliable and safe, fixing supports are constructed, which can be in the form of a triangular scarf or the letter “P”.
If the product is not very long, a triangle-shaped stand is suitable for it. The part is made of bars, fastened together and attached to the table top using hinges. For greater stability, you can make two such scarves and secure them on both sides of the tabletop.
Racks in the shape of the letter “P” are also made from beams and are attached to the surface using hinges. This makes it possible to fold the support. In the folding model, the racks can be attached not only to the tabletop, but also to any vertical surface.
The entire DIY assembly of a folding wall mount table consists of several stages. First, the fastening parameters are specified by applying the workpiece to the intended place for fastening.
Then the support posts are secured to the work surface using hinges or other types of fasteners.
At the end of the work, the structure is checked for strength.
The purpose of the folding table
Basically, balconies are designed with a small usable area, so it is advisable not to clutter up these valuable square meters with large furniture. It is necessary to seriously approach the development of interior design, select compact furniture and accessories so that the balcony becomes more functional and spacious. For such a room, a small folding table is quite suitable, which will give the interior originality and special style.
A folding table will not only visually increase the living space, but will also add practicality and functionality to the interior, as well as a stylish and unusual look. When assembled, the table will allow you to maximize the space of the balcony, and when unfolded, it will allow you to make all your dreams come true; it is quite suitable for both work and handicrafts, or just for spending time in the evening with friends.
We make a folding table for the balcony with our own hands
It is quite possible to make a folding table with your own hands; the work is quite simple and requires special skills. It is easy to install on the balcony, and on any wall. The main feature of the table is its functionality; it can be unfolded and folded at any time. When unfolded, it is a compact, stable and durable table that can be used in a variety of ways.
- Table for work. If you want privacy and do not have a personal office, this folding table for work is suitable for this. It is quite possible to place a laptop on it or, as a rarity, a typewriter, work with documents, and if you are a teacher, prepare for lessons or check notebooks.
- For breakfast. The folding table is perfect for breakfast. Waking up in the morning, it’s always wonderful to breathe in the fresh air, listen to the birds singing and drink strong coffee or fragrant tea, admire the nature or the awakening city. Therefore, by laying out a small table on the balcony, you will have a wonderful breakfast.
- For your favorite activities. This table can be used for your favorite activities. If you are interested in wood carving, this solution will be ideal for you; wood debris will not be scattered around the apartment. In addition, the folding table is convenient for doing handicrafts, metal chasing, or just playing chess. The only thing is that to practice your favorite hobbies you need to install high-quality lighting.
If you want to retire or just drink a cup of aromatic coffee, talk with friends in the fresh air, all this can be done on the balcony using a folding table.
Functional design of folding tables
Products for different types of premises have different functional purposes, which determine the design features.
We recommend: Optimal blind area dimensions: width, slope, thickness
Folding dining and kitchen tables
Most kitchens in modern apartments have an area of 5-10 square meters. m. In such a room it is quite difficult for several people to pass each other, which makes it necessary to save space. Folding tables are commonly found in modern kitchens (as the most ergonomic option). Most often, long folding models are used indoors, which can be attached to the wall; when unfolded, they can accommodate the whole family. The length of the tabletop is usually much greater than the width.
Folding desk and computer desk
For products with such functional purposes, reliability is a key requirement. Most often, traditional designs are used, which are equipped with additional elements for installing PC components, as well as a shelf for books. An excellent option is the built-in rotating design, which consists of a folding table top and a built-in shelf for storing notebooks and writing instruments.
Baby changing table
Such products are most often installed in sanitary rooms and public toilets. These are small, durable plastic wall-mounted models that are used for changing small children. They feature a reinforced design. The fastening elements and tabletop are made of mechanically resistant plastic, which is additionally framed with a steel frame. The products are equipped with a built-in container, which is used as a trash container for disposable diapers, as well as protective straps designed to secure the child.
Folding work table
Such designs look stylish; they are often installed in children's rooms, as well as office spaces. The tabletop of a product for this purpose, as a rule, has a rectangular shape. Very often folding models are used for work. When folded, there is space for storing basic accessories and documents, and if you unfold such furniture, additional space appears for a laptop or papers. Often such tables are equipped with additional shelves.
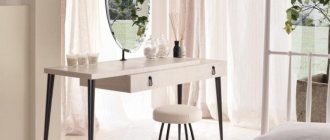
Folding dressing table
The product is used for storing cosmetics and personal hygiene products. Most often installed in the bathroom or dressing room. These can be round or square folding structures, which are equipped with spacious shelves inside. In most cases, a mirror is mounted in the cosmetic table.
How to choose furniture for a loggia
Before you start selecting new furniture for the balcony and installing a folding table with your own hands, you need to draw up a general picture of the changes in the loggia in advance. In this case, it is necessary to follow certain rules.
Furniture for a balcony should be small-sized, multifunctional and practical, in addition, it should be harmoniously combined with the rest of the decor.
Photo:
If the loggia is a place for storing old or unimportant things, then the space will first have to be freed up or redesigned so that it is pleasant and comfortable to sit at the table. Only in such a situation will this piece of furniture be appropriate.
In order for the furniture to last a long time, you need to select it based on the characteristics of the balcony - how protected from weather conditions and insulated it is, and the size of the loggia.
Furniture must be made of suitable material. For example, for an open or cold balcony it is recommended to use interior items made of metal or plastic.
These materials are more resistant to changes in temperature and humidity than wood and will last longer in these conditions.
If you have to make furniture from wood or similar materials with your own hands, then you should soak the structural elements yourself with an antifungal agent and cover them with a protective layer of varnish.
In an insulated and closed loggia, you can use any materials that suit the decor.
Both the shape and size of the product are of great importance. For example, on a small balcony area, a large angular table will look inappropriate, taking up a lot of space.
In addition, when planning the interior of the loggia, you need to evaluate your expectations - how many people will sit at the table, what, based on the purpose of use, should be its shape and area and other important issues that will have to be faced each time in the process of using the furniture.
Advantages of a folding table
In the event that you are just wondering whether you need a compact folding table for your balcony, you should consider several advantages of such furniture in order to decide whether this option is right for you or not.
- the folding table for the balcony is not large in size, and when folded it does not take up any space at all;
- it is as compact as possible and multifunctional, it would be wonderful if it can be suitable not only for dining in the fresh air, but also for work or classes;
- the ideal option is a folding table that will save you the space of a balcony or loggia, which is already not much, and you can spread it out so that you can use it only when necessary, it will not block the passage or interfere when it is not in use;
- made from any materials in any color and style, which allows you to match it to different balcony interiors;
- fits anywhere on the balcony, wherever you want.
The advantages of this design, which are discussed above, already indicate that this is one of the most convenient and reliable options for a balcony or loggia, which you will be completely satisfied with during use.
A folding table, as already mentioned, can be purchased in a store and attached to the balcony in the place you need, but it is not at all necessary to spend your time and effort on choosing a table of the desired configuration and at the same time pay money that could well be spent on others needs. Do it yourself, especially since this process is not particularly difficult.
It is very simple to decorate it brightly and elegantly with the help of decor, for example a beautiful, elegant tablecloth, and it is not at all difficult to do. There is a very large selection on the modern market of decorative materials, and it will not be difficult for you to make a beautiful design for a table with your own hands.
Even a novice master can cope with this task. Before you start making it, use a few tips given in this article.
Kinds
There are several types of balcony tables, varying in shape and size. Choosing the right one depends on your preference, uses and space capabilities.
Rectangular and square tables
In the interior of a typical balcony, a classic rectangular or square model of a folding table will look good.
It allows you to create an additional workplace; it can easily accommodate kitchen utensils, a sewing machine, books or a laptop.
But there are also significant disadvantages: in a narrow space, you can accidentally injure yourself on sharp corners.
Triangular tables
A tabletop in the shape of a triangle can only be considered as a stylish design option: in order to place a vase of flowers, an interior sculpture or some other design element. Such a folding table is even more dangerous and at the same time has a significantly smaller working surface.
Semicircular tables
The best option for installation on balconies is a semicircular shape.
It looks great in the interior of any space, comfortable to use, both for the work area and for the relaxation area.
Such a surface can be perfectly decorated and, of course, its main advantage is the absence of sharp corners. A family with small children should choose this option.
Material for making furniture
A balcony or loggia is a place where moisture can easily penetrate and where temperature changes are felt to a greater extent. Therefore, furniture must be selected only from high-quality materials in order for the product to last for decades. The Good-dom company produces wooden tables made from chipboard. Among the advantages of this material are the following:
- the ability to create a reliable fixation, the tabletop will not “shake” or “dangle”;
- durability - if you buy furniture made from chipboard, it will serve you for several decades;
- possibility of production in any color most suitable for the design of the balcony;
- high degree of resistance to mechanical damage;
- ease of care.
At Good-dom you can buy ready-made tables of various configurations for a balcony or loggia, as well as arrange custom-made furniture.
Why Good-dom?
Moscow is a big city with many companies creating tables for balconies or loggias. But, it is recommended to buy furniture from Good-dom for several reasons:
- We have experience in the production of tables for balconies and other types of structures. During this time, our employees have learned to cope with tasks of any complexity and implement client requirements.
- We do not cooperate with intermediaries, so we can guarantee you that we have the lowest prices in the city.
- Our company provides a range of services for creating tables for the balcony, including its production, delivery, lifting to the floor and installation:
- We provide a long-term guarantee for all types of structures. If any defects arise during the operation of the furniture, we will quickly correct them.
- To produce tables, we use only high-quality raw materials, which we purchase from reliable suppliers.
- We have our own workshop where the process of manufacturing and assembling structures for balconies or loggias is carried out. For our work, we use only imported equipment that allows us to achieve accurate results, so defects in our production are excluded.
Only from us you can purchase tables for your balcony at the lowest prices. From time to time we have promotions and discounts. We have prepared a nice bonus for the client.
Most city apartment owners are trying to make their homes more spacious and make their balconies not only attractive, but also functional. But how to ensure that the balcony does not turn into an abandoned room? It’s quite simple: equip it correctly. There are many ways to decorate a balcony, but in any case there should be a small folding table. Why? Now we will find out.
Balconies are usually designed with a small usable area, which means there is no point in cluttering it with bulky furniture. The table, as well as other accessories, should be compact to make the room more spacious. The best option is a folding table, with which the interior will look elegant and original.
In addition to the visual expansion of space, a folding table is also practical. When folded, it allows you to maximize your free space, and when unfolded, it can be used not only for a pleasant evening pastime, but also for work or handicrafts.
The finished design can be used in a variety of ways; let’s consider popular options.
- Workplace. If you need privacy, but you don’t have your own office, you can use a folding table on the balcony to work. You can use it to work with documents or use a laptop.
- A place for your favorite activities. Handicrafts - be it creating aircraft models or embroidery - require a lot of light, preferably natural light. Doing what you love on the balcony allows you to retire and actually enjoy yourself.
- A place to eat and drink tea, especially if you have a wonderful view from your balcony.
How to make a folding table on the balcony
There is not enough space on a balcony or loggia, so they are “equipped” with folding tables and shelving
(for storing various things that are needed from time to time, and tools).
Let's talk in more detail about inexpensive homemade tables with a folding tabletop
.
If aesthetics are important to you, then you will have to buy all the necessary materials at a construction hypermarket. In particular, for the manufacture of the main part you will need a furniture panel or laminated chipboard.
If you need to do it as cost-effectively and quickly as possible, you can use the materials that are available.
To make a folding table for the balcony with your own hands
, boards left over after dismantling the old plank floor will do, or, for example, you can use a piece of plastic window sill lying around after installing windows.
To hold the working part of the table, you can use furniture folding brackets
or the most common rotary support stand. You will have to buy factory mechanisms; you can make the support yourself.
How to make a simple folding table for installation on the balcony, see the video below.
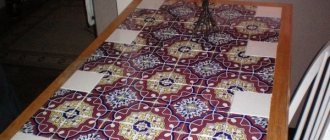
Comfortable table top for the balcony
The table on your balcony can be either folding or hanging, mounted, or wall-mounted. You can buy a ready-made version, or you can make a table yourself. For example, it will be a wide tabletop on the windowsill, and next to it there will be side stools. And all this will take up so little space that other furniture, for example, a sofa, cabinet, armchair, etc., will fit on the balcony.
You can decorate the tabletop yourself. Today, various stencils are sold, such that a person, even without any artistic skills, can make a gorgeous pattern, image, etc. You can make a stained glass tabletop by decorating it with pieces of colored glass or plastic.
You can use decoupage to decorate your tabletop. Find interesting motifs that match the style of the balcony design and glue them to the tabletop, and then apply several layers of special varnish.
The tabletop can be:
- Just white, like an extended window sill;
- Marbled;
- Just wooden, varnished;
- Multi-colored - simply stick thin strips of multi-colored tape to the tabletop one at a time.
Maybe you'll just give the coffee table a little makeover. It will become an ideal table for the balcony. You can always decorate the table, apply a new coating, paint, screw on new legs, etc. Today it is fashionable and interesting to give old things a new life.
Beginning of work
Before making a folding table for the balcony, choose a model that is suitable in size and dimensions. Today, the most popular types are:
- hinged table with support;
- folding rectangular table;
- folding with stand;
- table - cabinet.
1
2 3
4
Wall-mounted furniture is very compact, which is why it is so popular in small spaces. In order to begin preparing the material, be sure to sketch out the assembly diagrams. A folding table for a balcony is a simple design, drawings for which are available in large quantities on the Internet. The main thing is to change the sizes to those that suit you directly. And, of course, if you wish, you can create an original and unique model that you cannot buy in any store.
Making a folding table step by step
If you intend to make such a table yourself, then wood will be the best material. Typically, you can use either plywood/chipboard (which will cost less) or solid wood (which will cost more). Moreover, the first option is preferable, because a table made using one of these materials will weigh a little, so there will be no need for an additional base.
Stage one. Deciding on the type of table
First, decide what model you will make, calculate its dimensions and transfer all the data to a simple drawing. We have just figured out the optimal material, and the best location is under the window, as mentioned earlier. When developing a design, you can use your imagination or look at video and photographic materials to choose the model that is most suitable for your balcony. You can also use the generalized diagram presented below.
Stage two. We prepare everything you need
After developing the project, get everything you need for work; to make a folding table, you will need the following materials and equipment:
- plywood or chipboard sheets (recommended thickness - 25 mm) of the following sizes: 60x20 cm - 2 pieces, 80x40 cm - 1 piece, 80x5 cm - 1 piece;
- wood paint/varnish;
- "sandpaper";
- screws;
- jigsaw;
- loops.
Stage three. Let's get started
The dimensions and shape of the folding table may vary. Below are instructions for making an oversized semicircular structure, which can be used for other design ideas if desired.
Table. Instructions for making a folding table
| Steps, no. | Illustrations | Short description |
| Step 1 | First, take a large piece of plywood (80x40 cm) and draw a semicircular lid for the table on it using a compass. | |
| Step 2 | Carefully cut out this element with an electric jigsaw. | |
| Step 3 | Sand all edges thoroughly. | |
| Step 4 | Take one piece of 60x20 cm and cut it diagonally into two parts. You will get two triangles - set one aside, and the second will serve as a supporting element. | |
| Step 5 | Sand the edges of the triangle. You can make decorative holes in it, as shown in the image. | |
| Step 6 | Take the second piece 60x20 cm. Sand the edges, if desired, you can round the corners. | |
| Step 7 | Paint all the elements, then wait until the paint dries completely. | |
| Step 8 | Piano-type hinges will be used as fastening elements. Trim them to the required length. | |
| Step 9 | Using loops, attach the triangular piece to the base approximately 3mm below the top. This will prevent scratches from forming. | |
| Step 10 | Attach the base with the triangle to the strip, and in turn screw the tabletop to it (as shown in the image). | |
| Step 11 | Now you can begin installing the structure on the balcony. To check horizontality, use a building level; use screws for fastening. | |
| Step 12 | As a result, you should have a design that looks something like this. |
There are many ideas for decorating a balcony. A folding table can look different.
Variants of folding tables models
Even such simple designs can have different structures.
Important! When choosing a suitable design, you need to pay special attention to the fittings. The structure must be durable and securely fixed, the tabletop must be able to withstand the required load, and the fittings must allow the folding element to move without noise or jamming.
A folding table can be installed in an open place or disguised as an element of any structure.
Hidden tables
The tabletop can be camouflaged to look like an interior item, such as a shelf or cabinet. If necessary, its door can be opened to form a small table suitable for various activities.
Combination of table and cabinet
Another locker option combined with a folding table
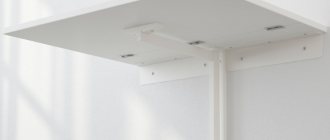
Model with retractable support
The structure consists of a tabletop fixed to the wall using hinges and a leg that serves as a support.
Folding table for a small kitchen. the free edge rests on a steel leg
When installing the cover in a horizontal position, a support extends underneath it, which ensures the rigidity of the structure.
We recommend: Tips for choosing a shower cabin
Table with extendable leg
The leg itself can be removable and not connected to the main structure. To fix it, a special recess is made at the bottom of the tabletop. This arrangement ensures minimal protrusion of the folded table from the wall. More convenient to use is a table with an attached support, which moves due to a hinge mechanism.
Kitchen table
Table with folding support
The flat, retractable support is even more convenient to use. As a rule, it has the shape of a triangle. The part is fixed on the wall in the same way as the lid - with hinges. If it is necessary to unfold the table, both the tabletop and the support are tilted (to the side), which is fixed in different ways, for example, using magnets or a latch.
Table with folding support
The model looks attractive, but the disadvantage of this design is the need for additional space for support, due to which the tabletop protrudes more relative to the wall.
Bracket design
Not so long ago, mechanical metal brackets appeared that allow the table to be installed and assembled very quickly. Moreover, the tabletop is fixed very securely. To unfold the structure, you simply lift the lid. The mechanism will lock on its own. When it's time to assemble the table, you need to either lift the tabletop slightly or press the lever. In this case, the most stringent requirements are imposed on the quality of the fittings, since the functioning of the structure depends on the reliability of the fittings. There are frequent cases of blocking of cheap devices.
Bracket design
Important! When using such brackets, there is no need to attach the tabletop to the wall with hinges, since the devices act as supports and hinges.
Mechanism with gas shock absorbers
Mechanisms developed recently ensure smooth operation and reliable fixation of the folding panel. To lift the lid, open the latch. Instantly, under the influence of the gas in the cylinders, the piston is pushed out, as a result of which the tabletop rises. Gas shock absorbers are quite simple in design, they are compact, inexpensive, work quickly and last a long time.
As you can see, there are a lot of design options for reading, eating, working at the computer, cutting up food or doing homework. It is possible to choose the optimal one based on your own requirements, purpose and cost.
Mechanism on gas shock absorbers
Pros of tables
- freeing up space - folded models save space;
- individual sizes - allow you to choose the optimal size tabletop;
- interesting appearance - the decorative design of the table makes it an interior item;
- ease of installation/disassembly - leaves a chance to move the furniture to another convenient place;
- dismantling the table will not create inconvenience in case of repairs on the balcony;
- conditional division of the balcony into zones - if the table serves as a workplace, then the space of the area can be decorated in a business style - hang additional shelves, a slate board, connect a lamp.
Preparation of tools and materials
The table should fit into the interior and be a bright accent in the room
It is best to start work at a time when repairs are planned on the balcony. This will allow you to better strengthen the folding table and decorate it to match the rest of the interior. If you are a creative person, then you will find this activity very exciting, and besides, you will have a unique piece of furniture in your apartment.
Before you start making a folding table with your own hands, you should prepare the tools and material. Anything can be suitable as a countertop: an old door or a countertop. You can also use plywood, it all depends on what exactly you want to get in the end. The table on the balcony should not be bulky, otherwise it will be inconvenient to use. To work you will need the following tools:
- screwdriver;
- screws, nails;
- construction stapler;
- countertop (any type);
- electric jigsaw;
- drill;
- two bars of at least 2 cm;
- two bars of at least 1 cm;
- decoration elements.
You can use an old cabinet door to create a table.
In addition, you may need several furniture hinges, depending on which model you are going to make. Don’t despair if you don’t yet know how to make a folding table, drawings and diagrams will help you do everything correctly and you will be happy with the result.
1 2 3
Dining
For spacious loggias, you can develop a whole dining room design project, where there is room for a large dining table. The dining table looks laconic on a large balcony with panoramic windows, however, if the apartment simply has a spacious loggia, then it is quite suitable for continuing the kitchen and dining area.
7 photos
Choose a dining table in accordance with the dimensions of the room and especially pay attention to the temperature regime: if the balcony is not insulated, then remove high-quality expensive furniture into the room so as not to spoil it. The shape of the dining table is different - for a spacious room, choose a round table, and for a small room, choose a square or rectangular table
Manufacturing and installation process
We make the table top first. We mark the outline of the structure on your material and very carefully cut out our future tabletop along it. Then, in exactly the same way, the stationary part of the table is made, which will be attached to the wall and serve as our support. The next step is to make the stop and connect it to our entire structure using hinges. You can paint the table both before and after installing the table (this is at your discretion, whichever is more convenient for you).
The table is installed as follows:
- We mark the level of the future structure on the wall and highlight the locations of future holes.
- We drill the stationary part of the table.
- We check the accuracy of the markings on the wall and drill the necessary holes there.
- Using screws or bolts we mount our structure on the balcony.
Making a folding table on hinges with a support
To make a transformable table, you can use various materials: wood, plywood, chipboard, MDF, plastic, metal. The most popular raw materials are wood and chipboard. Since the loggia table does not have complex structural elements, its assembly is quick. Moreover, each material requires certain nuances of work. Having chosen natural wood or chipboard for installation, you need to prepare the following tools: a jigsaw, a hacksaw, a hammer drill or drill, a screwdriver (it can be replaced with ordinary screwdrivers), a pencil, a ruler, a level.
Made of wood
To make a folding table for the balcony with your own hands, you first need to decide on the shape of the tabletop and its dimensions. For a strong and durable wooden table, choose a canvas about 3 cm thick. Lining is also suitable for the job. A drawing is made on paper with the main parts drawn, dimensions and attachment points indicated.
When making a table, first the tabletop is cut out according to the given parameters. To do this, its outlines are marked on a piece of wood. If the table is semicircular, then first draw a straight line equal to the length of the product. Then, using a compass, draw half a circle from its center.
As a compass, you can use an improvised tool made from a strip equal to the radius of the table. One end of it is loosely secured with a nail in the marked center of the line, and a hole is made in the second end and a pencil is inserted there. Next, use a jigsaw to cut out the shape along the marked line. The top surface of the table must be perfectly smooth. To do this, it is polished.
The end of the cut workpiece must also be processed with a grinding machine so that the edge does not have sharp jagged edges and is perfectly smooth.
The second stage is preparing the support. Most often it is a triangle. To make sharp corners more aesthetically pleasing, they are slightly filed. If desired, the stand can be decorated, for example, by cutting round holes in it. Next, cut out a strip that will be fixed to the wall and hold the support.
When all the main blanks are ready, they are coated with paint or varnish. Water-based or enamel-based paints are suitable for wood. While the table parts are drying, cut off the required sections of the piano furniture hinge. This can be done using a hacksaw.
Connect the fixing bar and the support with loops. The connection line with the support is marked on the tabletop. Fix it to the bar using butterfly loops or a piano loop. Mark the line for placing the support on the balcony wall. Before final fastening, it is important to try on the table on the balcony. At the final stage, fix the stand strip to the wall using self-tapping screws.
From chipboard
Making a similar design with your own hands is also possible from chipboard. This material is easy to process and practical to use. To make a folding table, you need two laminated boards and four butterfly hinges. Two identical blanks are cut out of chipboard, the size and shape of which are chosen at your discretion. The ends of the cut panels are carefully processed with a milling cutter and fine sandpaper.
One copy is a finished tabletop. The second is a blank for support. The middle is cut out of this panel so that the remaining part looks like the letter “U” with a width of approximately 10-12 cm. The lower edge of the cut out “door”, which will serve as a support, is cut off obliquely. This is done to make opening the support easier. At the edges of the tabletop, frame and supports, mark the places where the hinges are attached.
Next, the process of making the table includes installing all the hinges. When the folding table is ready, the place of its attachment is marked on the wall of the balcony. Check the horizontal level and secure the structure with dowels or anchors. At this point, the process of installing a folding table for a loggia can be considered complete.
We use loops
This option is a little more labor-intensive, but also quite simple. To make it, you will need four blanks from a wooden board or chipboard, two regular hinges and one long (piano hinge).
First, we connect parts 1 and 4 with regular loops. These parts must be the same in length and thickness.
Next, in the center of part 2, we attach part 3 to the piano hinge.
We connect the resulting two structures together, as shown in the figure below.
The connection must be strong, so we recommend using long screws and glue.
That's it, all that remains is to secure the finished folding table to the wall using spacers or long screws if the wall is wooden.
Please note that blanks may come in different shapes and sizes.
What is needed for production
If the balcony is furnished and the furniture was made by hand, the table should be kept in the same style. A small folding table can be made from leftover laminated chipboard or MDF used to make furniture. It is also possible to make a table top (table top) from dense thick plywood and slats. A tabletop made of slats and varnished looks quite attractive, but such a surface is more difficult to maintain than a solid one - debris will accumulate in the cracks.
If you make furniture with your own hands, it is easier to use wood - edged boards, bars. You can make a swivel support from the same material as the tabletop; when folded, it will be pressed against the wall and covered by the lowered lid. Another option is an attached leg(s); there should be a groove in the tabletop below where they will be inserted. Also, the upper edge of the leg can be attached using hinges closer to the outer edge of the table top, and the lower edge, when assembled, can rest on a stop fixed to the wall; when disassembled, the leg simply hangs down.
Depending on the size and weight of the tabletop, one stop in the center is enough or you need 2 at the edges. The tabletop can be rectangular or semicircular; you can also round the outer edges of the rectangle so that collisions with them in a confined space are not so painful. You will also need a beam, board or plate for the fastening strip connecting the table top to the wall. Before starting work, you need to make a drawing or sketch of the future table indicating the dimensions; it will help determine the amount of materials.
To make furniture, in addition to wood or wood board for the table top, fastening strips and stops you will need:
- connecting loops capable of supporting the weight of the tabletop;
- screws, dowels;
- antiseptic impregnation for wood, wood varnish, paint.
Approximate set of tools:
- jigsaw (saw, grinder);
- hammer drill, drill, screwdriver;
- level, ruler, square, pencil.
You should also stock up on sandpaper to sand the wood; a sander will come in handy. If you don't have the right size compass, you can replace it with a long ruler with holes on both ends or a piece of strong cord. A pencil is tied to one end of it, the other is tied to a self-tapping screw screwed into the right place.
Required materials and tools
For work you need to prepare the following materials:
- a suitable size piece of chipboard, laminated chipboard, multilayer plywood or window sill for PVC windows. You need to choose the supply of material taking into account the consumption not only for the tabletop, but also for the leg;
- wood screws half and one and a half times the thickness of the tabletop;
- long self-tapping screws with dowels or anchor bolts of suitable sizes;
- flat hinges for furniture;
- end tape for chipboard.
Scheme of a folding table. Tabletop thickness—20-25 mm
The following tools will be needed:
- electric or regular jigsaw for wood;
- belt, flat or angle grinder. You can get by with a simple sandpaper, but a folding table on the balcony may turn out a little worse;
- screwdriver;
- construction level or laser builder;
- pencil and compass.
You will also need a construction corner, a tape measure and a ruler.
Step-by-step master class on self-production
Wanting to save money, many people make a table with their own hands. This is not difficult, but requires compliance with certain requirements.
Wall mounted kitchen wall mounted
To make a folding table with your own hands, you will need to prepare plywood sheets; you can also use chipboard or MDF as a basis. Additionally, you will need screws, hinges, confirmations and anchors.
Manufacturing algorithm:
- Prepare a drawing of the model and parts separately. Moreover, it is necessary to draw a diagram according to the exact dimensions of the future product.
- To make a tabletop, use an electric jigsaw to cut the selected material, giving it the desired shape.
- Using a sanding machine, sand the edges of the product and cover them with special tape.
- Prepare supports. This can be a triangle or a support element in the shape of the letter P. For a small wall-mounted tabletop, a triangular-shaped support is most suitable. It is secured with a bracket on the wall and hinges to the tabletop. Using two strips on both sides, the structure can be strengthened.
- Attach the triangular support to the back.
- Mount the structure to the tabletop using hinges.
- Attach the wall table itself.
A suitable place to install a wall-mounted folding table is the wall next to the window sill.
Cut the material into the desired shape, process the edges of the product and cover it with special tape.
Prepare supports
Paint the parts, attach the triangular support to the back, mount the structure to the tabletop
Attach a wall table
Desk folding with cabinet
You need to prepare:
- sheet material for assembling the cabinet box, the thickness of which is at least 16 mm;
- a block for fixing the structure to the wall;
- chipboard or MDF sheets for countertops;
- strip for mounting the product on the wall;
- wooden beams for making supports.
In addition, you will need screws, furniture corners, and a bracket. The manufacturing process itself differs little from assembling a regular wall table, because the cabinet is a box without a back wall:
- The parts are fastened with self-tapping screws and reinforced with metal furniture corners. If desired, shelves and partitions can be secured inside the cabinet using corners.
- The tabletop is cut to the size of the previously made box. The edges are processed and secured to the bottom crossbar of the cabinet using brackets.
- Assemble a U-shaped support from the beams and fix it with loops to the tabletop.
- They make fasteners that will hold the tabletop in the assembled state. The table is ready.
Installing such a model does not require a lot of time and effort; the main thing is to choose the right place so that nothing interferes with the product’s unfolding and folding.
Fasten the parts with self-tapping screws and reinforce with metal furniture corners
Cut the tabletop to the size of the box, process the edges and secure it to the cabinet crossbar. Assemble the support and attach it to the tabletop.
Make fasteners and install the structure on the wall
If desired, attach shelves inside the cabinet
Three options for semicircular tables
The first option is one of the simplest. A semicircular table with a swivel support can be installed on the loggia
or in a home workshop.
The dimensions of the table can be changed at your own discretion - it depends on what you need it for. It all depends on personal preferences and needs.
Materials needed to make a balcony table
can be seen in the table below.
Step-by-step work process:
- We cut out a semicircular tabletop from a piece of furniture.
- We make a simple bracket from wooden blocks.
- We make a rotating support to support the tabletop.
- The support is attached to the bracket using hinges.
- We screw the tabletop with self-tapping screws to a homemade bracket.
If desired, you can make a “Christmas tree” on the surface. To do this, you will need to saw wooden planks, and then glue them to the tabletop (as when laying parquet).
Details on how to do it yourself
folding table for the balcony, you can read in this article.
There is an even simpler version of a semicircular table. You can make it from an old wooden reel for an electrical cable. This idea was shared by the author of the YouTube channel DIY Woodworking Projects.
The tools that will be required for the job can be seen in the table below.
The master uses one of the sides of a wooden reel as a basis. The sidewall needs to be cut in half into two parts, which need to be glued together - this way we increase the thickness of the tabletop.
If there are cracks and nail holes in the boards, they need to be covered with putty. Then the surface needs to be sanded.
We make a shelf from boards. We attach the tabletop to this shelf using a pair of furniture hinges.
To make the edge of the tabletop look more or less neat, you can cover it with veneer or nail a thin wooden lamella onto decorative nails.
After this, all that remains is to make a bracket from boards or wooden blocks, and you can begin installation.
Get acquainted with the step-by-step process of assembling the attachment
table is available
here
.
To make a table for a child, it is advisable to decorate it in an interesting way. For example, all children love bright colors - you can focus on this. There is nothing complicated here.
How to make a folding table with your own hands
, we have already discussed in detail above - this table is made in exactly the same way as in the previous version.
The material used is whatever is at hand - furniture board, chipboard, MDF, plywood.
To decorate the surface of the tabletop we will need ice cream sticks. But you can also saw such blanks from wooden slats. We paint the upper part of the sticks in different colors.
After the paint has dried, glue the sticks to the surface of the tabletop, laying them in a herringbone pattern, like parquet. The final stage of work is coating the decorative surface with wood varnish.
This idea was shared by the author of the YouTube channel M3b3dina. You can read more here
.
How to make it yourself
As a rule, a simple folding table for a balcony does not have very complex elements in its design, so even a novice craftsman can make it. Since most of the balconies in our apartments are not at all impressive in size, it is necessary to make good use of all the free space.
First, you need to choose a model, determine its dimensions and the material from which it will be made, think over the fasteners and select the color of the future product. Any work begins with competent calculations, so it is necessary to make a drawing of the future product and calculate the required amount of consumables.
The future table should not be too heavy, so it is better to use high-quality plywood or chipboard to make it. To work you will need:
- selected wood material;
- hacksaw or jigsaw;
- electric drill;
- screwdriver or screwdriver;
- self-tapping screws and utility hinges;
- sandpaper;
- antifungal composition;
- mounting angles;
- protective varnish or paint for wood.
The folding table consists of a main tabletop and an additional folding part, sides, legs, main support and ties. To place it on the wall, first markings are made and a horizontal corner of a size slightly smaller than the prepared tabletop is fixed with self-tapping screws.
Next, we will analyze point by point all the stages of assembling a simple folding table made of plywood:
We draw a tabletop on a sheet of plywood (it’s better if it has rounded edges) of the required dimensions and carefully cut it out with a jigsaw or hacksaw. We draw a rectangle with a length equal to the length of our table top and a width of 10 - 12 centimeters and also carefully cut it out. All parts must be thoroughly sanded until smooth and all remaining wood dust must be thoroughly removed. Particular attention must be paid to the edges of the tabletop. All finished parts of the future table must be treated with an antifungal compound and covered with several layers of wood varnish. We install a metal corner where the table is attached to the wall of the house
It is very important to securely fix the fasteners in several places. We fasten the sawn tabletop to the corner with medium-sized utility hinges; After this, we need to secure our table unfolded. To do this, we use a support foot, which can be made from an ordinary metal pipe. It is necessary to cut a small recess inside the tabletop to better fix the table when unfolded.
The most difficult thing is to fix the table strictly horizontally in a suspended form. This can be achieved using auxiliary supports made of thin metal rods or tubes.
As you can see, the process of making a comfortable piece of furniture for the balcony is not a very difficult task. You can watch the stages of its construction in more detail in the following video:
How to make a table for a balcony - in an hour
There's nothing better than spending a well-deserved evening relaxing on your balcony or terrace, with a good book in one hand and a glass of wine in the other. But the book and the balcony need to be placed somewhere; the floor is not a very good solution. The homemade balcony table presented here is ideal for such a case.
Thanks to its triangular shape,
the balcony table will fit into any corner, meaning it can be used even on the smallest balconies.
You will need: jigsaw, pencil, ruler, clamps, pine board. The table dimensions are 90 x 66 x 66 cm, and the height is approximately 30 cm. But if you want to make the balcony table larger or smaller, just change the dimensions. Take a board and cut it into pieces (for example, 90, 80, 60, 40, 20 and 10 cm). Then use these pieces to form a triangle. Then measure the corner of the balcony and mark the dimensions on the boards, forming an isosceles triangle. Then cut the boards to these dimensions with a jigsaw. Place a wooden board on a workbench or any stable, raised surface. If there is no way to clamp the board, ask someone to help!
Now make a support structure that consists of two slats that run parallel to the outer edges of the table. To do this, fold the boards into a triangle and place the planks on one of the two sides of the same length. Check that the strip is not flush with the edge of the board. It should be located partially inside the triangle. Then mark the position and angle where the triangle begins and ends on the bar. Cut with a jigsaw for both sides. To avoid splinters, all edges must be carefully sanded.
Once you have sawed and sanded the triangle and table slats for the supporting structure, you can begin assembly.
First, fold the boards so that they form a triangle. Then screw the planks to the sides using 11 screws evenly spaced. In total, you will need 22 screws. To avoid splitting the boards, drill holes. Clue. If you want to make a single-level table for the balcony, then the work is basically finished. And if you want a two-level design, you just need to repeat the previous steps.
To protect your balcony table from wind and rain, you can now apply a weather-resistant impregnation glaze, which is usually used for decorative finishing of wooden surfaces. While the coating is drying, you can prepare the suspension system. Cut the pipe into three 30 cm sections. Make sure you clamp the pipe firmly before you start sawing! Three lengths of pipe will later help separate the two levels of the table. Drill a hole in the corners of the tables, that is, three holes per table. The holes should be exactly the same diameter as the rope.
Then cut the rope into three equal parts long enough to pass through the pipes. Pass the rope through one of the holes in the top table, then through one of the pipes, and finally through the hole in the bottom table. Tie a knot above the top and below the bottom table to secure the two boards together. Finally, attach the top three ends of the rope to the beam using adjustable rings. And that's all there is to it! As you can see, making a table for the balcony is really simple. Now you can put your feet up and relax - put on your sunglasses and enjoy your favorite book.
How to make a bar counter on the balcony
Here's another idea on how to decorate a balcony - add a bar counter to the balcony railing . Here's how to do it. First, find the right materials. To save money, you can use old boards for this purpose. Gather them together to form a simple shelf with a border. Then sand and apply a coating - stain or impregnation. A light color was used here to maintain a natural look. Of course, you can choose what suits your style. Finally add a clear top coat. It is better to use external polyurethane, the table will be protected from the elements and look great! The hardest part is the metal brackets that need to be attached to the railing. If possible, you can make such brackets yourself. The design is very simple in principle, they are just large hooks that cling to the railing and can be easily removed if necessary. If you don’t have your own welding, you can order them, such work will not cost much. Add a couple of bar stools and your space is ready for outdoor entertaining.
Folding balcony table
So you have a rather narrow balcony and want to create a nice cozy place to relax or dine al fresco in the summer? A folding balcony table with folding chairs can easily make your wish come true. Here are step-by-step instructions on how to make a folding table for a balcony with your own hands . Start by preparing the things we will need to complete this project. First of all, lumber. Find a 2 x 10cm board approximately 3m long, a 60 x 60cm square piece of wood for a tabletop and a spare board from the bed base (whatever...).
The tools and equipment parts needed for the project are, in general, a cordless drill, a hand or circular saw, various sandpapers, wood glue, a spirit level, a pencil, many different screws, you will depend on the situation. More wood putty, some L-shaped brackets and hinges.
Pine lumber 18 mm thick.
- 1 PC. 60.0 x 60.0 cm
- 1 PC. 10.0 x 40.0 cm
- 1 PC. 10.0 x 43.0 cm
- 2 pieces 10.0 x 50.0 cm
- 1 PC. 10.0 x 56.5 cm
- 1 PC. 7.0 x 57.0 cm
- 1 piece 10.0 x 60.0 cm
Hinges
- 2 pcs. 50 x 40 mm (small for “legs”)
- 3 pieces 63 x 50mm (large for folding tabletop)
- L-shaped brackets
- 4 pieces 50 x 50 mm
- Water-based wood putty and impregnation.
We recommend: Painting wood: features of working with different materials
So, to make a folding table for a balcony , you need to make three basic structures: a leg, a -T- piece
... and tabletop
First we make a triangular “leg” .
For this you will need the following lumber:
- 1 PC. 10.0 x 40.0 cm
- 1 PC. 10.0 x 50.0 cm
- 1 PC. 10.0 x 56.5 cm
The 56.5cm piece needs to be cut at a 45 degree angle on both ends to fit as shown in the photo. To connect these parts, it is better to use a pocket hole jig and then connect them with screws and glue. This solution produces a more beautiful final product. If you don't have a crag jig, make the joint simpler, although it won't look as attractive. Basically, just glue pieces of wood together at a 45 degree angle and screw. Another solution is to drill vertical holes through the boards using an 8mm drill bit, then insert cap screws into the hole and tighten the joints.
Then you need to prepare the countertop . First, you need to properly sand a piece of 60 x 60 cm. Then clean the tabletop by removing dust with mineral spirits. It is also a good idea to round the edges, because if the balcony is narrow, the table will be easier to move. To create rounded edges, use a small kitchen plate and draw a corner. Then cut with a handsaw to create a nice round corner. After sanding and cleaning, apply the 1st coat of stain. After the 1st coat has dried, lightly sand the countertop with fine sandpaper to get as smooth a finish as possible. Then apply a second coat, let it dry and the top is done!
The T-piece is perhaps the most important part of this folding table as it is used to connect the top to the leg and wall mount. Here you will need boards:
- 1 PC. 10.0 x 43.0 cm
- 1 PC. 10.0 x 50.0 cm
- 1 PC. 7.0 x 57.0 cm
To make this part, take 43.0 cm and 50.0 cm boards, set them flush on the bottom, then glue and screw them together. After that, attach the top part (7.0 cm x 57.0 cm) as shown in the photo. Note that there is no need to use a 7.0cm board, you can use a 10.0cm board but then cut 10.0 x 43.0cm accordingly (make it 10.0 x 40.0cm). The basic structure is ready, it's time to start assembling. You need to find the center of the -T-piece and mark it. Then attach the legs vertically to the center and mark the sides with a pencil. This will help position the hinges as vertically as possible on the same level.
The second thing to do is screw the hinges to the two pieces (pay attention to the length of the screws). The last thing to do at this stage of the folding table assembly is to screw the L-brackets onto the structure you just made. Please note that you do NOT need to screw the brackets to the top. At this point, it's time to paint these pieces, since the next step is to attach them to the wall. Now installing the countertop. This is the easiest part of the entire assembly. Required parts:
- 1 piece 60.0 x 60.0 cm
- 1 PC. 10.0 x 60.0 cm
Fix the parts and screw the hinges. Wall mounting of a folding table . So, almost everything is ready, all that remains is to add a few screws! The most important thing at this stage is alignment and selection of the correct plugs. The last thing to do is install the table top and screw it to the L brackets. The end result should look something like this.
Idea for a folding table for a balcony
Folding tables are very convenient when space is at a premium, making them ideal for balconies. This table can be attached to any balcony rail up to 18cm wide, providing space for drinks, snacks and more. When not needed, the table folds onto the edge of the balcony and you don't even notice it. Of course, the table shown here is a shop table, the price is around 70 dollars, but it is a good idea to make a folding balcony table with your own hands , it is not a very complicated design.
Outdoor balcony table
Here's another great feature for any balcony. This is a small table or tray that can be placed on the railing, like most similar balcony tables . But there is a significant difference. This table is made of glass and aluminum and can be installed indoors or outdoors, depending on how much space you need at the moment. By installing it outside the balcony, you will get more space inside. So in this regard, the idea is good, but security measures would not hurt, for example, some kind of fencing around the perimeter of the outer part of the countertop. Ketchup falling from the eighth floor onto the heads of passersby will not cheer anyone up.
Secret table on the balcony
Surely it would be ideal to have furniture that simply disappears when not needed? Would you like a table and chair that simply tucks away into the floor when not needed? Well, now you can have such things. The secret table is a concept by Hong Kong designer Sandy Lam that is ideal for small balconies. Built-in furniture simply “opens” and rises from a hiding place embedded in the floor. And all this was developed and made by the author of the project with his own hands. True, there are no instructions, but there is an idea, so anyone can do this if they want.
Choosing a balcony table: what to look for
Material
The choice of a table, like any other piece of furniture, primarily depends on the microclimatic conditions of the room. If the balcony is glazed and insulated, then you can install a table on it from absolutely any materials, focusing on the quality of construction and appearance. If we are talking about landscaping an open loggia or balcony, then you should give preference to the most durable and wear-resistant products.
It is believed that materials such as plastic and metal behave best in outdoor conditions; accordingly, the balcony table should be made from them. Of course, these materials are good because they are practically not afraid of moisture, and this significantly increases their service life. However, one should not exclude the possibility of decorating the balcony with furniture made from lighter materials.
If the interior of the room gravitates, for example, to tables made of wood, rattan or bamboo, please note that serious manufacturers always treat products with moisture-resistant and antifungal mixtures, which significantly increases their wear resistance
Folding table and chair for the balcony
Glass table hanging for the balcony
Plastic table with chairs on the balcony
Design
The balcony area, as a rule, is not spacious, so standard tables are unlikely to add convenience to this room. But a small table on the balcony can give your family unforgettable moments of relaxation in the fresh air. Which table should you prefer? First of all, this piece of furniture should fit compactly into the room, without taking up extra centimeters. If the balcony is too narrow and long, then it is more rational to install a corner rectangular table on it, which will not take up too much space, and at the same time visually make the room more proportional. For glazed balconies this can be a window sill table.
Window sill-table on the balcony photo
Convenient and compact table for the balcony with your own hands photo
If the balcony has a normal width, it is quite possible to install a small table of a standard design on it. For example, round tables on one leg or light structures with rectangular tabletops look very beautiful on open or closed loggias.
Furniture for the balcony – round table and chairs
Balcony table models
Balcony round table
Often, owners of small balconies refuse to improve them, believing that the furniture will create a feeling of clutter. This is true, but only if the size of the table does not correspond to the size of the balcony. Now in the assortment of many furniture manufacturers you can find incredibly compact and comfortable folding tables that are perfect even for miniature balconies. Sometimes the design of such tables is very different from standard products. For example, a folding table for a balcony can be made in the form of a high stool, which when folded takes up virtually no space.
Cute folding table for the balcony
Blue folding table for balcony
Wooden balcony table photo
In addition, there is another interesting and convenient option for a balcony table, which, in fact, is a hanging tabletop. Hanging tables for balconies are most often attached to the railings, but there are also models whose fasteners allow them to be mounted to a wall or window sill. The main advantage of tables of this design is their mobility and compactness. Such a table can be removed or moved to another place at any time.
Folding glass table for the balcony
Folding table for balcony photo
If the space on your balcony does not allow you to place even such a miniature product, please note that hanging tables can be folding. If you are not currently using the table, you can lower it down and it will practically merge with the wall, taking up 2-3cm at most
DIY folding table for the balcony
Hanging balcony table photo
Hanging balcony table photo
Folding tables in the apartment
In small apartments it is sometimes not possible to place all the interior items necessary for life. Installed bulky furniture can interfere with free movement around the rooms and block access to necessary equipment. Homeowners often look for non-standard solutions to problems. One of the best ways is to install transformers.
It is quite simple to assemble the structure based on furniture fittings
A mobile design can have beds and sofas, armchairs and tables (both dining, desk or computer). It is quite simple to organize a workplace or dining area in compact spaces using folding structures. The most common type of such tables is a folding one.
Folding table on the balcony
Tabletops mounted on the wall, which can be unfolded very quickly, are popular due to their functionality and simplicity:
- they take up minimal space in the room;
- the budget cost of the structures allows anyone to install them;
- the table lid folds back in a matter of seconds;
- caring for interior items does not present any problems;
- despite the simplicity of the products, they can fit into many interiors;
- folding tables are much easier to manufacture compared to sliding counterparts;
- transformable models can be used when necessary, but when folded they are practically invisible;
- Anyone with minimal skills in handling tools can make a folding table on their own.
The folding table takes up minimal space when folded
The disadvantages of the folding design include the rather small usable area of the table top, which allows only two or three people to sit at the table. For a large family or large company, the size of such a table is unlikely to be enough for a comfortable pastime.
Countertops can be made from various materials:
- furniture board;
- MDF;
- chipboard;
- plastic;
- glass
Folding table with MDF top
Folding glass table
The table cover can also be made from a metal sheet, but it will not be as ergonomic as a product made from the listed materials.
Wall-mounted folding table (workbench)
Depending on the purpose of the product being installed, the surface of the tabletop may have increased resistance to external influences. Laminated materials, glass and plastic will cope perfectly with a glass of water thrown onto the countertop and with chemically active detergents.
Semicircular table with plastic top
Wooden furniture, even treated with special protective compounds, is not as functional, but many people prefer wood models for their attractive appearance. If we take into account the cost of the table, then the most economical in this regard will be products made of plastic and laminated chipboard, but the former are less reliable in terms of strength, and the latter, if low-quality material is used, can begin to crumble in the fastening area (especially if the table is used frequently as intended).
MDF combines affordable cost, decent strength and beautiful appearance. Most interiors are greatly decorated with interior items made from impact-resistant glass. Especially in combination with metal trim.
Folding table with metal mount
The folding table can be made in any shape. The type of construction is determined by the wishes of the owners, the design features of the room, the dimensions and layout of the room. The most common types of structures are rectangular and semicircular in shape. But you can even install a triangular piece of furniture.
Folding table with semicircular top
Place tables with a folding tabletop along the wall or in the corner of the room.
Corner table