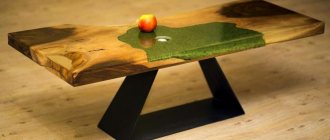
Epoxy countertops are becoming more popular every year. And this despite the fact that their cost in a store or workshop is quite high. They are resistant to moisture and are easy to clean with modern chemicals. But their main advantage is that you can create unusual designer pieces of furniture from this material. Further in the article we will figure out how to make such a table with your own hands, consider its production step by step and warn about common mistakes.
Which epoxy to choose?
If you have already decided on the type, look, and design of the future countertop, now it is important to decide on the choice of epoxy resin. Epoxy resin for pouring a countertop must be transparent and have a long life, otherwise you risk seeing the resin “boiling” with your own eyes or spending many times more time on layer-by-layer pouring. Structural and base resins (such as ED-20) are not appropriate here, because they are thicker, which will not allow all the air bubbles to escape, they are more fragile, not always colorless (grade 1), and the hardeners that are used with such resins (pepa, theta, etc.) will give you a mixture with insufficient life time, which again It can also lead to both deformation of the product during rapid curing and boiling of the mixture.
Add a description
Of the resins presented in our store, the EpoxyMaster 2.0 composition will suit you, allowing you to fill layers up to 5 cm in one layer. The composition has a low viscosity, provides good fluidity and filling of hard-to-reach areas, and moderate reactivity allows you to work with large objects. In addition, the EpoxyMaster composition has excellent self-leveling, resistance to peeling and cracking, good fillability and no “whitening” effect of the coating.
EpoxyMaster 2.0 Set for pouring in a layer up to 5 cm thick
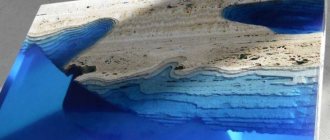
Thanks to the transparency of the composition, you can achieve almost any visual effect: pour in various fillers (shells, dry leaves, stones, pictures, etc.), you can organize lighting both in the thickness of the tabletop and under it, you can realize a creative idea with a phosphor or color the resin, while maintaining the overall transparency of the layer.
Features of using plywood
Plywood is made from thin veneers by gluing layers together. The number of sheets may vary. Depending on the purpose, it varies from 3 to 23 pieces. Since veneer has natural fibers, the structure of the wood is preserved, so the surface of the plywood has a specific pattern.
Each subsequent layer is applied perpendicular to the previous one, thereby increasing the strength of the sheet. Gluing is done under pressure. The finished material has a number of features. Let us highlight those that allow the use of plywood as a composite material for the manufacture of countertops.
- The nominal thickness of the plywood sheet varies from 3 to 30 mm. For the manufacture of countertops, you should choose options from 10 mm. But in its field of application, each sheet is quite durable. Strength is one of the main qualities. The slab is used as a base for a countertop, but in some cases plywood can simply be impregnated with resin, processed and the finished product is obtained.
- Plywood is resistant to loads in the direction perpendicular to the fibers, it is flexible. This quality is used when decorating, since when bending the surface does not crack or break. It is difficult to bend plywood at home, since without special equipment the process will take a long time.
- The following quality attracts all masters. Plywood is very easy to process. No special tools are needed to cut the sheet. Pressed veneer can be easily cut with a regular hacksaw, jigsaw or circular saw.
- Finally, plywood products are low cost. It is believed that this is the most accessible and inexpensive material on the construction market. To make a table, you need to look for sheets marked “Ш-2,” which means “polished on both sides.”
Useful to know > What epoxy resin backlit tables look like, what they are like and how they are made
When combined with epoxy resin, plywood produces a durable, even surface. Any product will be environmentally friendly and lightweight. If you want to buy a ready-made table, you need to have a decent amount of money, since epoxy tabletops are considered the signature creation of a master. But if the table is made from plywood and epoxy resin yourself, then the overall cost estimate will please those who want to save money.
Preparing for work
The room must be well ventilated or have forced ventilation. The indoor air temperature should not be lower than 22 °C. High humidity and dust can ruin your work!!!
It is necessary to prepare materials for the manufacture of formwork. The formwork or form can be assembled from plywood, plexiglass (without scratches or chips) or polished aluminum sheets. You will also need release agents such as wax or semi-permanent release agents. For “home” use, wax is better. And if you are planning a series of countertops, then semi-permanent separators are better, they allow you to make more than 20 removals without rebuilding the separating layer.
Some home craftsmen use ordinary cosmetic Vaseline as a separator. It is easy to purchase, but it is difficult to perfectly align on the mold/formwork and it will cause clouding in places where it comes into contact with the resin. This layer will then need to be sanded.
Accordingly, you need to prepare tools for grinding, or at least a set of abrasive paper of different grain sizes for manual sanding.
Add a description
Don’t forget to prepare personal protective equipment for your loved one) These are gloves, a respirator, and safety glasses. A disposable painting overall and a cap will not be superfluous, because in its liquid state the resin seems to attract any speck of dust, lint, hair...)
Cover the floor and other horizontal surfaces in the area affected by the resin with polyethylene to keep them clean.
You will also need containers for measuring and mixing ingredients. Scales, accurate to 1 g. Or measuring cups, because Some resins are mixed by volume, and some are mixed only by weight, like EpoxyMaster.
Add a description
Advantages
When purchasing ready-made furniture, the main guidelines are appearance and price. If these two parameters suit the buyer, then the deal will go through. The excessively high cost of epoxy tables, as well as the desire to be creative, force many, even inexperienced craftsmen, to fill the countertops themselves. They might just need information about the benefits of using wood.
- Wood is the most affordable material. It is impossible to say unequivocally about its cost, since the price depends on the type of wood and the method of finishing, but you can always choose options that are affordable.
- Every tree has its own unique texture. This pattern can make any piece of furniture unique. The characteristic highlight of the fibers on the wood cut fits perfectly into any interior.
- Wood is available for processing. In the absence of a special tool, you can even use unprocessed fragments (boards, slabs, cross cuts) as decoration.
- The wooden base of the tabletop will give it strength, which will allow the future table to be used under constant loads.
We fill our tabletop. Instructions
Please read the instructions for the resin kit carefully!!! Familiarization with this document will protect you from possible surprises in the process. We prepare the form or assemble the formwork. Be sure to make sure the mold/frame is sealed. Literally your entire future table can leak through a tiny crack. The cracks can be sealed with sealant, plasticine, thermal glue or paraffin. Treat the mold or frame with a release agent. Level it up! The wooden parts of the future countertop must be dry! BUT, even dry wood can release air during the pouring process. What to do in this situation? Before pouring, it is advisable to prime the wooden parts in places of contact with the resin. For these purposes, you can use the resin itself (ready-made mixture) or furniture varnish (polyurethane, for example). This will not only prevent air from escaping from the wood, but will also prevent dyes from migrating along the wood fibers if filled with colored resin. And so, the form/frame is ready for work. Wooden parts are primed and dried. Let's start preparing the mixture. We will talk about the EpoxyMaster 2.0 pouring kit
EpoxyMaster 2.0 for creating designer furniture
If it is necessary to tint the resin, then we add the dye only to component A (resin), before adding component B (hardener). You should add in very small portions, literally at the tip of a toothpick, until you get the color of the desired intensity.
Stir thoroughly until smooth. To make the pigment disperse better and faster, component A can be heated to 30-40 degrees (place near a radiator or in a water bath)
Pigment pastes
Next, mix our components 100:35, as indicated in the instructions.
Because Since we have a composition with a lifetime of more than 7 hours, there is no point in heating our components any more, the air bubbles will all have time to come out without these manipulations. Mix the mixture thoroughly, do not forget to stir in the middle and along the edges of the walls. The heterogeneity of the mixture will ruin your entire product! Somewhere the resin will harden, somewhere a sticky layer will remain, and somewhere else everything will remain liquid. Such a “product” can no longer be saved(
Now we pour a thin layer of resin to the bottom of the mold, lay out our decorative elements (Attention! Wooden elements, leaves, pictures may float!!! Then they can be left in a thin layer of resin until the layer is almost completely cured, so to speak, glued at the depth you need .) Pour the prepared composition into the mold; if the thickness of the filling does not exceed 5 cm, then pour it at once.
ATTENTION! You need to pour the resin in a thin stream at one point; you can pour it over an inclined stick lowered into the mold. To prevent internal voids from forming in the corners, moisten them with a ready-made filling compound before pouring.
If you need to cast a product with a thickness of 6 cm or more, pour it in two stages, in two layers. Between layers should pass from 1 to 2 days.
If it seems to you that the bubbles are coming out poorly (perhaps the room is cool), you can heat the surface of the resin with a hair dryer or simply spray acetone from a spray bottle, this will reduce the surface tension and allow air bubbles to come out faster.
And so, we are done with filling. We leave the product to cure; it is advisable to protect our mold from dust settling on the surface. Curing will take at least 2 days! You can speed up the process by increasing the temperature, but very carefully, because The layer is quite large, and so is the volume of resin. Avoid overheating the mixture, otherwise this will lead to abundant formation of air bubbles or deformation of the product, cracking, and the appearance of craters.
Advantages
In furniture made of epoxy and wood, not only the appearance attracts attention; the positive qualities of the resin are also transmitted to objects made from it, these are:
- Wear resistance. Epoxy resin perfectly tolerates various unfavorable factors: humidity, high temperatures, mechanical stress, etc. Such coatings do not wear out during long-term use.
- Durability. Thanks to this quality, the material significantly increases the service life of furniture.
- Reliability. Resin is very similar to glass, which is often used to create interior items, but it does not break, does not form dangerous chips, and also weighs half as much.
In addition, when epoxy hardens, it is a very plastic material that can be given any shape. It is quite easy to process. The resin adheres well to different surfaces, forming very strong connections. These features of the material attract not only craftsmen, but also amateurs.
Polishing/sanding of the finished product
The product is considered finished after post-curing is completed; you can read more about this in the instructions for your resin. Post-curing allows your product to achieve its maximum properties. If post-curing is not possible or the instructions do not require it (not required), allow your product to gain strength. At a temperature of 22 -25°C this takes 5-7 days. Well, now you can start grinding and polishing work.
Attention! Wet the surface with water to avoid overheating your product, otherwise the resin will begin to melt and clog the abrasive paper. Well, or choose a speed mode that does not lead to overheating.
The final touch is to coat the product with UV-resistant polyurethane varnish in several layers, with intermediate sanding. This will save your masterpiece from yellowing due to exposure to sunlight and will give the piece a much brighter shine than polishing.