Today, you can increasingly find original design solutions in apartments. After all, in addition to traditional materials, they also use those with which you can embody the most interesting ideas. You can, for example, make a table from epoxy resin with your own hands - such a piece of furniture will be a stylish decoration for any room. The combination of these materials allows you to create true masterpieces!
DIY epoxy resin table
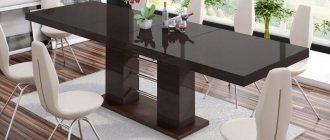
Wood and epoxy resin are always an exclusive option
About design and types of construction
Furniture items made from epoxy resin are distinguished by their unique design and ability to fit into almost any interior. Most often they can be found in the living room and kitchen, and no strict requirements are imposed on the style of such tables . We also note that with the help of epoxy you can not only create new products, but also restore old furniture. Many models combine several materials.
Using this material you can create real masterpieces
One of the main advantages of epoxy resin is that after hardening it practically does not shrink, and therefore retains its original shape for a long time. It can also be decorated in various ways. Epoxy tables can be of several types; let’s look at the features of each of them.
Fantastic glowing epoxy tables
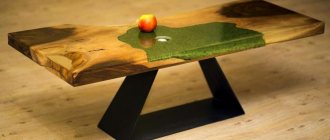
- Combined tables . In such products, resin is combined with wood elements.
- Tables with support . They differ in that only the top layer is filled with resin. Various additional decorative elements are often used, such as flowers, leaves or coins.
- Tables without support . Their construction contains only epoxy resin. These are, as a rule, small coffee tables that are not designed for serious mechanical loads.
Epoxy resin combination table
Small table without support
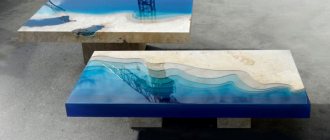
On a note! An epoxy table can be single-color, transparent or a combination. Popular colors are blue, light turquoise. Fluorescent powder or additional lighting is often used.
Example of using luminescent powder
The patterns can be the most intricate.
The cost of manual tables is quite high, but you can always save money and make such furniture yourself. Moreover, this will allow you to show your imagination and restore old furniture in a very original way.
Stylish coffee table
Beautiful epoxy resin chairs
Main types
The popularity of epoxy tables grew almost instantly. Previously, the resin was used as an adhesive, but not so long ago another area of application was discovered. Epoxy resin has become a real gift for those who are seriously thinking about interior styling. In the interior decoration of the room, not the last place is given to furniture. By the way, a piece of furniture can perform an exclusively decorative function. In particular, epoxy tables turn into interior elements. The capabilities of the material allow you to create exclusive masterpieces.
It is not possible to describe the variety of tabletop designs due to the numerous artistic variations. In the simplest classifications, tables can be divided into categories according to their functional purpose: kitchen table, coffee table, coffee table, desk. There is another classification - by type of production. But since it also determines the design of the countertop, it is quite suitable for consideration.
- Tabletops without base. These tabletops are a slab entirely cast from resin, which can have different shapes, from a disk to a prism. Due to the transparency of the material, various objects can be placed inside the slab to act as decoration. When a dye is added to the resin, an array with a tint is obtained. Various powders allow you to reduce the transparency of the resin. Since there is no rigid base, such tables are not intended for high loads. The pouring table is used as a beer, coffee or coffee table. In some cases, tables stand without any practical use at all, only for decoration.
- Table tops with base. The base performs a protective function and gives the structure additional strength. The basis is a sheet of chipboard, slab, multiplex or even an old countertop. The resin is poured on top, forming a transparent layer. As in the case of tabletops without a base, here you can also decorate the product with various elements. Due to the fact that the base below is strong, the resulting tabletop can withstand high loads. Similar products are used in the production of dining tables or work tables.
- Combined tables. Due to the fact that epoxy has fluidity, it is possible to construct combined models. They cannot be classified either in the first or in the second group. The tabletop includes fragments of wood, stone or metal, but they may not act as a base. In various variations, elements of various shapes are used, with processed and unprocessed edges, sharp or rounded edges. Tabletops with wooden elements are especially valued, since the structure of natural wood has its own originality. When producing combined tabletops, the sides are made, and decorative elements are placed inside. First, the master must coat the elements layer by layer with resin so that it gets into all the cavities. Then a flat surface is formed.
Useful to know > How to make an epoxy resin ball, simple step-by-step instructions
Characteristics of epoxy resin
The peculiarity of epoxy resin is that it is not used in its pure form . To obtain a solid fragment, it is polymerized using a hardener. The mechanical and physical properties of the material may vary depending on the proportions of the components.
Epoxy composition and hardener
The main qualities of epoxy include:
- resistance to chemicals, high strength;
- no need for special care (we’ll talk about this in more detail a little later);
- no unpleasant odor;
- resistance to abrasion and mechanical damage;
- polymerization temperature (hardening can occur in conditions from -15°C to +80°C);
- low moisture permeability;
- structural stability and low shrinkage.
Epoxy resin is highly durable
Damage to epoxy resin
Important! If you use additional protective components, the epoxy table will become immune to the effects of sunlight.
Thanks to the colloidal structure, you can get interesting layered colors by mixing several shades.
Resin also has its disadvantages - for example, it can release harmful substances at high temperatures. To work with resin, you need to strictly follow the technology and have certain skills. Finally, the cost of this material cannot be called low.
Plasticity, resin fluidity, self-leveling ability
Width doesn't matter
Preserving wood in resin allows you to use slabs of even the widest trunks without any consequences during further use, since the access of air and moisture to the wood is closed. Therefore, even the widest tabletop will not dry out over time, will not crack, and will not be driven by a screw. Tables with such a tabletop often compete with classic furniture made of expensive wood.
Popular epoxy resin table designs
To create such a table, it is advisable to have a good imagination. In addition to the wood mentioned above, the table can be decorated with buttons, small stones, wine corks, leaves, and moss. In short, you can use whatever comes to hand.
Epoxy resin furniture has obvious advantages
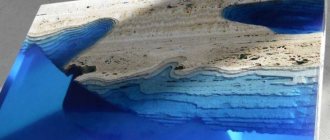
Table-river
Elements in such structures are always placed according to the same principle: a resin insert is created between two pieces of wood. The insert can be curved or straight, it can be made narrow or wide, decorative fragments are often additionally used - for example, pebbles, islands.
River table with epoxy resin
The tabletop can have any shape. The furniture is ideal for the kitchen or living room, office (if desired). The approximate consumption of epoxy resin is about 13-14 kg for a river whose dimensions are 210x15x5 cm.
An epoxy insert is placed between the pieces of wood
Solid table
To make a solid epoxy table, you will need a mold of the right size. As a rule, such tables are made without support, so they are not intended for intense loads. In this case, more resin will be required - approximately 30 liters for a tabletop measuring 100x60x5 cm.
Solid table made of liquid glass
Slab table
For those who don’t know, a slab is a solid stone or wood slab . They usually make structures with their own hands from solid wood - mainly longitudinal cuts with uneven edges and knots. Thanks to this, truly unique models are created.
Slab table
Most often, oak with a thickness of 5-15 cm is used. It is important that the tree does not have any joints and is not glued together. To make a medium-sized table, you need about 10 kg of epoxy resin.
As a rule, such tables are made of oak
Table made from saw cuts
Tabletops, which are saw cuts filled with epoxy, look impressive and original. The substance consumption in this case is at least 7 kg. This table is ideal for rooms decorated in a rustic or eco-style.
Models of saw cuts of wood material coated with an epoxy solution look no less impressive.
The shape of the tables may be different, but the number of elements used depends on it. It is important that the cuts are of high quality and the required diameter (do not use cracked fragments).
You need to use only high-quality saw cuts
Video - Making a table from slab and epoxy
Other filling options
A table made of epoxy resin and wood does not have to be made only from expensive slab. Radial cuts of trees can be perfectly adapted. And the radius is far from important here. You can make a frame out of wood, which you can install on the tabletop - on plywood 10 mm or so. Lay out the saw cuts in this frame - according to the pattern or randomly. In this case, the tabletop will not need to be removed from the base - this is the simplest option. For self-production for the first time - the simplest solution.
You can make a table from wood cuts and epoxy resin in different forms
Please note that it is better to choose wood with flaws. In this case, these are not defects, but a highlight. Rotten ones generally look exotic. Especially if you emphasize the difference in colors and textures using deep color.
Designer furniture made of wood and epoxy resin. The second one is definitely not the same
A very interesting effect when using not only tinting, but also various additives. For example, glitter, powder that gives a metallic effect, even broken colored glass or mirror shards give a very interesting picture.
Using pearl powder with stained wood
You can use stone instead of wood. The weight of such a table will be substantial, but the strength will also be great. Layered rocks look great. It is advisable to have skills in working with stone. This is more difficult than sanding wood. When preparing, you need to fill the voids well so that all the air comes out.
Epoxy resin and stone table
Use pebbles, natural or painted gravel. These stones can be laid out in a fairly thick layer - the resin will still flow into the gaps. Often found in combination with wood. By the way, if you “missed” the amount of epoxy resin, you can add pebbles to the poured resin. This way you can get the desired level.
Pebbles and gravel are also used
Human imagination is limitless. They make furniture from epoxy by pouring various pieces of iron into it. Car parts, wrenches, bicycle or moped chains, etc.
Metal is also used
Using the same principle, you can make chairs or stools. You can cast cabinet legs in the same style. They even began to pour LED garlands into epoxy. Why not a night lamp or a leg with soft lighting. By the way, there are glow-in-the-dark additives in epoxy resin.
Can be used both as chairs and as a tabletop support
Selection and consumption of epoxy resin
As mentioned above, epoxy contains 2 chemically active components - a hardener and the resin . Both components are elastic while they are in different containers, but after combining, the resulting composition hardens quite quickly.
The cost of epoxy resin varies between 300-900 rubles. for 1 kg
It is advisable to buy resin in large packages, and from wholesalers (it’s cheaper). Fortunately, today there are no problems finding such outlets. So, the following brands of epoxy are best suited for making a table at home.
Table No1. Popular brands of epoxy resin.
| Name, photo | Short description |
| Art-Eco | This resin is more suitable for pouring thin layers. If you wish, you can give the composition different shades using branded colors. |
| QTP-1130 | This resin is recommended for use for very thin pouring (no more than 3 mm). The good thing about the composition is that it is very transparent and self-leveling. |
| Crystal Glass | Viscous transparent resin of fairly high quality. It is ideal as a fine filler, as well as for filling a herbarium. |
| PEO-610KE | The composition of domestic production is good because it does not turn yellow or become cloudy. It is also UV resistant. |
| MG-EPOX-STRONG | This brand of resin is most often recommended for making tables. The optimal combination of high quality and affordable price. |
It is also worth mentioning another brand of resin – ArtLine Crystal+.
Review of ArtLine Crystal+ epoxy resin from the Review site
To make it easier for you to choose a material for pouring, check out several real reviews about the use of epoxy resin.
Review of the use of epoxy resin on the website Masterforum.Composites
Another review about the use of resin (left on the Forum.Woodtools website)
And the last review (taken from the same site)
As for consumption, it is indicated in the manufacturer's instructions. Although often the resin is mixed with the hardener in a ratio of 10:4 (that is, 400 ml per 1 liter of resin). To calculate the exact amount of epoxy, measure the width, length and height of the future countertop. Multiply the length by the width to calculate the area, and multiply the resulting value by the height. As a result, you will receive the required volume of resin. There is no need to buy a substance with a large supply - it does not shrink, so take as much as was calculated.
A small example : to fill a table measuring 210x160x5 cm, you will need 16.8 liters of resin.
We pour the resin in a well-ventilated area or under a hood.
What to make the countertop from?
First of all, decide which elements you will use for the upper part of the structure. But note that if a soft material is used, then a resin of a more liquid consistency will be needed.
Tree cuts
For production, you can use large saw cuts, boards cut across, fragments of wood with notches, and branches. Moreover, you can combine wood of different hardness and types. A beautiful table can be built from untreated material, but it is more difficult to work with. When using a solid board, the surface is not varnished - instead, the top layer is filled with resin.
The use of untreated wood guarantees a unique design
Transparent countertops are also popular. For their manufacture, special forms are created - glass or plywood. For filling, you can take a variety of materials - cones, small pebbles, shells, sand.
Here, shells, sand, and sea plants are used for decorative filling.
Plants in the thickness of the kitchen table will retain their original appearance for a long time
Example of stone backfill in a countertop
On a note! Luminous tables made of epoxy look great - they can make any interior romantic. Another good option is to create three-dimensional images inside the tabletop.
Glowing tables made of epoxy resin
Table No2. Proper preparation of the mold for pouring.
| Steps, photo | Description of actions |
| Step 1 | The form is created based on the selected design option. The edges of the inner surface are covered with a thick film so that the resin, after hardening, lags behind the shape without any problems. |
| Step 2 | The finished form is placed on the base, and decorative elements are laid out inside (if necessary). Be sure to degrease all joints, and it is important that they are completely sealed. |
| Step 3 | The mating surfaces are glued using a glue gun, and the quality of the connection is permanently monitored. It is best to use silicone sealant for this. |
The next steps are not difficult. The components are mixed, the resulting composition is thoroughly mixed to obtain the desired consistency.
The hardener is added to the resin
On a note! It is convenient to mix the epoxy with a special stirrer, but this must be done only at low speeds, otherwise the composition will become saturated with air bubbles.
Then the mold is filled with a thin stream. If the thickness of the future countertop is less than 5 cm, then you can fill it in one layer. If more, then two, with a break of 24-48 hours between them.
The composition is poured in a thin stream
After pouring, air bubbles that have risen to the surface are removed, then the tabletop is covered (to prevent foreign objects from getting there). All that remains is to wait for the resin to dry completely.
It is advisable to cover the resin after pouring.
How to cast an epoxy coffee table
Using epoxy resin you can create real masterpieces of art. This substance is not afraid of high temperatures, is quite durable under physical influence, and when completely hardened, it is not dangerous for humans, at least if you do not gnaw it with your teeth))
In the east, the topic of epoxy resin is just beginning to develop; more and more interesting and delightful homemade products are appearing. Most often, this material is used in the manufacture of various jewelry, as well as in the production of furniture.
Today we will talk specifically about making furniture, or more precisely, how you can make a cool coffee table. To complement the unique design and appearance, so to speak, the author decided to fill an uncut board in epoxy resin. You just need to choose an interesting shape. However, instead of a board, you can use various roots, tree branches, and so on. It is also not necessary to stop on a tree; stones, flowers, and even hay or reeds are perfect for such purposes. It all depends only on your imagination.
Materials and tools for making a coffee table that the author needed:
List of materials:
- uncut board;
- epoxy for filling; - finished legs or materials for their manufacture; - self-tapping screws or screws for wood; - stain for wood; - materials for making the mold. List of tools:
- orbital sander; - sandpaper of various grain sizes; - cordless drill; - welding, grinder (for making legs); - latex gloves; - hacksaw for wood and more.
Table manufacturing process:
Step one. We make the mold and prepare the resin
The most difficult part of making a table will be creating the shape.
Here you will need sheets of fiberboard, acrylic or other similar material. You will need to make a rectangular shaped box. The most important thing here is that the joints do not leak and the walls do not deform during pouring. You can assemble the form using clamps, but this is the simplest and easiest option.
All you have to do is tape all the joints with masking tape or other tape so that they do not let the epoxy through. It is important to set the form clearly horizontally; use a building level (you can download the application to your smartphone). If this is not done, the thickness of the tabletop will not be the same, and this will lead to the fact that the table will be crooked.
If we understand the form, now we prepare the resin. The author decided to give it a turquoise tint. To do this, add the required amount of dye to the resin and mix thoroughly. It is enough to add a couple of drops of dye; if you overdo it, the resin will not be transparent. The author makes the color to match the water style. There is no need to add hardener yet. All components can be weighed by weight using an electronic scale. Wear rubber gloves and avoid getting resin on exposed skin.
Step two. Preparing the wood
Prepare the desired piece of board that you think will look good on the table. Cut off the excess and sand the surface thoroughly with an orbital sander or by hand. Since the wood at the cut site will be white, it can be painted for beauty; for this we use a stain of a suitable color.
Step three. Mix and pour epoxy
Mix the resin with the hardener in strictly specified proportions. Place the pre-prepared board in the mold in the right place. The mold must be lubricated with beeswax or some kind of fat so that the epoxy does not stick to the walls. Some also use oilcloth. Now let's start pouring, there is no need to rush here, wear a respirator, as epoxy vapors are toxic. Try to carry out work in a warm room or warm up the resin a little in advance, since when heated it is more fluid. After pouring, you will probably have a problem such as air bubbles. Getting them out is not that difficult; for these purposes you will need a hairdryer. Simply heat the resin in the area where the bubble has formed. The resin will become more liquid and the bubble will come to the surface. In order for the resin to dry well and dry at all, it must be applied in several layers. Apply the first layer, wait until it dries and only then apply the next one. The number of layers and drying time depends on the thickness of the countertop. It may take weeks for the resin to dry completely... In some ways, the “drying” is speeded up by a slightly larger amount of hardener. The author’s 2.5 cm layer of resin took about two weeks to dry.
Step four. Taking off the uniform
When the resin is completely dry, the mold can be removed. Do not rush, as rough work can easily damage the tabletop. If the mold has been well greased, the product should come out of it without difficulty. The author did something wrong in this case, and the mold had to be broken using a chisel and hammer. As a result, the tabletop was damaged.
Step five.
Grinding the tabletop The next stage is grinding, however, it is inevitable in the manufacture of any furniture. Your task will be to obtain a perfectly smooth and even surface. Of course, this task can be handled manually, but it is better to use automated tools. Here an orbital sander came to the author’s aid. The sandpaper grit you will need is 60, 100, 120, 150, 220, 320, 420. We use coarse sandpaper to remove various defects, to level the surface, and so on. Gradually reducing the grain size, we remove rough scratches and polish the surface.
During work, a lot of dust is generated, this dust is very harmful to health both when inhaled and when it comes into contact with the skin. Wear long sleeves and eye and breathing protection.
It happens that in some places the resin may not completely harden; this happens when it is mixed with the hardener poorly. In this case, the problem area is heated with a hairdryer and the uncured resin is cleaned off. Instead, fill in a new one with hardener. Also, to prevent the resin from sticking, it can be cleaned off with acetone. But be careful here, as this substance is very toxic and flammable, and also has a strong odor.
Step six. Top layer of table top
To obtain complete transparency of the tabletop, apply a layer of varnish to it; a more professional solution would be to use polyurethane. Pre-carefully sand the entire surface so that the coating adheres well to the surface. As for the number of layers, there should be at least two. Apply the first layer, wait until it dries, and sand with fine sandpaper. Then we apply a second layer, and then a third one in the same way, if necessary.
Step seven. Making table legs
To make the legs, you will need steel rods, bend them into a “P” shape. Weld plates to the opposite side, with the help of which the legs will be attached to the tabletop. The author makes the plates in the shape of the letter “G”. After drilling holes for screws in the plates, the legs are ready and can be installed. You can also paint the legs before installation. The author paints them with black spray paint. Before painting, sand the metal thoroughly with sandpaper so that the paint adheres well.
Step eight.
Conclusions As you can note, the table is very simple to make, although the whole process of work is harmful to health. However, if you use all the necessary means of protection, everything is not so bad. It is more correct to carry out similar work on a belt sanding machine, but for the author this pleasure is too expensive.
However, the table turned out great and is worth the effort.
Source
Become the author of the site, publish your own articles, descriptions of homemade products and pay for the text. Read more here.
What are table legs made of?
The legs are made mainly of wood or metal. Both materials have their own characteristics; when choosing one or the other, you need to take into account the overall design and performance indicators of the future table.
Wooden table base
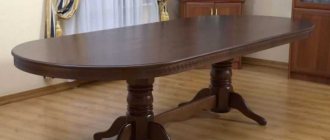
- Tree . Wooden legs look stylish and natural, they are characterized by practicality and durability. It is advisable to take larch, beech or oak for this.
- Metal . Metal legs will provide reliable support for the table. They can be steel, aluminum or cast iron. Painting is optional. Metal is better than wood in that it is more durable and resistant to various damages.
A prerequisite is the safety of the finished products, and therefore it is necessary to create strong fastenings and stability of the structure.
Also, the base can have any shape - for example, a frame or separate legs. If the table is round, then one support installed in the center will look beautiful.
The configuration of the table support can be different Review of creating a table from epoxy from the ForumHouse website
Video - Coffee table with epoxy
Master class No1. Beautiful coffee table made of epoxy resin
Stylish coffee table made of epoxy resin
Step 1 . So, to prepare the composition you will need 2 components - a base (“A”) and a hardener (“B”). First of all, be sure to read the manufacturer's instructions.
The photo shows the base component (“A”), which must be mixed with the hardener.
Step 2 . It is also better to check the transparency of the composition before starting work. Make a test sample and place a piece of transparent glass in it. If it merges with the resin, then it has satisfactory transparency.
A piece of glass is immersed in transparent resin
Step 3 . It is better not to use a mixer for mixing (except at the lowest speed) to avoid the appearance of bubbles; instead, use a clean stick. Mix the components as much as indicated in the instructions.
Using the corrector, you can remove cosmetic defects (bubbles and sagging) from the surface of the product without using a hair dryer or burner
Step 4 . Before mixing, check the instructions for the maximum thickness of one layer of fill. Usually this is 5-10 mm, although there are also modern types of compositions that are poured with a layer of less than 5 mm. Also note that the temperature should be room temperature and the humidity should be a maximum of 70%. Be sure to use a respirator while working to avoid inhaling fumes from the material.
Thickness of epoxy resin filling layer
Step 5. Use a release wax or similar product that will allow you to disassemble the mold once the resin has set.
Release wax will help you disassemble the mold
Step 6 . If necessary, you can use dyes, but remember that different manufacturers have different shades (follow the recommendations in the instructions). Distribute the dye evenly throughout the composition.
It is important that the paint is evenly distributed throughout the composition
Step 7 . Prepare the mold for pouring. Epoxy resin is very fluid, so seal the seams with silicone caulk.
Sealing mold seams with silicone sealant
Step 8 . Maintain the correct ratio of components - the normal thickness of the composition depends on this.
When mixing components, observe the proportions
Step 9 . If you prepare the solution correctly, it will turn out not much thicker than water.
If the solution is prepared correctly, it will be only slightly thicker than water
Step 10 . Assemble the base of the future structure. In our example, it has a rather complex configuration, but you can use a simpler design with four legs.
Assembling the table base
Step 11 . The height of the mold should be 5 mm greater than the thickness of the future countertop. Let us once again remind you of the need to carefully seal all joints.
Table top mold
Step 12 . Coat the wood with varnish in several layers in advance so that after pouring no air escapes from it. Wait until the varnish is completely dry.
Wood must be prepared in advance
Step 13 . Pour resin to the desired thickness (in one or more layers if required).
Pouring epoxy resin
Step 14 . After 3-7 days, dismantle the mold (the specific time depends on the number of layers).
The form is dismantled
Step 15 . Sand using a sander and 800 to 1500 grit sandpaper. Then polish the tabletop with a felt wheel.
Sanding the finished countertop
Step 16 . Attach the tabletop to the base according to the design features of the table.
At the end the tabletop is attached to the base
Manufacturing technology
Review articles on epoxy resin products indicate that they are quite expensive. For example, the price of a kitchen table can exceed one hundred thousand rubles. And then the advantages of the product indicate its inexpensive cost. There is uncertainty that needs to be resolved. Indeed, the cost of an epoxy table suggests affordability. But by cost we mean all the costs of independent production. Those models that are presented in the store or made to order are considered handmade products. The main part of the final amount is formed solely due to the fame of the master.
As has already become clear, there is simply no factory production of resin countertops. Whether the countertop is made to order by professionals or made by hand, the technology for its manufacture is absolutely identical. The whole process can be divided into stages.
- choice of epoxy resin;
- preparatory work;
- fill;
- grinding.
All issues related to the manufacture of countertops are of interest to users in terms of the possibility of independent work. Here the position is based on two radically opposing versions. The first is that even experienced craftsmen pour the resin by hand. Therefore, following the step-by-step instructions, anyone can master this procedure. However, there are many pitfalls in the listed stages, and everything is not as simple as it seems. The slightest deviation from the recommended algorithm sometimes leads to irreversible negative consequences.
Resin selection
The process of selecting epoxy usually begins after creating the first sketch of the future table. If you do not have sufficient experience, you should focus on universal requirements: the resin must be transparent and resistant to external factors. The store may not offer an option for making furniture, because as such, this category of building material does not exist. You will have to select the epoxy yourself. It is recommended to immediately exclude the popular ED-20 model. It is too thick, so air cavities will form during the pouring process. When mixing resin with hardeners, a composition that is very unstable over time is obtained.
EpoxyMaster 2.0 is considered the best option for beginners. It is recommended to use it if there is no proper experience, since the thickness of one layer can reach 5 cm, that is, there is no need for layer-by-layer filling. EpoxyMaster 2.0 has good fluidity, which eliminates the occurrence of errors, and the surface is smooth without additional smoothing.
In addition, the resin interacts well with many materials. If the countertop is decorated with metal or wood, then after pouring there is no peeling or cracking. Another quality you should pay attention to is the lack of bleaching. Note that some resins become cloudy over time and become covered with a white coating.
Preparatory work
Pouring resin should only be done in a ventilated area. Temperature is of decisive importance. The temperature indicator should not be lower than 22°C degrees. Moisture and dust negatively affect the results obtained.
Preparatory work includes the production of formwork; it is constructed regardless of the type of future countertop. The material you can use is laminated chipboard plywood or plexiglass. In order for the resin to better adhere to the formwork walls after hardening, the latter should be treated with a special substance. At home, wax is suitable. As a last resort, the walls are treated with cosmetic Vaseline. But it is impossible to apply it in an even layer; moreover, cloudiness is observed in the places where Vaseline and resin come into contact. After the epoxy has hardened, the ends of the tabletop will have to be carefully sanded.
Every master class and every instruction says that you must use personal protective equipment during the pouring process. These include: glasses, respirator, gloves. To avoid dust, lint or hair getting into the liquid resin, it is recommended to wear overalls and a cap. All objects located in close proximity to the work area are covered with plastic film.
From the auxiliary materials and tools you will need a container for preparing the finished solution, scales or measuring cups. The resin and components are calculated using the formula provided by the manufacturer. The instructions indicate the mass of resin and hardener or their proportional ratio. Practice shows that the absence of resin shrinkage allows you to use a universal formula. With a layer thickness of 1 mm per 1 sq. m of area, 1.1 kg of the finished mixture is consumed. Considering that the standard EpoxyMaster package weighs 1.35 kg, 4 packages will be required to make 1 m2 of countertop (with a thickness of 5 mm).
Fill
Even professional craftsmen, when starting work, read the instructions from the epoxy manufacturer. Assembling the formwork is not the final part of the preparation. Resin can leak through the cracks, so the gaps between the walls should be treated with sealant, plasticine or hot melt adhesive.
Wooden formwork, like wooden decorative elements, contains some air inside. If it begins to separate, bubbles will form in the thickness of the resin. To prevent this undesirable phenomenon, you can treat wooden surfaces with the same epoxy composition applied a little earlier. Furniture varnish, such as polyurethane material, is also excellent. This procedure manages to “kill two birds with one stone.”
- Firstly, air from the wood will not escape into the resin.
- Secondly, the dye, if present, will not penetrate the fibers of wooden decorative elements.
Useful to know > What decorations you can make from epoxy resin with your own hands
If it is necessary to obtain a colored composition, the dye is added not to the hardener, but to the main component before mixing it. It is advisable to start adding paint in small portions to avoid irreversible consequences. Pre-heating of the base composition is allowed in order to better dissolve the dye. The components are mixed in the ratio that is necessarily indicated in the instructions. The “lifetime” of the solution is several hours. You should pay attention to this when making your own. The longer the specified time, the greater the likelihood that all air bubbles will come to the surface.
The pouring itself in technological terms is an elementary operation, however, if you decide to make a table with your own hands, you will have to provide for several nuances, which will be discussed below.
Drying time depends on the type of composition. Typically, one layer can dry for 2-3 days, so the process of creating a masterpiece cannot be called quick. Experienced specialists speed up drying by increasing the temperature. But novice masters are not recommended to do this. At high temperatures, additional air bubbles will begin to form inside the layer.
Grinding
When working with resin, it is important to maintain post-curing time. This is the time required for the seemingly solid resin to achieve its final properties. Some compositions are ready for use without post-curing. Detailed information can be found in the instructions.
Sanding and polishing will improve the visual effect of the cured resin. To prevent the tabletop from overheating under the influence of friction forces, grinding work should be carried out on a wetted surface. First you will have to process the edges of the tabletop. In places where they come into contact with the formwork, unevenness may form. The plane itself is treated with a material with fine abrasive, gradually reducing the size of the granules. Eventually sanding gives way to polishing. If immediately after the resin has hardened, a cloudy coating forms on the surface, do not despair, this is a normal phenomenon that will disappear after polishing.
Epoxy, unfortunately, changes its physical properties with prolonged exposure to ultraviolet radiation. Polyurethane varnish has protective properties. It is applied in several layers followed by sanding. If everything is done correctly, the resin will not turn yellow over time.
Master class No2. Coffee table with metal legs
A very beautiful product, for the manufacture of which metal, cork, fabric, etc. could potentially be used instead of wood.
Coffee table with metal legs made of epoxy resin
Step 1 . Prepare wood 20-30 mm thick and sand it with sandpaper. By using fine-grain paper, less resin will seep into the wood, meaning it will retain a more natural color. When using coarse sandpaper, the material will have a darker tone.
The selected wood must be properly prepared
Step 2 . Cut the wood into pieces, thoroughly clean it of sawdust and dust. Then wait until the wood dries in the sun (or near the radiator if you are working in winter), which will take 1-2 days. Then proceed directly to creating the table.
The wood must dry thoroughly
Step 3 . Make a mold (in the same way as described above), cover it inside with film and lay out pieces of wood (you can use something else - stones, for example).
Assembling a wooden mold
Step 4 . Prepare the mixture, then pour it evenly into the mold to the required level. To remove air bubbles, you can use a hair dryer (preferably an industrial one), they will burst when heated. Remove the countertop from the mold after 24 hours.
Wood is filled with epoxy resin
Removing air using a hair dryer
Step 5 . Remove excess resin using a sander (if necessary). All that remains is to fix the legs and cover the tabletop with colorless varnish.
Processing the tabletop with a sander
Metal legs are ideal for such a table Photo of the finished product
Master class No3. Round coffee table made of epoxy
To make such a table, prepare elm or oak. It is highly undesirable to use soft wood.
Round coffee table made of epoxy
Step 1 . Prepare the cut. Sand it thoroughly.
Preparing the cut
Step 2 . Build the form, paying special attention to the tightness of the joints of the sides.
Step 3 . Lay out the cut fragments. Leave a niche of the required width/shape between the fragments, because we are talking about a table with a river.
Laying out fragments and pouring resin
Step 4 . Perform painting and resin pouring.
Step 5 . Make a base.
Making the underframe and dismantling the sides
On a note! Cover the countertop with film and wait for the time specified in the instructions. Then remove the sides and finish the product.
Video - Unique epoxy countertop
Master class No4. Glowing table made of solid wood and epoxy
To work, in addition to the resin itself, you will need luminescent paint and a large board (necessarily with cracks). Prepare 3 pieces of the required length, then follow the step-by-step instructions below.
Glowing table made of solid wood and epoxy
Step 1 . Make a tabletop. Take prepared boards for this, glue them together and leave them overnight to dry.
The table top is being formed
Step 2 . Clean all cracks on the surface from dust and debris.
Cracks are cleared of dust and debris
Step 3 . Sand the boards, then, armed with tape and film, protect the ends and sides.
The surface of the wood is sanded
Step 4 . Prepare epoxy resin by additionally adding photoluminescent paint (100 g for every 2 liters).
Epoxy resin preparation steps
Step 5 . Fill cracks in wood. Carry out this operation at least 10 times, taking equal breaks between layers. Then wait for the array to dry (you can leave it overnight).
Cracks are filled with composition
Step 6 . Remove tape, film and any remaining epoxy.
The tape and film are removed
Step 7 . Sand the surface, then apply polyurethane paint with a glossy sheen.
The wooden surface is sanded
Paint is being applied
Finally, secure the legs using bolts and anchor plates.
Attaching the legs to the tabletop
Important! Place the table in a well-lit area so that it glows in the dark. This way its surface will absorb a sufficient amount of light.
Master class No5. Coffee table made of saw cuts and epoxy resin
To create such a design, prepare sections of wood with a diameter of 10-15 cm (can be the same size or different). This round, neat table will become a true decoration of your living room!
Coffee table made of saw cuts and epoxy resin
To work you will need the following:
- jigsaw or hand saw;
- epoxy;
- bendable plywood (pieces 20 cm wide, their total length should be 100 cm) or, alternatively, plastic corners;
- tree cuts;
- packing tape;
- brushes of different widths;
- a grinding machine or grinder and the corresponding attachment for it;
- scotch;
- “sandpaper” of different grain sizes.
Materials and tools for creating a table
The base in this case is made of branches with a diameter of no more than 15 cm. The branches are pre-cut into sections 10 cm high.
The branches are sawn into equal sections
Step 1 . Create a shape from a strip of bendable plywood by joining the ends together with a furniture stapler or tape.
The form is assembled from plywood
Step 2 . Place the packaging film on the work table in two layers: place the first inside the plywood circle, and the second behind it. This will create an airtight “bath”.
The film is laid in two layers
Step 3 . Place the saw cuts inside the circle, close to each other. Start from the center and gradually move towards the periphery.
The saw cuts have been laid
Step 4 . Prepare epoxy resin - mix the components in the required proportion.
Preparing Epoxy Resin
Step 5 . Perform the filling. First fill the voids between the cuts, then gradually fill the entire circle, not reaching the edge 0.5 cm.
The assembled base is filled with resin
Step 6 . Dry the resin, and the heating should be uniform, without ultraviolet radiation and temperature changes.
The product must dry
Step 7 . Perform finishing treatment - remove the film, level the edges, carry out three-stage grinding with three types of abrasives, and finally coat the tabletop with varnish.
The film is being removed
The edges of the table top are aligned
The surface must be sanded with three types of abrasive
Step 8 . You can also make the legs from branches, but they are thicker to support the weight. Sand the branches and treat with an antiseptic. Fix the legs with screw fastenings. That's it, the table made from saw cuts is ready!
Tabletop after varnishing. All that remains is to install the legs
Master class No6. Table stream made of slabs and epoxy
Table-stream made of slabs and epoxy
First, prepare slabs of suitable sizes and shapes. Cut the tree in half as shown in the photo.
Preparation and cutting of the slab
Process the slabs - align them to bring them to the same plane. In the example, a hand router with a circular saw is used for this, as well as a homemade milling machine.
Pre-processing of slabs Using a hand router with a disk cutter
As a result, the wood will reveal its structure, the boards will become even and of the same height.
Slabs after pre-treatment
Assemble an airtight mold for pouring. In the example, this is glass covered with film (not the best option); the wood is clamped with clamps.
Assembling a sealed frame for pouring
Prepare epoxy resin according to the manufacturer's instructions.
Preparing epoxy resin for pouring Added dye to the composition
After this, proceed directly to filling.
The process of pouring epoxy You need to fill it in one or several layers, depending on the brand of resin
Another photo of the process
Remove air bubbles using a hair dryer.
Air bubbles are expelled with a hair dryer
Once the resin has hardened, sand it and then polish it.
Grinding cured resin Using abrasives of different grain sizes
After grinding the surface is polished
Photo of the result of the work
Coat the surface with protective Danish oil. Install the legs (you can use ready-made ones, as in our example).
Ready-made stream table made of slabs and epoxy
Master class No7. Restoring an old table with epoxy resin
If you have an old table that has become dilapidated from time and various negative factors, do not rush to throw it away - it is better to update it and make it an original element of the interior. You can decorate the table with coins, buttons, photographs and much more.
Step 1 . Remove old paint as well as damaged and rotten areas. Dry the surface thoroughly.
The table will be decorated with black and white photographs
Step 2 . Lay out decorative elements. If these elements are light, it is better to glue them to the surface so that they do not float after pouring.
Gluing decorative elements
Step 3 . Apply the resin in several layers with two or three days in between.
Preparing and pouring resin
Step 4 . Sand the dried layer and apply varnish. This original method of restoring furniture can hardly be considered simple, but if all the nuances are followed, you will get a real masterpiece!
Additional decor of the product
You can make such a work of art from an old table
Video – Huge table made of epoxy resin
Technological nuances
In order to make your own table from epoxy resin, you must follow all the nuances:
- The resin must be of the best quality. The brand CHS Epoxy 520 is very suitable. Lower quality resin quickly turns yellow and becomes cloudy.
- Mix the resin and hardener mixture according to the instructions.
- The liquid composition is good for filling all the unevenness.
- The semi-liquid composition is excellent for filling round tables and creating decorative elements.
- The thick composition is used to create jewelry and restore oak furniture.
- With a mold thickness of 1 millimeter, the resin consumption is 1 liter 100 grams per square meter of area.
- Avoid exposing the curing material to direct sunlight.
- Remove any air bubbles that have formed using hot air or by piercing with a needle.
- Cover the curing product with polyethylene. This will prevent dust and foreign objects from entering.
- When adding paints and colors, the composition must be heated to 30 degrees.
- The wood must be thoroughly cleaned and polished before pouring.
- It is not allowed to polish hardened resin with coarse abrasive materials.
Do not forget that epoxy resin is a toxic composition. You need to work with it in protective clothing and a respirator.
How to care for an epoxy resin table?
There is nothing complicated here. Use only a soft cloth for wiping. Try to keep the table away from alcohol, hairspray and nail polish remover.
If small scratches appear on the table, they need to be polished with soft flannel and beeswax.
Furniture made from balls
And finally the most extraordinary thing. Sometimes completely unprecedented things are born experimentally. Solid furniture made from balloons is evidence of this. The idea will probably appeal to many who are involved in Hand-Mad.
But it is still not worth using such furniture for its intended purpose; its strength still does not inspire confidence. But it is quite suitable for the role of an art object.
Is it possible to buy an epoxy table?
Such tables are usually original works, and therefore it is better to look for them on the websites of handicraft artists.
An original table can be ordered from the designer’s workshop
You can also find stores online that sell mass-produced tables. In this case, it is better to give preference to those located in your city. The fact is that long-term transportation of such furniture often negatively affects its condition.
As for the price, designer products from masters cost at least 20,000 rubles. The more complex the work, the higher the cost (can even reach up to 150,000). If we talk about factory models, then, for example, the cost of Estwood tables varies between 36,000 - 140,000 rubles.
Beautiful and unique epoxy furniture will decorate your interior
If you have experience working with epoxy resin and can give useful tips on creating such furniture, be sure to tell us about it in the comments to the article!
5 / 5 ( 3 voices)
Decoration
We can say that not all technologies have yet been mastered in the manufacture of furniture from epoxy. New ideas constantly push masters to create the next exclusive. Color shades are just one direction in creating a design. Decoration of countertops is carried out by adding various components to the composition. At the same time, the surface of the barrel cover still remains smooth. Any surface, textured or smooth, can be coated with resin. Light objects should be attached to the base, otherwise they may float in the resin. They pour into the tabletop everything that is subject to the master’s imagination. These could be pebbles, cones, shells, coins, flowers or leaves. Since the resin is poured in layers, the presence of objects in each layer gives a three-dimensional image.
When working with wood, the bark is left behind. Small cracks or chips, knots and wormholes are even more valuable than solid wood. The bark is also left on the wood. You just need to make sure that wood dust does not fall from the array, because it will float in the resin in the form of a suspension. Large decorative items include cutting boards, saw cuts, large stones, and decorative stone tiles.
Useful to know > How to paint a picture with your own hands using epoxy resin
For those who want to emphasize the high cost of the product, craftsmen advise adding precious metals, marble chips, pearls and even some memorable souvenirs to the resin. In our case, table legs are not considered, since no resin is used in their manufacture, however, it is the responsibility of the craftsman to choose a suitable design. The legs must have a style combination with the tabletop, so metal, stone, and wood are used as materials.