Features of the material
Epoxy resin is a multi-component chemical substance. These oligomers, which contain epoxy groups, form cross-linked polymers when mixed with a hardener. In its pure form it looks like a clear liquid. It has many shades - from white to wine red. It was first developed in France by chemist Pierre Castan in 1936, and in 1938 he filed the first patent application.
In a short time the material became in demand. It began to be used in industry: aircraft manufacturing, automobile manufacturing, construction, in the production of radio electronics, electrical engineering, and in other industries, including space. In everyday life, raw materials are used for various purposes; they are used to make crafts, decorations, and are used for the production and repair of furniture.
One of the main features of the substance is that it is not used in its pure form. Its properties appear after combining with a hardener, the type of which determines characteristics such as strength, density, rigidity, and elasticity. The components are mixed at room temperature, the proportions depend on the manufacturer, usually indicated in the instructions for use.
What kind of material is this and its features
Epoxy is a synthetic substance that contains epoxy groups.
The production of this material is very complex. It is impossible to use such a substance in its primary form, but after using hardeners, a polymerization process occurs, and then we can talk about the use of this material.
The composition of such a mixture may also include other components, such as cement, chalk, and so on, they make the mass more dense.
Transparent epoxy is often used with wood for decorative work; it contains various modifiers and has the following properties:
- High level of resistance to mechanical damage;
- Good level of wear resistance;
- Moisture resistance;
- Almost no shrinkage during use;
- Not afraid of various chemistry;
- Good level of adhesion to wood, plastic, metal, ceramics, leather and so on.
Composition and properties
Epoxy resin, suitable for creativity, is available in several versions. The compositions differ among themselves in color and consistency, as well as in performance characteristics. The most popular option is labeled ED-20 and is divided into premium and 1st grade products. The second option is considered industrial; it thickens and sets no more than 4 hours after mixing. Grade 1 resin is used for the needs of chemical, aviation production, shipbuilding, is used in the production of adhesives and sealing compounds, and is used in electrical engineering.
The high-grade variety is ideal for decorative purposes. This epoxy resin ED-20 is very transparent, viscous, easy to use, and products made from it are decorative. When adding a hardener, the correct mixture is obtained without bubbles and holds its desired shape well. Other similar compounds are also used in jewelry and ornamental arts: ED-16, ED-22.
Among the characteristic features that are inherent in epoxy resin after crystallization, several of its properties can be noted.
- High adhesion ability to different types of surfaces. It binds well to ceramics, metal, glass, and interacts with polymers, concrete, and wood.
- Dielectric properties. The resin has extremely low conductivity and can be used for the manufacture of decorative lamps.
- Resistance to external influences. The hardened compound tolerates mechanical processing well, is moisture resistant, and is not afraid of temperature changes and contact with chemicals.
- Ecological cleanliness. The material is absolutely non-toxic both when creating crafts and after complete curing.
Due to these properties, epoxy resin has gained popularity in the jewelry and decorative industries. It is used to make jewelry, household items, and cast countertops and sinks for plumbing needs.
The composition of all types of epoxy resin is the same. It contains 3 main ingredients:
- caustic soda;
- diphenylolpropane;
- epichlorohydrin.
Depending on the type of compound, the proportions of substances change. In addition, manufacturers add additives and substances to the composition to enhance artistic properties and simplify work with the material. In addition to the base itself, to obtain a resin suitable for use, a hardener is needed - a substance that turns a liquid and viscous composition into a monolithic one. It is he who is responsible for the crystallization process, usually included with the selected compound, but sometimes can be purchased separately.
In order for epoxy resin for creativity to have optimal consistency and other characteristics, plasticizers are added to it, providing improved strength or elasticity of the material, increasing its hydrophobic properties. Most often these are products labeled DBP, DEG-1, S-7106. If low-grade raw materials are used for creativity, the use of additives will help improve its performance. In a special compound for creativity, they are already present in the required volume.
When stored for a long time, creative epoxy resin, like its industrial counterparts, becomes more viscous. Solvents help solve the problem; white spirit is usually enough for this.
However, such aggressive liquids should only be used as a last resort - they are intended for technical needs and require extremely careful handling. You can remove traces of resin from your hands using acetone-containing cosmetic liquids.
To increase the decorative properties of a product, in addition to glitters and dyes, other substances or fractions are often used. Among the most frequently used fillers, several options can be distinguished.
Crushed minerals and rocks. Garnet, serpentine, marble, and travertine look interesting. You can even use regular fine gravel.
It is not a good idea to add highly hygroscopic fillers to the epoxy resin. These include all types of mineral powder - from tooth powder to talc. They also help produce the white color of the material, but make it more brittle and vulnerable to external threats.
The benefits of making it yourself
When creating products in an industrial style, various materials can be used, including those left over after renovation. You can also use parts of old furniture and equipment, pallets, pipes, coils. The advantages of self-production are undeniable:
- Creating things in the loft style is very profitable economically, because suitable materials can be found in your garage or purchased inexpensively at a sale.
- The product will be made in a single copy and specially matched to the interior.
- The models have a simple, rough design. They are easy to make yourself even with modest skills.
The easiest things to make are beds, sofas, poufs, and various tables. Upholstered furniture in the loft style is easy to make with your own hands from barrels, beams or pallets. For the bed, you can use deck boards and treated pallets, then invest in a good mattress and a few decorative pillows.
Do-it-yourself loft-style tables are also easy to make from any available materials, using imagination and artistic taste. Everything will be used, from old wood, bottles and boards to electrical cable reels. A successful chair or pouf will be made from timber, wooden and metal barrels, and boxes. It is a good idea to equip the table with small wheels. This is not only an element of industrial style, but also a functional detail.
Economical
Uniqueness
Simplicity of design
Materials
The main materials for making crafts are epoxy resin itself and its hardener.
Where to buy epoxy resin for crafts? It is sold in hardware and construction stores and markets. Choose the most common inexpensive resin.
There are ready-made epoxy adhesives, but it is better not to use them because they are not always transparent in color and are usually relatively expensive.
The price of epoxy resin for crafts is very affordable. This is an inexpensive adhesive material.
The resin is sold both in small bottles and quite spacious buckets.
Naturally, the cost depends on the volume, and the larger the capacity, the cheaper the material. However, you shouldn’t buy too much in advance; the resin has its own expiration date.
How to use?
A master class on using epoxy resin for creativity allows you to get a complete understanding of exactly how to work with this material. First of all, standard safety precautions should be observed: wear rubber gloves and a mask or respirator, ensure free flow of air into the room, cover the workplace with polyethylene or oilcloth, make sure that the air temperature does not exceed +25°C.
Preparing epoxy resin requires purchasing a certain set of consumables:
- compound and hardener;
- disposable medical syringes or measuring cups with millimeter graduations;
- wooden spatula for stirring the composition;
- clean containers of different sizes.
Before starting work, it is recommended to read the instructions supplied by the manufacturer with the consumables. The proportions vary for different compositions; there is no single recipe. Next, the components are combined in a small bowl or cup, or cuvette. The accuracy of the proportions will be ensured by the use of cups or syringes with measuring divisions. Do not prepare too much resin at once; it may begin to polymerize before it is used up.
The combined hardener and compound are carefully and thoroughly mixed in the selected container. At this stage, glitters and pigments can be added to them. You need to perform circular movements for some time, removing air bubbles, achieving homogeneity of the composition. If they do form, the mixture is settled and heated. The air chambers will rise and be accessible for removal.
It usually takes 20-24 hours for the epoxy resin to completely cure.
It is important to maintain the correct room temperature during this time. To speed up the process, you can send the workpiece to the oven for 20 minutes at a temperature of +80°C, and then leave it at room temperature until complete crystallization
Pouring into molds
The finished resin can be used in different ways. Most often it is cast in silicone forms - molds, giving it the desired shape. Such blanks are used for the manufacture of small items. Thanks to the characteristics of silicone molds, hardened resin comes off easily. There are ready-made solutions for rings, key rings, and pendants.
When using decorative natural elements - shells, stones, they are washed and degreased, herbs, moss, flowers are thoroughly dried. These components are then placed into a mold and filled with resin. The procedure may vary.
- With preliminary placement of decor. In this case, the decor is placed on the bottom of the mold. Then the resin is prepared - it needs to sit for at least 30 minutes. Upon completion of this process, the epoxy base is poured into the mold. All that remains is to wait until the workpiece hardens and clean its uneven edges with abrasive tools - a needle file, a fine file.
- With resin filling. After filling out the form, the decor is distributed in it using a toothpick. This allows you to create products with symmetrical and more complex filling.
After hardening, the resin product can be subjected to additional grinding and machining. Most often, sandpaper is enough, but you can use abrasive files for manicure and pedicure. Sanding creates a lot of dust, so it's a good idea to protect your eyes, nose and mouth.
Casting within
Products made from epoxy resin can be made not only in molds. There are special metal frames and frames. Their main difference is the need to polish the finished jewelry from the front and back sides. The bottom edge of the frame is usually placed on the surface of the adhesive tape during pouring to prevent resin from leaking out from below. You can also add decorative elements to the frame - leaves and flowers of plants, small ornamental stones, a photograph.
Manufacturing technology
Review articles on epoxy resin products indicate that they are quite expensive. For example, the price of a kitchen table can exceed one hundred thousand rubles. And then the advantages of the product indicate its inexpensive cost. There is uncertainty that needs to be resolved. Indeed, the cost of an epoxy table suggests affordability. But by cost we mean all the costs of independent production. Those models that are presented in the store or made to order are considered handmade products. The main part of the final amount is formed solely due to the fame of the master.
As has already become clear, there is simply no factory production of resin countertops. Whether the countertop is made to order by professionals or made by hand, the technology for its manufacture is absolutely identical. The whole process can be divided into stages.
- choice of epoxy resin;
- preparatory work;
- fill;
- grinding.
All issues related to the manufacture of countertops are of interest to users in terms of the possibility of independent work. Here the position is based on two radically opposing versions. The first is that even experienced craftsmen pour the resin by hand. Therefore, following the step-by-step instructions, anyone can master this procedure. However, there are many pitfalls in the listed stages, and everything is not as simple as it seems. The slightest deviation from the recommended algorithm sometimes leads to irreversible negative consequences.
Resin selection
The process of selecting epoxy usually begins after creating the first sketch of the future table. If you do not have sufficient experience, you should focus on universal requirements: the resin must be transparent and resistant to external factors. The store may not offer an option for making furniture, because as such, this category of building material does not exist. You will have to select the epoxy yourself. It is recommended to immediately exclude the popular ED-20 model. It is too thick, so air cavities will form during the pouring process. When mixing resin with hardeners, a composition that is very unstable over time is obtained.
EpoxyMaster 2.0 is considered the best option for beginners. It is recommended to use it if there is no proper experience, since the thickness of one layer can reach 5 cm, that is, there is no need for layer-by-layer filling. EpoxyMaster 2.0 has good fluidity, which eliminates the occurrence of errors, and the surface is smooth without additional smoothing.
In addition, the resin interacts well with many materials. If the countertop is decorated with metal or wood, then after pouring there is no peeling or cracking. Another quality you should pay attention to is the lack of bleaching. Note that some resins become cloudy over time and become covered with a white coating.
Preparatory work
Pouring resin should only be done in a ventilated area. Temperature is of decisive importance. The temperature indicator should not be lower than 22°C degrees. Moisture and dust negatively affect the results obtained.
Preparatory work includes the production of formwork; it is constructed regardless of the type of future countertop. The material you can use is laminated chipboard plywood or plexiglass. In order for the resin to better adhere to the formwork walls after hardening, the latter should be treated with a special substance. At home, wax is suitable. As a last resort, the walls are treated with cosmetic Vaseline. But it is impossible to apply it in an even layer; moreover, cloudiness is observed in the places where Vaseline and resin come into contact. After the epoxy has hardened, the ends of the tabletop will have to be carefully sanded.
Every master class and every instruction says that you must use personal protective equipment during the pouring process. These include: glasses, respirator, gloves. To avoid dust, lint or hair getting into the liquid resin, it is recommended to wear overalls and a cap. All objects located in close proximity to the work area are covered with plastic film.
From the auxiliary materials and tools you will need a container for preparing the finished solution, scales or measuring cups. The resin and components are calculated using the formula provided by the manufacturer. The instructions indicate the mass of resin and hardener or their proportional ratio. Practice shows that the absence of resin shrinkage allows you to use a universal formula. With a layer thickness of 1 mm per 1 sq. m of area, 1.1 kg of the finished mixture is consumed. Considering that the standard EpoxyMaster package weighs 1.35 kg, 4 packages will be required to make 1 m2 of countertop (with a thickness of 5 mm).
Fill
Even professional craftsmen, when starting work, read the instructions from the epoxy manufacturer. Assembling the formwork is not the final part of the preparation. Resin can leak through the cracks, so the gaps between the walls should be treated with sealant, plasticine or hot melt adhesive.
Wooden formwork, like wooden decorative elements, contains some air inside. If it begins to separate, bubbles will form in the thickness of the resin. To prevent this undesirable phenomenon, you can treat wooden surfaces with the same epoxy composition applied a little earlier. Furniture varnish, such as polyurethane material, is also excellent. This procedure manages to “kill two birds with one stone.”
- Firstly, air from the wood will not escape into the resin.
- Secondly, the dye, if present, will not penetrate the fibers of wooden decorative elements.
Useful to know > What furniture is made from epoxy resin and what it looks like
If it is necessary to obtain a colored composition, the dye is added not to the hardener, but to the main component before mixing it. It is advisable to start adding paint in small portions to avoid irreversible consequences. Pre-heating of the base composition is allowed in order to better dissolve the dye. The components are mixed in the ratio that is necessarily indicated in the instructions. The “lifetime” of the solution is several hours. You should pay attention to this when making your own. The longer the specified time, the greater the likelihood that all air bubbles will come to the surface.
The pouring itself in technological terms is an elementary operation, however, if you decide to make a table with your own hands, you will have to provide for several nuances, which will be discussed below.
Drying time depends on the type of composition. Typically, one layer can dry for 2-3 days, so the process of creating a masterpiece cannot be called quick. Experienced specialists speed up drying by increasing the temperature. But novice masters are not recommended to do this. At high temperatures, additional air bubbles will begin to form inside the layer.
Grinding
When working with resin, it is important to maintain post-curing time. This is the time required for the seemingly solid resin to achieve its final properties. Some compositions are ready for use without post-curing. Detailed information can be found in the instructions.
Sanding and polishing will improve the visual effect of the cured resin. To prevent the tabletop from overheating under the influence of friction forces, grinding work should be carried out on a wetted surface. First you will have to process the edges of the tabletop. In places where they come into contact with the formwork, unevenness may form. The plane itself is treated with a material with fine abrasive, gradually reducing the size of the granules. Eventually sanding gives way to polishing. If immediately after the resin has hardened, a cloudy coating forms on the surface, do not despair, this is a normal phenomenon that will disappear after polishing.
Epoxy, unfortunately, changes its physical properties with prolonged exposure to ultraviolet radiation. Polyurethane varnish has protective properties. It is applied in several layers followed by sanding. If everything is done correctly, the resin will not turn yellow over time.
Polishing and finishing to a glossy shine
The product is considered ready after it has completely hardened or post-curing has occurred. The product must gain strength. Sometimes this takes from 5 to 7 days.
After final post-curing, you can begin sanding and polishing the product. During these operations, the finished product is given evenness and the piece of furniture is brought to a glossy shine.
During polishing, you need to constantly moisten the product with water so that it does not overheat. If overheating occurs during polishing, the resin will begin to melt and clog the abrasive paper.
When polishing, pay attention to the speed. An insufficient amount will lead to poor-quality polishing, and an excessive amount can ruin the epoxy layer of the finished product, the appearance of the countertop and overheat the surface
During polishing, special attention should be paid to the end side of the tabletop. If there is a stone exposed at the end, it should have been sanded before final pouring.
When polishing, you need to carefully walk over the surface and then apply varnish.
If a piece of furniture is cast, that is, it consists entirely of epoxy material, it must be polished with special care. The hardened resin is polished using a special machine. The polishing procedure can be carried out by the master himself.
Treatment with polyurethane varnish will give the product a glossy shine. Polyurethane varnish will not only add a glossy shine to the polished resin, but will also prevent the tabletop from yellowing when exposed to sunlight.
Varnish treatment should be carried out in several stages. After each application of varnish, intermediate sanding must be carried out. All this will give a bright glossy shine, greater than with just sanding without the use of varnish. The tabletop can be polished to a mirror finish, which looks very impressive on furniture.
About design and types of construction
Furniture items made from epoxy resin are distinguished by their unique design and ability to fit into almost any interior. Most often they can be found in the living room and kitchen, and there are no strict requirements for the style of such tables. We also note that with the help of epoxy you can not only create new products, but also restore old furniture. Many models combine several materials.
Using this material you can create real masterpieces
One of the main advantages of epoxy resin is that after hardening it practically does not shrink, and therefore retains its original shape for a long time. It can also be decorated in various ways. Epoxy tables can be of several types; let’s look at the features of each of them.
Fantastic glowing epoxy tables
- Combined tables. In such products, resin is combined with wood elements.
- Tables with support. They differ in that only the top layer is filled with resin. Various additional decorative elements are often used, such as flowers, leaves or coins.
- Tables without support. Their construction contains only epoxy resin. These are, as a rule, small coffee tables that are not designed for serious mechanical loads.
Epoxy resin combination table
Small table without support
Example of using luminescent powder
The patterns can be the most intricate.
The cost of manual tables is quite high, but you can always save money and make such furniture yourself. Moreover, this will allow you to show your imagination and restore old furniture in a very original way.
Stylish coffee table
Beautiful epoxy resin chairs
Epoxy resin stool
To work you will need some materials and tools:
Dried branches of various thicknesses.
Epoxy resin. You will need 1 kg of transparent material intended for countertops.
- You need a container, for example, a plastic bucket. The diameter should be whatever diameter of the chair you would like to make.
- To give the product the desired color, use a special dye.
- To level the mixture you will need a plastic spatula.
- To glue the parts, prepare hot glue.
- You will also need gasoline.
The tools you will need are those that every home craftsman most likely has. This is a grinder and preferably a router.
Making a designer stool with your own hands
To create designer furniture with your own hands you need:
- Cut the branches into pieces of the same size. If they have different diameters, it will only be more interesting.
- Cut off the bottom of the bucket. Measure the height you need, about 5 cm, and cut out the blank for the future stool. You will end up with a plastic circle.
- Prepare your work surface. To do this, stick tape or oilcloth onto a piece of chipboard. Place the prepared plastic circle on top and glue it to the tape along the edges, use hot glue for this. This must be done so that the structure does not move during operation.
- Now you need to attach three legs from branches to the base. Arrange pre-cut circles from branches in random order.
- Mix the material according to the manufacturer's instructions. It is at this stage that, if desired, you can add dye.
- Gradually pour the mixture into the cracks between the previously laid branches. Make sure that no voids or air bubbles form.
- Leave the material for a day to dry thoroughly.
- Next, you just have to carefully cut and remove the plastic ring.
- Using a sander, sand the entire surface and round the edges using a hand router.
- Treat the surface with gasoline.
- Fill the surface with epoxy and level it with a thin layer using a spatula.
Jewelry with dry plants and flowers
To create such decorations, it is necessary to prepare flowers. Forget-me-nots, buds, petals, and heather look very original and cute. First, a stencil is drawn out on paper, then it is placed on a base in film. The stencils are coated with multiphores.
Next, pour the prepared epoxy directly on top, pouring it evenly over the entire stencil, making a layer of 3 centimeters. Then a dome-shaped form is placed on top (this option is suitable for making earrings or pendants).
They leave everything for a day, then remove the mold, remove it from the multifora, sand it and glue it together.
Pouring layers of epoxy composition: nuances of the work
The color of the mixed colors (blue and green) gave the necessary shade of river water. By the way, the dye must be added in drops. Of course, the mood was a little spoiled by the fact that the wax-coated film was wrinkled, but nothing could be done here without completely dismantling the assembled form. I planned to subsequently cover the resulting creases with epoxy resin and sand them. Looking ahead a little, I will say that due to the fact that they were poured after complete drying, polishing with a sander led to heating and peeling of the material, so I had to work manually.
Each layer had to be heated a little with a gas burner. This allowed air bubbles to escape and the epoxy to cure faster.
The first layer of resin has begun to be poured into the prepared mold.
The hole, cleared of spoiled elm, was also filled with the composition, but in one layer - its volume was small. After the allotted time had passed, the second and third fillings were made. The total time spent on work and drying is two days. To be precise - about 50 hours.
The hole in the elm was also filled with epoxy.
How to remove bubbles from air
It happens that it was not possible to carry out work without the appearance of bubbles. There is no need to heat the object, otherwise bubbles may appear again.
The best way is to take a thin needle and pierce each ball. Or take a spray bottle of alcohol and sprinkle it on the surface with bubbles.
Although in this case the surface may change color or become less transparent. If the balls are large enough, then after complete hardening they are drilled, cleaned and refilled.
Epoxy resin table: types and design features
Most often, countertops are made using epoxy resin. The most popular design options for such products.
| View | Image | Description |
| Baseless transparent type designs | To make these tables, resin is poured into a mold. The result is a transparent tabletop. | |
| With a base made of natural wood or chipboard | In this embodiment, the resin protects the main surface from moisture and mechanical damage. | |
| Combined | The use of pouring and natural wood in various combinations and combinations is a favorite design technique. |
Let's look at the features of the listed varieties of epoxy countertops.
Transparent structures without supporting surface
For the manufacture of such structures, a casting mold is used. It can have the most bizarre geometry - the more complex, the more interesting. These countertops are most often used to create coffee or coffee tables. Craftsmen use built-in neon lighting and add inclusions of natural materials to the fill. Adding water to the filling looks especially impressive - you get real “cosmic” objects. Considering the lack of a base, you need to treat tables made of liquid glass with care and not subject them to excessive load.
Interesting ideas for countertops made of wood and epoxy resin
Epoxy does not necessarily have to be colorless - to decorate furniture it can be tinted or even made matte. Moreover, all inclusions in such a product will be clearly visible even through a thick layer of chemical glass. An interesting idea is the use of luminescent dyes. The surface of a base, such as a tree branch, is treated with a substance that can glow in the dark. After pouring, you get a very original product.
A favorite technique of designers is to frame a wooden tabletop with epoxy filling. Even boards from old boxes can be used as a base.
An original design option is obtained if you use laminated chipboard with a marbled coating as the base. No less impressive are paintings and still lifes, which are used as the basis for filling the tabletop. In short, the design options are endless. Epoxy resin allows you to create and imagine – this is its main advantage. Here are just a few photographic examples of tables made of epoxy resin and wood.
Related article:
Wooden tables with epoxy resin coating and different fillings
By adding various decorative elements underneath the filling, interior artists achieve amazing effects.
You can achieve the same effect using as a basis drawings and ornaments made from natural materials: shells, dried flowers, colored pebbles, cones
You can use a collection of coins or grandma's buttons, a set of tools, or just a scattering of bolts and nuts. A dilapidated tree looks especially colorful in such a fill: a rotten stump covered with moss, sun-scorched boards or a piece of log bleached by sea water. All these things will be frozen in resin forever, like prehistoric midges in amber.
As decoration you can use river pebbles, marble chips, a scattering of beads and sparkles.
What tables made of slab and epoxy resin look like
A slab is a solid solid slab. Can be stone or wood. In our case, a stone slab is too heavy a base for a table. But wood is an excellent base for a tabletop. How to determine a slab:
- This is a longitudinal cut with raw edges;
- wood thickness – from 5 to 15 cm;
- The solid wood is solid, without gluing or other joints.
A cut from a large trunk demonstrates a rich texture and intricate pattern
Such massive elements are preserved in their original beauty with all the knots and uneven contours. Nowadays such products are in trend, and many designers use them in interior compositions. Fortunately, now it’s not so difficult to buy a countertop made of epoxy resin or order it individually from a good craftsman.
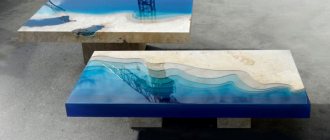
Epoxy resin table in the shape of a river
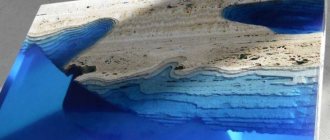
One of the most popular forms is a tabletop with an epoxy insert in the shape of a river. A special highlight of this type of product is given by the uneven edges on the two wooden parts. Previously, such tables were made with colored glass, but now epoxy has finally replaced this technology. Such tables can be round, rectangular, oval or square - the filling allows you to use any shape and size. In the depths of the “river”, craftsmen place sand, stones and shells, and the filling itself is painted in blue tones. It turns out very picturesque, check out these examples.
Interesting design solutions
To make furniture, skilled craftsmen use matte and transparent varieties of glue, and each of them can be given different color shades. Transparent mixtures work well with wood or other incorporated objects. They emphasize all the details of the decor: solid fibers, inscriptions or badges on metal elements. Even the smallest elements will be clearly visible even through a thick layer of fill. Colored dyes slightly reduce transparency, but the fill acquires a rich color. Both types of resin mixtures are used for the manufacture of exclusive tabletops and other furniture. You can find some interesting ideas below:
- coating made from a composition with luminescent dye - furniture made using epoxy glue and luminescent dye looks impressive. Experienced craftsmen fill all the resulting cavities and voids on the edges of the knots with this epoxy grout, after which they fill in the main mixture. When illuminated, such a masterpiece will glow. Well, in modern interiors such furniture will emphasize the style and impeccable taste of the owners;
- wooden scraps or a board framed with a layer of filling - this idea is successfully used by many craftsmen who create designer furniture. Wood is used as the base element. It is covered on all sides with a small layer of the prepared composition;
- inclusions of water - an interesting effect is obtained by combining the adhesive composition with drops of water. In a colored mixture, such stains resemble cosmic nebulae or milky stains. Often craftsmen create a multi-color coating by filling it with portions of the composition painted in various colors. It should be noted that the mixtures are perfectly painted with gouache, ink, and oil paints, that is, these components do not harm human health. Thin plastic barriers are used for partitions. Usually the top of the entire composition is filled with a thin transparent layer;
- imitation marble is an unusual solution that allows you to obtain a coating reminiscent of marble. For this, laminated chipboard is used, which is covered with colorful patterns, as well as other compositions, but the last layer must be epoxy. This technique opens up new horizons for furniture designers, allowing them to experiment and create new interesting surfaces;
- a table with a surface in the form of a painting - such furniture looks great in living room interiors. Drinking tea at such a table will undoubtedly be pleasant. It is important that this furniture attribute fits into the overall interior of the room and is in harmony with other items. The pattern usually stretches along the entire length of the tabletop - the manufacturer offers a great variety of still lifes or other images that are pleasing to the eye. The legs are made of wood and should be of a laconic shape - rectangular or square;
- stump with moss - fill a pre-prepared stump with moss with epoxy compound, you can get an absolutely unique chair. Numerous cracks and other “defects” will only add sophistication to the accessory. Such furniture is absolutely safe, so it will look organic in an eco-friendly interior, and the product can be made by hand;
- Gradient-colored travertine and resin worktops—gradient-colored compositions ranging from light blue to rich dark blue colors, combined with a durable limestone material, are used by some designers to create unique designs. Layers of epoxy resin are applied alternately in a specific order. The composition imitates a lagoon with its light coastal areas and dark water areas.
Epoxy bracelet
An unusual craft made from epoxy resin - a beautiful ladies' bracelet. To make crafts you need to acquire a mold. You can cast it yourself from silicone or purchase it ready-made.
Mix epoxy resin and hardener according to instructions. Stir the solution until it is completely homogeneous. Let it sit for a while to let the air bubbles go away.
Take dry leaves and cut off excess parts so that they do not protrude from the mold. You can use other decor - twigs, berries, flowers, beads, sparkles, etc.
Pour the prepared solution into the mold. Pour in gradually so that no voids form.
Using a toothpick, carefully lower leaves or other decor into the resin. Wait for the resin to harden. To speed up the process, the product can be placed in the oven for 10-15 minutes at a temperature of 80°C. This will also remove any bubbles.
After this, leave the mold with the resin for 24 hours for final polymerization. After hardening, remove the finished bracelet from the mold.
If there are sharp edges, simply sand them down with fine-grit sandpaper. Treat the product with acrylic varnish. After hardening, the bracelet can be used for its intended purpose.
Tips for use
Epoxy kitchen countertops are not the most durable. When used as a kitchen worktop, special protection is required. The use of stands should never be forgotten. Porcelain dishes will scratch the surface, a hot pan will melt.
If the table on a wooden base is not large and is not used as a work surface;
- do not take it out of a heated room;
- place closer than 1 m from the fireplace or heating radiator;
- move to a room with humidity above 75%;
- leave in direct sunlight for a long time.
Temperature fluctuations and high humidity have a negative impact on wood. It changes volume (swells, dries), disrupting the structure of the frozen fill.
Maintenance involves regular wiping with a damp soft cloth and immediate wiping dry.
Kinds
With all the variety of countertop designs, it is not possible to describe every original solution.
The first fundamentally distinctive option is countertops with a base. This classification applies to any material, from metal to plastic, but we are currently interested in wood. The base can only perform the function of a base if decorative elements are placed on it, or it can also combine a decorative function when the base itself is decor.
Tables with a base can withstand high loads. It is necessary to understand that the hardened resin itself has mass, so large slabs require a solid base. The latter can be used slab, chipboard, veneer, solid wood, slats, boards, bars. Finally, we should not forget about restoration work in which the base is an old countertop.
If it is not planned to place high loads on the tabletop, then the base is not made. Epoxy resin is poured into the mold, and wooden elements are placed inside the mass as decoration. They can be located at different depths, but for this you will have to fill them in layers. Often the resin is tinted. Dyes are added to the composition before mixing it with the hardener. This type of tabletop is produced for small dining tables, coffee tables and decorative tables.
A third type of countertops has been identified - combined. An example would be compositions in which a wooden slab or slab is the base, but its area is smaller than the area of the countertop. The introduction of this type was not fundamental, because these countertops could be classified as both the first and second types. However, the division presented above allows you to decide when purchasing or before making your own resin furniture.
Decoration
We can say that not all technologies have yet been mastered in the manufacture of furniture from epoxy. New ideas constantly push masters to create the next exclusive. Color shades are just one direction in creating a design. Decoration of countertops is carried out by adding various components to the composition. At the same time, the surface of the barrel cover still remains smooth. Any surface, textured or smooth, can be coated with resin. Light objects should be attached to the base, otherwise they may float in the resin. They pour into the tabletop everything that is subject to the master’s imagination. These could be pebbles, cones, shells, coins, flowers or leaves. Since the resin is poured in layers, the presence of objects in each layer gives a three-dimensional image.
When working with wood, the bark is left behind. Small cracks or chips, knots and wormholes are even more valuable than solid wood. The bark is also left on the wood. You just need to make sure that wood dust does not fall from the array, because it will float in the resin in the form of a suspension. Large decorative items include cutting boards, saw cuts, large stones, and decorative stone tiles.
Useful to know > How to make a vase from epoxy resin with your own hands
For those who want to emphasize the high cost of the product, craftsmen advise adding precious metals, marble chips, pearls and even some memorable souvenirs to the resin. In our case, table legs are not considered, since no resin is used in their manufacture, however, it is the responsibility of the craftsman to choose a suitable design. The legs must have a style combination with the tabletop, so metal, stone, and wood are used as materials.
Features of the material
Epoxy resin is often used in workshops on making jewelry, crafts, sculptures and interior items. Particularly popular is transparent epoxy, which has enormous scope for imagination. The composition of epoxy for pouring includes synthetic oligomer compounds, alcohols, and a number of other components. To obtain the desired properties, it is necessary to pour a hardener into the product - only after this can the resin harden.
Depending on the amount of hardener and the introduction of other substances, the resin for products can acquire different characteristics. It has the ability to harden or turn into glue, be super strong or rubber-like. To fill dining tables, you need to use solid resins, both for creating new furniture and restoring old ones. It is this coating that will be abrasion resistant and durable.
Advantages and disadvantages of epoxy countertops
A huge advantage of the products is their unique design. The tabletop can have any appearance that the user desires. To decorate chairs, coffee tables, kitchen tables and even desks, different materials are used - pieces of wood and glass, stump cuts, stones, foil and glitter, sawdust and sand. Shells, marble chips, pebbles, souvenirs and money, dried flowers and leaves are also used. The resin can be painted in any color, up to the most saturated tone, to achieve the effect of a landscape, sea, river, etc.
Other advantages of the products are:
- completely waterproof, washable;
- tolerance of many household products;
- no shrinkage during operation, preservation of shape and original color;
- absence of deformation and reaction to moderate mechanical stress.
When choosing this technology, you need to take into account its disadvantages. The cost of a table for the kitchen, living room, countertops for the bathroom will be high. The consumption per 1 m2 of epoxy is high; it can take 10-20 liters of resin or more. If the sequence of actions is violated, at the slightest mistake air bubbles will appear inside, which are difficult to get rid of.
Related Posts
- Do-it-yourself stone tabletop: step-by-step master class with photos! preparatory work, drawing creation, materials and tools
- What sizes can the countertops have? standards for chipboard and other materials
- How to embed a sink into a kitchen countertop: the correct DIY installation process
- What are window tides, what types are there? how to install it yourself?
- Do-it-yourself vibrating table: design drawing for the production of paving slabs, step-by-step assembly
- How to paint wood with stain and varnish it
- How to glue fiberglass correctly?
- How to seal the joint between the bathtub and the wall? 8 popular options
- How to update old tiles in the bathroom
- Alabaster: what is it? how to divorce? where to apply?
- The door handle creaks: causes of the problem and solutions
- How to cut metal using a grinder
- Why does the air conditioner gurgle when not working when there is wind?
- Bar counters for the kitchen: photos 50 examples
- Homemade Russian stove on the street under a canopy
- Options for making shelves for the garage with your own hands
- Fum tape technical characteristics, how and how much to wind on the thread
- Making a stand for a drill with your own hands: instructions, drawings, video
- Do-it-yourself tabletop made from furniture board
- How to make a garden swing from wood?
- What and how to drill into the tiles so that they don’t crack?
- Connecting the toilet to the sewer without corrugation
- Sealant for sewerage
- Why line the roof and ceiling with clapboard and how to do it correctly? nuances of the procedure
- Technology of painting wallpaper with water-based paint
Read with this
- Do-it-yourself stone tabletop: step-by-step master class with photos! preparatory work, drawing creation, materials and tools
- What sizes can the countertops have? standards for chipboard and other materials
- How to embed a sink into a kitchen countertop: the correct DIY installation process
- What are window tides, what types are there? how to install it yourself?
- Do-it-yourself vibrating table: design drawing for the production of paving slabs, step-by-step assembly
- How to paint wood with stain and varnish it
- How to glue fiberglass correctly?
- How to seal the joint between the bathtub and the wall? 8 popular options
- How to update old tiles in the bathroom
- Alabaster: what is it? how to divorce? where to apply?
Use of material
The areas of application of epoxy are varied. It is well used in various industries:
- In electronics;
- In aviation;
- When repairing equipment;
- In construction;
- When pouring floors:
- In shipbuilding;
- In machine production;
- In the production of paints and varnishes;
- In the manufacture of grout, glue, putty.
You can also work with this substance yourself at home. This epoxy is well suited for the production and processing of wooden objects. For example, combining an epoxy mixture and wood produces beautiful furniture (stools, cabinet doors, tabletops).
Other products made from this combination of materials also look very original, for example, figurines, watches, various jewelry, souvenirs, toys, cutting boards for the kitchen, and so on.