Do-it-yourself film covering of kitchen units
Once upon a time, from the lips of the English poet Geoffrey Chaucer, a phrase sounded so vital that even after 7 centuries, having changed its form, it did not lose its meaning.
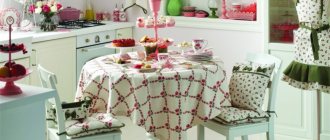
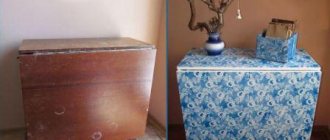
Everyone in their life has heard at least once: “Everything new is a well-forgotten old.” This truth applies to everything: both to immaterial concepts and to the world of things. If furniture that has been used for a long time is still quite suitable for further use, but is no longer pleasing to the eye, try giving it a second chance.
The furniture that loses its appearance most quickly is in the kitchen. How to cover your kitchen set with your own hands to prolong its stay in your home?
How to choose film for furniture
Gluing the kitchen facades with film will help give a new life to an outwardly worn out but still strong set. This idea will also be useful for changing the interior of the room.
To make the updated product beautiful and practical, you should choose the self-adhesive material wisely.
Types of film
Several types of film are used for furniture:
- from PVC (polyvinyl chloride);
- polyester;
- polypropylene.
These materials have similar properties. They are moisture resistant, resistant to abrasion, high temperatures, and physical impact. Do not react to components of solvents and household chemicals.
Films can be smooth or textured, imitating fabric, leather, or pile.
Vinyl materials are most often used to decorate furniture.
Single-layer films are a sheet of PVC composition with an adhesive layer covered with paper. In two-layer versions, a paper or fabric backing is added under the polymer.
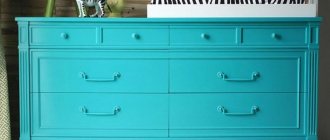
Color selection
The design variability is unlimited. Films are:
- Plain . A light palette refreshes the room. Yellow, orange, pink shades promote a good mood and increase appetite. Blues, cyan, violet are calming. Green helps to achieve harmony. Black, white, red are best combined with each other or with other colors. Dark colors are appropriate in a well-lit room.
- Under the tree, stone . Always relevant in the kitchen, fit into almost any interior.
- With imitation fabric or leather. This film will help in creating an interesting, unusual design.
- With various images, drawings, patterns. Absolutely everything can be reproduced on them: city landscapes, nature, animals, abstractions.
- With photo printing. You can make a custom film with any selected photograph or an exclusive image or your own drawing.
In order not to get confused in the variety of patterns and colors, base your choice on the general concept of the kitchen interior. The updated set should match the color of the walls and other furniture in the room, and the facades should match the shade of the countertop.
Selecting an effect
In addition to color, materials for pasting furniture have different finishes:
- Glossy . Ideal for use in dimly lit kitchens as it reflects and diffuses light. The surface to be pasted must be perfectly smooth: glossy vinyl emphasizes the smallest irregularities of the renewed canvas.
- Matte . Universal, looks discreet in any lighting and in different colors.
- Metallized . Plain fronts with a metallic sheen add shine and brightness.
- Mirror . Visually expands the space and brightens a dark room.
- Holographic . Has shine and a three-dimensional effect.
Types of self-adhesive films
Self-adhesive films can have different colors, textures and embossing
As a rule, products are produced in rolls, the width of which is 45, 67.5 or 90 centimeters. The length of the skein can also be different - 2, 8, 10 or 15 meters. As noted earlier, the range of products is very wide. There are both inexpensive solid-color models and products with various textures and patterns on sale. The industry even offers designer stickers from famous designers, but the cost of such products is quite high. In general, the following types of PVC films are used for finishing doors:
- Simple plain ones. They have a matte or glossy surface.
- Metallized. These are durable films with a mirror surface that are used to provide information protection for objects.
- Decorative. They are used to imitate different types of wood, metal and even mosaics.
- Fluorescent. They glow in low light and are often applied to glass doors.
- Three-dimensional. Installed on interior doors.
Helpful advice: Choose a film depending on the object of its installation and personal preferences. At the same time, you should not focus on the most budget models from little-known manufacturers, since their quality usually leaves much to be desired.
Stages of update work
Filming kitchen facades takes place in several stages.
Facade preparation
Vinyl is a thin and flexible material. Any flaw in the surface being glued will stand out and spoil the appearance of the product. Careful preparation of the base will help avoid this.
First of all, the facades need to be washed from grease and dried, disconnected from the cabinets, and remove the fittings. Clean any irregularities found and fill them with putty. Sand the leveled surface.
If the item has already been covered with film, it is better to remove it before gluing a new one.
You can do this in several ways:
- Soak a small area with hot water and try to remove the coating. You can carefully pry off the material with a spatula or knife so as not to scratch the surface.
- Use a heat gun to heat the coating. A household one set to maximum temperature and power, or even a fan heater, will also work. Peel off the film while it is hot.
- Special aerosols for removing tinting and stickers from cars will help. Spray the product onto part of the surface. After a certain time specified by the manufacturer on the packaging, remove the coating. Instead of aerosols, you can use WD-40. Work with it carefully: the white spirit contained in the composition can damage the paint on the facade.
- White spirit and rectified alcohol are used when the surface coating under the old film does not need to be preserved. Soak the material in them and carefully separate them from the base. The same means, gasoline or other solvents, remove glue residues. Apply them to a piece of fabric and remove the dried adhesive.
Degrease the product with alcohol or gasoline. Prime with furniture varnish or wallpaper glue based on methylcellulose (it is suitable for rough surfaces).
Metal and glass bases are moistened before pasting with water or soap solution.
Measurements and markings
Measure the parameters of all parts to be pasted and transfer them to film. On its reverse side there is usually a centimeter grid for more convenient marking, around which an allowance of 1-2 cm is added.
Cut along the lines with an allowance using sharp scissors, a stationery knife or a breadboard scalpel. It is recommended to cut the film with a pattern from the front side so that you can see how to correctly separate the fragments of the picture and then fold it back into a whole composition.
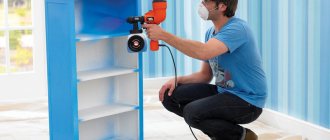
Pasting the film
When the preparatory work is completed, the most important stage begins - gluing the kitchen unit:
- We begin to glue the part on top.
- We apply the film evenly to the facade. Remove the protective paper layer from a small area no larger than 10 cm.
- We press the vinyl tightly against the facade, smoothing it from the middle of the part to the edges. This can be done with a rubber roller or a plastic wallpaper scraper (if you wrap it with tape, it will become softer). A piece of cloth or a foam sponge will do.
- When the first section is secured, separate the paper from the next one. Press, smooth. Repeat until we reach the bottom of the part.
- We iron the film-covered façade again with a cloth, and trim off the remaining material with a knife or scalpel.
Required Tools
Before proceeding to pasting the door, you need to prepare the fixtures. To work you may need:
- ruler, metal corner and measuring tape (marking);
- pen or marker (outlining contours);
- scissors or construction knife (cutting film);
- rubber spatula (leveling the pasted coating);
- sprayer with water (adjusting the position of the self-adhesive);
- hair dryer (processing corners and protrusions).
If the door leaf needs preparation, then you need to prepare sandpaper or a sander, a plane, primer and putty.
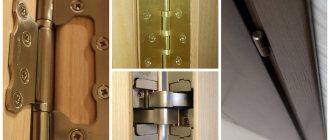
Installation of moldings and fittings
You can return the old fittings to the vinyl-covered façade (they also change it by repainting it) or install new ones.
Furniture moldings or trim will complete the renovation process. They come in the form of strips of various shapes or with twisted, patterned elements.
Moldings are made from wood, PVC, polyurethane, and metal. There are self-adhesive models.
Decorative elements are cut into parts of the required sizes. Products with an already applied adhesive composition are pressed tightly against the facade, others are secured using universal glue.
Attention ! It is better to pre-mark the places where the decor will be attached with a pencil.
Surface preparation
Before covering the door with film, thoroughly clean the surface.
For ease of operation, the door can be removed from its hinges. It is also advisable to remove the handles and lock, if any.
Helpful advice: If there is glass in the door, the pasting process will take a little longer. In this case, you need to remove the glazing beads and dismantle the fragile material.
The surface of the canvas should be as smooth as possible, because the applied film will repeat any, even the most minor, unevenness. If the structure was originally painted, and its surface began to crack over time, then it is worth thoroughly removing the layer of old paint. After this, the surface must be degreased. Take regular dishwashing detergent, dilute it with water and wipe the fabric with a rag soaked in the solution. Then wipe the surface with a dry cloth. If there are flaws on the door, remove them with putty. If there are bulges, carefully remove them with a plane. Next, sand the door with sandpaper until completely smooth and treat it with acrylic primer.
What are MDF facades under PVC film?
The basis of the facades is MDF board. The abbreviation MDF “hides” the composition of the material. It can be quite loosely translated into Russian as “finely dispersed fraction.” In fact, the composition of MDF is wood dust, which is pressed under high pressure and baked. When exposed to temperature, binding components – lignins – are naturally released. MDF does not contain any other additives and is truly environmentally friendly.
But it is extremely unsightly in appearance.
The bare MDF board is grayish in color and resembles thick pressed cardboard. Due to its high density, the material can be milled, edge processed, and a 3D design applied.
And then prime the surface and paint. Or cover it with PVC film.
Facades covered with PVC film are also called film facades. The name is somewhat off-putting; it seems that we are talking about ordinary decorative “self-adhesive” film from hardware stores. In fact, this is not true. The PVC film is quite dense and is not just glued, but practically sealed with a thermo-vacuum press into the surface of the MDF.
PVC film can be smooth, matte, glossy, metallized, pearlescent, with sparkles (glitters), with relief.
Relief film is the most interesting. The relief can be fantasy or imitate some kind of texture. For example, the surface of linen, leather, stone. But most often it is a tree. The wood texture looks quite expensive.
MDF facades under PVC film can be “upgraded”. Add patina, like solid wood facades. Patina or finishing painting of the facade (most often “gold” or “silver”) is paid separately. As a result, with the correct selection of film, MDF PVC facades look almost identical to those made from solid wood. But they are also not cheap.
Photo printing can also be applied to MDF film facades. The technology allows you to scale any images and apply them with the effect of “flowing” from facade to facade.
But basically, of course, photo printing is more common on MDF kitchen facades and aprons made of various materials.
Five main “secrets” when ordering MDF facades under PVC film
I will outline the main points when choosing the design of custom-made film facades to make it easier for you to navigate the place:
- When ordering most routing patterns, you are prompted to select a cutter type. The cutter can be of different depths, widths, and reliefs. And in each case the drawing will look completely different. For example, in the photo there is a regular rectangular pattern with cutters of different width, depth and relief.
- According to the design, the cutters on the facades for drawers, bottle holders and other narrow elements need to be further clarified. Due to the small width, a typical drawing diagram can be greatly distorted and look completely unpresentable. Sometimes it is better to leave narrow facades without milling at all. And they will look much nicer.
- You can choose not only the type of cutter, but also the method of processing the chamfer - the edges of the facade. The chamfer “makes” even smooth surfaces without milling (for example, countertops or facades in the Art Nouveau style) look quite unusual and stylish. It is decorated with an interesting chamfer and a classic facade.
- When choosing a pattern from a thin cutter, be sure to pay attention to the thickness of the selected film. And check with consultants what the finished façade will look like. I will explain using a specific example of facades for a nursery, in a combination of PVC film “maple” with colored, “orange gloss” and “lemon gloss”.
Colored glossy film with sparkles is thicker initially than smooth maple without texture. As a result, the pattern, so beautiful and graceful on maple, on the MDF facades under the glossy film was barely noticeable. A sharp contrast - visible even in the photo.
- Also, the PVC film with embossing will make the small and ornate pattern of the cutter less expressive - it gets lost under it. And practically unnoticeable. If you don’t additionally highlight it with patina. And this is paid separately.
To independently order MDF facades under PVC film, it is important to correctly calculate the dimensions. You can read about it here.
How to use film for kitchen facades
Film for kitchen facades is one of the materials for covering and decorating the surfaces of kitchen furniture. It is made from high-quality polyvinyl chloride (PVC) and can be applied to a wooden surface using a special glue in vacuum installations, or it can have an adhesive back side. The first type is used in the factory production of furniture, and the second can be bought in hardware stores and decorated the kitchen yourself.
PVC film is one of the most popular materials for covering and decorating kitchen furniture.
The range of products includes various film options: from glossy or matte, with varying intensity and depth of texture, to imitation wood, stone, leather, fabric.
What to do if the film comes off?
It will take time to reupholster kitchen MDF facades. And I don’t really want the film to come off after a month or two and the film on the headset or cabinet to peel off. If you follow the gluing technology and operating rules, this should not happen.
But if in some places the film moves away from the base, it can be glued. You will need a syringe and glue (for example, “Moment” or “Titan”). It is inserted under the film and pressed into the restoration site.
With the help of adhesive-based films, you can give a new breath to MDF kitchen facades and kitchen units made of any material. An ordinary, neatly papered cabinet and set looks quite aesthetically pleasing. Follow the instructions and enjoy the results of your work.
Source: idealkuhnya.ru
Using film for facades
PVC film is a profitable alternative option for decorating furniture surfaces. In the production of factory furniture, various types of coatings are used, such as veneer and various types of plastic materials. The main purpose for which furniture coatings are used is to give the surface of MDF or chipboard boards a beautiful appearance, as well as to protect them from external influences.
The advantage of decorating kitchen furniture with film material is that, unlike veneer or plastic, it completely covers the entire surface of the facade, including corners and end sides, without leaving joints where moisture usually tends to get in, which has a detrimental effect on the exterior. type of facades.
When manufacturing furniture in a factory, decorating kitchen facades is done in vacuum installations, which prevents air from getting under the coating material and causing bubbles. It is impossible to apply this technology at home, but with the proper level of diligence and care, hand-made pasting will also look neat and will last a long time.
Application area
As you have seen, self-adhesive film has a lot of advantages. But the main thing is that it is universal and can be glued to almost any surface. Manufacturers recommend using the product for cladding doors made of chipboard, MDF, PVC and other similar budget materials, which often have an inexpressive appearance and wear out quickly. And thanks to the self-adhesive film, you can completely transform the door leaf and make it pleasing to the eye. So, most people choose natural wood veneer material. As a result, an inexpensive door acquires noble features and looks very presentable.
But it is worth noting that film finishing is used not only for budget door models, but also for metal structures. The question here is what goals the owner of the home is pursuing. For example, not everyone likes the elegant shine of iron, so people want to give their doors a more traditional wooden look. There are even cases when the owner wants to mislead possible uninvited guests by concealing that the structure is actually made of metal. By the way, film is often used to protect the surface, since even the most durable metal doors are exposed to adverse external factors. Therefore, if there is a large amount of precipitation in your region, then finishing the entrance doors with self-adhesive is more than justified - this way you will prevent metal corrosion.
Self-pasting the kitchen with PVC film
A kitchen design with a contrasting Japanese style will make the kitchen more vibrant.
Pasting the kitchen with such a modern decorative material will allow you, without resorting to significant financial costs, to refresh the appearance of one of the main rooms of your home. The choice of colors and textures of films is truly huge and can satisfy even the most sophisticated taste. To visually expand the kitchen space, it is recommended to select light tones of film that imitates wood or metal. If you want to bring the look of the kitchen closer to the high-tech style, you can choose a film of various metallic tones. Films with a contrasting graphic pattern in a fashionable Japanese style also look original.
Before you start covering the facades with film, you should dismantle all the cabinet doors and remove the fittings from them. To carry out the work you will need the following tools:
- pencil for marking;
- sharp scissors;
- stationery knife;
- plastic scraper;
- foam sponge or wooden block covered with soft material (for example, felt);
- needle.
Facades with nature patterns will make the kitchen spacious.
Before starting work, thoroughly wash all surfaces of the facades and dry them. Then, using scissors, cut a piece of the covering so large that it not only fits completely on the surface of the cabinet door, but also leaves about two centimeters of material for folding on its end sides. Place the door on a flat horizontal surface (for example, a table) so that part of it hangs a few centimeters over the edge. Then peel off the beginning of the protective coating from the film and glue it to the end of the facade. After this, carefully continuing to remove the backing from the film, cover the front part of the facade, leveling the surface with a plastic scraper or foam sponge. After completing the pasting, carefully inspect the facade for air bubbles. If you find them, carefully pierce them with a needle and smooth them out with a scraper or sponge.
Replacing the MDF panel on the door
A situation may arise when the MDF trim on the metal entrance door has been damaged and needs to be replaced. This process is simple and you can handle it yourself.
You need to measure the canvas, after which it can be purchased at any specialized store. In addition, you will need a solution for degreasing the metal door and means to protect it from corrosion.
- Preparing the door leaf. At this stage, the old lining is removed, after which the surface is degreased, and then it is painted or a protective film is glued.
- Holes for self-tapping screws are made on the canvas along its perimeter.
- Lubricate the surface of the lining with glue, and then use clamps to fix it on the door leaf.
- Fix the cover using self-tapping screws. The inner panel is installed first, and then the outer panel.
Before replacing the MDF lining, all fittings must be removed
This simple procedure allows you to completely renew your metal front door and give it a beautiful and aesthetic appearance. In addition, the presence of MDF linings can significantly increase the heat and sound insulation characteristics of entrance doors, so living in such a house becomes more comfortable and cozy.