Furniture made from solid wood has been highly valued at all times. Now it can rightfully be considered a luxury item. However, anyone who has basic carpentry skills and sufficient desire can make a table from solid wood with minimal investment.
Furniture should be durable, reliable, beautiful, and correspond to its functional purpose.
Choosing a table model
Before you begin selecting materials and directly creating a piece of furniture, you need to decide on its design. The model directly depends on the functional purpose and features of the room.
For example, if the room is small, it is better to choose compact products.
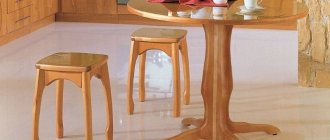
In this case, a neat round table on 1 leg will do.
For a spacious dining room or living room, the ideal option is a classic rectangular table.
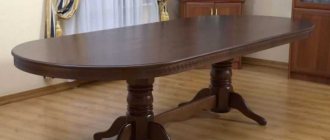
It can also be a roomy oval table with a massive base.
If there is a need for a product with a large capacity, but the room does not require the presence of large items, you should think about a sliding or folding design.
If necessary, the tabletop can be extended.
For beginning craftsmen, it is easier to make a piece of furniture of a square or rectangular shape on 4 medium-sized legs.
This table is made without additional mechanisms.
How to assemble a table with your own hands?
- Select boards for the countertop. The ideal option would be tongue-and-groove ones with ready-made grooves and ridges.
- Process them to perfect smoothness using a plane or circular saw, sandpaper or grinder.
- Coat the longitudinal sides of the boards with PVA or wood glue, firmly connect them in the shape of a shield and clamp them with clamps. After a day, remove the clamps.
- Cut long and short frames to connect the legs (drawbars).
- Make simple legs. To do this, you will need a wooden beam, which must be sanded and polished. You can also purchase ready-made carved or regular ones.
- Using a pair of cokes (additional fastening in the form of hidden wooden pegs), for which you need to pre-drill holes with a diameter of 7.5–8 mm, assemble two parts of the table, consisting of legs and a short connection.
- In the upper part of each leg, on both sides, drill holes for coke at a distance of 50 and 100 mm from the top edge and make markings for the drawers, maintaining alignment and starting from the edge of the tabletop. Add a small amount of PVA to the holes and insert the cokes halfway.
- Connect the resulting structures using long drawers.
- Form the table frame.
- Make connecting strips from timber (“kerchiefs”) with a cross-section of 40×40 mm to make the frame more stable. For a tighter fit to the sides, bars with dimensions of 200×40×40 or 200×50×50 mm should be cut on both sides at an angle of 45 degrees.
- Attach the connecting bars or “kerchiefs” to the table frame with self-tapping screws, screwed in from the inside at an acute angle relative to the board.
- Attach the tabletop, decorate the entire structure to your liking/
Which type of wood is better?
Each type of wood has its own characteristics that should be taken into account when designing furniture.
People have long considered wood as the main building material.
For a more convenient and detailed comparison of characteristics, let's refer to the table.
Table 1. The most common types of wood used in the furniture industry
| Name | Average density kg/m3 | Chip strength | Characteristics |
| Oak | 700 | 9,9 | A very durable rock, resistant to rotting processes. It has a beautiful, noble texture. |
| Beech | 670 | 12,1 | Representative of hard rocks, easy to process, pliable. However, it is prone to rotting, which requires careful antiseptic treatment. When it dries out, it deforms more than oak. |
| Larch | 660 | 9,8 | Durable, resistant to rotting and deformation, prone to cracking. Therefore, it is not recommended for rooms where there are constant changes in humidity and temperature. |
| Birch | 630 | 9,0 | Quite durable, resistant to deformation, chipping and cracking, but with constant humidity it has a tendency to rot. This drawback is easily neutralized with the help of antiseptic treatment, since wood is easily impregnated with special compounds. |
| Pine | 500 | 7,4 | Durable, soft, lightweight, slightly deformable. Due to its natural characteristics, it is pliable when working. Easily impregnated with antiseptic compounds. |
| Spruce | 450 | 6,8 | Less smooth texture compared to pine, has a larger number of knots. It is not so well treated with an antiseptic, it is more capricious in processing. |
| Aspen | 380 | 6,5 | The texture is not particularly expressive, the color is whitish-green. Due to its softness, it does not crack, is easy to process, and is little susceptible to rotting. However, marks from mechanical influences may remain on surfaces made of this material (for example, if a child draws with strong pressure on a pen or pencil) |
| Fir | 370 | 5,9 | The wood is soft, does not tolerate moisture well, is susceptible to rotting, and is therefore not suitable for furniture that will be used outdoors or in rooms with high humidity. It is easy to process, which will simplify the work of novice carpenters. |
So, after carefully studying the table, it becomes clear that soft woods (aspen, fir) will be easy to work with, but during service they may disappoint due to their susceptibility to mechanical stress and low moisture resistance. It is better to opt for harder varieties such as pine, larch, beech and oak.
We did not consider heavy-duty wood species (hornbeam, yew, etc.), since their processing is extremely difficult at home.
Selection and adaptation of the drawing
To make a table at home, you definitely need a diagram that you can do yourself. The tabletop drawing should be as clear and accurate as possible. You will need to indicate what kind of fasteners are used to connect the tabletop, what dimensions the legs have, and how they are connected to each other and the tabletop.
The dimensions of the table can be easily adapted to your own needs. If the product being created is designed for children, then reduce the height. The height of the coffee table should be such that it is comfortable to use while in an armchair or sitting on the sofa.
The drawings and diagrams will consist of 4 parts: the main view, two side sides, and a top view of the wooden table. They start with the main view, where the height, width and length of the product, and its shape are determined. Then a side view is drawn, all the main parameters must coincide with the first drawing. The last diagram is a top view.
Do-it-yourself solid wood tables, made according to ready-made drawings, require reliable material with good load-bearing capacity. Furniture drawings can be adapted to your wishes, just change the dimensions of the corresponding elements. Each part is included in a separate drawing with all the specifications: main dimensions, hole axes and edge finishing. Making larger tables will take more time. It should be noted that it is better for a beginner to start with small tea table tops. Using only available materials, it will not be possible to create a product with decorative elements.
The optimal height parameters are in the range from 70 to 75 cm. If you make the table lower, your back will start to hurt from sitting at it. The thickness of the tabletop depends on the thickness of the selected board.
Necessary materials
To make the table you will need the following materials.
- Beam 40 mm x 40 mm for attaching the supporting part to the table top and giving the structure strength and stability.
- Beam 70 mm x 70 mm for making legs. If the design includes classic carved balusters, and your experience in woodworking does not allow you to make them yourself, you can always choose a suitable option in a furniture fittings store and purchase ready-made elements of the product.
- Boards for the tabletop (thickness not less than 40 mm).
- Wood glue.
- Furniture dowels and confirmants.
- Antiseptic.
- Varnish or glaze for processing wooden products.
The number of boards depends on their width and the expected size of the table.
What should you consider when making a table from wood?
Dimensions. When building, you should adhere to certain parameters. The height should be 75 cm, length 120 cm and width 70 cm. The boards are first planed and then cut. They should be 40*140 mm in size.
Materials. We will need two beams with a cross-sectional diameter of no more than 40*60 mm and a length of 70 cm. In addition, self-tapping screws and 4 furniture screws 100 mm long with a cross-section of 8-10 mm may be useful.
Tools. To work, you need to prepare a hacksaw, plane, chisel, grinder, screwdriver, drills.
Assembly and fastening. It is assembled from 5 boards, which are attached with self-tapping screws to the beams. The boards are leveled along the edges.
Coloring. Paint can be used based on its durability. The most convenient coloring option is stain or varnish. Such products will not only preserve the natural appearance of the wood, but also protect against excess moisture.
Tools for work
All the tools necessary for work can be divided into 3 groups.
- Measuring tools:
- Metal ruler 50-100 cm;
- Roulette;
- Metal square;
- Manual level 50-80 cm.
Tools for creating furniture with your own hands.
- Tools for working with wooden surfaces:
- Saw/hacksaw;
- Jointer;
- Sanding machine, sandpaper.
The necessary set of tools.
- Tools for assembling the product:
- Wedge or screw clamps;
- Mallet (suitable for both wooden and rubber strikers)
- Screwdrivers with different points;
- Drill, screwdriver.
Classic with legs
A table with legs is a classic for the kitchen. In order to make a table from wood, complex calculations are not required. It is enough to select the legs of the required size for the tabletop and mount them. Tools and materials for work:
- saw or electric jigsaw, plane;
- screwdriver, drill, drill bits;
- nails, screws, dowels;
- grinding machine or sandpaper;
- pencil, tape measure;
- wood glue;
- boards - 8 pieces: four products are one meter long, two are 80 cm, the rest of the wood is 40 cm;
- four ready-made legs or beams 70 cm high. And which countertop to choose for the kitchen can be found out at the link.
In the video - how to make a classic wooden table with legs:
The tabletop is made: four boards are adjusted to one size - a meter. The width and thickness are equalized if the wood was not sawn on a sawmill. The material is sanded with a plane.
Markings are made on the edges of the boards, a step of 10-15 cm. Holes are drilled for dowels (chops), an 8 mm drill. The gaps are sanded, the dowels are treated with glue and inserted into the holes. The boards are connected. Excess glue is removed with sandpaper, and the edges of the tabletop are sanded with a plane. Treatment with steel sponge will add texture to the product.
If ready-made legs are used, they are fastened to short 40 cm boards with screws and glue. Holes are drilled on the inside of the cross beam at an angle and self-tapping screws are inserted. The crossbars are installed 2 cm from the edge of the leg.
You can make the legs yourself: the bars are cut into the desired shape with a plane, the products are processed with sandpaper and secured with crossbars.
In a similar way, 80 cm boards are attached to the legs on the sides. A tabletop is mounted on the frame. The product is treated with varnish or paint if desired.
You can read about combining wallpaper in a Khrushchev-era kitchen here.
Folding transformer
Compact furniture when folded, suitable for a small kitchen - a transforming table. The shape of the product is a rectangle, but there are also oval folding tables.
The table unfolds using a spring or gas lift mechanism (purchased at a furniture store). For the table, parts are prepared according to the required dimensions:
- four boards for the frame and two for the tabletop;
- legs - 8 pieces;
- one small board is the support of the product when unfolded.
The frame is assembled: four boards are adjusted to the same size and connected.
The folding mechanism is mounted to the frame: through holes are drilled in the base, the parts are fastened with bolts.
Legs are made: each product is two parts connected at an angle of 90° with small corners. Marks are drawn in the frame, holes are drilled, and the legs are secured with metal bushings.
In the video - how to make a transformable folding table from wood:
The tabletop parts are connected to each other with the front side. Places for installing hinges are drilled. A hinged fastener is screwed into the finished gaps. A small board is installed on the mechanism, the assembled tabletop is mounted to the folding parts.
The table is processed with a grinding machine or sandpaper, and covered with varnish or paint.
You can find out which bread bin is best for storing bread in this article.
Window sill table
A folding window sill table is an ergonomic and efficient option for a small kitchen. The simple design is easy to make yourself. For the main set of tools you will need a profile and two tubular supports.
This is what a window sill table looks like
It is better to treat wood with wax to protect it from moisture. If using chipboard or MDF, you will need edge tape and sealant.
The dimensions of the future table are selected: the optimal depth is 60-70 cm, the height is equal to the window sill from the floor level.
A tabletop of rectangular, square or curved shape is cut from the prepared material. The far side of the part is mounted on a profile under the window, the near side is mounted on a support in the form of a pipe.
A hole is made in the window sill-tabletop for the radiator: in winter the air will warm the window, the glass will not fog up. A small ventilation grill is glued onto the gap.
Making a wooden table with your own hands: step-by-step instructions
Tabletop
Treat all boards thoroughly.
Having achieved a perfectly flat and smooth surface, drill holes for dowels in each end in increments of 10-12 cm (for the outer boards they should be made only on one side).
All edges must be milled and surfaces sanded.
After thorough cleaning of chips and dust, they must be coated with special wood glue (PVA can be used).
Then the boards are fastened together using wooden dowels placed in the prepared holes.
Important! When gluing, direct the pattern in different directions. This increases the strength of the product and reduces the risk of deformation.
When the canvas of boards is assembled, it is necessary to dry it, securing it with clamps.
After complete drying, cut off excess glue with a construction knife and sand the surface. Treat the finished shield with a special antiseptic.
Thus, it takes one day of work to make a canvas from wood.
Underframe
Let's look at the process of creating a standard underframe (4 legs and a rectangular frame).
Saw off the required size bars for all elements, process them using a grinding machine or manually with sandpaper and coat them with an antiseptic.
To save time, it is better to carry out the procedure in parallel with the countertop.
When the prepared elements are ready, fasten the pairs of legs with smaller cross beams using furniture screws.
They can be pre-lubricated with glue.
Important! Self-tapping screws are screwed in from the inside at an acute angle to the surface.
In the same way, fasten the legs with long beams.
Drill holes in the center of each leg for further assembly of the furniture.
If you plan to make the table two-color, painting the prepared elements should be done before final assembly. If the product is the same color, assemble the structure and paint it entirely.
Final installation of the product
Place the table top face down on a flat, clean surface and begin working:
Place the base on top the way it should be attached and draw a pencil along the inside.
Mark the joints of the parts in increments of 200 - 230 mm on both surfaces.
Drill holes in the underframe and tabletop, remove shavings from them, coat them with glue and assemble the product using special furniture fasteners (as when making wooden panels). Use a mallet if necessary.
Leave the product to dry for a day (at least 12 hours).
The final stage
When the structure is assembled, perform final sanding, apply decorative elements in accordance with the design project and cover with several layers of varnish or glaze.
By following the instructions, you can easily make a wooden table with your own hands.
Important! Each layer of coating must dry completely. Therefore, the final finishing of the table will take at least 1 more day. Therefore, the process of creating your own masterpiece from an array will take you about 3-4 days.
By spending a minimum amount of money and a few days, you will receive a reliable and durable dining table made of oak, pine or other material you like, and a lot of positive emotions.
So you have learned how to make your own table from solid wood.
Transformable tables
A folding table made of wood, made by yourself and capable of changing its original shape, is a real masterpiece. Folding structures look equally advantageous in a country house and fit into the interior of a city apartment. The simplest option is to make a transformer for a personal plot, and you can easily cope with this task yourself.
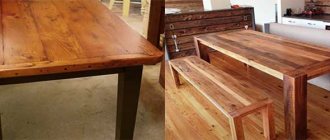
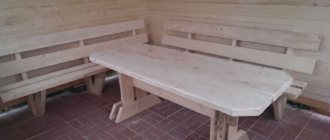
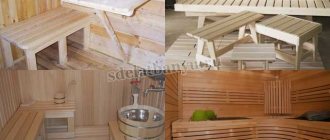
To surprise guests and get a comfortable wooden picnic table, you need to assemble 2 benches with high backs. The seat is made of 3 boards connected to each other by crossbars. There is one nuance here: the edge of the crossbar, which is located on the back side, should protrude beyond the edges of the seat by 10-15 cm.
Table legs are made in different lengths. A short support post is placed on the side of the seat, the long one will serve as the basis for the backrest. Note that the recommended height of the backrest should vary between 60-90 cm. The design feature of the backrest is that it is mounted on one bolt, which is located in the upper part and serves as a turning mechanism. Closer to the seat, a hole is drilled in the rack where the lock for the backrest will be inserted.
After completing all the operations, you get 2 benches on which you can sit quite comfortably, discussing the latest news or admiring the sunset. If you lift the backs of these benches and move them closer to each other, you get a table with two rows of seats. Taking into account the width of each backrest, a tabletop measuring 120-180 cm is obtained.
Wooden tables in the interior – 50 photo ideas:
PreviousTablesBasic parameters for choosing a transforming table
Next
Tables Making a luminous table with your own hands: the advantages of creating