What could be better than a beautiful, comfortable table? Maybe two of these tables? Or the same table, but much more compact? How to turn an ordinary table with your own hands into a narrow console table, with two legs. Or divide it into two and make a rack. Do you know?
How to turn an ordinary table into an elegant console. You can create a real exclusive from a sawn table with your own hands. You've probably admired them in stores, where prices are often steep. But you can make such a “piece copy” yourself. And it will be much cheaper than the store-bought version.
The best part is that this table can be made from absolutely any high table. You can even take an old tabletop and screw beautiful legs onto it. And there are plenty of ways to decorate this item.
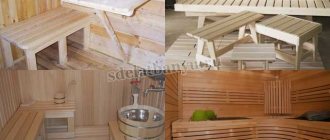
◆ Master class No. 1. ◆ Bedside table on two legs from a sawn table.
You will need an old dining table, wood paint and 2 blocks.
1. Shorten the legs, because a side table (or bedside table) is usually lower than a dining table.
2. The table should be cut not along the long part, but along the short part.
3. A product painted in a bright color (with a brush or spray gun) looks especially impressive.
4. A stable position is secured not with corners, but with a pair of bars (approximately 1/2 the width of the already sawn-off tabletop). They need to be connected to each other and screwed to the wall. The finished bedside table is placed on top.
◆ Master class No. 2. ◆ Two consoles from one sawn round table.
One of them (yellow) became a console under the TV in the bedroom. The second one (painted blue) serves as a bedside table in the hallway.
1. Take an old round table, remove the old paint or varnish, and sand down any rough edges. Apply primer.
2. Cut the tabletop with a jigsaw into 2 equal parts.
3. Sand the edges and paint them in colors that you like and match the color palette of the room.
The first few days after the onset of the new year we relaxed, lay on the couch, went to the children's theater, watched movies and read books. In general, we had a rest. But before the new year, we decided that during these long New Year holidays we should do some kind of home project. They chose a console table behind the sofa in the living room.
The project was supposed to be economical, so don’t judge too harshly :) Again, this is the second piece of furniture that we make with our own hands.
Therefore, after the stores began to operate normally, we went to buy balusters that would be our legs for the table. We have the best selection of balusters in St. Petersburg for the most ordinary stairs in Metrica on the Vyborg highway. All the fun cost us 830 rubles for 6 balusters.
We bought the furniture panel in Maxidom, it is ordinary pine, 18 mm thick. Balusters 50 mm in diameter. We also bought 20mm (thickness) board for the project.
Well, another new acquisition of ours is a circular saw. Sorry neighbors and thank you for your patience. 
We shortened the legs a little, because... the height of the balusters is 900 mm, which is too much even for a console table.
For assembly we will again use our favorite Kreg. We saw how to attach legs to a table using Kreg in one of my favorite blogs - Anna White.
The table will be made of 6 balusters with a total length of 1800 mm (almost the entire length of the sofa). Therefore, we collected it in parts. Here's one of the halves:
We attach the bottom shelf to the table in the same way as the tabletop: We again saw a more detailed plan on how to do this on Anna White’s blog. Thank her very much. Her blog is simply a treasure trove of useful information. To strengthen the structure and level it, small jumpers were made.
And now our table is slowly acquiring a more or less finished look before painting it:
Here and there I simply smeared the cracks that had formed a little with wood putty:
Modern interiors cannot boast of elegant and beautiful objects. Today, most often, laconic and functional furniture is selected for it.
But it was not always so. In the times of kings and castles, each item in the room was distinguished by its uniqueness and ornate elements.
It was in those days that the classic console table, in our understanding, appeared.
Of course, its analogue was used before, but in the 17th century, King Louis XIV of France introduced the fashion for baroque console tables, which can be seen in the paintings of many artists of that time.
And although we associate console tables with something ancient, they can look quite modern and will take their place in an apartment or house.
Console table in a modern interior
There were few options for using a console table during its heyday. Most often it served as a beautiful stand for expensive and exclusive items. It can still be used for the same purpose today.
In this case, a small console table is installed against the wall in the living room and not only supports beautiful accessories, but also serves as an effective addition to them.
In addition, if previously a console table consisted only of a table top and legs, then in a modern design such a table can be supplemented with drawers or open shelves.
Therefore, there are significantly more options for using this piece of furniture.
The console table located behind the back of the sofa located in the middle of the room looks organic. It can be used as a bar counter or placed indoor flowers in beautiful pots.
It has become traditional to install a console table in the hallway. In this room, such a table is complemented with a mirror or soft poufs.
Also, in addition to the console table, you can hang a coat rack or place an umbrella basket in the hallway.
This option looks especially relevant for small hallways.
The console can also be found in the bedroom, where it is used as a dressing table. Complemented with a mirror and a matching chair, this small table will add an element of femininity to the interior.
If you are wondering how to arrange an office in a room that is used for a completely different purpose, then a console table can also help here.
By adding drawers to it, you will get a small, but separate, comfortable workspace where you can sit at the computer or do handicrafts. In the same capacity, the console table can also be placed on the loggia.
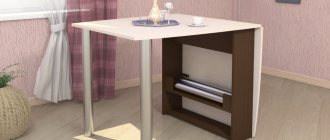
In small kitchens, a console table can replace a dining table.
There are models that easily unfold, increasing in size several times. And if, when folded, it can easily accommodate a couple of people for a snack, then in its full-size form, large groups of guests can be received at such a table.
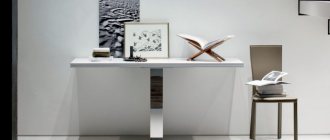
Design
A console table is essentially a table. And therefore its design is similar. In this regard, craftsmen who assemble furniture with their own hands do not have any big problems with how to make a KS.
The console consists of two main elements. This is the tabletop and supports, that is, legs. Classic and modern variations look slightly different. Classic designs are characterized by the presence of rich and multiple decorations in the form of mosaics, paintings, balusters, stucco moldings, gilded inserts, etc. Also, methods of artistic wood carving and natural stone are used on the base.
Modern models are more concise and functional. Therefore, the design often additionally includes cabinets instead of legs, drawers, mirrors, etc. Transformer functions are also found, which allows the console to be turned into a spacious dining table with a few movements.
Currently, console sets that can replace dressing tables are considered in demand. It uses mirrors, pull-out seats, shelves, drawers for various small items and cosmetics. The table can be either corner or straight, or hanging. The choice is yours.
Console models depending on functionality
There are a huge variety of designer console table models. So it could be a table with carved legs in the Baroque style.
Instead of classic legs, a figured base in the form of an animal can also be used. They can be mobile or attached to the wall.
A laconic console table with drawers located under the tabletop is convenient to use even as a small desk.
And if you put the console on wheels, then not only can it be easily moved from place to place, but also used in the living room as a coffee table.
But there are also console tables - transformers. So a small console table from a coffee table can, folding out, turn into a fairly large dining table.
A modern console table can be made of a variety of materials - wood, stone or plastic - which allows it to fit into any interior.
And the ability to choose consoles with carved legs or straight lines guarantees that you can choose this piece of furniture in any style.
Additional Variations
Of the additional variations, quite interesting are those that use improvised materials, things that can be thrown away and not used:
- old door leaves;
- window frames and windows;
- furniture parts;
- simple boards (unedged);
- leftovers from plastic window sills.
In general, any planes that will look more or less aesthetically pleasing and at the same time have sufficient size and strength.
Here the question arises of what to make the legs from and the answer will also be to search for available and free materials that could perform such a function. For example, if you approach the work competently and with imagination, then it is quite possible to take, for example, PVC pipes, which are used as a support for the table cloth. Also, the legs can also be simple boards or bars; if the table is made in the style of natural materials, then halves of untreated timber can be used.
Note. When choosing legs, evaluate the likely load; you should make a design with a sufficient margin of safety, even when talking about a simple coffee table.
It should be noted that the console table is not always attached to the wall; it may be separate. At least there are such models. Then they are simply a separate thin table for a variety of purposes.
Photo of a console table in the interior
A console table is a shallow structure with or without shelves and drawers. Such furniture is particularly intended for spacious rooms, but you can also find a place for it in small rooms. You can place souvenirs on such a stand in your office, cosmetics in the bathroom, decorative elements in the living room, and used as a dressing table in the bedroom. They can also look different, for example, decorated with mosaics, painted or made of stone. Consoles are installed near the wall; they are ideal for zoning rooms. This article will describe how to make a console table with your own hands.
Where is the best place to put the console?
Very often, console tables are placed in the hallway. This saves space, since a large bedside table can get in the way in a limited space. A narrow table is suitable for storing keys, gloves, and useful items.
In modern times, it is a separate piece of furniture, something like a mantelpiece, on which almost anything can be placed.
Tables are also placed in bedrooms and boudoirs. Usually they put a mirror on them (or they are attached to the wall under the mirror) and cosmetic accessories.
Depending on its purpose, the console looks like a long narrow table or a miniature shelf.
Using the console, you can organize a dining area on the balcony. In the living room, narrow tables are placed next to the TV, above the fireplace.
Making a durable and massive console table with your own hands
A DIY console table is made in several stages after purchasing all the necessary materials, fasteners and tools. The work process itself includes the following processes.
Making legs
Since our table is quite voluminous, it will need massive and large legs. It is better to purchase blanks at a hardware store.
Important! Of course, if you have a machine at home, you can make them yourself, but this will also require certain skills.
Preparation of boards:
- To arrange the top and bottom of the table, take a board 3 m long, 20 cm wide, 10 cm thick.
- Cut it into pieces using a circular saw. You should have four boards to make a table 150 cm long.
- We will also need four boards 145 cm long and 10 cm thick. We will install them vertically on ready-made boards.
- Four squares are needed along the edges so that their sides are 10 cm.
Connecting table parts
Take two square blanks 10 cm wide and 10 cm long, place a 145 cm long board on top of their ends, screw them into the end with two screws. Repeat this manipulation again, make two more blanks to make the upper and lower parts of the structure.
Screwing the legs:
- Place three legs on a board 150 cm long and 10 cm thick, measuring their locations.
- Screw them at these marked points.
- Use wooden plugs to cover the holes so that you end up with a piece that can stand on its own.
Top formation:
- Step back 2.5 cm from the edge, place the resulting workpiece on top of the board and generously coat it with wood glue on both sides.
- Place another board on top of it.
- Screw the end piece from below near the outer legs on the right and left using screws.
Making the lower part
Repeat the procedure described above with the bottom of the boards to end up with a table ready for painting. It is better to clean it additionally with sandpaper.
Processing of the finished structure
Paint the table in the way that suits you best.
As a result of the work done, you will receive a durable, original, stylish console table with your own hands. The master class given in this section will allow you to do everything clearly and without the help of professionals.
STRENGTHENING THE CONNECTION
Regardless of whether you're making a coffee table, a desk, or even a bench, it's critical to strengthen the joints of the boards in addition to using glue. This is done with the help of hidden, loosely sitting spikes, one or two (photo below). The tenons also help align the joint. Additionally, it can be reinforced with a metal corner on the bottom side.
Our piece was too short to create waterfalls on both sides, so we chose a welded steel leg, painted black, to support the other side of the table. The screws should not pull the leg against the board too much, taking into account possible compression and expansion of the wood.
After assembling the product, sand the front and back surfaces of the boards with 220 sandpaper.
Be careful not to flatten the joint seam and thereby disrupt the waterfall effect. If your joint has a slight gap, gently smooth it down with a round head screwdriver or sanding tool until it disappears. Finally, coat the piece with a product that will highlight the raw edges. We applied two layers of an oil-varnish mixture that revealed the texture of mahogany.
What are balusters and their types?
We previously looked at how to make a cantilever structure using store-bought pre-made legs, but it can look more attractive if you make the supports yourself. Next, we will look in detail at how to make table legs from balusters. But first, let's figure out what it is. Why made of baluster?
The fact is that these carved columns have a very original shape, thanks to which they were previously widely used in architecture by the ancient Romans and Greeks. Modern architecture does not require the presence of such decorations, but, nevertheless, balusters are often used to decorate stairs, balconies and furniture. They themselves are functional due to their unusual shape. Depending on this parameter, balusters are divided into three types:
- In the form of bodies of rotation. Outwardly, they resemble a regular cylinder or a flowerpot of any shape. They are made on lathes, thanks to which each post has a finished look. This form is considered the most popular.
- Slotted. They are made from boards, so they are mainly used in attics, that is, technical stairs. They are decorated with through figured holes.
- Sculptural. Such balusters have a more complex arbitrary shape, which is why they are made exclusively by hand or using a machine with a large number of axes.
Important! Today they are produced from a variety of materials - it can be stone, concrete, wood, polymer compounds.
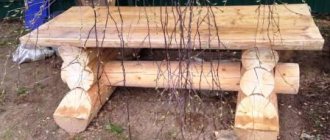
FURNITURE FROM UNCUT BOARDS – TECHNOLOGY
Furniture made from uncut wooden boards attracts with its sculptural beauty and the soul put into it by nature itself. If you make such furniture with a rectangular connection of boards, in which the wood fibers seem to flow down, like a real waterfall, the effect will increase a hundredfold.
However, cutting a piece without straight side edges so that its joint is perfectly matched and fits tightly is quite a tricky task. By the way, the proposed technique allows you to create an imitation of a waterfall using a common set of tools that can be found in almost any store (this technique will also work with ordinary planed lumber, but it is too large for a saw table).
How to make a console for a hallway with balusters with your own hands?
Now we will learn how to make a table with legs from balusters with our own hands. The most important thing is that you can use an old regular table for this. Or just take an old tabletop and buy beautiful baluster legs.
Important! This is a great opportunity to save money and get a new, high-quality, original decorative element. This furniture is ideal for narrow hallways. Do you have little space in your hallway, do you adore miniature things, or do you like classic style? Then you will definitely like this idea.
To work you will need:
- Rectangular table or countertop.
- Two baluster legs.
- A piece of fabric is 30 cm, width 1.2 m.
- Aerosol adhesive for fabrics.
- Jigsaw.
- Screwdriver.
- Scissors.
- Pencil.
- Roulette.
- Self-tapping screws.
- Sandpaper.
- Metal corner.
- Masking tape.
You can make such a console table with your own hands without legs or with them according to the following scheme:
- If you use a table for work, cut it lengthwise into two parts. Use a pencil and tape measure for marking. Sand the edges with sandpaper to avoid scratches.
- Attach baluster legs to the base on both sides.
- On the back side of our tabletop, attach metal corners so that one is located clearly in the center, the other two - at the edges.
- Cover the edges of the table with masking tape. Prepare a piece of fabric and spray glue over the surface of the table.
- Apply the cloth to the tabletop, being careful not to form bubbles. Trim the remaining fabric around the edges.
- After the glue has dried, remove the tape.
- Attach the free part of our mounting angle to the wall so that there are no gaps between the console and the wall.
Making furniture with your own hands is considered a creative and interesting process. Every person can create stylish and budget-friendly products. The master has the right to independently choose an interesting design for furniture, equipping it with interesting details and high-quality fittings. The easiest way is to make your own console that will fit perfectly into the interior of the living room.
Preparing the edges of the boards
Raw edges attract attention (and, in general, deservedly so), so they should be handled with particular care. Although it may seem
attractive to leave the bark, this is not necessary. It will eventually fall off in pieces anyway, so it's best to remove it right away. If it does not come off easily, it can be chipped or cut off with a semicircular chisel (the sharp corners of a flat one will catch the wood), a spatula or a wire brush. Hidden surprises may be found under the bark, such as small spines, wavy growths, or grooves drilled by insects; It is better to leave them as is: they add a special charm to the product.
After removing the bark, finish the edges to suit your taste. If you prefer a slightly lumpier texture, leave the cambium fibers and bristly areas. If you're leaning towards a smooth edge, remove any rough edges with an abrasive disc, moving from larger to smaller grits.
Product for a narrow room
If you have an old table that has lost its former appearance, then it can be used as the main raw material. This option attracts many craftsmen because the work requires a minimum of tools and financial investments:
- Pieces of beautiful fabric 130 cm wide.
- Rectangular table (IKEA or ISALA are ideal).
- Screwdriver, pencil, jigsaw, aerosol glue, sandpaper, sharp scissors, one metal corner, two self-tapping screws.
The prepared table must be cut lengthwise into two even parts. All edges should be cleaned with sandpaper. If the table has removable legs, then you need to securely fix two of them. On the back side of the console you need to secure a corner (in the center). The edges of the table are covered with regular masking tape to prevent glue from getting in. A piece of fabric prepared in advance is sprayed with an aerosol product. There should be no bubbles on the surface. Excess fabric on the sides of the tabletop is cut off with scissors. After the glue has dried, you can carefully remove the tape. The free part of the metal corner is screwed to the wall as firmly as possible so that there are no gaps.
LEVELING AND STRENGTHENING THE BOARD
Most often, wooden boards with raw edges have a roughly sawn face and bark residue along the edges. In order to create a perfectly fitted corner joint, both boards must be flat and the same thickness throughout.
To do this, you can pass them through a wide planer or drum sander, or you can do it more simply - use a router and a homemade template. This method will require patience as you will have to make numerous shallow passes up and down the board, but it is effective. Upon completion of milling, sand the board with 60 or 80 grit abrasive.
Next, you need to carefully inspect the board for any splits, knots, bark inclusions, voids and other defects. You can fill the voids found or repair defects, and this will make the material stronger for a long time, but you can leave everything as is - in this natural form the furniture will look much more advantageous.
If there are splits in the wood, they can expand depending on changes in humidity, so such cracks should be reinforced with butterfly dowels. But first you need to determine and mark the place of the corner joint: after all, then you won’t want to make a cut through the “butterfly”, the installation of which took so much time and effort.
Application of cinder block
From this material you can make your own console with an original design. To work, you need a minimum of materials: two strong wooden boards and four cinder blocks. This option is quite simple, since it only takes 30 minutes of free time to make it. A cinder block is placed on both sides, and varnished boards are placed on top. Then the actions are repeated again. You can lay out your favorite books on the middle board, but it’s better to put photo frames, candles and flower pots on the top shelf.
Aristocratic model
This option is in greatest demand. Using a minimum of materials, you can make your own console, which will decorate not only the living room, but also the room of a young fashionista. The master will need:
- Roller and brush.
- An old console or chest of drawers.
- Plain gift paper with an interesting pattern.
- White paint.
- Sandpaper.
- Wallpaper glue.
- Scissors.
You need to sand the surface of the chest of drawers and remove all the fittings. The product is cleaned of dust. All surfaces need to be coated with two coats of paint. It is necessary to cut a blank from gift paper to the size of the table top with a small margin. The product is glued to the chest of drawers. It is necessary to remove all air bubbles by running a cloth from the center to the edges. Excess paper needs to be trimmed and the outline highlighted with white paint. All that remains is to screw on the fittings and the product is ready.
Compact and refined
From scrap materials you can make a console with your own hands, which will look harmonious in any interior. To work you will need an old dining table, two blocks and wood paint. All actions correspond to the standard scheme, but there are some differences:
- It is necessary to shorten the legs quite a bit, since the bedside console is not high.
- The table should be cut crosswise rather than lengthwise.
- Those products that are painted in a bright, solid color look more aesthetically pleasing.
- The console is attached to the wall not with corners, but with a pair of wooden blocks. They are fastened together in advance and screwed to the wall. The prepared bedside table is simply “put on” on top of the bars.
master class No. 2. a bedside table on two legs made from a sawn table
This compact piece can decorate your living room or bedroom. It is done according to a similar principle. However, there are some nuances that we will talk about.
You will need an old dining table, wood paint and 2 blocks.
Here are the differences from the previous master class.
1. Shorten the legs, because a side table (or bedside table) is usually lower than a dining table.
2. The table should be cut not along the long part, but along the short part.
3. A product painted in a bright color (with a brush or spray gun) looks especially impressive.
4. A stable position is secured not with corners, but with a pair of bars (approximately 1/2 the width of the already sawn-off tabletop). They need to be connected to each other and screwed to the wall. The finished bedside table is placed on top.
Furniture made from table halves can become a true work of art. This is how they are made, for example, by designer Isabelle Quiroga (photos 1 and 2). She creates entire multi-story compositions from dining tables and coffee tables - beautiful and at the same time incredibly practical.
By the way, it's not as difficult as you think. If Isabelle’s laurels haunt you, try doing something similar yourself. Maybe a “skyscraper” won’t work, but a convenient and cute shelving unit - why not?
So, now you know how to make an original console for any room with your own hands from a sawn table. Complete your home with such elegant furniture, it’s not difficult at all!
Transforming old drawers
Long cracked and shabby chests of drawers are considered an excellent material from which you can make stylish furniture for your home. For a clear example, you should study numerous photos of consoles. You can build unique products with your own hands from standard wooden boxes. To make furniture you will need:
- Boards for the frame.
- Two plywood boxes.
- Screws.
- Primer.
- Screwdriver and drill.
- Sturdy board.
- Dye.
- Circular.
- Wood glue.
- Furniture clamps.
First of all, the craftsman needs to sand the drawers and coat them with paint. Using a circular saw, you need to make the necessary parts and frame. The blanks are fastened with screws and glue. All irregularities are carefully filled with putty. After complete drying, the product is coated with primer and paint. Boxes are placed on top of the frame and secured with glue and self-tapping screws.
Sarah Dorsey's proposal
You can make such a console table with your own hands in just a few hours. The technology is in great demand in different parts of the world, since it is possible to use both sawn parts at once. One blank can be used as a stylish TV stand, but the second can be installed as a bedside table in the living room.
Progress:
- You need to take an old round table and remove all the paint or varnish from it. Thoroughly sand all uneven surfaces to apply a thick layer of primer.
- A jigsaw is ideal for cutting tabletops.
- The edges need to be sanded and painted in the desired color, which will harmoniously match the interior of the room.
This is a great option for transforming an old table into two original consoles.
what other consoles can be made if you cut an old table?
Using the same technology you can make a narrow dining table on two legs
.
This compact model will be greeted with a bang by owners of small kitchens where there is no room even for a snack. To do this, again, you will need a square table - you can buy a modern one, but your grandfather’s inheritance will look especially chic. The technology is exactly the same. Just don’t forget to first remove all the “internals” - drawers, folding mechanism, etc.
But what to do with the second half of the table if you don’t need the second console (see master class No. 3)?
If you want to use such a valuable resource with maximum benefit, make a two-tier console bar with a shelf
. The main difference is that the legs of the upper part are shortened by about half (they can be larger or smaller, depending on the tasks of the rack).
How can you use such a console? Whatever! It is ideal not only for the hallway, but also for the dining room or minibar
By the way, pay attention to how the author of the idea coped with the task of storing bottles: they are stored in tubes for stationery. And the glass holder can be hung from the bottom of the second tier
In addition to the kitchen and dining room, such a compact table on two legs will be useful in other rooms.
If you strengthen a small rack on top, you will get a workplace
needlewomen or in a children's room.
And if you also have an old door leaf, a shelf and a couple of brackets, you will get an original design with vintage charm
(don't forget to paint everything the same color and create a patina effect).
About that (more than 50 photos), see our special guide.
And in this section there are several more examples of such narrow consoles, made with your own hands from sawn tables.
And another option for “waste-free production”. Do you recognize the good old LACK from IKEA in this turquoise table? Yes, that's him. How did they make him so tall, you ask? It’s very simple - connecting two legs into one. If you desperately need free space under the table, take this idea into account.
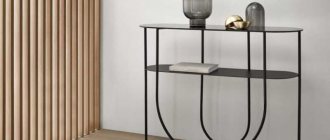
The concept of a console table appeared during the reign of Louis XIV. In those distant times, these interior items were very popular, and they are no less in demand today. Console tables come in a variety of designs, but they have one thing in common: console means narrow. This type of furniture is very convenient to use in small spaces; it does not take up much space and is not far from the wall.
Console is a narrow table with straight or curved legs, suitable for different interiors.
Decorative console decorated with carvings
We will not talk about variations of console table models, because there are countless of them. Let's talk about the scope of application of this piece of furniture. The furniture looks great in hallways and living rooms, acting as an alternative to a buffet.
The console table in the hallway has both decorative and practical significance.
In the living room, consoles replace tables attached to sofas.
You can turn this furniture into something like a mini bar, or place a framed photo on it. An original idea to use a console table in a boudoir or for storing cosmetics.
Modern console table in the bedroom
Store your keys on a table in the hallway and place a candlestick or picture on it. And in the bedroom space, you can install a DVD player or TV on the console.
Forged console table for figurines in a modern interior
If you have your own office, store cigars or beautiful figurines on the table. And in the children’s room, place toys on this piece of furniture, put markers or boxes with construction sets.
White console table with drawers for various small items
Console with drawers for children's room
We'll tell you about creating a console table with your own hands - it's a simple, fun activity that will help you save a lot of money. To do this, you will need to purchase some tools and be careful and patient.
A budget option
Experienced craftsmen know many options for making a console with their own hands. You can make interesting products from PVC and old kitchen furniture. For beginners, it is best to make multifunctional products from suitable-sized cabinets, which must be connected into one, long structure. Be sure to put a strong board on top. A small bar is attached to the back of the table. The board itself may be rough and unpolished. If desired, it can be refined, thereby constructing a less weighty and bulky product. If the master has the necessary skills, then you can use all your imagination to create a truly original console.
Variety of materials
To furnish your personal home, you can use different types of furniture. A console for the living room allows you not only to emphasize the existing design, but also to create an additional corner for placing personal items, flower pots or cosmetics. In order for a handmade product to last as long as possible, you need to choose the right consumables. In factory conditions, pine, oak, ash, mahogany, and beech are most often used. Of course, such furniture is not cheap, which is why not all citizens can buy it.
To save your family budget and get high-quality furniture, it is best to choose veneer products. This material is absolutely safe for humans and is resistant to the negative effects of moisture and mechanical damage. The surface of the slabs can be decorated at your discretion: stick a laminate, fill it with high-quality polymer, use PVC film. Not only the amount of costs, but also the durability of the console depends on the choice of a specific material. Among ready-made furniture, stone models have become very popular: granite, marble, turquoise. These materials are durable and expensive. A forged product will fit perfectly into a classic interior. Thin rods make refined coils.