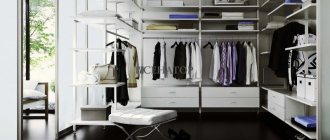
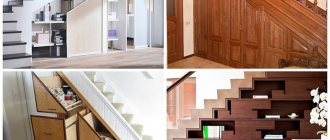
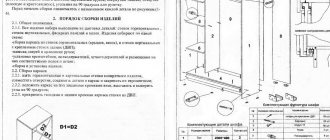
A sliding wardrobe is something more than just a wardrobe with shelves, almost a wardrobe. Sometimes sliding doors close the entrance to a pantry with numerous compartments for clothes, things, and canned food storage.
A sliding wardrobe is something more than just a wardrobe with shelves, almost a wardrobe.
Shelves that are too long (more than half a meter) can bend; it is better to install a rack under them.
The benefits of designing a wardrobe with your own hands become visible to those who imagine what they need from a new piece of furniture. Standard cabinets are almost the same in stores, they are diverse, but cannot take into account the nuances associated with your apartment, things and preferences. A niche in the wall that you want to completely cover with a cabinet, or use it to fence off a pantry. Or make a closet that spans the entire wall so that there are no unsightly cracks where dust will constantly get clogged. What about the shelves? More or less, specifically suitable for standard boxes or jars.
The benefits of designing a wardrobe with your own hands become visible to those who imagine what they need from a new piece of furniture.
Cabinet doors should be the same width to provide maximum opening width.
School geometry alone, even with a good grade, will not be enough. If you have never done a renovation, it will be difficult to imagine three-dimensional pictures of what the future interior will look like. This is fine. Drawing comes to the rescue. We take a piece of paper, a pen and draw with a pencil in a certain proportion your room, the corner where the closet should be, the shelves that you want to make there. We take a tape measure in our hands and see what a 30-centimeter shelf actually looks like, and draw conclusions.
Standard cabinets are almost the same in stores, they are diverse, but cannot take into account the nuances associated with your apartment, things and preferences.
When designing drawers in a wardrobe, it is worth considering that a protruding handle can protrude and interfere with the movement of the door, which must be avoided.
Making a project is not as easy as it seems. How to calculate the cut of chipboard for a cabinet so that all the doors open, all the drawers pull out, so that the structure does not collapse under its own gravity? Then we would have to start all over again. Designing a wardrobe with your own hands is not an easy task; you need to take into account the little things that can create big problems.
A niche in the wall that you want to completely cover with a cabinet, or use it to fence off a storage room.
It is mandatory to install stoppers on each sliding door - this is convenient during operation and prevents the doors from opening or closing spontaneously.
Deciding on the design and dimensions of the wardrobe
How best to plan a wardrobe depends on its location. Its design can be:
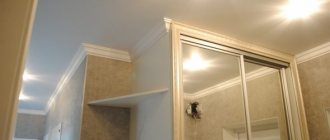
- Completely freestanding. The easiest option for independent design. The dimensions of the wardrobe are reduced relative to the allocated space in width and height to make assembly possible. If you plan a closet for the ceiling, it is better to allocate a separate mezzanine. It is not always possible to assemble a wardrobe standing upright. And if you assemble it lying down, then the diagonal of the sides will not allow you to lift it and move it to the designated place.
- Partially built-in. Planning a partially built-in wardrobe (for example, when installed in a corner, without a back wall or bottom) is also not difficult if you take all the measurements correctly. Shelves adjacent to the side wall may need to be filed in place if the angle is not level. When installing in a corner, it is better to leave the section adjacent to the corner for outerwear.
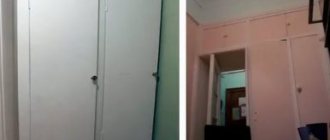
- Fully built-in. In this case, the sliding wardrobe is completely mounted in a niche and does not have a roof, bottom, side or rear walls. It is necessary to plan the internal content in such a way that all shelves and drawers are in the center. And leave the side sections, for example, under clothes on hangers.
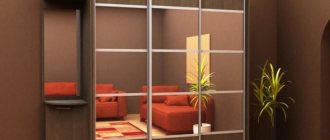
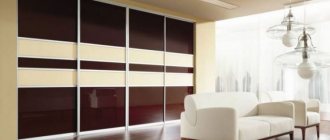
Cabinet wardrobe
Partially built-in wardrobe
Built-in wardrobe
Stages of designing a sliding wardrobe project with dimensions
The first thing you need to do is take measurements of the available space - how much space you are willing to allocate for a dressing room, how many things on average you intend to keep in it.
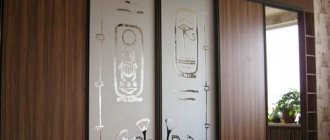
Then you should decide where it will be located, and also measure all the parameters - depth, width and length of the niche. Then you should present the general appearance of the furniture. What style do you prefer, will there be additional solutions, for example, the number of drawers, mirrors. You can outline the sketch on a piece of paper or transfer the sketch to the computer if you plan to do everything in a wardrobe design program.
After this, you should create drawings. One will be comprehensive, that is, it will contain all the main parameters and display the appearance. And others will depict in detail individual elements that require careful preparation - down to the smallest fasteners.
Then a map of cuttings of building materials is collected. An estimate is created according to which the work will be carried out - how much wood or other material is needed to realize your idea in the interior. At this point, the purchase can already be made.
Separate calculations and measurements are made to detail the profile. This is a sliding system, which is one of the most important in the design of a sliding wardrobe.
After creating the project, the results are summed up, namely: how many fasteners and fittings need to be purchased in order to begin assembly.
When all the documentation and materials are prepared, the furniture creation stage begins.
We leave space under the doors and adjust the depth
The peculiarity of sliding wardrobes is that the sliding system immediately “eats” 100 mm from the depth of the wardrobe itself. And all shelves and partitions must be recessed relative to the compartment body. And the drawers are equipped with mortise or simply non-protruding handles so that the sliding doors do not cling to them.
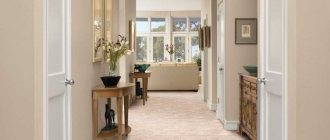
If you need to plan a wardrobe inside for the hallway, with storage of bulky outerwear, it is better to immediately increase its depth to 650 mm. So that later you don’t have to adjust the sleeves, shoulders, fluffy “hems” of sheepskin coats and fur coats, which “strive” to get in the way of the compartment door when closing.
If the hallway is narrow and a wardrobe with a depth of more than 450-550 mm cannot be made, it is more correct to immediately plan the transverse arrangement of the hangers on the pull-out rods.
What options could there be for hanging and hanging rods under hangers?
Stages of cabinet furniture design
Preliminary work - we need to understand what we want. Built-in wardrobe or regular, what size, how many doors. For example, the optimal cabinet depth is 60 cm; if it is less, you will not be able to place hangers comfortably.
School geometry alone, even with a good grade, will not be enough.
Sketch design - calculating dimensions, drawing the desired cabinet on paper in order to understand what exactly should turn out in the end.
Sketch design - calculating dimensions, drawing the desired cabinet on paper in order to understand what exactly should turn out in the end. The number of shelves and what sizes, what will be stored in this cabinet. How will things be stored - hung on hangers or folded on shelves? How should you make the shelves - narrower so that nothing falls out, or are you planning to use boxes?
Drawing comes to the rescue.
Preliminary work - we need to understand what we want.
A technical project in a special program, where all dimensions and details are thoroughly indicated, down to the type and color of fittings. Yes, you will have to download, install and master new software, find video tutorials on it and spend several hours learning. However, the result will be worth it - you will be able to save time in the future.
We take a tape measure in our hands and see what a 30-centimeter shelf actually looks like, and draw conclusions.
A technical project in a special program, where all dimensions and details are thoroughly indicated, down to the type and color of fittings.
Planning the roof and base of the wardrobe
You can skip this step when planning a wardrobe if you decide to make a structure without a bottom and a roof. In this case, the roof will be the ceiling, and the base will be the floor covering.
What could be the base of a wardrobe?
As for the roof, it can be overhead (in the form of a protruding canopy). Or inset, as in ordinary cabinets.
In the first case, the fasteners (confirmations) are screwed in from above. Therefore, it is better to immediately make a removable mezzanine to facilitate assembly.
In the second case, there is a possibility that the wardrobe can be assembled “standing up”, because the fasteners will be screwed in from the sides.
How to plan a wardrobe inside
The sliding wardrobe resembles a construction set consisting of a set of parts
Rational operation depends on the layout and location of internal accessories. The finished cabinet has the main components. At your request, the manufacturer will adjust the internal space and fill it with the accessories you need.
To order, an individual project is created inside the module. You determine the number of rods, shelves, combine them with drawers and mechanisms.
To create a plan, you need to know the principle of dividing a closet into zones, approximate dimensions, attributes for filling and organization techniques. To distribute internal segments, there are special online programs on the Internet.
Accessories layout with names
We divide the wardrobe into sections and check the doors
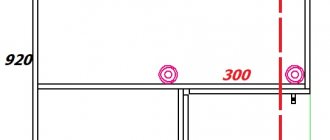
Any internal filling of a wardrobe is a combination of shelves, niches and drawers in vertical sections.
Partitions determine the width of the vertical sections:
- Typically, vertical sections of 500-700 mm in length are allocated for shelving shelves.
- Sections for clothes on hangers can be longer if a longitudinal hanger is used.
- If the wardrobe is shallow and transverse pull-out rods are installed, then the optimal width of the sections for hangers is 600 mm.
When arranging partitions, match their position relative to the sliding doors of the compartment! The shelves should not overlap with them, otherwise “dead” zones will form. Doors should not interfere with the sliding of drawers, baskets, rods and other storage systems.
Are planning
Arm yourself with a sheet of paper, a pen and try to schematically depict the layout of your future wardrobe. Start with the tall sections where long clothes will hang. Dresses, raincoats, coats will require 140-160 cm in height. The next step is hangers with short items. T-shirts, shirts, jackets will take up 70-80 cm. Trousers - up to 130 cm. Drawers or baskets can be provided under the bar with short clothes.
Now the width. A set of 5-10 dresses will take up to 40 cm in the closet. A dozen men's suits - up to 100 cm. Based on the volume of the wardrobe that you assessed in the first point, determine the width of the compartments that is suitable for you.
For daily use, drawers are best suited - they are best placed at a comfortable height. In order for the rollers to glide well along the guides, the width of the drawer should not exceed 100 cm. Under high loads, the mechanisms will “slip” and often break, so do not place a lot of things in such compartments. The standard height of the retractable compartment is 20-25 cm.
Shelves are usually located at the top and bottom of the wardrobe. The distance between them should be at least 40 cm, otherwise it will be simply inconvenient to get things out. Where you plan to store large items: travel bags and suitcases, leave a shelf 60-80 cm high. Overhead handles on drawers inside cabinets are a real luxury, “eating up” several centimeters of space. Give preference to mortise fittings or the “push-open” system.
Using the residual principle, distribute additional systems in the design: hangers for belts and ties, shoe racks (although many people prefer to store shoes in boxes), special hooks for bags, etc. The ideal design is in front of you! All that remains is to bring it to life. Choose a responsible manufacturer who makes sliding wardrobes, and use them with pleasure!
We develop internal content
How to plan a wardrobe inside, how to make its internal contents depends on the purpose of the wardrobe itself and its placement.
For example:
- For the wardrobe in the hallway, they plan to have more hanging space for outerwear, shelves for shoes, hats and bags, narrow drawers for mittens, gloves and other small accessories.
- For a wardrobe in the bedroom, it is better to design more shelves of different heights - for linen, things, voluminous pillows and blankets.
- In a nursery, it is more convenient for a child to use drawers and baskets, there should be more shelves, and hangers under hangers take up less space.
- In some wardrobes, it is important to allocate “household” sections designed to store a vacuum cleaner, ironing board, dryer and other household appliances.
Let's start with the revision
In an ideal world of interior design, experts recommend making a list of things that you are going to store in the closet, based on which you can divide the structure into functional parts: for outerwear, for everyday and holiday sets, for shoes, bedding, etc. Rarely does anyone have enough time and patience for this procedure, so assess the scale of the “disaster” at least by eye. Systematize all planned content according to the principle you need, and then add 20-30% to each component “in reserve.”
A clothing audit will help you decide on the dimensions of the future cabinet. For small storage systems, we recommend two-door designs with one or two compartments inside. The best option for a family is a three-door wardrobe. Models with four or more doors are not suitable for all rooms. If the space allows, that's great!
Removable and rigid shelves, mezzanines
Let us repeat once again: in free-standing wardrobes under the mezzanine ceiling, it is better to make the mezzanines removable. In this case, sliding doors can be from floor to ceiling, or separate for the lower and upper parts of the cabinet. True, the design for these two options will be different.
If the wardrobe has a separate mezzanine, with its own sliding doors, its design will look like this.
If single doors from floor to ceiling are planned, then the bottom of the mezzanine is recessed to the level of the remaining shelves and partitions of the internal filling of the wardrobe.
The seam on the side of the wardrobe divided in this way will be almost invisible if the color of the chipboard is correctly selected and the texture is cut. However, it can always be “covered” with decorative side shelves or any other extension.
If we talk about the aesthetics of the sidewall, then the numerous holes from fastening the shelves do not add “beauty”.
To avoid making holes in the visible sides of the wardrobe:
- If possible, sections with shelves are placed in the central part, as was written earlier.
- They use hidden fastening in the form of furniture dowels and an eccentric tie.
- Alternate rigid fastening of shelves with removable ones.
Zoning
Conventionally, the entire space of the built-in wardrobe can be divided into three parts: upper, middle and lower. The least needed items are stored at the top - seasonal items, large bags, suitcases, spare bedding items, which are taken out for overnight guests.
Frequently used items should be at eye level, so the middle of the closet is always used for everyday clothes. This is where crossbars with hangers, drawers, and pull-out structures are located. The lower zone is intended for shoes, bulky and heavy objects.
Photo: pinterest.ru
The internal content of a child's closet will differ from that of an adult. Here, all objects and things used by the child every day should be located at the bottom.
Checking the rigidity of the structure
With a built-in wardrobe design, the rigidity of the shelves and partitions is ensured by fastening them to the walls at key points. Long shelves for heavy, large items are reinforced with the help of special console holders.
Everything else is fixed with ordinary plastic commander corners.
If the wardrobe is free-standing, then in the design of high and wide niches for outerwear, as well as under long shelves (longer than 700 mm), it is necessary to plan stiffening ribs.
Otherwise, the finished product will be extremely unstable and shaky. Any distortions negatively affect the movement of the sliding doors; the doors begin to jam, or even roll to one side (the side of the distortion).
Part of the function of the wardrobe's rigidity is taken over by the rear wall.
About methods of fastening the back wall of a wardrobe.
Sliding wardrobe designer: we design in 3D
Do you want to buy a wardrobe, but did not find a suitable model in the company catalogs? Order the manufacture of a cabinet according to your own design or even make it yourself! If at school you had a solid A in drawing, then a sheet of paper, a pencil and a ruler will be more than enough for work. But it is much more convenient and simpler to use the capabilities of the designer for designing cabinets, which is a convenient addition to the Interior Design 3D program.
Review video: we design a wardrobe ourselves
BUY only 693 rubles
Online wardrobe designer
Quick implementation of any ideas
Do you dream of a large closet with space for all your things? First, make sure it will fit in the room. Launch the designer and specify the exact size of the cabinet: in the appropriate boxes, enter the desired values for length, height and depth. Don't forget to take measurements first of the place you want to install it. When all the fields are filled in, click on the “Set dimensions”
. The cabinet in the preview window will be immediately redesigned to suit your requirements.
Customize your cabinet size
Additionally, you can add side shelves to the left or right of the cabinet. Just check the box next to the desired option in the menu, specify the number of shelves and adjust their size.
Add side shelves
Change the viewing mode if desired. To do this, go to the “View” > “Display” menu and select the appropriate item from the list. The wardrobe designer can display on the screen only the frame or a sketch of the cabinet, a sketch with a frame or a sketch with materials (displayed by default).
Design that suits you
Try yourself as an interior designer! Immediately after setting the basic parameters, you can proceed to correcting the appearance of the cabinet and change the design of the cabinet and the appearance of the back wall. Just open the catalog and select the appropriate texture from the list or download it from your PC.
Select finishing materials for the body
Design your space to your liking
Whatever one may say, the most important part of absolutely any closet is the shelves. There is good news: you can independently determine not only their type, but also the quantity in the sliding wardrobe designer. Our program will allow you to adjust these functional areas in the “Cabinet Configuration”
.
In the menu on the right you will see a list of all possible elements:
- • vertical and horizontal shelves;
- • drawers;
- • vertical stand;
- • universal shoe holder;
- • standard and retractable hangers.
Drag all the elements you are interested in onto the plan. You can change the location of any parts using the switches located under the catalog.
Add as many shelves and partitions to the plan as you need
With the help of the wardrobe designer built into the program, you will quickly design the wardrobe you have been dreaming about for so long! The final touches remain - the doors. Select them in the “Door Editor”
. First, determine their number: this number can vary from 2 to 5. Please note: you can see each of the doors “in operation”. To do this, grab it with the mouse in the preview window and pull it in the direction in which it should open.
Customize the number and appearance of doors
Set aside separate time to customize the design of each door. Just as with the design of the case, you can use the built-in catalog of finishing materials. Find suitable textures in the list and drag them onto each of the doors. You can immediately evaluate all changes in the preview window.
Project export
The finished project can be saved on your computer as an image in any popular graphic format or printed immediately. In this application, you can create a virtual copy of your apartment and see how the closet will look in the place where you want to install it.
Now you know how to quickly and easily create the closet of your dreams. Don’t waste your time: a great addition to it is a 3D designer of sliding wardrobes. You can start designing your closet now! Together with these two powerful and convenient tools, you can easily and quickly create the interior in your home that you have been dreaming of for so long.
READ OTHER ARTICLES:
- Analogues of the Remplanner program
- Analogues of the PRO100 program
- Analogs of the Planner 5D program
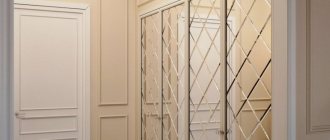
Arrangement of a corner wardrobe
The corner cabinet is unique in its capacity. Great depth can create problems, so you need to think about the filling and arrange the elements correctly. The location depends on the housing design and dimensions.
Approximate content of a corner compartment
It is better to equip a corner place with a two-level bracket with hangers for clothes. In the deepest place, hang unpopular/seasonal or formal clothing. The corner can be equipped with a rotating stand.
If the closet is in the hallway, then the outer spaces are equipped with shelves for umbrellas, bags, and hats. There are shoe shelves at the bottom. On the side, between the shelves, make a key holder with hooks.
Corner L-shaped cabinet with filling