DIY carved furniture is exciting
The popularity of carved furniture does not wane over time, but on the contrary, it grows.
Ordinary sofas and armchairs are quite boring, but hand-carved furniture is something new. People have long puzzled over how to make tables and chairs, armchairs from what they had at hand.
This raw material was wood, and not the kind from which ordinary furniture is made (with a thick trunk), but the softest and thinnest, convenient for cutting with old and primitive tools. Craftsmen made and sold such furniture for a lot of money. Centuries passed and she settled into the elite class.
Is it possible to make furniture from wood with your own hands: original designs and secrets of the masters
If you are tired of standard and tasteless furniture made of plastic and chipboard, try making original wood solutions with your own hands. What types of homemade headsets exist, and how to make them yourself, you can find out from our review. With proper care, DIY furniture made from wood will last no less than structures made from artificial materials. In addition, homemade products will become an original decoration of any room and will add individuality and uniqueness to the interior. And for the manufacture of simple structures you will need inexpensive material, which will also ensure the cost-effectiveness of the headset.
Homemade designs will fit perfectly into any interior
We prepare everything for the manufacture of carved furniture
It is believed that it is the center that keeps the home cozy and this is true. It requires extreme skill and patience to make. But if you follow the instructions and do everything step by step, then it is possible that in just a few days or weeks you will be sitting on “fresh” armchairs and chairs made with your own hands.
First you need to prepare the source material. Any carved wooden furniture is not made in one day, so please be patient. If you have it, consider wood. You can buy already prepared bars and sheets, or you can trim the wood yourself using a plane. We recommend using species such as linden, oak, birch or alder.
We may also need the following tools: a plane, chisels, squares, compasses, mallets, a drill for tightening screws and holes, a jigsaw (preferably electric) for jewelry cutting and a number of other tools. The fact that you know how to use all these tools is also important, otherwise you will end up with a somewhat clumsy product, rough and very ugly. We want to make an exceptional masterpiece that will decorate any home, even the most sophisticated and stylish in the design sense.
Examples of carved furniture (video)
We make carved furniture
In our case, we have all the tools and source material ready (raw material - wood). First you need to cut the planks on a special machine - a circular saw. In cases where wide boards are needed, several bars can be glued together with PVA glue - this is quite reliable. Next comes the drawing process. Ornaments can be different: from small and light circular ornaments to complex and varied patterns. You should be precise and, with a slight movement of your hand, apply the drawing to the board with the most ordinary pencil. The path of the graphite must be clearly visible so that we can then cut off the unnecessary part with a jigsaw. It will be great if you have an electric jigsaw. He will cope with the task in a few tens of seconds.
If one side (the side) is ready, then cut the other along it. Our blanks for assembly must be symmetrical. After this, you should prepare the back, seat and legs. Do not sand your boards under any circumstances, otherwise the wood will lose its original appearance. Modern wood carved furniture is quite durable because it uses a minimal amount of wood in the details of an individual object, be it an armchair or stool, table or cabinet.
How to make a carved chair
After the necessary tools and wood have been prepared, the pieces of plywood need to be placed on a flat surface for cutting.
- Apply markings according to the drawings used.
- Using an electric jigsaw or a special circular saw, cut out the parts for the future chair.
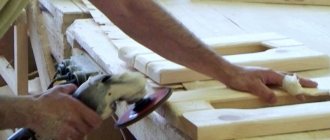
- The cut parts should be cleaned. Experienced woodworkers do not recommend sanding the wood with sandpaper at this stage. It is better to use one scraper.
- Secure the workpiece that will be decorated with carvings on the workbench.
- Transfer the drawing to the wood with a simple pencil, tracing the contours of the stencil. Show precision and accuracy when doing this.
If you have no experience and have never made carved wooden chairs with your own hands, start with simple options. Gradually, skills and abilities will improve. Indeed, to apply complex patterns, special modern machines are often used for processing three-dimensional parts.
- Proceed with cutting according to your choice. Beginner carvers can use a jigsaw to cut out the pattern in the form of through holes. The part for such work can be made from plywood.
- Assemble a chair from finished processed parts. Use glue, screws or wooden tenons. After assembly, you need to secure the connections with clamps or a special press until the glue dries completely.
Let's start assembling furniture
So, if all the parts are ready, then the fun part begins - the assembly process. To do this, you need an assistant who will hold the parts. Take medium-sized screws (5-8 mm) and place them aside. Use a drill to make thin notches (thinner than the diameter of the screws) on the parts. Then press the workpieces and carefully tighten the screws in all places using a drill. Before this, you can apply PVA glue to the seams to provide additional strength and tightness. Attach or glue four legs to the bottom. Our furniture is ready!
In this form, a chair or any other furniture should last a couple of days. If you don’t like the color, you can paint the product with varnish of any shade. So, easily and with your own hands, each of you, if you have talent, can make beautiful furniture.
Source: www.mebelniykrug.ru
Decorating the product
Carved furniture can be decorated in various ways:
- Add mirror elements to the design that will match the lighting of the room.
- Install glass analogues or decorative grilles of a suitable color in place of furniture doors of the same type.
- Attach a mosaic of stained glass to the free spaces of the products, which will visually make the room brighter.
To make the surface acquire a more expensive dark shade, coat the product with several layers of varnish.
Attention! When working with chemicals, do not forget to ventilate the room.
DIY carved furniture
Furniture made from wood has always been valued and in demand. Products made from natural, environmentally friendly material are not harmful to health in comparison with, for example, plywood or plastic. The furniture in the house speaks of the owner’s wealth, and carved interior items immediately stand out among others; they are distinguished by their beauty and grandeur. Decorative elements that you make yourself will be an invaluable decoration of your home, because you can feel the soul in them.
If you decide to independently select wood for making carved furniture, then it is better to choose linden, birch or alder.
Not everyone can afford wooden furniture, because it is quite rare and expensive. So we’ll tell you how to quickly, easily and inexpensively make carved furniture yourself.
Master class on making a carved table
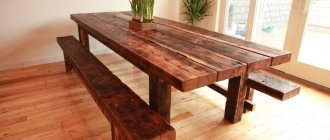
Simple tables are available at any furniture store, but their simple square shapes have not attracted anyone for a long time. Today we will talk in detail about how to make a classic carved table with three legs yourself.
- Lathe.
- Drill or screwdriver.
- Chisels.
- Incisors.
- Tesla and an axe.
Materials you will need:
- Solid wood board (chestnut).
- MDF for table top.
- Dowels.
- Ties.
- Dowels.
- PVA glue.
Master Class
- On a lathe we make the first part of the table - the leg, the central support of the table.
- On the turned leg we now cut out an acanthus leaf, as well as a pattern in the form of scales, which you will see in further images.
- At this stage we will start cutting out three legs - lions. We draw a drawing of a flat lion on the board and then carefully cut it out along the lines. The photo shows one of the sawn legs.
- The legs have a three-dimensional appearance, so in the future they will be additionally pasted over in places where the muzzle, paw and mane are located. Since our lion is mythical, and therefore winged, we begin to make the wing blank.
- The wing is attached quite simply - you just need to put it on the leg of our lion. This is what it looks like.
- Let's proceed to the most important stage of work. We cut out the feathers on the wings and other small patterns planned. This is what the wing should look like.
- We add an additional board to the lion’s paw for thickness and begin to make carvings on it. In the photo you can see that the volume of the paw is larger than the workpiece itself. The workpiece has a thickness of 46 mm, add 25 mm on each side. See photo for side view.
- At this stage of making the legs, we begin to cut out the lion's muzzle. Initially, we glue additional layers of wood, then remove the excess and, finally, cut out all the parts. The photo partially depicts these stages.
- Now let's move on to processing the mane. Similar to the previous parts, we add more wood to the sides and make carved elements.
- Next we make the table cover. We cut out an even circle and make curly carvings on the sides.
- We saw out and cut out the lower legs and the supports at the top for the lid. And the last job is assembling the table. To do this, we use dowels, ties and PVA glue.
How to make wood furniture
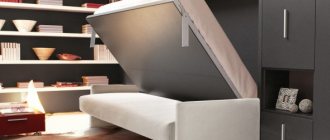
I want to furnish the house really beautifully... But you will have to look for high-quality, beautiful and, especially, original products, and also pay a tidy sum for them. This is not a problem for our brilliant forum members. How to make furniture from boards with your own hands, how to assemble an unusual transformable bed or an ordinary but reliable high-quality wardrobe, reupholster a sofa or build an interesting monolithic kitchen with your own hands... What tools will be useful to you, where to start, where to find drawings, what materials to use - we have collected FORUMHOUSE's experience and expert advice in this week's topic.
Articles:
Furniture workshop for beginners: choosing a tool. What tools are needed: which set is sufficient for the entry-level, and which one is necessary for an experienced furniture maker, is it possible to assemble a cabinet without special tools, and how to set up a furniture workshop - experts tell us.
Everything you need for carpentry work. Review of new products. Hand router, PVA glue, circular saw, oil and wax for countertops and an electric chisel. Our selection presents new items that will be in great demand among furniture makers and handymen.
DIY transforming bed. How to make an unusual bed from boards yourself that can be hidden in a closet - we have summarized the experience of FORUMHOUSE.
Wood gluing - technology and subtleties. One of the most popular methods of joining wood is gluing - it allows you to obtain durable, monolithic parts. We talk about the technology and the intricacies of the process.
A do-it-yourself monolithic kitchen is a profitable alternative to a modern kitchen set. Construction of a monolithic kitchen is an exclusive and practical solution that allows you to profitably arrange the furnishings of your own home, avoiding the purchase of mediocre and expensive kitchen furniture. We offer ideas and practical developments related to the construction of a monolithic kitchen.
New outfit for the sofa. Over time, favorite things become old and go out of fashion. And the once beautiful sofa turns into a shabby, dull piece of furniture. You can return upholstered furniture to a fresh and neat look by reupholstering it. FORUMHOUSE users talk about what products will help update their favorite sofa and armchairs.
DIY furniture is like a dream philosophy. Items that you made yourself keep the warmth of your hands and meet all your wishes. And the users and specialists of our portal will help you understand all the intricacies of this matter. We tell you how to make furniture from wood.
Video:
Working with furniture panels. Master Class. According to Sergei Ilyin, when making furniture from chipboard panels you are faced with two problems. This is fitting a part to an uneven wall and making parts with curved edges. How to make wooden furniture at home - see the master class.
Furniture restoration. With my own hands. Galina Samsonova became our forum member thanks to the hobby she developed - restoring old cabinets and tables. Since this is not an easy matter at all, and it was a pity to throw away the inherited set of interior items, Galina went to the forum to learn how to give new life to old things. Today she herself is an experienced expert in this matter.
Different methods of decorative coating of OSB panels. OSB, or OSB panels, are suitable for both finishing buildings and making furniture. You can refine the surface of an OSB panel or give it the desired antique effect using wood paints and varnishes.
Fairytale chair in rustic style. Master Class. Interesting DIY furniture is usually not that difficult to make. The technology for making such furniture is very simple. The most important thing is to find the right blanks. Together with the masters of fairy-tale buildings in the rustic style, we will make a fairy-tale chair. You will also learn what tools you need to make furniture in a rustic style, in addition to a drill and a screwdriver.
“Unladylike business?” DIY furniture. If you have a small apartment and a large family, buying all the necessary furniture becomes a problem. Try making it yourself! As forum member Elena Mitkina from Moscow did. She divided the room between children of different sexes, made original beds and wardrobes out of boards and is ready to do a lot more to improve her apartment.
DIY modular furniture. While inventing furnishings for his home, FORUMHOUSE member Yuri Buyskikh came across the idea of structures made from boxes. As a result, all this was transformed into the idea of multifunctional sets of modular wardrobes, tables and beds, which Yuri creates on his own. Making unusual furniture with your own hands is easy if you have a simple set of tools for furniture makers, buy accessories and watch our small master class.
Forum thread:
We make, remodel and restore furniture ourselves. Even a beginner can make a shelf or a bed, a wardrobe or a table with chairs, or turn a Soviet striking clock into an “antique French manor clock” - from things found in a trash heap or bought on the cheap. In this topic you will find many photos of interesting solutions that can be implemented in winter and long, “idle” evenings. Any unnecessary things can find a second life and become elements of an unusual design.
My works, work and hobbies. Several years ago, Philip bought a house in the Novgorod region, and is still furnishing it. In addition to construction, the owner also does carpentry. Unusual, soulful, atmospheric works - their photos are presented in the topic.
What to make from wooden shipping pallets. Pallets are an amazing material for creativity - natural, cheap (or even free), strong: you can find both pine and mahogany. FORUMHOUSE participants talk about their options for crafts made from wooden pallets and the technology for their proper disassembly.
Carpentry for home and garden. In this topic, for the 6th season, FORUMHOUSE participants have been discussing wood processing technologies and techniques for working with tools, giving comments, and sharing experiences.
Recipes for preparation and use. You can prepare impregnations, antiseptics, varnishes and paints for wood yourself - they will work out well, and are cheaper and more environmentally friendly, FORUMHOUSE users are sure. In this topic they share their “homemade” recipes for ingredients.
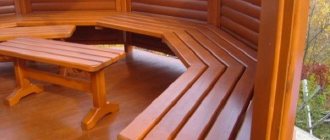
Drawings of furniture for the garden (and not only). This topic contains ready-to-use drawings of country furniture made of wood - study, print and make!
Guide to the section “Furniture for home and garden”. Lessons, useful programs, master classes, experience in making and restoring furniture and a lot of other useful information are collected here - for “beginners and not only.”
Source: www.forumhouse.ru
Intricacy married to beauty
One has only to start looking for an unmistakable sign of wealth in the house, evidence of the owner’s wealth, and the furniture immediately comes into view. If carved furniture is made with your own hands, then it contains not only the warmth of the master’s hands, but also the special light of his creative spirit, the artistic vigilance of his gaze. Few things can compare in beauty, intricacy and elegance with carved furniture. The harmony of lines, strict adherence to proportions, and magnetic originality immediately attract attention to it, regardless of where it is located: in the living room or in the kitchen.
Varieties and styles of carving
In modern furniture production, two types of threads are used:
- sculptural, the figure is worked out from all sides;
- relief, the design either protrudes above the product or is drawn along the background.
The relief category is divided into five types:
- cut-out, a thematic image is created by completely removing the original background;
- muted, the background remains untouched;
- invoice, openwork thread is fixed on the plane;
- a flat-relief, three-dimensional pattern is applied to the background surface with uniform depth;
- geometric, the ornament repeats certain geometric shapes.
Furniture with carved patterns can duplicate any style of art. Empire lyres and laurel branches, fantasy Baroque motifs, Gothic openwork ribbon weaving are not the limit of the possibilities of this technique.
Preparatory stage of work
Before you start making carved furniture, you need to prepare high-quality material for it. It is best to stock up on wood from autumn to mid-January, when the sap does not move in the trunk. This is important so that the wood does not crack. The material intended for the manufacture of carved furniture must be thoroughly dried. Its best examples come from birch and oak, alder and linden, elm and walnut wood.
In the process of work, you will need a lot of different tools, but from a range that is accessible to everyone and not difficult to use in practice. The main list will not be long:
• You need jigsaws and compasses • Jigsaws and chisels • Mallets and carpenter's square • Rasps and thicknesser • Jigsaws and scratchers • Files and chisels • Angles, chases and drill
The easiest way to cut the material into blanks is on a circular saw and plan them on a jointer or planer. If you need very wide blanks, you need to use PVA glue, with which the boards can be easily glued together, after which they can be planed and cleaned by hand. The workpieces are leveled during the scraping process; there is no need to grind them with sandpaper. Mark the future ornament with an ordinary pencil after the workpiece is secured on the workbench in the most convenient way for work.
Take the risk of becoming a Master
Of course, the high quality of such a product can only be ensured by professional craftsmen who have been making carved furniture for a long time and who have adopted the experience of their talented predecessors. You can try to make furniture yourself, but this will require some effort on your part. Wood carving is not an activity for everyone. Although, if you start to succeed, then you will not be able to tear yourself away from this process. While carving, you will get maximum pleasure and feel like a real Master. This requires skills that you acquire through trial and error.
Clean and varnish
As soon as the marking is finished, they begin to cut out the parts necessary for the further work process. Larger elements are fixed in the machine, small ones can be worked on the table. When all the elements are cut out, assembly begins.
One of the common fastening methods is to screw them in with screws. To clean finished products from fine dust, just wipe them twice with a break with a wet cloth and dry.
Three hours after this, the product is sipped with nitro varnish and polish, after which it is left for twenty-four hours to dry the coating. Another sanding and subsequent polishing is required. Four days will pass, you need to polish the furniture with alcohol polish. The treated surface will shine like a fifty-kopeck piece that has just come out of the mint.
Carved furniture made with your own hands can elevate the interior of a room in a way that other items purchased at an expensive price in a store cannot do. The tradition of using carved ornaments in furniture manufacturing goes back many centuries. Mastery, accumulating gradually, gave rise to special artistic values, expressed in the appearance of elegant and beautiful wood products next to a person. A bed with carved elements can transform the interior of a bedroom. A carved table brings new, elegant and attractive features to the kitchen design.
Wooden carved furniture has become a sign of good taste, contributing to the highest degree to the formation of a cozy atmosphere in the home. It is no coincidence that the most valuable types of wood are used in the manufacture of such products. As a result, carved furniture serves faithfully for many generations, turning into a kind of family heirloom. In order for it to fit naturally into the interior, a well-thought-out decoration of the room and its certain style are required. You can find a worthy place for carved furniture in an eclectic interior.
DIY wood carving
Wood carving is one of the most complex options for finishing furniture. Furniture made in this way, with beautiful openwork patterns, began to be made back in the 12th century. For eight centuries, DIY wood carving has been passed on by craftsmen from generation to generation.
Furniture with carved elements is of particular value. Just some time ago, such furniture could only be seen in museums or in the houses of oligarchs. Today, anyone can have similar furniture at home. Thanks to it, your home design will become more attractive.
A small box for great joy
Wooden furniture with carvings can be found in offices, living rooms, dining rooms and bedrooms. It matches the interior of any dacha or cottage. All of the above applies in full to the wooden box in which housewives store their most valuable things. The oval box, which looks like a toy tram, looks especially attractive. It can be made from birch.
The wood must first be thoroughly dried. The manufacturing process can begin only after it is clear that the material is dry. First you need to process the required boards on a jointer, after making sure that they do not have defects or knots. We make the size of the workpieces that is required using a thickness planer. After this, you need to saw off the existing material in width and trim along the length. A circular saw allows you to do everything at a good level.
You need to start gluing the box in such a way that the gluing is reliable and the boards do not crack along the seams. You need to use the most reliable glue. The process is best carried out in a carpenter's vice, using regular spacers to help avoid damage to the box.
The wooden rectangle needs to be even, the angle from the inside is ninety degrees. Templates for the outer and inner oval will come in handy here.
It is best to sketch it out first on paper, then use carbon paper to transfer it onto a plywood sheet three millimeters thick and cut it out using a jigsaw. If the wall of the box is one centimeter, then the outer oval should exceed the inner one by two centimeters in width and by the same number of centimeters in length. To cut out the inner oval, you also need a drawing from the template on both one and the other side for greater clarity when cutting. A jigsaw allows you to do this accurately and accurately, so that the feature itself is preserved. From the inside, as a result of careful grinding, a perfectly clean oval emerges.
Glue the bottom and lid to the box in a vice; To avoid damaging the parts, we use gaskets. Now all that remains is to adjust the parameters of the lid and bottom to the size of the box. You need to draw an oval on the outside of them, carefully cut out and glue the legs. Sanding the outside of the box allows you to bring its appearance to the required condition. It is necessary to make a cut and polish the box blank and the lid: there should be no gap between them.
There is no such thing as beauty
To begin the beauty of the box, you need to make a neat bevel on its lid using a grinding machine, gradually, slowly, adhering to the inner oval template, carefully rotating the lid. Considering the size of the product, it is better to put two small loops than one for the entire length of the box. After this you can start carving the box. The easiest way is to apply geometric carvings to a wooden surface. It can be drawn with maximum precision directly on the box and then cut out.
Patterns, which are a necessary addition, must first be drawn, then transferred onto the product using carbon paper. A bright thin spiral left by burning will look good on the edges of the lid and base. You can start varnishing the box with nitro varnish, let it dry, treat the entire surface with fine-grained sandpaper and repeat the process twice, using oil varnish. All that remains is to glue the inside of the product with velvet, applying a layer of glue only to the bottom and walls. The beauty is ready for everyone to see and admire.
Wooden kitchen furniture
Kitchen furniture made of natural wood has always been a sign of prosperity, reliability and comfort. The products were distinguished by high aesthetic characteristics and exquisite beauty.
The use of solid natural wood or its derivatives in difficult kitchen conditions has forced furniture craftsmen to improve processing and finishing methods so that wooden furniture can withstand high humidity, various stains and mechanical stress with dignity.
Great achievements in the field of wood protection make it possible to make wooden furniture with your own hands without fear for the appearance and long service life.
Advantages of wooden furniture
The production of furniture from MDF or laminated chipboard panels reduced the cost of goods in this category, and the appearance turned out to be excellent. But even high-quality facade decor will never replace the luxury of natural wood, the beauty of carved elements and the color of expensive wood species coated with glossy varnish.
Making furniture with your own hands allows you to acquire such furniture, while saving a large amount. Deep knowledge of working with this material makes even the most elite things available, such as carved furniture, chairs and tables with curved elements.
Products made from wood and epoxy resin are widely used - a synthetic material that, after drying, becomes transparent and acquires properties similar to natural stone. Furniture made from wooden elements visually soldered into resin and with the addition of glow-in-the-dark areas looks original.
In addition to the considered aesthetic characteristics, do not forget that wood is an environmentally friendly material. At the same time, the manufacturing features of wooden furniture increase its service life so much that sometimes it greatly exceeds the performance characteristics of other materials.
Energy of different types of wood
According to scientists, every object in the universe emits an energy spectrum that can affect a person in different ways. Furniture made from natural wood is no exception to the rule. Not only the type of wood differs energetically.
It is a common belief that making your own wooden furniture can affect its aura. A product created in a good mood will only bring joy, while working under stress will give the material a negative effect.
After some observations, the following conditional classification was compiled:
- trees that can absorb energy - spruce, aspen, chestnut, bird cherry, poplar;
- energy emitters - birch, rowan, oak, maple, acacia.
For the home, the use of these tree species should be done in doses. After all, it is difficult to predict what energy this natural material will emit or absorb.
DIY natural wood furniture for home and garden: manufacturing instructions
Furniture made from natural wood is valued for its environmental friendliness, durability and exclusivity. You can make any interior items from solid wood of various species - from a hanger for the hallway to a double bed.
DIY natural wood furniture
The main thing when working with wood is accuracy and patience. What tools to use, how to choose the material for work, as well as the order of work will be discussed in this article.
Using laminated chipboard and MDF for production
Before you start producing furniture from natural wood, you should consider other widely used materials: MDF and laminated chipboard.
Laminated chipboard is a special board made of wood chips, which is covered with a paper-resin film. The coating is based on a paper sheet impregnated with melamine resin and attached to the chipboard by means of an adhesive bond (lamination) or under the influence of high temperatures and pressure (lamination).
As a result of processing, the material becomes moisture resistant and is not exposed to temperatures or mechanical damage. During the manufacturing process, it can be given any color and structure. The disadvantages of laminated chipboard include low environmental friendliness and difficulties in spot processing.
MDF has a lot in common with chipboard. However, the compositions of these products are different. When gluing chips in MDF boards, environmentally friendly natural resins are used. For this reason, MDF furniture can be used even in children's rooms.
The positive characteristics of furniture boards include high resistance to moisture, temperature changes, and damage. Unlike chipboard, they lend themselves perfectly to fine processing.
As practice has shown, interior items made from MDF are not inferior in their characteristics and appearance to natural wood, and can last longer than homemade wooden furniture.
Furniture panel: features, application possibilities
Furniture board is a board obtained by gluing slats, bars, and lamellas from wood. Its dimensions are larger than those of solid wood boards, which makes this material an excellent raw material for making furniture.
The manufacturing features result in an environmentally friendly, fairly strong material, which even outperforms solid wood in some ways in terms of the absence of shrinkage and deformation. At the same time, the price of the shield is lower.
Shields can be made with your own hands at home. A separate room with the necessary humidity and a fixing press are enough.
Solid wood furniture is the best natural material for making furniture
Considering the wide range of raw materials for furniture production, you can notice the following pattern - plastic or wood chip boards imitate the surface of wood.
This is due to the fact that solid wood is considered the best for the manufacture of interior items, decoration and coatings used indoors. And it’s hard to imagine antique furniture made of anything other than natural wood. The material is varnished and tinted in any color. All the same, the result should preserve its structure.
Wood can be easily processed and restored, is the most environmentally friendly raw material, has a long service life, and does not require constant special care.
And most importantly: whether it’s homemade oak furniture with your own hands or an author’s project from a single piece of spruce trunk - such products will fit perfectly into any stylistic interior.
Furniture making process
After developing a drawing of the future product, carved furniture is made according to a specific pattern. The initial floor of the manufacturing process is virtually indistinguishable from carpentry. Having all the necessary tools and materials, you can begin work.
First draw a pattern on paper.
When applying a design to a designed workpiece, the product must be well fixed. If you don’t have a special workbench at home, you can use a large vice. Carving is carried out with sharp movements.
It is difficult for a beginner to immediately make beautiful furniture.
The process can be done in two ways:
- First assemble the structure, and then apply the image.
- First, start with the ornament, and then assemble the object. This method is used when the product is highly complex.
When using a jigsaw when carving wood, be extremely careful and attentive. At the end of the work, the surfaces must be sanded and coated with a finishing layer.
Wooden parts are cut out with a jigsaw.
If the result seems beautiful, then the copy can be considered complete, feel free to add it to the interior.
Stool
When creating a stool, special attention should be paid to the design of the lid and legs.
The chair is made with carved legs or a back, and the seat is reinforced so that it can be used for its intended purpose for a long time.
To produce the most accurate carvings, purchase a CNC machine. This will significantly speed up the workflow. It is better to choose a drawing in advance.
Be careful when making a stool.
If you don’t have a set of special tools at hand, use a stencil and a chisel. Do not overdo it with the legs of the stool; the design should not only look attractive, but also be stable.
Drawing of a stool with a round seat.
Before starting work, you should draw up a detailed diagram of the future image. To make a through ornament in the area of the back of the chair, you can use plywood. It is easy to cut and the material will not crack. There should be no major defects on the boards that will serve as the base.
Carved chairs with their exquisite appearance can decorate any living room.
Get yourself various angles, files, chisels, a jigsaw and a hand router in advance. It’s enough to simply create a carved chair with your own hands. The work is carried out in stages:
- The workpiece is placed in a stable place, and markings from the drawings are applied to the boards. Each part must be numbered.
- For cutting, it is recommended to use a circular saw or jigsaw.
- All elements undergo thorough polishing, and the blanks are covered with the outline of the future pattern.
- The workpiece is placed on the workbench and fixed. The part must be securely fastened.
The easiest option for beginners is sawing thread. It will not be possible to make complex shaped parts of a chair without a specialized machine. Assembly of finished polished parts is carried out using dowels or self-tapping screws.
Carved chairs will suit any room decor.
After the glue has dried, the surface must be sanded and polished. Hand-made carved wooden chairs will perfectly decorate any living room or kitchen. Don't be afraid to experiment.
Carved furniture is made mainly according to one pattern; the differences lie in the ornament and dimensions of the elements. When creating a table, the most difficult element will be designing the legs. The base is represented by a square beam.
Creating carved furniture will take some time.
A sketch is applied to the tabletop material, and an ornament is cut along the contour using a jigsaw. When the fine work is completed, you need to sand the workpiece. It is better to make decorative lintels from a single piece, similar to the tabletop.
A carved table will suit a classic living room.
The table elements can be joined with wooden dowels, and additionally apply wood glue to the joints. After the glue has dried, sand and remove dust. Finally, the product should be coated with primer. To achieve a natural nut color, use stain.
Other types of furniture
Carving elements can be applied to almost any piece of furniture. If the choice fell on geometric patterns with the correct shape, it is better to choose linden as the main material. Conifers have a different fiber structure that is not suitable for small decorations.
The patterns can be anything.
Do not use freshly cut wood for carving work. The wood will gradually dry out and many cracks will appear on the furniture. If the thread is applied to an old furniture set, it must be disassembled.
Pay attention to individual elements of furniture.
Working with an assembled product is much more difficult than working with individual elements. Before treating the surface, you need to clean it of old paint and varnish; to do this, use a hair dryer and a spatula.
Manufacturing stages
When creating solid wood furniture with your own hands, it is important to set priorities correctly, take into account all the nuances of the process, study the stages of manufacturing and assembly of the constituent elements of the structure, as well as the importance of the final stage - coating the surfaces of the finished furniture with a protective layer of varnish.
Drawings and diagrams for manufacturing a durable and beautiful product
Any thing created with your own hands begins with paper and pencil. The first stage is drawing a drawing of the room and a visual representation of the future product on it. Only then do we take all the necessary dimensions and make a detailed diagram with details and the removal of the composite mobile elements, attachment points for the side walls, bottom and top, location of fasteners and other small parts.
Already at this stage, you need to take into account the use of color in the interior of the room, carefully draw the facade of the furniture so that its influence on the environment is immediately visible.
Assembly
After all the parts have been cut out and polished according to the diagram (this stage can be entrusted to specialists or implemented at home), you need to prepare the necessary tools for making furniture and assembling it at home: a screwdriver or drill, a set of screwdrivers and shaped keys, brushes and rollers for paint and varnish products. In addition, you will need fittings such as handles, curtains, mounting angles and various fixing consumables.
Wooden furniture is fastened using self-tapping screws or bolts with nuts to fix right angles; plastic corners of different widths are used. If you are creating a large dining table, the legs will need to be attached using special metal adapters and additionally reinforced with jumpers.
Source: vseme.ru