Damage to home furniture occurs quite often and for various reasons. Repairing a chest of drawers, replacing guides or refinishing can cost a hefty sum if you take it to a special workshop. It is much cheaper to repair the furniture yourself, but it will require some skill and skill.
Similar articles:
Do-it-yourself restoration of old furniture DIY chair restoration DIY chair repair DIY furniture painting
How to disassemble ball guides?
I heard that a box mounted on ball guides can be pulled out. How to do it?
Ball guides, also known as telescopic guides, which are mounted on ball-bearing rollers, are disassembled as follows:
You must first pull out the first guide all the way and press the trigger between the first and second guide and lightly pull it out.
It turns out that the guide will come out completely from the telescope.
The box with the already installed telescope can be dismantled in the same way, only you need to pull the trigger on both sides at once.
Installation is also carried out in the reverse order of up to two clicks, one of which will be approximately in the middle, and the second click when you push the guide all the way.
Dismantling and installation of the guides on the drawer and niche are carried out using self-tapping screws, about 3 of them per guide.
It is extremely important to understand here that we just need to get a box with ball guides, or disassemble those same guides into their component parts.
If you just take a box out of the closet, then go to the box and pull it out.
We are standing facing the box, which means we lower the plastic latch under the right hand down, the same latch under the left hand, on the contrary, up.
Here is the same retainer in the photo.
While pressing the latches, simultaneously pull the box towards you.
If we disassemble the guides, then after we take the drawer out of the cabinet, we take a Phillips screwdriver in our hands.
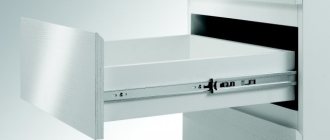
Ball guides consist of two strips, one half of the guide is attached to the cabinet, the other to the side wall of the drawer (in pairs).
Fastening to the surface with self-tapping screws.
Self-tapping screws are screwed into all oval holes (oval because the mechanism can be adjusted) + round holes that are in the slats, unscrew them.
In general, that’s it, the work is not at all difficult, it’s more difficult to install guides from scratch, you need proper markings.
Source
Installation of guides
In order to install these devices, it is necessary to remove their inner part, for which you should press the black antennae. Both halves of the guides are attached to the outer side of the drawer and to the inner surface of the cabinet, chest of drawers or other furniture.
Algorithm of actions:
- First of all, you should decide on the direct mounting location. To do this, mark the fastening line on the outside of the drawer side. It can be done in the center, or it can be done on the bottom. One half of the ball structure must be attached to this marking line using screws.
- On the inside of the cabinet itself, it is necessary to make a similar marking in the form of a line. The location of this marking directly depends on the height of the box. The remaining halves of the guides must be screwed into place. After this, the drawer can be placed in place, check the free movement of the mechanism during extension and closing.
It is worth noting that there are quite a few different holes on both halves of this mechanism. And each of them has its own purpose. Thus, oblong horizontal holes are necessary for the purpose of moving and adjusting the guides horizontally. And the oblong vertical holes are for adjusting and moving the bar up and down.
After the final adjustment has been made, screws or self-tapping screws must be screwed into special round holes in order to firmly fasten the main elements of the ball guides.
Usually the whole process in practice looks like this:
- The bottom rails should be installed approximately 30mm from the bottom of the cabinet.
- Depending on the dimensions of the drawer fronts, the location of the remaining parts will also vary. During operation, they should not touch or rub against each other. Therefore, during installation, it is necessary to take this into account by making the distance between the guides, which are installed on the cabinet wall, 2-3 mm greater than the height of the facade of the retractable structure itself.
- The guide parts must be screwed strictly along the intended marking line.
- After the parts are temporarily secured, you should try to insert the drawer into place through the oblong holes. If the previous steps are performed correctly, you will hear a slight click that occurs when the latch is activated. This means that the guides can be permanently secured through round holes. If you do not hear a click, then you need to make adjustments by slightly moving all the parts up and down, as well as back and forth. Before making adjustments, you should slightly loosen the mounting screws.
DB4461 is a modern model of ball drawer guides, which is equipped with a soft closing mechanism using a soft closer. This mechanism makes it possible to fully extend the drawer, gaining access to all its contents. In this case, smooth closing is carried out using an oil closer.
On average, this mechanism can withstand at least 50 thousand closings and openings. The device is designed for a weight of up to 25 kg, while it is absolutely silent in operation. There are other models of similar devices, which makes it possible to completely select the mechanism depending on your needs.
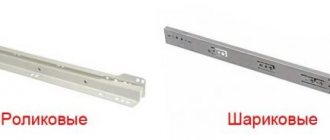
It should be noted that many people often confuse ball drawer slides with their roller counterparts. Therefore, when choosing a mechanism, you should pay attention to many factors. Thus, roller products are mainly painted white. In this case, the drawer is pulled out using plastic wheels. Experts say that these devices are less convenient and wear-resistant, so they are not worth installing. During operation, you can often hear a squeak, and the plastic wheels often break down over time and also fly out of the guides themselves.
If the bottom of the box is inserted into special grooves, then it is better to secure it using thin self-tapping screws with edges. Otherwise, the contents may begin to fall out along with the bottom. In case of heavily loaded drawers, a double set of guides can be used.
Experts recommend that the installation of this mechanism be carried out immediately before assembling the furniture. The fact is that in this case it is much more convenient and easier to carry out all the work, and it will take significantly less time. In this case, after assembly it will only be enough to make all the required adjustments.
When installing, also pay attention to the fact that the height of the drawer should be approximately 4-5 cm less than the height of the facade itself.
In fact, installing drawer mechanisms does not cause any problems. To do this, you just need to purchase high-quality guides and install them correctly. It is important to comply with certain standards and carry out measurements and adjustments correctly. In this case, the mechanism will last quite a long time, and no incidents will arise during operation.
Repair of drawers: causes of breakdowns
Before you start repairing drawers with your own hands in a closet or chest of drawers, you should understand the cause of the breakdown. Understanding what caused the problem is the key to successful repairs. The main thing is not to confuse causes and effects. For example, warping the cabinet or cabinet body itself can cause incorrect movement of the guides and their failure. And if you do not “return” the body to the original correct geometry, replacing the guides simply will not solve the problem.
The box frame has fallen apart or the bottom is falling out
This kind of breakdown is especially common in wooden chests of drawers assembled on spikes. Over time, the boxes dry out and become unstuck. All that is required is to take them out, disassemble them into parts, level them, sand them and reassemble them with glue. For reliable tightening, use additional fasteners in the form of furniture corners and self-tapping screws.
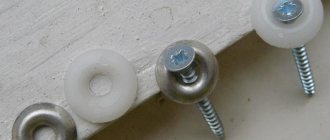
The bottom of the fiberboard box may not be nailed securely at first. Fasteners on small nails are especially unreliable. If the drawer is made of chipboard, then it is better to attach the fiberboard bottom to it using 3x16 self-tapping screws. Use washers to expand the clutch area.
The drawer falls out or warps in the guides
Most likely the reason is the insufficient rigidity of the cabinet or chest of drawers itself. Due to the uneven load of the shelves, the body inevitably deforms: the sides bend, the distance between them increases, and the drawers begin to fall out. The cabinet may warp if the floors are uneven and the cabinet or chest of drawers itself is not level.
Correct, smooth movement of the guides is possible only with the correct geometry of all elements. That is, both the body and the boxes of the drawers must be aligned diagonally. Perhaps the assembly was incorrect from the beginning - if you screw the guides unevenly relative to each other by at least a millimeter, and over time, as the boxes are loaded and they sag, this inaccuracy will become critical.
Also, the cause of the box warping and falling out of the guides may be grinding and deformation of the rollers (ball bearings) of the rails themselves. It happens that the metal of the guides itself bends. The reason is simple - the fittings have exhausted their service life and require replacement.
The drawer doesn't slide out well, the guides stick
The reason may be either in the deformations described above or in the fittings themselves. Even if I installed Chinese analogues with thin metal on the guides, it is unlikely that the fittings were originally designed to fully load the box. Therefore, it cannot ensure the expected smoothness of closing and opening the drawer.
DIY drawer frame repair and replacement
Summarizing all of the above, we can identify several repair methods to return the drawer to its former strength and smooth operation:
- Strengthening the structure itself . It is necessary to add rigidity by installing strips along the back wall. You can also level furniture that is standing unevenly so that its geometry becomes correct. After checking all the corners, you can repair the drawers and replace the fittings (if required).
- Strengthening the drawer frame and strengthening the bottom . If during operation it becomes clear that the fiberboard bottom is not able to withstand the load and is expected to fall out even after replacement, there is a reason to strengthen it. To do this, install a stiffener horizontally or vertically along the bottom - a partition. You can additionally attach the bottom to this part. This method will also help make a large box more rigid without warping.
- Replacement of drawer boxes. Sometimes wooden tenon boxes that have fallen apart are easier and cheaper to replace than to repair. For example, make them again from chipboard. You can read how to calculate the dimensions of the drawer parts for replacement here. It is also worth doing if it turns out that the dimensions of the drawers were initially calculated incorrectly, and therefore fall out of the guides. Or the fittings themselves are already outdated and are no longer available (such as some types of guides with an insert into the groove of the drawer).
What you need to know before you start installing drawers
The principle of attaching the runners to the sides of the cabinet is the same for almost all retractable systems. As a rule, 2 mm are removed from the front edge and then screwed along the outer mounting holes and several central ones, depending on the size of the guides themselves.
The only difference is the calculation of the height at which the skids are mounted.
There are three main types of drawer slides, with different slide positions:
- Along the bottom edge (bottom). The simplest and most cost-effective roller guides are installed strictly under the bottom of the drawer frame itself, overlapping on the fiberboard. As in fact, the most expensive options for equipping drawers are tandem boxes. They are also installed on the lower level of the drawer frame.
- In the center of the side of the box. Ball telescopic ones give greater freedom during installation - they can be mounted at any level of the sidewall of the box box. But it’s still better to stay at the central one. As practice shows, installation and adjustment are greatly simplified.
- With top mount. For metaboxes (metalboxes), the roller guide runners are located along the upper level.
In each case, the box will “sit” completely differently. Let's look at the example of a drawing of a regular chest of drawers with three drawers. To make the task easier, let’s assume that the boxes begin to be installed from the bottom of the side of the cabinet itself, without deduction for the base box and bottom. This is possible in the following option.
- The height of the sides of the cabinet is 668 mm (with the height of the chest of drawers without legs being 700 mm).
- The height of the drawers is 150 mm with the height of the facades being 221 mm.
How to install roller guides
The bottom is captured by part of the runners that are attached to the box at a height of 8-10 mm, depending on the thickness of the bottom (fibreboard).
Let's take the distance from the bottom to the lower edge of the facade to be 20 mm (usually it ranges from 10-30 mm).
The installation diagram of the roller guides will look like this.
There will be no harm in rounding the values. Take not the height level 32/255/478, but round for convenience to 40/260/280. The main thing is to secure the roller guides equally on both sides.
How to install ball guides
With a similar tolerance under the bottom of 20 mm, the installation diagram of the ball guides will look like this.
The difference is that it is customary to install ball guides in the center of the sidewall. Since they come in different widths, it's easier not to move them higher or lower.
Also, the values 99/322/545 can be rounded and made, say, 100/330/550.
How to install metaboxes on a drawer
A distinctive feature of a drawer with metal sides is its fastening along the top edge. The main thing here is to choose the right height of the metaboxes relative to the vertical of the facade. It can be 54 mm (optimal for installation in a narrow niche under the built-in oven in the kitchen), 86, 118 or 150 mm. If a deeper drawer is required, it can be “expanded” using one or two rows of special rails.
Repair and replacement of guides in drawers
It happens that the guides quickly fail because the box is large and heavily loaded. Telescopic (ball) guides allow installation in two rows. In this case, the drawer will be endowed with greater load-bearing capacity and will last longer.
With such an “upgrade,” it is quite possible to replace the bottom made of flexible fiberboard with chipboard or plywood in order to store, say, tools in such a box.
It is better, of course, to replace the metal guides. They don't cost that much. However, if upon visual inspection the rollers are intact, have an even shape, and only the metal of the runners is bent, you can try to return it to its original shape. To do this, use a vice, pliers and other hand tools.
Source
Repair and replacement of drawer guides
Firstly, it is important to understand the causes of the breakdown.
If the fittings require replacement only because they have served their purpose, then everything is simple. Unscrew the old guides, measure their length and purchase exactly the same ones. Installation can be done in the same holes. I advise you to read about the restoration of chipboard - it is quite possible that in order for the fasteners to be strong, you will first need to putty the holes. Well, or choose thicker screws - not 3x16, but 4x16.
If the box initially “did not please” with trouble-free operation, constantly fell out, warped, or jammed, then most likely the guides failed prematurely. And simply replacing with new ones may not solve the problem. Here we need to eliminate the cause itself.
Correct operation of any retractable mechanism is possible only with the coaxial installation of the runners themselves (clearly opposite each other) and the correct geometry of the cabinet box and the drawer itself. And during operation, due to insufficient rigidity, heavy loads, or simply due to an uneven floor, distortions could occur.
Possible causes of failure:
- Initially cheap and low-quality fittings. When purchasing, pay attention to the thickness of the metal. It is better to purchase guides from reliable brands.
- Incorrect installation of guides. When replacing, re-measure all distances down to the millimeter so that the runners are installed clearly opposite each other.
- The drawer itself is skewed. If the box is very large, then the fiberboard bottom does not help in maintaining the correct, clearly rectangular shape. It needs to be strengthened by adding rigid partitions to the box or replacing fiberboard with plywood.
- The cabinet itself is skewed. It helps to solve the problem of leveling furniture using pads for supports. You can also install additional stiffening ribs into the design of the cabinet.
- Heavy loading of the box. Perhaps the previously installed guides are simply not designed for such loads. Maybe it's worth changing them to other, more powerful ones?
Is it possible to replace one drawer system with another?
Usually this question is puzzled by those who purchased a budget kitchen set with drawers on roller guides, the quality of which is “not very good”. I would like to replace them with something better and generally different, more pleasant to use.
It happens that owners of expensive kitchens also think about replacing them. When the tandembox on the box is out of order, and you don’t really want to buy another one at a price of 7, 10 or more thousand rubles. Moreover, the drawer is not the most “important” and you can get by with simpler fittings.
In general, the reasons may be different. And there is one good news - yes, it is possible. There is no need to change the facades or the body of the cabinet with drawers. There may be a mismatch in fasteners. But since all fastenings are located on the inside of the facades and walls of the case, this will not be noticeable.
But regarding the drawer boxes themselves, everything is not so clear. After all, different retractable mechanisms may differ in both the size and design of the drawer.
How to replace roller guides with ball guides
Standard ball and roller skids are interchangeable . To replace roller slides with ball slides, simply twist the slides, following the step-by-step instructions described in the last section of the article “How to Install Drawer Slides.” In this case, the holes on the sidewalls from the position of the roller guides will remain uncovered. They can be masked with self-adhesive plugs.
The exception is mortise-in full-drawout ball guides.
Unfortunately, they cannot be replaced with anything else, while maintaining the same dimensions of the drawer box. Only for a similar retractable system. Or saw the box frame to maintain the same gaps (read - calculating the size of the box for ball and roller guides).
The same can be said about narrow rail guides. They are also ball-shaped, but differ in design: the runners themselves are much narrower and the “balls” in it are arranged in one row, and not in two. It is unlikely that you will be able to find them on sale; they are usually used on foreign-made furniture walls and chests of drawers.
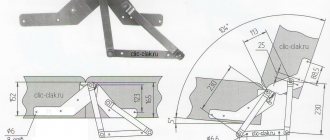
Attaching ball telescopic guides
On the outer side of the drawer, draw a horizontal line clearly in the center and screw half of the guide along it.
Then you need to draw the same horizontal line on the inner side of the chest of drawers.
You can accurately calculate the distances and parameters for fitting drawers into a chest of drawers using the drawings of the furniture product. To do this, we simply measure the appropriate distances from the bottom of the chest of drawers, at which we fix the second half of the guide.
After marking and securing all the guides, you can move the boxes into their places and consider the work complete.
How to replace ball or roller guides with metaboxes or tandemboxes
It is not so easy to replace a drawer with ball and roller guides with tandemboxes or metalboxes (metaboxes). And this is quite obvious, because the design of the boxes themselves is completely different.
Therefore, you will have to completely saw down the parts of the box, taking into account the height of the existing facades, and assemble a new box for installation in the same cabinet.
Determining the dimensions of drawer components
To correctly install telescopic guides that have a full extension stroke, you need to correctly calculate the parameters of the parts that form the drawer.
On both sides between the sides of the already assembled drawer and the sides of the chest of drawers there should be small gaps equal to 13 mm; this must be taken into account when calculating, corresponding to the thickness of the “telescope” itself.
Parameters such as the depth of the drawer and the length of the guide should be equal. Standard lengths of “telescopes” vary between 250-800 mm, with a difference in length between each subsequent model of 50 mm. In addition, a gap of at least 10 mm is also required between the back walls of the chest of drawers and the drawer.
The height of the box is usually determined taking into account the needs of the future user and is most often in the range of 80-250 mm.
How to disassemble ball guides
Previously, I honestly believed that ball slides were permanent, until I encountered a cabinet that was impossible to disassemble (for repairs) without removing the drawers. It was logical to assume that the drawers were still pulled out and the guides were disassembled. And so it turned out...
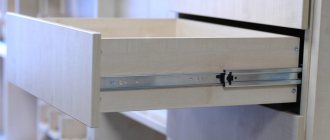
Ball guides consist of two separate halves, which are inserted into each other and secured with a special plastic latch. It is this latch that creates the illusion of inseparability.
In order to “unlock” the lock, you need to place your finger on the latch and, moving it down, pull out the inner part.
In order to remove a finished box mounted on ball guides, there is a little trick. The latch on the left rail moves down, and the right one moves up. After which the box can be easily removed from the body.
Installing such a box is even easier - first we combine one guide, then the second - push them into each other until it clicks. If resistance arises, then do not push with force - it is better to push it out all the way and try to push it in again.
Otherwise, you can bend the fastener with the elastic band, which will eventually fly off.
Source
We repair drawers with our own hands
In the modern furniture market you can find many types and designs of drawers. But what we are interested in now is not their appearance. No matter how high-quality the guides are and no matter how high-quality the assembly is, there are many cases when problems begin to arise over time. Most often this happens
- when the load is exceeded
- incorrect installation of guides
- exceeding the effective service life
- deformation of individual parts during operation
The problems cited relate to the mechanics used in modern furniture to pull out drawers. There are fewer problems with the box itself and its design. Let's look at them first.
Video “How to attach ball guides: installation instructions”
Nowadays, the most popular guide system is telescopic or, as they are also called, full extension ball guides.
This system has its advantages:
- reasonable cost;
- during the entire service life the movement remains quiet and smooth;
- wear resistance and strength;
- easy to install and operate.
Such a system of guides is often used as a component of kitchen sections, chest of drawers, and similar structures with a pull-out function, which helps to avoid problems during subsequent operation. This is why this one is so popular. Let's take a closer look at the installation process.
Problems with the drawer design
The most common problem is the bottom of the drawer. There are two types of drawer bottom fastening. We can safely say that 90 percent of manufacturers simplify production and make an overhead bottom that is attached to the bottom of the box. Attached along the perimeter to the sidewalls. This greatly simplifies the technology; the bottom becomes another load-bearing part, which also takes on the role of a part that forms the geometry of the box. What to do if there are problems with this type of bottom fastening.
Most often, the reason is insufficiently strong and well thought out fasteners. The bottom is attached with nails to the front and back, and it is held in place by guides on the sides. At first, this scheme works quite well, but over time the nails become loose and the bottom comes off, even if the box is not overloaded. The solution is to replace it.
Nails - forget them right away. Today only the lazy and downright stingy use them. For repairs, it is easiest and most effective to use furniture staples. A furniture stapler is very inexpensive, staples are even cheaper. If your drawer is not loaded to its maximum capacity, 8 mm staples will be enough for you. They are easier to work without getting used to, they are less deformed and go to a sufficient depth. But if you are ready to practice first and fix the bottom more confidently, take 10 mm long hardened staples. You can use hardened nickel plated ones - they are even stronger and do not rust. Afterwards the procedure is simple. We remove the old fasteners and “shoot” the bottom with staples around the perimeter. Under the guides too. They are easy to remove - they are secured with three screws on each side. In this case, you must not disturb the geometry of the box, so punch the sides sequentially.
You can use screws if you have problems getting a stapler and staples. You will need screws with a diameter of 3.5 mm. There are two generally accepted standards for the length of furniture screws of this diameter - 15 and 30 mm. In principle, 15 is enough. However, it may be that the box is made of low-quality chipboard, which is porous inside, so it is better to use 30 mm screws.
Both of the above methods are also suitable for replacing the bottom of a box - you will need to cut the material to the required size and secure it to the box box.
The second type of bottom fastening is a mortise bottom. Most often this is thin plywood, which is glued into the slots on the walls of the box. Such a bottom very rarely causes problems; in most cases they are caused by its destruction. If laminated fiberboard is used, you may encounter a situation where, due to plasticity, the glued zones simply tear out of the grooves. This “disease” can be treated a couple of times by re-coating the groove and gluing the bottom in place, but it’s still better to change it right away. This is not an easy procedure, but with some skills it can be done.
- the box needs to be disassembled;
- clean the grooves without disturbing their shape and thickness;
- order or cut a new bottom part of the required size;
- reassemble the box by gluing in a new bottom;
- give time for the glue to dry thoroughly. Do not load the box.
If the box is assembled using self-tapping screws or confirmations, this can be done easily. However, if tenon joints were used, it is better to turn to specialists for disassembly if you are not strong in carpentry. The same actions are performed when you need to replace the plywood bottom. If it is cracked, damaged, deformed or lost its appearance.
Repair tool
To repair a dresser drawer, you should not use nails, even though this is the cheapest material. In order to repair wooden boxes with your own hands, it is better to use furniture staples. You'll have to buy a furniture stapler. The tool and staples cost a little more than nails and a hammer. If the box is not subject to heavy loads, then 8 mm brackets will be sufficient for reliable fastening.
They are easy to work with. They are difficult to deform and enter to a sufficient depth. For more reliable and durable fixation, staples 10 mm long are used. To make the bottom as strong as possible, purchase hardened nickel-plated brackets. They have increased strength and do not corrode.
To replace the guides you will need screws with a diameter of 3.5 mm. There are two variations in the length of furniture screws for this diameter - 15 and 30 mm. To install the guides, in most cases, 15 mm screws will be sufficient, but if the chest of drawers is made of poor quality chipboards, then it is better to use 30 mm screws.
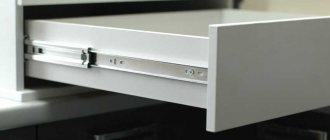
Roller guides and their “convenient” brothers – metaboxes
The advantage is simplicity, low cost, ease of installation, the design is such that the box closes under its own weight - the last few centimeters of closing are downhill. Thanks to this, such guides have become very widespread. The photo of the metabox clearly shows which part of the guide is intended for what. One is attached to the furniture wall (small parts in the photo, load-bearing), the second is attached to the drawer structure. In the case of a metabox, the second part of the set forms the entire side wall of the box. A box with roller guides installed looks like this
However, the main disadvantage of this type of guide is incomplete extension. The drawer can be safely pulled out to approximately 75% depth. Let's see what problems most often arise with such guides. Naturally, we will assume that everything was normal in the “freshly purchased” furniture.
Incorrect installation
This problem is usually diagnosed immediately, even before purchase. A box with a roller guide correctly installed according to the technical gaps moves smoothly, it has a fairly small horizontal play. It is easy to check - try to “sway” the almost closed box left and right by the handle. If there is more than three to five millimeters of play, the installation is incorrect. This may be caused by errors in the dimensions of parts during design, or it may be a technological error in the guide itself. It is no secret that in the modern furniture market there is a sea of small firms that save on literally everything. And cheap guides have questionable gap thickness.
Over time, this problem may arise due to deformation of the structure. A heavily loaded furniture box will become deformed if it is made from a slab of improper thickness. Again, the manufacturer saved and used the material without thinking about the safety factor.
Problems caused by changes in technical clearance are difficult to cope with. Here you already need to intervene in the design, this can be done in 90% of cases and is not very difficult, but this is another rather voluminous topic.
If the drawer does not close on its own when pushed in under its own weight, this is an incorrect installation of the supporting part of the guide. Most often it is not installed horizontally. There is no need to touch the front part during this repair - we don’t want to mess with the appearance of the drawer gables. We unscrew the fasteners - except for one point near the very front roller, align them, and screw them into place. We do this with part of the guide, which is located on the furniture wall.
Excess load
This problem is not as rare as it might seem. The reasons can be either banal, like “the manufacturer saved money” or “well, they put a lot of stuff in,” or non-standard - children simply love to climb the handles of dresser drawers as if on a ladder or use them as a support to climb higher. And since the last thing people save on now is the handles, the guide suffers.
The problem can be solved in two ways. The main symptom is that the front wheel of the supporting part of the guide, the one on the furniture wall, “twists” - the plane ceases to be vertical, the metal in the mounting area is deformed and the wheel begins to catch on the second guide. You can return the wheel to its original position. There is no need to hit with a hammer, the roller can simply be split, but with the help of a vice, holding the bushing, you can return the part to its original position.
However, more often this problem is caused by the manufacturer. There are two main applied standards for metal thickness for such guides - 0.5 and 1 mm. The manufacturer could simply save money. Replacing the guides with thicker ones is not a problem - all fastener locations match. Simply remove the old ones and replace them with new ones.
The older brothers of the roller guide – metaboxes – have the same “diseases”. If it seems to you that this will not help, replace the roller guides with telescopic ones. This is quite easy to do. Below we will talk about roller guides.
Exceeding the effective service life
There's nothing you can do about it. The rollers are plastic and will simply wear out over time. Backlash appears, drawers no longer open so confidently. There is only one way out - replace it. You can, of course, use silicone lubricants for a while, but this will not solve the problem.
Deformation of individual parts
This can happen if the guides are installed carelessly. There are not enough attachment points on the load-bearing part of a furniture wall, for example. Then the guide bends, the connections become loose, this can be detected almost immediately. To avoid such a problem out of the blue, ask the seller to pull out the drawer and make sure that the guides are attached at all points provided for by the design.
The same problem can occur if the load is exceeded. In this case, the lack of proper rigid fastening will only aggravate the situation. It is easy to “treat” – most often it is enough for the parts to be returned to their original shape and secured properly.
Video on installing telescopic guides
Cabinet or modular furniture is often equipped with drawers, which are designed to store various small items. They can have different sizes, but their main feature is that they can easily be pulled out and pushed back in if necessary. For this purpose, furniture guides are used, which can be presented in several types. They differ in the installation method and operating principle. Their main task is to ensure smooth and quiet use of the drawers. At the same time, they must be reliable to guarantee long service life and ease of use of the furniture.
When choosing furniture guides, you need to pay attention to various factors. The most important parameter is the type of design, according to which they can be roller or ball, and also be equipped with a closer and have a reverse action. Each option has both advantages and disadvantages, so to make the right choice you should study the characteristics of each type.
Roller
The choice of these furniture guides is considered the most popular. They appeared on the market more than 15 years ago, and quickly became in demand among furniture manufacturers and ordinary users.
Roller guides for drawers have many advantages:
- Do not require the use of lubricating pastes and other compounds;
- Ensure smooth movement of boxes;
- They are easy to install, since there is no need to drill numerous holes for fasteners.
Such furniture guides are installed on both sides of the recess allocated for the drawer. Slight deviations in furniture and drawer dimensions are allowed. Even if small errors were initially made in the installation, the design can be adjusted. The length of the roller guides can vary from 200 mm to 600 mm.
Ball
Ball guides are considered quite popular due to their smooth running and ability to withstand significant loads. In addition, they are in an affordable price range. Such telescopic guides can be equipped with closers or produced without them.
They consist of two elements, one is attached to the drawer, and the other is attached to the side wall of the furniture. To disconnect them, you need to press a special lock.
There are many models of ball furniture guides that differ in height, which can vary from 17 to 45 mm. Additionally, they differ in the degree of extension. The most popular designs are those whose height reaches 45 mm. They can withstand a load of up to 36 kg, so even large and heavy items can be stored in the drawers.
With door closer
Guides for drawers with closers are considered interesting. They are similar in design to the previous version, the only difference is that these elements are equipped with a closer and dampers. Due to the former, the drawer is picked up in a certain position, after which it smoothly closes independently, without any effort on the part of the person.
The damper ensures that the drawer closes smoothly and silently. Additionally, it acts as a shock absorber, so that even if significant force is applied to close the drawer, strong impacts and noise are prevented.
Designs with a closer are considered reliable and comfortable to use. They can withstand significant loads, which is why they are popular among furniture manufacturers.
Full extension
Full extension slides are popular modern designs. They are based on a special ball bearing. This system ensures complete and smooth opening of any drawer. To use such a retraction system you will have to make some effort.
Guides that ensure full drawer extension are available on the market in numerous models; the choice depends on the planned load. The installation of such fittings should be carried out with extreme caution, since careless handling can cause damage to the integrity of various parts.
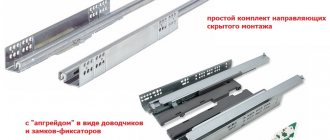
Hidden mounting
Installation of guides of this type is considered the most difficult and time-consuming. But this fittings are becoming more and more in demand, as they are convenient to use. The design is equipped with a closer and a reverse action system.
The undeniable advantage of these furniture elements is that they are installed under the bottom of each drawer, so you get the feeling that the object is floating in the air. Other advantages include good reliability of the products, and the movement of the box is smooth and free of extraneous unpleasant sounds. The drawer closes softly and quietly.
Initially, such fittings were installed only on solid wood products, but today they are equipped with structures made of chipboard and MDF. Depending on the model, such guides can withstand loads of up to 50 kg.
Reverse action
Such guides are similar in principle to fittings equipped with closers. The only difference is that the drawer opens by lightly pressing the front with your hand.
A significant advantage of this design is that it is not equipped with any handles or recesses for control. It has an attractive appearance and also allows you to integrate the box into any part of the structure. Often used in the production of furniture in modern styles, where it is important that the glossy surface is not disturbed by any fittings.
It is better not to use reverse action guides for children's furniture. They cause the drawer to pull out abruptly and can injure the child. In addition, pushing such a box will require significant effort.
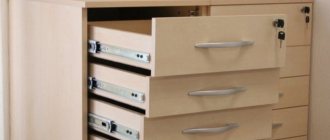
Tandemboxes and metaboxes
Such fittings appeared on the market relatively recently, but quickly became in demand. Design features include:
- The guide is located directly inside the metal side wall;
- Equipped with a closer;
- Dampers are definitely used.
An important advantage of such fittings is the ability to withstand really significant loads. This is especially true in relation to products in which the guides are installed in a hidden manner.
Another advantage of such elements is their interesting design; they fit well into furniture made in various styles and sizes. Due to excellent performance characteristics, the products are easy to use and have a long service life. In order for the installation to be carried out correctly, it is necessary to use special marking devices. They help to accurately determine the location of the guides and avoid distortions.
I would especially like to mention Bloom's guides. They combine many advantages inherent in various types of furniture fittings. Due to the complexity of the design and ease of use, the cost of such products is considered quite high. Therefore, tandem boxes are usually used in luxury interior items made from natural wood or other similar expensive materials.
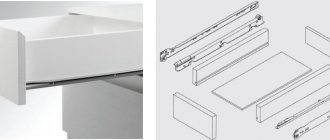
Ball guides
The second type of guides is ball guides. Or the “telescope” type. And their older brothers are “tandemboxes”. They are more expensive, but free from all the diseases of roller skates. Therefore, they are often used by those manufacturers who value quality over savings. They look like this
The ball guide can withstand many times the mass. In a roller there are two points of support - rollers on the supporting part and part of the box. In a ball bearing, there is a whole block (middle) on which small balls are located according to the principle of a rolling bearing. Plus, the thickness of the metal from which the guide parts are made is much higher. Three more most noticeable advantages are that such guides are almost impossible to install incorrectly; they allow you to pull out the drawer to its full depth and make it possible to firmly fix the drawer when closed. In addition, ball guides can be installed at any height according to the structure.
Source
DIY process of repairing a chest of drawers
Damaged furniture must be repaired as soon as possible. Further exploitation will lead to even greater destruction. Detachment of furniture veneer often occurs. The coating gives the headset a pleasant appearance. The furniture does not crumble or deform. Often, due to high humidity in the room, the top layer of the chest of drawers becomes covered with cracks and swellings. The material then peels off.
In this case, you need to repair the chest of drawers as quickly as possible, before the inner layers of wood begin to warp. The first step is to iron the peeled veneer through a sheet of paper.
If such a measure does not produce a visible result, then a small cut will have to be made along the wood fibers. After this, lift the edge of the veneer and coat both sides of the cut with glue. Any adhesive that has leaked through the edge is immediately wiped off with a sponge. It is recommended to treat the seam with stain. The final stage will be coating the cut with colorless varnish.
Replacing guides
In most cases, furniture drawers and drawers are equipped with roller guides. They have only two support points (rollers) located on the supporting part of the structure. For this reason, the guides are not very reliable and often fail.
It is best to replace such fittings with ball elements. Their design includes a solid middle block on which small balls are located. These guides are almost impossible to install incorrectly. They allow the drawer to be fully extended and firmly locked in the closed position.
To change the slides, you first need to take out the drawer and remove the old hardware. Such fasteners are fixed with 2-3 screws.
Important: the ball guides must be positioned parallel to each other. This is the most difficult and most important aspect of the installation.
To do everything right, first make markings on the frame of the chest of drawers and on the drawers. Using a building level, make sure that the fasteners are positioned strictly horizontally. Having aligned the guides, secure them with 15 mm screws.
Repair of the frame itself
Repairing drawers is easy. To restore the bottom, you will have to remove the old fastening. After this, the bottom is shot with staples around the perimeter. The fasteners must touch the side walls. It is necessary to ensure that the geometry of the structure is not violated. Therefore, the sides of the box are shot with staples sequentially.