Often, an ottoman is considered something unnecessary in the interior and something that can be done without. But its role, which is often underestimated, is quite significant, as it gives the room a finished look.
But you don’t necessarily need to go to the store to make such a purchase. An ottoman of any design can be made with your own hands, applying very little effort and spending a little time.
In addition, the financial costs of making such an element with your own hands will be quite insignificant.
Available materials for making ottomans
To spend a minimum of money to make an ottoman, you can use improvised materials that are practically not needed for anything else on the farm.
For this use:
- Plastic bottles.
- Tire from a wheel.
- Washing machine drum.
- Old boxes.
All of the above materials will help you realize the most daring ideas on how to make an ottoman at home from scrap materials.
Instructions for making an ottoman from plastic bottles
So, for example, you can use the following instructions, which will tell you how to make an ottoman, describing everything you need step by step.
You need to take about 40 plastic bottles and cover them in the middle with masking tape in a circle. Then cut the bottle into two parts in the middle of the tape.
Insert one part inside the other with the neck.
Then take the second bottle and insert it inside, folded in half. In order to hold the structure together, glue the joint together with ordinary transparent tape.
Repeat this way with all bottles. The result is a reinforced rigid structure made from plastic bottles connected together.
Next, you need to combine bottles of 3 to make a round ottoman or 4 for a square or rectangular product.
Next, the individual sections are combined into the desired shape. And around the perimeter they are sealed several times with tape. It is advisable to fasten along the top, bottom and middle of the finished structure.After this, measure all the side parts of the ottoman, as well as the top and bottom base. Using the measurements taken, sew a pattern from a suitable material, not forgetting to leave seam allowances. Sew the cover by sewing a zipper on top on three sides. This way the cover can be removed and cleaned.
After this, insert the bottles into the case.
In order for the ottoman to sit softly, it is necessary to place a suitable sized base cut from a sheet of chipboard on top of the bottles. It will provide rigidity.
Place a thin layer of foam rubber on a sheet of chipboard, which will give the desired softness.
After this, close the zipper of the cover - the ottoman is ready.
Making a round case
To make a round case you need:
- main fabric;
- fabric for pockets in a contrasting shade;
- threads;
- scissors;
- rubber.
First you need to measure the height and circumference of the product. After taking the necessary measurements, you need to start cutting. Next, you need to cut out the resulting parts and attach them to the pouf, check that everything matches. Don’t forget to add 2 centimeters to the allowance before cutting, they will be needed for the seams.
Let's move on to the pattern of pockets. You can choose any size. The larger it is, the more things you can subsequently fit there. Choose the number of pockets at your discretion. You can make one large one or several small ones - it all depends on your desire.
Now we need to cut out the rectangles. They should have the same shape. The upper part of the pocket must be folded over 2 centimeters and stitched. This is done so that you can insert an elastic band there. Then we insert the elastic band and tighten it. The pocket should shrink a little. Then the elastic needs to be sewn around the edges. The resulting pockets with elastic bands must be sewn to the longest part of the product, which is its side section.
Once you have sewn the pockets, you can begin sewing the side part. Then we proceed to the top of the case with the side part. We go over the seams with an iron and try on the cover for the ottoman. Work is done.
Options for covering an ottoman
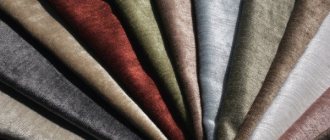
The ottoman can be covered with various materials:
- Dermantin.
- Fabric imitating plush.
- Rogozhey.
- Twine.
Here's how to beautifully cover an ottoman with your own hands.
If this is an ottoman for the corridor, then it is better to use fabrics that are easy to clean with a damp cloth on top without resorting to washing.
If the ottoman uses a tire or a solid wooden frame as a base, then string can be glued on top of them around the entire perimeter, in a spiral. To do this, you need to attach it to hot glue. What a very interesting product.If this is an ottoman for a children's room, then it can be additionally decorated with pockets, ribbons and flaps, which will allow you to store all sorts of children's little things in them.
Stage two: cut the foam rubber
It is necessary to cut out parts from foam rubber that correspond to the size and shape of the bench cover. The foam part may be slightly larger in size than the wooden lid of the banquette, but it cannot be made smaller, because sitting on the furniture will not be entirely comfortable due to the uncovered hard edge.
You need to do the following:
- measure the wooden lid of the banquette;
- mark the foam rubber with a marker or felt-tip pen in accordance with the size of the lid;
- cut out parts from foam rubber along the marking lines.
Cutting foam rubber is not as simple a task as it seems at first glance. The material must be held, and the blade of the breadboard knife must be positioned strictly perpendicular. Of course, the length of the blade must match the thickness of the sheet of foam used. Heating the knife blade facilitates the process of cutting foam rubber, but at the same time causes melting of the material. Therefore, it is not worth making the cutting process easier by heating the blade.
Why French children behave well: eight ways to raise them
The money tree pleases with lush flowering: my secret is in caring for the leaves
Women's jeans: before you buy them, you need to pay attention to one detail
Ottoman in the form of a bean bag
The bean bag chair is currently a fashionable element of the interior. It can be used both in the living room and in the children's room.
If it is lined with waterproof fabrics, then it can also be used in garden conditions, when designing a landscape park.
In order to understand how to properly sew a bean bag ottoman with your own hands, you must first choose the correct size pattern.
Then, you need to stuff it tightly enough. To do this, you can use either special purchased polystyrene foam balls, or use finely chopped old rags.
You need to stuff it tightly enough so that the product holds its shape. Since it is manufactured using frameless technology.
Stage four: sew the cover
At this stage of work, all the cut out parts need to be combined into a single whole. Despite the simplicity of the product, preliminary marking should not be neglected. This will allow you to try on the cover, which is necessary to make sure that the product is not too big or too small. If there are mistakes, it is much easier to correct them by removing the basting rather than by unraveling machine seams.
It’s more convenient to start working by making a hem.
You need to do the following:
- fold the fabric once, from the front side to the wrong side;
- iron the hem with an iron, fixing it; if heat treatment is not possible, you need to sweep it;
- bend the material again, so that the cut line is under the fabric, inside;
- fix the hem using ironing or basting;
- attach the strips to the end of the foam cushion to make sure that the remaining width of the fabric is enough to connect to the main parts of the cover;
- Sew the hems using a machine and remove the basting.
The rest of your sewing will be much easier.
You need to do the following:
- baste the ends of the strips to each other;
- narrow stripes should be folded towards each other, the top strip should overlap the bottom;
- baste the connected strips to the main parts of the cover;
- try on a pillow cover;
- sew seams;
- remove the mark;
- overlock the seams.
If you don’t have an overlocker, you can use embroidery or zigzag stitches.
Other options for ottomans
Also, the best options for ottomans that you can make with your own hands include products with legs. Their legs are made in the form of a cross, to which a seating plane is attached on top. A layer of foam rubber is laid on top of it and, using a furniture stapler, it is covered with selected fabric.
It is also very convenient to have an ottoman with a storage container inside. To do this, the upper part of the seat is made folding, that is, in fact, it is the cover of the product.
But in order to make such a product, you will definitely need to make a diagram and a drawing, from which you can figure out how to make such an ottoman with a lid.
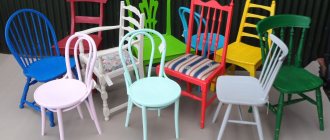
All the options presented above for making ottomans at home are not the only possible ones. In order to understand how diverse they are, just look at photos of handmade ottomans on the Internet.
Stage one: dismantling the old seat
You need to start work by removing the old pillow that has become unusable from the bench. The list of actions and tools required for dismantling directly depend on how the seat is attached to the furniture. For example, if you use upholstery nails, you will need a nail puller, and if you use staples, you will need regular pliers.
As a rule, foam rubber is glued to the surface of the bench cover. It is extremely important to get rid of it completely. The wooden surface must be cleaned of old glue and foam rubber; if necessary, it can be treated with coarse sandpaper or sanded using a machine.
Photos of do-it-yourself ottomans
Please repost
1+