Regardless of the size of the apartment, you always need a place to compactly store a huge amount of things - clothes, shoes, linen, books and many other necessary (and not so necessary) things. And such a place is a closet.
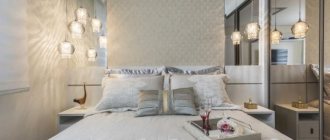
The ideal option is a coupe - it saves space in the absence of swinging doors, it is spacious, and the design can decorate any room. Mirrors will visually enlarge the space, MDF inserts will make the interior unique, and soft triplex with a pattern of your choice will turn your furniture into a work of art.
DIY sliding wardrobe for the hallway
Which wardrobe should you choose? The answer is simple. If you have settled in your home seriously and for a long time, if you do not like rearrangements, if there is a free niche that you definitely want to use, then you need a built-in one. But if moving is still possible and you, due to your character, have a hard time parting with your favorite and comfortable things, then your choice is an ordinary cabinet made according to your individual project.
Furniture, in the construction and design of which everything is thought out by you and for you, is more than a piece of furniture: it is your creation, your pride, a way to express your individuality.
You can, of course, just go to the store and buy an option that more or less suits you in color, filling, size and price. One of tens of thousands produced on the conveyors of furniture factories. You can order production according to an individual project in one of the many showrooms. Or you can do it yourself, putting a piece of your soul into a thing that will be before your eyes every day. In one piece of furniture, realize yourself as a designer, constructor, sawmaker, assembler. And let some of your friends not like your creation. This is YOUR work and no one has the right to criticize it.
Step. 1. Decide on the type - built-in or cabinet-mounted.
Built-in
Built-in corner wardrobe
Advantages
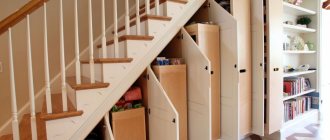
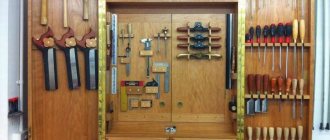
- Mounted in niches and closets, it saves space significantly. Here you can compactly store a variety of things - from jars of jam and tools to items of daily use.
- Thanks to the design of sliding doors, the niche disappears, the angularity of the room disappears, and in its place a unique interior detail appears.
- There is no empty space between it and the wall - a place where dust constantly collects.
- It’s easier to make a built-in wardrobe – there are fewer parts, since the shelves are attached to the walls.
- Sockets and switches can easily be placed inside it.
Flaws
- The built-in one is absolutely non-transportable, and even if you decide to disassemble and transport it to another room, converting it to new dimensions will take a lot of time, effort and nerves.
- It does not have a back wall and you will need to prepare the niche before installation.
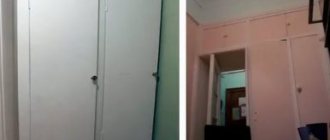
You can make a built-in wardrobe without having a niche with two main walls. It can be partially “built-in”. Its design may include a sidewall or a roof.
Hull
Double door wardrobe
Advantages
- Can be installed in any convenient place in the room or hallway.
- Can be used as a partition in a room to zone a room.
- No additional wall preparation is required. On the contrary, a closet can be used to cover up wall imperfections.
Flaws
- “Excess”, unused spaces: between the ceiling and the roof, between the side wall and the wall.
Space for a dressing room
To make using a room more convenient, you must first determine a more suitable location for it. If it will be used by the whole family, then it is better to place it where it will be accessible to everyone. But most often such a room is located near the bedroom. When creating a dressing room, it is advisable to place it in such a place that access to it does not take place through open spaces accessible to guests.
Step. 3. Choice of material.
Main material
- The most common is laminated chipboard (LDSP). This is a very practical material. It is easy to process and affordable. The variety of colors provides ample opportunities for design solutions. Laminated chipboard is manufactured industrially. The sheets have different sizes and thicknesses. For production, slabs with a thickness of 16 mm are used, and for inserts in doors - 10 mm thick.
- 3.2mm thick fibreboard (fibreboard) is suitable for the back wall;
- MDF is beautiful, durable, more environmentally friendly, used for making furniture in rooms with high humidity, but a much more expensive material;
- Wood is the most environmentally friendly of materials, but, unfortunately, it is poorly suited for the manufacture of wardrobes.
- Due to its fragility, drywall is generally not recommended for furniture making.
Sliding door system. Currently there is a fairly large selection of different systems on the market:
- aluminum;
- steel;
- hanging;
- frameless, etc.
Each of them has its own advantages and disadvantages. For example, in aluminum systems, convenient vertical handle profiles are ideal for hallways and children's rooms. Steel systems are distinguished by their elegance, which is especially important in the bedroom. Hanging systems will fit perfectly into the interior, where they should be invisible.
Design
Before you make shelves in your dressing room with your own hands, you should think about their location. Structures are built not only in the shape of a rectangle. It is more rational to fill the corner space with round structures. This allows you to place things without adding depth to the shelves in the closet, makes it easier to access clothes and increases free space.
Shelves can be made stationary or retractable. This solution is convenient for the lower part of the dressing room. You can store both large items and various small items in them. They should be carefully placed over the entire surface. When the structure is pulled out, things will again appear in the same arrangement. This shelf successfully replaces baskets and drawers, which are represented by more expensive options.
For greater practicality, retractable structures are made with shallow cells, which increases ease of use. It is worth remembering that the arrangement of shelves in the dressing room should be convenient for the apartment owner. If the standard options are not suitable, they should be changed.
Built-in wardrobe
The most convenient way is to make preliminary markings directly on the walls of the niche with a pencil. This will make it possible to avoid errors in the dimensions of parts.
For example:
- top shelf = width of the niche x depth of the internal filling (that is, the depth of the cabinet minus the door);
- stand = niche height – top shelf height – material thickness;
- shelves on the right = (niche width/2 – 5-10 cm) x depth;
- shelves on the left = (width of the niche - shelves on the right - thickness of the material) x depth.
Additionally you may need
| Side stands: | strip 3 = niche height x 7 cm, strip 4 = niche height x 10 cm. |
| Base: | strip 1 = (niche width) x 7 cm – 2 parts, strip 2 = (niche width – one or two side posts) x 10 cm – 1 part |
Additional parts are needed if it is not possible to level the side walls and floor. The rectangle in which the sliding doors will be mounted must be perfect. This can be achieved by installing a box for them in whole or in part. If the walls are uneven, gaps between the walls will be visible, and if the floor or ceiling is uneven, the door may even jam or jump out of the grooves, not to mention opening and closing spontaneously - it will slide down the slope under its own weight.
Cabinet wardrobe
Decide:
- how will you attach the back wall made of fiberboard if it is located in a niche, from wall to wall, and if there is no answer, then you should consider the option with a built-in wardrobe where there is no back wall;
- whether your cabinet will rest on legs or on sides;
- what type of sliding door system you will use.
Carefully read the instructions for this type of door, paying special attention to the maximum and minimum permissible dimensions. The durability and reliability of the system itself depends on this.
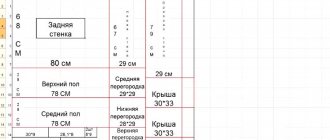
Direct drawing. Armed with a ruler, a pencil and an eraser, proceed to the most important part of the work.
Let's consider the option with support on the sidewalls.
Main material parts:
- roof = cabinet length x depth;
- support = (cabinet depth – thickness of material for the plinth – 20 mm – width of the plinth) x height of the plinth;
- back wall (fibreboard) = (cabinet height – base – 2-4 mm) x (cabinet length – 2-4 mm);
- sides = (cabinet height – material thickness) x depth;
- bottom = (roof width – two material thicknesses) x depth;
- base = cabinet length - two thicknesses of material) x 70-100 mm;
- rack = (cabinet height - base - 2 material thicknesses) x (cabinet depth - doors);
- shelves = (cabinet width – 3 thicknesses of material – width of the adjacent niche) x (cabinet depth – doors).
Here it is worth paying attention to the fact that the doors of the wardrobe are wider than 1/2 of the internal width, there is an “overlap” of the doors, and if you plan baskets or drawers, they simply will not move out of the closet, that is, the size of the niche with shelves under the baskets should be less than half.
Attention! Do not leave the roof unsupported by a support; it may sag.
Basic rules for planning a dressing room
To use the room more efficiently, you should heed the following tips:
- occupy all the space;
- when placing men's and women's items, they must be stored separately;
- outerwear should be hung closer to the exit;
- if you arrange all things by color, then searching for them will be simplified;
- It is better to make shelves for shoes in the dressing room inclined;
- when changing clothes in another room, you should purchase special cabinets that can be easily moved from one room to another;
- the use of glass walls allows you to see all things and therefore quickly find what you need;
- for convenience, it is better to install an ottoman in the room and hang a mirror on the wall;
- Pantograph elevators will make it easier to take things.
Step. 9. Detail
Table of parts for making a cabinet
Based on the finished drawing, make a list of parts indicating their dimensions (specification).
Mark the parts whose ends need to be covered with a decorative edge and, taking into account the thickness of the edge, adjust the dimensions of the parts.
Mark the parts where you need to make “cuts”, for example, under the baseboard on the sidewalls.
How to choose room filling elements
Before creating a room for a wardrobe, you need to draw up a plan in advance, which outlines the placement of cabinets and shelves. This will make the room more comfortable. It is worth paying attention to the various retractable structures. You also need to install:
- drawers with compartments for storing ties,
- shelves for shirts,
- containers for things
- mesh shelves for dressing room.
To reduce space, you can use a pull-out table with a mirror. To make more efficient use of space, many use rotating columns with round shelves, as well as drawers on wheels. Metal shelves for the dressing room are often purchased, which are a cheaper option than specialized cabinets.
Photo ideas for using built-in and cabinet wardrobes in different rooms:
PreviousSliding wardrobes Measure seven times or How to calculate a sliding wardrobe?
Next
Sliding wardrobesCorner built-in wardrobe in the interior
Dimensions of shelves in the dressing room
When creating wardrobe shelves with your own hands, you carefully calculate the parameters of each module. The normal height for the average level is 160 cm. This is the length of a standard dress. The upper part of the wardrobe structure should be at a distance of 7-10 cm from the ceiling. The size of the middle tier is subtracted from the height of the entire structure and the characteristics of the lower part are obtained. The depth of the middle segment is not made less than 50 cm. This is due to the standard dimensions of the hangers (45 cm).
When calculating the width of each module, it is necessary to take into account that a separate section for hangers, clothes and linen will be made for all family members. The standard width of the internal shelves is 40 cm. Mezzanines and sections with hangers are created with a standard width of 80 cm. The lower tier can be made in any size. For example, a pair of men's shoes is 25 cm wide.
Location options
If you decide to build a compartment with your own hands, you should choose the location of the shelves and how to fix them. There are two main options:
- On different axes. This option is considered simpler. In this case, it is important to select the appropriate fastener to be used, and also to ensure that the planes remain parallel to each other.
- On one axis. To implement this method, you may encounter a number of difficulties. It is important to achieve a strong union of elements located in the same plane, provided there is a partition separating them.
Be sure to take into account the functional features of the design. Take into account the purposes for which you will use the cabinet, as well as the loads that will be placed on the shelves every day. Only then will you be able to do quality work.
It is equally important to choose the screed method. Today there are several types:
- screw involves the use of a screw and a barrel. The disadvantage of this option is the complexity of implementation;
- a conical tie is usually used to join thick elements;
- corner - the most common option, which involves the use of furniture corners. This fittings are sold in almost every furniture store or specialized department. Such elements are inexpensive and quite easy to handle;
- the dowel will give the design additional rigidity;
- Euroscrew is a simple method of fastening, which, as a rule, does not cause difficulties;
- eccentric screeds are increasingly used by modern furniture manufacturers. It is durable and unnoticeable.
Once you have chosen the method of attaching the shelves in the closet, you can proceed with the actual installation.
Making a shelf with your own hands
Having determined the number and dimensions of the shelves, we proceed to their manufacture. To do this, we will prepare tools and materials:
- MDF or chipboard sheets;
- jigsaw;
- metal ruler and square;
- pencil or marker;
- stationery knife;
- mallet or rubber mallet;
- end tape;
- iron.
Apply the required dimensions to the slab with a pencil using a ruler and square. Using a jigsaw, we cut the chipboard into pieces along the marking line. At the ends, we smooth the edge tape through a sheet of paper with a hot iron. The shelves are ready for installation. If it is possible to make cuts with a band saw or circular saw, this will allow you to obtain better ends of the slabs.
Functional significance of a plasterboard niche in the wall
You can make built-in niches in the wall with your own hands and realize your most original ideas. It is worth noting that it is with the help of a niche that you can completely change the geometry of the space of the room by forming such an element on a regular non-plasterboard wall. Quite often, niches are created solely for the purpose of decorating a room to make it more dynamic and modern.
As for the functional load, niches can be installed for:
- TV;
- Book storage;
- Formation of a built-in cabinet;
- Aquarium installations;
- Curtain cornices;
- Decor.
Through fasteners (with drilling) for confirmations
Confirmats are the most common through fasteners for shelves. To install, you will need to drill a hole in the end of the shelf with a diameter of 5 mm and on the front side of the side of the cabinet with a drill with a diameter of 8 mm. It is better to use a special confirmation drill. Since a countersink is still required for the head, the screw itself is flush with the surface of the sidewall. Next, the cap is hidden with a special self-adhesive plug, matched to the color of the chipboard.
A nuance: depending on the thickness of the sidewalls, the length of the confirmat is selected. For standard chipboard and MDF thicknesses of 16-18 mm, a 5x50 euroscrew is used; for thicker board materials, a longer one is used, up to 70 mm.
- Among the advantages of attaching shelves to confirmations, it is worth highlighting the ease of assembly and the low cost of the fasteners themselves.
- The downside is the need to drill through. Not everyone likes the “holey” sides of the cabinet from an aesthetic point of view. Although the self-adhesive plugs are color-matched, they are still visible. Also furniture assembled through repeated assembly and disassembly.
An example of installing a shelf on rastexes (minifixes)
- On the sides of the cabinet, use a pencil, ruler and level to mark the position of the shelf.
- Mark two points on each side. We drill them to the depth of the plastic dowel.
- We substitute the shelf and, on the bottom side, mark where the surface aligns with the holes in the cabinet walls.
- We hammer in the dowels and screw the rods into them.
- Using a milling cutter, we cut out recesses in the shelf into which we insert rotary bushings.
- We drill channels for the rods.
- We install the slab by inserting screw rods into the channels.
- Using a screwdriver, turn the bushings clockwise until the connection is completely secured.
Shelf levels
There are only 3 zones in the dressing room:
The first should not be higher than 80 cm, the second is usually in the range from 60 to 190 cm. The upper zone must be located at a height of more than 1.9 m. This allows you to most effectively divide the space. Rarely used items are located on the shelves in the lower zone. This is where the drawers with linen are located. Also on this level there are shelves for storing shoes. The height of such a compartment in the dressing room should be more than 45 centimeters. This allows you to avoid twisting the tops of women's boots.
Before arranging the shelves, you need to make a list of rarely used items and place them at the bottom. At the same time, you should not fill all the shelves just because they are intended for something; you should create a dressing room only based on your needs.
The middle zone is intended for frequently used items and consists of rods with hangers, as well as shelves and drawers. Usually. Hangers with clothes are in the middle, and shelves are in the corners. This makes it easier to use all items. It is worth calculating the height of the rods in advance. Usually it is a maximum of 1.9 to the lower zone. If desired, you can install elevators, the cost of which is quite high.
When creating a dressing room, it is worth remembering that drawers should be located no higher than eye level. Otherwise, viewing all things will be problematic. It is worth paying attention to the space between the shelves. All things located in the dressing room must be well ventilated, which will prevent moths from appearing. The upper zone is intended for hats and things that are used somewhat less frequently than those in the middle.
When creating cabinets, it is enough to observe the approximate height of the shelves in the dressing room and the depth of each of them; their number and appearance depend only on the preferences of the owner.
Varieties of arrangement and fastening of shelves
Immediately after the shelf is cut, the question arises - how to attach it? The presence of vertical bulkheads gives two possible mounting options:
- along different axes - it is important to maintain parallelism;
- along one axis - the key point will be to create a reliable fastening between the shelves.
The first method is the simplest compared to the second.
Application of furniture corners
The corner used in furniture production is a very common and convenient accessory. The material used to make the corners is plastic or wood. Installation is so simple that it does not require special skills. Each corner is fixed with a self-tapping screw at two points - directly on the shelf structure and on the vertical wall. This type of fastening is not popular among professionals today. A significant drawback is the protruding parts of the fastening.
Screw tie
As a type of fastening, a screw tie consists of a screw and a corresponding barrel. The screw, screwed into the hole of the barrel, provides reliable fastening between the shelf and the side wall.
The barrel is installed in a pre-drilled hole. Here you should calculate how much you need to move the hole away from the edge, so that later the screw stroke is enough for a reliable connection. The difficulty of this fastening lies in the alignment of the barrel hole with the mating part of the screw, especially for non-professionals.
ATTENTION! The disadvantages of this connection include the visible part of the screw head on the outside of the vertical wall of the cabinet. But this can be smoothed out somewhat by using furniture plugs.
Using a dowel
A dowel is a type of fastening made of wood. In order to make it, you need to insert wooden cylindrical blanks of small diameter into the hole of the shelf, deepening it approximately halfway. The second part of the dowel fits into holes corresponding in diameter, depth and location, drilled in the side wall of the cabinet.
Euroscrews used
Euroscrews are used in budget class furniture. Using this type of connection, you can easily fasten elements together, but as a result, numerous holes with recessed screw heads are formed on the outer surface of the wall. They are also covered with plugs, which still affects aesthetics. The use of this type of fastening is advisable only where there will subsequently be no need to redesign the interior of the cabinet.
Conical coupler
This type of fastening is suitable for thick elements ranging from 25 mm to 38 mm. To use it, screw a barrel-shaped body into a cut chipboard. Next, the screw is installed into the side wall from the inside and the conical part is placed into the corresponding hole in the barrel, where it is then fixed with a rod.
ATTENTION! The disadvantage of this design is that the shelf installed on such a connection is not able to bear a large load. The conical part of the screw may simply not withstand it. But the advantages include the fact that the front side of the side surface remains untouched.
Eccentric coupler
The eccentric clamp is currently the most popular in furniture production. Its popularity is due to the fact that this type of connection is practically invisible (both from the inside and outside), provides sufficient strength and is reliable during operation. The eccentric fastening consists of three parts: a stand, an eccentric and a fitting.
Incoming parts may differ slightly, as a rule, in geometric parameters, which allows, if necessary, to ensure a certain load on the shelf and the reliability of the service of the entire structure. So the stand can be made either in the form of a self-tapping screw or in the form of a screw. But the variable length of the eccentric allows you to achieve the necessary strength and withstand load.
The complexity of installation is caused by the need for precise fitting of parts. A coupling is installed in one panel, into which an eccentric is screwed, fixed on the other panel. When the eccentric hits the head of the rod as it rotates, it creates a tightening connection.
Photo
A few more photos where you can evaluate the result:
Sources
- https://samodel.guru/mebel/sdelat/shkaf/kupe/vstroennyj-v-prihozhuyu.html
- https://sdelaisam.mirtesen.ru/blog/43279964175/Delayem-shkaf-kupe-samostoyatelno-ot-proekta-do-sborki-svoimi-ru
- https://remboo.ru/dizajn/mebel/shkaf-kupe-v-prihozhey.html
- https://oboiman.ru/inside/skaf-kupe-v-prihozuu-svoimi-rukami-36-foto-kak-sdelat-certezi-izgotovlenie.html
- https://dekoriko.ru/shkaf-kupe/v-prihozhuyu-svoimi-rukami/
- https://prihozhaya.guru/shkaf/kupe-svoimi-rukami
- https://remont-spalni.ru/mebel/shkaf-kupe-svoimi-rukami.html
[collapse]
Why are partitions needed?
A wardrobe up to 6m long can be ordered without partitions, since the guides are made to that length. Even if you want it, then with such a length there will be many doors in the closet, and behind them there will be a space without partitions. It's not aesthetically pleasing. It is impossible to create a wardrobe of this type in an ordinary apartment, due to the fact that with a six-meter guide you will not be able to turn around either on the landing or in the apartment. Therefore, the cabinet, or rather the guide, must be divided into 2 parts. A vertical partition appears at their junction.
Device project
First of all, experts recommend making a furniture design and choosing a convenient location. Everyone must independently choose a suitable location, taking into account the area of available space. A built-in wardrobe can easily fit in a closet, in a niche, or even in the corner of a room.
The size also depends on the parameters of the room, if, for example, the ceiling reaches a height of 2.5 meters, then the recommended height is 155 cm, and the depth should be no more than 60 cm, so that it is convenient to both fold and remove things.
Having decided on the appropriate dimensions, you should draw up a design drawing, or familiarize yourself with the finished diagram on the Internet. Having a correctly drawn up drawing at hand will make it much easier to assess the scale of the work and purchase the required amount of material.