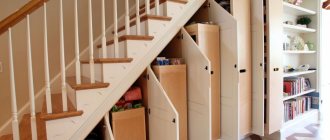
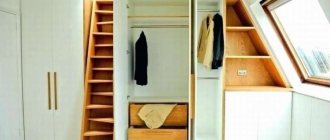
Here are a few examples, how to make a tool cabinet with your own hands. An absolutely necessary thing in the home workshop, garage and more. If you do not have a separate room, from this article you will learn how to make a small workshop in the closet – ideal for a balcony, storage room or even a hallway.
There are also several examples of how to make a closet into a pantry or, if there is no utility room, a pantry from a closet is also a good option. All presented projects with step-by-step photos, there are diagrams, drawings, links to primary sources.
What is a cabinet for?
A tool box is a unique and multifunctional device that can be called the calling card of a master who knows his job well. A piece of furniture allows you to save a lot of time spent searching for the necessary parts or tools. In different compartments of drawers or cabinets you can store not only tools, but also other important items that could easily get lost in the garage.
Tool cabinets with drawers for tools
There are several types of tool boxes, which differ in size and design features. We are talking about movable and stationary structures. The former are more compact, which allows you to move all the necessary tools over long distances. Stationary structures cannot be moved due to their large size.
DIY tool cart
Tool cabinets, drawers, cabinets
Prices for tool trolleys
Arranging the tools
It was described above how to create a simple box, but in order to use it conveniently, its internal space must be ergonomic. For such purposes, shelves, drawers and hanging hooks are organized. This issue can be resolved this way:
- Upper compartment. To create shelves, you can use the same boards that are fixed inside the frame. It is permissible to fix them on ready-made hooks or by drilling holes in the ends (on the outside of the box) and place them on self-tapping screws. Such shelves can easily withstand the weight of small tools or boxes of nails and screws.
- Bottom part. For convenient use, it is best to make only one shelf in the lower compartment. More massive instruments can be placed on it. If you wish, you can install a folding table here.
There is also an option for mounting tools on the walls. It’s worth saying right away that all heavy elements should be located in the central part, but lighter tools are hung on the doors (if there are any).
Cabinet assembly diagram
Usually loops, nails or other elements are used for this, but boxes can also be placed. To ensure that they always remain in their places, they are placed on glue or screws.
The quantity and shape of the internal filling of the box directly depends on the needs. The more building material there is, the more shelves and compartments need to be created.
Tips and tricks
Making a closet from scrap materials is not difficult at all.
Making a tool cabinet is very simple. The use of special and expensive materials is not required. But to improve the use of the device, there are several simple and proven tips:
- do not occupy the entire space; in the future you may have to expand it, depending on the replenishment of your tool stock;
- if the product is planned for a large number of heavy devices (adjustable wrenches, hammers, etc.), it must be strengthened using aluminum corners;
- When making the structure yourself, think through all the details, including additional fasteners, shelves, drawers, hooks, etc.
Creating a cabinet is not difficult if you have patience and the necessary materials.
Addition
The cabinet can be supplemented with lighting
Depending on where the cabinet will be used, you can supplement it with various convenient things, such as lighting. Often garage lighting is not enough to easily find the right tool, so additional lighting will be very helpful. If you understand electricity and do not plan to move the shelf, then you can make automatic lighting.
Place the cabinet in the desired location. Determine the cable length. Using screws, secure to the ceiling or walls. If convenient, you can run it under the baseboard or stove. Then place the lid and close it. After carrying out the manipulations, we proceed to the serial connection according to the “phase-zero” circuit. We do everything with the electricity turned off for safety reasons.
Another lighting option is a halogen lamp. This method is used for large structures. Ready-made kits are available for sale. They include: a switch, transformers, the lamp itself, a connector and the required number of wires. You just need to put everything together sequentially.
LED strip - the simplest lighting option
The simplest and no less effective way is LED strip. It is convenient to use even for an iron cabinet. Such tapes can be purchased as reels, which are sold from 5 to 10 meters, or by purchasing several meters separately. To install such lighting you will additionally need: a power supply, a controller and a wire with a plug at the end so that it can be connected to the power supply.
Connection steps
We connect the block, cable and controller. The wires must be connected by color using a soldering iron. We check the operation of all light bulbs. Using the adhesive side, we attach the backlight in the right places.
Let's get started
When all the materials are at hand, the diagram is ready, you can start creating the box. We start by treating wooden surfaces with an antifungal agent. With its help you protect the material from mold and rotting. After complete drying, cover with a primer and use a product that will protect against moisture.
Important! It is necessary to process the boards when they have the desired size and after planing. Otherwise, if you cut it after carrying out protective manipulations, uncovered parts will remain and in the future there will be problems in these places.
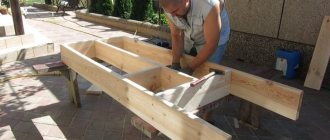
Assembling the box
Using materials that were previously prepared in size, we connect them to obtain a common frame (bottom, lid, walls). We fix the structure with self-tapping screws. Next, we use the corners and fasten all the places where there are joints.
Important! Self-tapping screws and nails are temporary fasteners. With their help, we simply mark the joints so that everything is level, and then screw in special screws and nuts for furniture. We make holes for the screws using a screwdriver. We select the drill based on the length of the screw itself
Regarding the boxes
Let's start creating the boxes. First, we knock down the frame to the desired size. It is important to do this clearly according to the drawing. If the box is larger than the box itself, it will not fit there, and anything smaller will dangle. Then we nail the bottom. We make space for the shelf on the inside. If the cabinet should have several compartments, we make cuts from the inside to fit the width of the plywood and install it. All products are coated with varnish or paint and left to dry completely.
What to make it from?
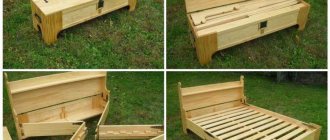
You can make a chest of drawers with your own hands from different materials:
Cardboard. Furniture made from this material is exclusive and the most affordable in terms of price. If you follow the manufacturing technology of the chest of drawers, it will be durable, functional, and environmentally friendly. The advantages of cardboard include its flexibility. Thanks to this, it is possible to make original and exclusive models with a variety of facades and shapes. The only drawback of cardboard is its poor resistance to high moisture. It is not recommended to install such furniture items in dining rooms, baths and kitchens.
Plywood. 8 mm plywood is used in the manufacture of furniture. It has high technical characteristics that are practically not inferior to natural wood.
When choosing plywood for making a chest of drawers, attention is paid to: species, grade, thickness, type of gluing of sheets. Its advantages include: moisture resistance, resistance to deformation, practicality
Furniture from a chest of drawers requires virtually no maintenance. It is distinguished by its aesthetic appearance and long service life. Furniture board. This material has a flat and smooth surface. Thanks to innovative production technologies, furniture panels are: resistant to cracking, environmentally friendly and safe, resistant to deformation, durable, aesthetically pleasing in appearance. Chests of drawers made from furniture board can be safely installed in bedrooms and children's rooms. Since they do not emit harmful substances, do not cause allegra and do not harm human health in any way. The thickness of the material varies from 1 to 5 cm. This allows you to wear carvings and other ornaments and decors on the facades. Chipboard. The features of laminated chipboard include: moisture resistance, impact resistance, scratch resistance, a wide selection of textures, textures and colors. This material has taken a strong position in the manufacture of various furniture items. It does not emit toxins, is simple and easy to use and operate. Even a beginner in this field can cope with the manufacture of a simple chest of drawers from laminated chipboard. This material is made from natural wood. Therefore, it is environmentally friendly, unlike chipboard. The surface of the material is covered with a melamine film, which makes the material resistant to high moisture. In construction stores you can purchase moisture-resistant laminated chipboard, which is perfect for making furniture items for the kitchen and bathrooms.
Plastic. Such models are most often installed in bathrooms, kitchens and hallways. They can be used to store personal items and pastel accessories. Plastic chests of drawers come in a variety of shapes, colors and designs. Their advantages include: light weight, practicality, moisture resistance, strength and functionality. Also, the advantages of plastic furniture include low cost. Boards Board chests of drawers are classic. They fit harmoniously into styles: loft, Provence, country. The advantages of furniture made from boards include: environmental friendliness and naturalness, durability, resistance to stress. When choosing boards, attention is paid to the degree of drying, the presence of defects and appearance. The best types of wood are: oak, ash, walnut. Budget models include chests of drawers made of pine, birch and linden.
Array. When choosing wood, it is worth considering that it is divided into: soft, durable and hard species. Most often, when making chests of drawers, the following are used: oak, beech, ash, birch, pine, walnut. Each individual type of wood has its own advantages. Newspaper tubes. To make a chest of drawers from newspaper tubes you will need: old newspapers, glue, scissors, a brush, a pencil and a ruler. Of course, this option is long-term. If the correct manufacturing technology is followed, furniture made from newspaper tubes will not differ in any way from products made from wicker, either in technical characteristics or in appearance. Available means. Here you can use: pallets, old wooden boxes, plastic 5 liter eggplants.
Tip: in fact, you can use any material. The choice depends only on its availability and the skills of the master.