Is it possible to repair old canvas?
The process of mirror restoration is very painstaking . Many experienced specialists in this field can not only collect the fragments, but also restore complete integrity. Dust from the inside, clouding, scratches, amalgam defects - all these damages can be eliminated independently using a minimum of tools that every home craftsman has.
But you should understand that in exceptional cases, inserting a new mirror into the frame is much more profitable than restoring the former beauty of the old canvas. Expensive and complex restoration is very rarely applied to museum exhibits that have historical value.
But if the mirror is slightly damaged, then it is stupid to throw it away, so in case of minor defects, it is advisable to restore the surface with your own hands .
If you use the right chemicals and abrasives, the mirror will shine like new. The main criterion is a correctly calculated dosage and a little effort.
Restore an old mirror
If the glass of an antique product is too cloudy and the reflection is barely visible, then it is hardly worth undertaking its restoration. In addition, the industry uses special equipment and mercury for production, which is too dangerous for health. Therefore, we will consider restoring only those models that have very minor defects and damage.
Fixing a mirror surface
The methods and use of materials depend on the degree of damage to the reflective surface. For scratches, silicone sealant is mainly used, and for minor damage to the amalgam, food foil and glue are used.
Repair
It is possible to restore a mirror surface even if cracks appear , and the repair can be carried out in such a way that no defects will be visible even with the naked eye.
But it is better to carry out this process only with those mirrors that have historical value. Thus, it is not advisable to restore a simple household mirror on the wall - such repairs can be quite expensive. Do-it-yourself restoration work is carried out only if it is justified, for example:
Let's look at some methods that can be used for recovery at home.
Tarnished surface
If a mirror hangs for a long time in a damp room or during prolonged use, its surface may become dull. If a similar situation occurs, then there is no need to throw away the piece of furniture; it can be returned to its original state, or rather polished.
This is a universal restoration tool that is used very often. The process will remove dark stains, minor scratches and abrasions from the surface. Polishing can be done completely or partially ; in some cases, preliminary polishing is allowed.
When polishing, it is important to choose the right special products and their dosage, otherwise the mirror surface may darken even more.
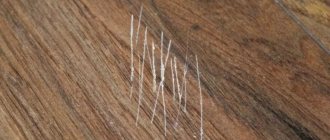
Scratched canvas
If there are scratches on the mirror, you can get rid of them by sanding the surface using abrasive materials. The process works as follows:
How to remove scratches
This can be done using available tools. Their choice directly depends on the type of damaged surface, as well as the availability of free time that you are willing to spend on the process.
Toothpaste
Regular toothpaste can not only take care of the beauty of your smile, but also help effectively cope with various types of damage to glass. When choosing, give your preference to a product with a whitening effect, which contains a large number of abrasive particles. This method is suitable for removing scratches on sunglasses and window surfaces.
To make scratches less noticeable, you need to follow just a few steps:
- Take a piece of cotton wool, squeeze a small amount of toothpaste onto it and start rubbing in a circular motion into the damaged area.
- Remove excess using the same circular motions in the opposite direction.
- Wait for the bleach to dry on the surface of the glass, and then rinse it off with plain water.
Important: you need to understand that this method will not remove deep damage; it is only suitable for masking minor scratches.
Baking soda
This home remedy not only copes excellently with various types of damage, but is also sold in the public domain. How to use it:
- Prepare a mixture of two parts water and one part baking soda in a separate bowl.
- Mix the ingredients well to form a thick paste.
- Apply a little to a piece of old cloth and rub into the damaged areas.
- Remove any remaining baking soda from the surface of the glass with a damp cloth.
Attention : soda-based products do a good job of removing scratches on glass, but are absolutely not suitable for varnished surfaces.
Metal polishing paste
This method is usually used by car owners if they are faced with the task of removing scratches from thin glass (for example, a windshield):
- First you need to clean the surface you are going to restore from particles of dirt and dust. Wipe it with a damp cloth, previously wrung out well.
- Take a cotton swab and squeeze the contents of the tube onto it. Be careful, otherwise this may lead to new scratches that will completely ruin the whole picture.
- Rub the paste into the damaged area for 30 seconds, and then rinse off any remaining residue with water.
How to easily restore a mirror with your own hands at home
Hi all! I think every home has at least one mirror. But often there are much more of them. And all of them can wear out over time. Mostly we are talking about peeling off the amalgam; there is a special coating on the back side. It is important to understand that restoring a mirror with your own hands is possible. But you should not expect a miraculous transformation and the return of the product to its original state.
Independent restoration, carried out at home, is aimed at correcting the condition of the product and trying to hide existing flaws.
Moreover, you can restore any mirrors mounted in a trellis, in the design of an old dressing table, an antique frame mirror or an ordinary linen in the bathroom. The only trick is to gain access to the back of the old or worn mirror.
Decorating the mirror frame
Restoration involves not only updating the amalgam; the frame also needs to be periodically updated. There are several upgrade options: complete replacement of the old element, partial replacement of bad elements, alteration of the frame based on the old body.
The necessary tools and materials are determined by the type of frame. Restoration of the mirror frame is carried out in accordance with the following points:
- Decide what kind of restoration will be carried out: complete or partial.
- Remove broken elements or parts of the old frame.
- Clean the restoration areas using sandpaper or a coarse bristle brush.
- Replace the elements with new ones.
This is the simplest scheme for restoring a mirror frame made of any material.
Restoring a mirror with your own hands is simple and quick if you think through the sketch and method of updating in advance. The new mirror design should match the interior of the room.
Mirror restoration options:
- You can glue the mirror onto a wooden base. The new platform should be larger in size than the mirror itself. Pieces of old CDs, pebbles, and beads can be attached to the free edges.
- You can remove the old frame and stick seashells, polymer clay figures, artificial flowers, and thick twine onto the surface of the mirror itself. The frame can be formed not along the entire perimeter of the mirror, but in individual parts of the product.
- The edges of the mirror can be decorated using acrylic paint. If a person does not know how to draw, then you can use ready-made templates. You can also paint on the mirror with regular nail polish.
- From scraps of wood you can put together a new frame, which can resemble a puzzle in structure. To do this, you can use ordinary branches or round cuts of branches.
- You can put together a new frame from pieces of tile or mosaic. It is advisable to first glue the mirror onto some kind of base, and then lay the mosaic of glass or tiles.
There can be many ways to restore a frame; the main thing is to show imagination and the ability to work with decorative materials.
It is difficult to imagine a modern interior without mirrors. Sliding wardrobes, bathrooms, dressing rooms, corridors, and in some cases large areas in the premises are equipped with large mirror panels. This technique is often used to achieve a visual increase in space, and it is quite popular in modern society.
Antique lovers often become the owners of antique mirrors with exquisite frames that fit perfectly into a classic room. In some cases, antiques and large canvases indoors require frame restoration and mirror repair
. Restore their costly and troublesome occupation, as well as painstaking work that requires patience, knowledge and a flight of imagination.
DIY mirror repair
It can be done by home craftsmen if they first view and study the information available on the Internet.
Mirror repair
.
Scratches
The mirror plane may need restoration due to cracks, abrasions, and clouding that occur over time, as well as from the item being in damp conditions. The edges of the product are especially affected. Deep defects occur with damage to the amalgam - the reflective metal layer on the mirror. If the item is of particular value, then expensive restoration can be carried out in a special laboratory.
When cracks appear, grinding is necessary - this is carefully removing the top layer using an abrasive wheel. The size of the particles on it depends on the depth of damage to the mirror surface. To restore shine after sanding, polishing tools are used. DIY mirror repair
, in this case, must be carried out especially carefully so as not to permanently damage the surface by removing the excess layer.
Tarnished glass and cracks
If dullness appears on the surface, polishing will be required. Such mirror repair can eliminate microcracks and shallow abrasions. The stages involve partial or complete polishing of the top layer. In some cases, depending on the depth of the damage, grinding may be required.
Before starting work, you need to know the sequence of stages of repairing a mirror with your own hands.
:
The surface must be cleaned using mirror cleaners and wiped with a soft cloth; . place the canvas on a flat surface; . sand the top layer; . polish; . prepare a solution (mix 1 tbsp. water and 15 g of ammonia), spray it over the surface and remove it with a paper towel.
Deep cracks and frame
To restore the surface and eliminate deep cracks, use a special vein, similar to lead, which is used for stained glass work. Seal the crack and, if necessary, apply a masking pattern using a stencil and matting paste. This will bring mirrors of both large and small areas back to life, which, as in the case of a wardrobe, are quite difficult to replace.
When carrying out restoration work, the frame plays an important role in an old table mirror. To avoid harm, remove the glass and remove the damaged coating using special tools - brushes, sandpaper. Then the joints are glued, the chips are filled with putty and new paint is applied.
A table mirror can be decorated with fabric materials and then it will last for many more years and become an exclusive piece of furniture. When planning work, be sure to calculate the economic feasibility of its implementation. In some cases, it is easier and cheaper to purchase a new mirror than to restore it.
Probably every person has some old, old thing that it’s a pity to throw away. It is often difficult to place such a thing anywhere, because it does not look anywhere and only spoils the entire interior. So it is with me. While cleaning the apartment I inherited from my grandmother, I found this old mirror:
I feel sorry for throwing it away, but leaving it just like that is also unacceptable. First, we need to cover the mirror with double-sided tape. I chose a product made by Buromax.
Depending on the size of the mirror and its shape, you should choose adhesive tape of different sizes. For my case, the middle one worked well. Carefully cover the mirror with tape.
Advice from personal experience: If your mirror has ever been painted, try to get the tape on the first time. The paint sticks to the glue and the tape becomes unusable. If you want to make the frame more beautiful, use a utility knife to cut out waves from the tape.
It is very important that the knife is sharp. In the end it should look like this:
I'm going to decorate the mirror in a romantic style. To do this you will need: 1. Beads in several colors. 2. Plastic decorations, which can be purchased at craft stores. 3. Organza ribbon. A bow will be tied from it.
Now carefully remove the protective film from the tape and sprinkle the frame with beads. You can also use fish bait instead; it will cost even less and will look no less nice. In some places you should leave free space for other decorations. We form a bow from the ribbon.
It is tied in the same way as shoelaces. After that, we place the branches where we like and attach a bow on top.
Mirrors always need careful care. This is the only way they will always look especially impressive. However, over time, the amalgam on some mirrors may begin to come off, causing it to lose its attractive appearance and reflectivity. If something like this happens to your mirror, don’t despair and immediately take it to the trash heap. Restoring the mirror yourself will help you solve this problem. However, it is necessary to be realistically aware that mirrors are manufactured in factory conditions as a result of a very complex technological process. This is why you can successfully restore only minor damage to a mirror surface.
Causes of wear
Sometimes, after several years of service, we notice that the mirror does not reflect well and some spots appear. Turning the canvas over, it turns out that the coating has been torn off from the back side. It's called amalgam.
This coating can come off for various reasons. And these are not necessarily the consequences of scratches and mechanical stress. Amalgam also begins to slip if normal air circulation on the inside is disrupted. If you see transparent spots on the reflective side, you should think about gluing the mirror correctly or choosing a different place for it.
The production of mirrors is technologically quite complex. To create a reflective surface, a thin layer of metal, supplemented with special additives, is applied to the reverse side. Metal microparticles are gradually applied to the surface, often in several layers.
It will not be possible to achieve the same effect at home without special industrial equipment. Therefore, if your antique mirror in a wooden frame has worn out and lost some of its reflective properties due to peeling amalgam, partial restoration will be required.
No one is stopping you from giving the product to a special company, where they will do professional restoration. But it is very expensive and not every city has such specialists. The cost of the service sometimes exceeds the price of the mirror itself. First, you should try to perform the procedure yourself, at home.
Sequence of actions when removing scratches from different objects
If you do all the work step by step and follow these recommendations, the result will blow your mind! The main condition that must be observed before removing scratches is calmness and accuracy.
How to polish glasses lenses at home? When making such a decision, you must consider all possible risks and understand that this is not the best option. Any manipulations performed at home can easily lead to the appearance of cloudy spots on the product. These glasses will negatively affect your vision. In this case, you have no choice but to say goodbye to them forever. Seek help from professionals in specialized optical salons.
Important: if you nevertheless decide to “reanimate” the glasses yourself, then use any of the methods described above, having first paid attention to the nature of the damage.
How to polish the glass on a watch at home to prevent scratches? It is quite possible to repair the damage without resorting to outside help. GOI paste is best suited for these purposes. It is produced under different numbers. We recommend starting with the fourth, which is designed for rough processing of glass surfaces. Rub the glass with it for 2-3 minutes, then remove the remaining product and wipe the surface of the watch dry.
Next, you can use the third number of paste, which contains particles of smaller diameter. When finishing the procedure, you need to polish the dial with paste number one, and then lubricate their surface with mineral oil to give it shine and shine.
Mirrors
A mirror has always been considered an object that requires a particularly reverent attitude. Its surface can be easily scratched and sometimes even broken. It makes no sense to try to glue it together, but anyone can handle minor damage. The principle of operation is very simple: first you need to fill the chips and cracks with the composition, and then polish the surface until the damage completely disappears.
As a filler, you can use GOI paste, tooth or mustard powder, or use others (silicone sealant, epoxy glue, etc.). The same method is suitable for restoring window glass.
Telephone
No matter how carefully you treat your smartphone, sooner or later hateful scratches appear on the screen. The best way to protect against this is to stick a special film or protective glass in specialized salons, but it is not always possible to do this on time. You can correct the situation with improvised means. Toothpaste, vegetable oil and baking soda have proven themselves better than others. As for professional chemicals, GOI paste, Displex and various car polishes can also help you with this.
Plexiglas
Removing scratches from the surface of plexiglass is not difficult; you just need to be prepared in advance for long and painstaking work.
Before starting the procedure, we strongly recommend that you stock up on various types of sandpaper and surface polishing products. If your attempts are unsuccessful, then you can always turn to the services of a car service, where specially trained people will professionally polish the glass to perfect condition. Now you know all the intricacies of working with various types of surfaces, and you have an idea of how to remove scratches from glass. All of the above methods are working and have proven themselves over time. Remember: if an item is of particular value to you, it is better to seek help from specialized centers. We advise you to first study detailed information and read reviews to be completely confident in their competence. Good luck!
Tools and materials
If the mirror has peeled off and partially lost its amalgam coating, it’s worth talking about how to restore it with your own hands.
In fact, there are a number of video and photo instructions that clearly show the restoration procedure. And you'll be surprised how simple the restoration kit is. It consists of:
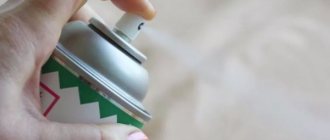
We will replace amalgam with ordinary foil. But try to choose thin and durable material. As for glue, here buy special compounds designed for working with glass and glue. The transparent structure of the glue before and after hardening is important.
You don’t need to come up with anything complicated with a degreaser either. It is enough to take simple alcohol or any other liquid that contains it.
How to restore tarnished surfaces and amalgam
If the mirror has become tarnished (from time to time or for any other reason), it will be quite difficult to restore its original appearance and it will not be easy to achieve good results using home remedies.
If the reason for the loss of the previous appearance is time, then you can polish the mirror surface for a long time and persistently, then it can shine again and the mirror will look like new.
After treatment, be sure to wipe the surface with a suitable detergent.
However, this method does not always help. If the problem is a chemical reaction between the amalgam (silver layer) and the protective outer coating. Then only restoration of the mirror, carried out in a special workshop, can help. The instructions are as follows: you need to remove both layers and apply new ones.
To avoid defects and extend the life of the product, it is important to provide proper care.
IMPORTANT! You should not try to do this at home, as the mirror will be irrevocably damaged.
Recovery procedure
Now let’s go through the process of self-restoration step by step.
It is important to follow consistency and do everything as indicated in the manual. Don't skip any of the steps.
And only then, using a suitable method of attaching the mirror, return it to its rightful or new place.
If this method does not help, then the damage and defects on the canvas are too serious. Home restoration is unlikely to help here.
In fact, you are left with only two options. Namely, turn to professionals for help, or simply buy yourself a new mirror. This directly depends on the value of the old product.
In practice, independent restoration is not a difficult matter, but it does not always help and not everyone. Objectively evaluate the current state of the product and think about whether a similar set can cope with the task.
What methods of mirror restoration do you know? Have you ever used them in practice and what results did you get?
We are waiting for your answers in the comments! Subscribe, ask questions and invite your friends to join us!
Source
Restoring damaged reflective surface
First, you should prepare the necessary tools and materials: glue for glass and metal, brushes, acetone for degreasing, paper napkins, a brush with stiff bristles, a sponge for washing dishes, scissors, window cleaner, food foil.
Restoration of an old mirror is carried out in accordance with the following algorithm:
- First you need to remove the mirror from the frame. It is worth looking at the extent of damage to the metal coating.
- Gently clean problem areas with a brush. Do not press hard or clean the amalgam. It is enough to remove the broken particles.
- Wipe the mirror with a slightly dampened cloth. Then wipe the surface of the product dry.
- Apply a little acetone to a dishwashing sponge and wipe the areas that will be restored in the future with this mixture.
- Apply special glue to the damaged area.
- Cut a piece of foil that is larger than the damaged area.
- Place the foil with the shiny side facing away from you towards the mirror. Using a rag, iron the foil to remove excess glue.
Within a few hours the glue will dry completely and the mirror can be hung in place. To make the foil more durable, it is sometimes coated with wood varnish or clear nail polish.
Simple instructions on how to remove small and deep scratches from a mirror with your own hands
Mirrors are presented in the design of any apartment.
They not only perform their direct function, but also decorate the interior, visually increasing the space. During use, scratches may appear on the reflective smooth surface. Such defects spoil the entire impression of the mirror and require elimination.
We will tell you in the article whether and how to remove scratches from a mirror.
Features of mirrors
Thanks to their reflective properties, mirrors can visually expand the space, add light to the room, and hide its imperfections. Enclosed in beautiful frames with built-in lighting, clock mechanisms, ornaments, drawings or inscriptions, they perform a decorative function and can also be part of the decoration.
The expected effect is reduced to zero if flaws appear on the mirror surface. This often happens due to improper care, because despite its apparent strength, the mirror is a rather fragile material. Of course, it will not be possible to completely eliminate the defects, but you can try to mask the scratches on the surface yourself.
ATTENTION! To extend the life of the mirror, it is necessary to provide it with high-quality care. Do not use sharp objects, hard sponges or abrasive cleaners for cleaning and washing. For bathrooms, it is better to purchase special mirrors designed for rooms with high humidity, where the coating is protected from destruction by moisture.
Home Recipes
You can smooth out microcracks and make them less noticeable using simple home recipes. To do this, you will need simple tools that you already have in your household.
Silicone sealant
To carry out the work you will need:
Procedure:
Walnuts
Walnut kernels will help camouflage the defect. For treatment, you can use a piece of the nucleolus to rub the area with the crack.
But the best result is achieved when the kernels are ground into flour . Enough to work a small quantity. Just a little olive oil is added to the resulting powder so that the composition becomes paste-like. And the resulting paste is rubbed into the mirror.
How effective is it?
In fact, it is unlikely that you will be able to completely get rid of deep scratches and chips using home methods. But they can be disguised. The main thing is not to damage the mirror even more when removing scratches.
If possible, it is better to contact specialists who, using a special grinding machine, will restore your favorite item. But if you are determined to do it yourself, then we will help you with useful tips and recommendations. There are several ways to remove scratches from a mirror at home.
Special means
To perform work to improve the condition of the mirror surface, special preparations can be used.
Paste GOI
GOI paste is a special composition for grinding work . The main component is chromium oxide. The paste is used very widely - not only for caring for mirror surfaces, but also for polishing:
How to use:
Polishing with GOI paste must last for 15 minutes for there to be a visible effect; the exposure time cannot be shortened. The price for 20 grams is on average 50 rubles.
Cerium oxide
Cerium oxide is a chemical compound that can be purchased in powder form . This substance is used in ceramics, for processing jewelry stones, removing scratches on mirrors, etc. The product is available in packaging of various weights.
To repair a mirror and eliminate defects, cerium oxide is diluted to form a paste. The surface requiring treatment is moistened and the prepared composition is applied.
Periodically moistening the surface, polish with a felt cloth. Adding water helps prevent premature hardening of the mass. If necessary, add “gruel” and continue rubbing. Price for 0.1 kg is about 500 rubles.
Procedure
When restoring a mirror, it is recommended to follow step-by-step instructions. Following the exact procedure will help you avoid mistakes and get the job done efficiently.
Scratches and chips
To eliminate detected cracks and chips, you can resort to different methods, using improvised and specialized tools. The most common options are the following:
- Toothpaste. A small amount of paste is applied to the product and lightly rubbed with a flannel cloth, making rotational movements. After the toothpaste has dried, the surface is thoroughly polished, as a result of which all minor defects become invisible.
- Mustard powder. Dry mustard powder and vinegar essence with a concentration of 9% are mixed in a container, maintaining equal proportions. The components are mixed and the resulting mass is applied to the damage. Excess mixture is carefully removed and the product is polished with a soft cloth until shiny.
- Cerium oxide. A specialized chemical allows you to visually hide chips and scratches. The product is often called jewelry blush due to its property of optically smoothing the mirror surface. In powder form, cerium oxide is dissolved in liquid and applied to the product. Then polishing with a damp cloth is required. If necessary, the procedure can be performed several times in a row.
- Nail polish. Deeper chips and scratches must first be filled with a substance and then polished. Due to its special consistency, transparent varnish is excellent for this purpose. First, a layer of varnish is applied to the damage, the excess is removed and wait until it dries. After this, wipe the surface until shiny with a soft cloth.
- Paste GOI. The substance is crushed to a powdery state, applied to a piece of cotton wool and spread in a thick layer over all defects. After waiting 1.5 minutes, rub the product into the surface and wipe with a clean, dry cloth. After completing the procedure a second time, the duration of polishing is increased to 15 minutes. To prevent the paste from becoming dull, you should not rub it intensively into the product to repair the surface.
DIY decoration
Large cracks in the mirror can be repaired using decorative elements. The advantages of decorating yourself are the ability to not only hide defects, but also transform the appearance of the product, showing your imagination. The easiest method is to use transparent stones. Having chosen the stones you like, they are glued to the surface by dropping a drop of silicone sealant onto the back side. The design of a mirror looks most original when using transparent and translucent stones, which can be monotonous or colored.
You can also decorate the defect with painting. This requires special materials, including:
- Glass outline. It is a colored or transparent composition in a container with a pointed spout. The substance is applied to the mirror in a thin strip and the contours of the invented design are drawn. The circuit can be with or without firing, but in everyday conditions it is easier to use the second option.
- Stained glass paints. This type of paint differs from simple ones in that after drying they become transparent. Paint is applied with brushes or squeezed out of a tube and distributed over the mirror with cotton swabs.
- Glitters. Small shiny elements can take the form of different geometric shapes - stripes, circles, polyhedrons. Glitters are added to paints and varnishes, which gives them an original shine. A substance with glitter is applied to the crack, drawing a pattern.
Tarnished surface
As a result of exposure to high humidity and sunlight, characteristic stains and tarnishing appear on mirrors over time. You can restore the natural shine of a tarnished product using a mixture of water, vinegar essence and crushed chalk.
To make a surface treatment solution, first add a tablespoon of essence to a glass, and then a similar amount of chalk.
Before use, the solution is heated and allowed to brew, and then a few drops are added to a fluffy rag and wiped over the mirror. It is important to consider that this method is only suitable for mirrors with an aluminum reflective layer. To remove tarnished stains and ensure the original shine with a hint of blue, you can clean the products with a solution containing blue. In case of strong darkening of the mirror, treatment with a mixture of water, magnesia or ammonia mixed with gasoline is required.
Amalgam restoration
If defects appear on the amalgam on the back side of the product, you can visually hide them and restore the condition of the surface by gluing foil. To do this, carefully remove the mirror from the frame or other structure and place it on a flat, soft surface with the front side down. Then a piece of foil of suitable dimensions, which should be slightly larger than the defect, is smoothed out and glued to the surface of the amalgam.
Pros and cons of homemade restoration
Having discovered minor defects on a bathroom mirror, many people prefer to carry out the restoration themselves. This procedure has a number of advantages and disadvantages. The advantages of self-restoration include:
- Minimum costs. For processing, you only need to buy cleaning products, without spending money on the services of professionals.
- Use of available materials. Most defects can be removed using household products.
The main disadvantage of doing the work yourself is that you can only remove minor scratches. To remove deep defects, you will need the help of specialists.
General rules for mirror care
Like any other thing in the house, mirrors require some care, which you can easily provide on your own. It is necessary to wipe mirror surfaces with soft cloths soaked in warm water, and if necessary, use glass cleaner.
Clean your mirrors regularly with warm water and a cloth or microfiber cloth.
If the mirror is very dirty, you can use hydrogen peroxide, vinegar solution or ammonia. The mirror may become foggy. To avoid this, you can use regular shaving foam, applying it to a mirror surface and then wiping it off.